
User Guide
Page 12
Table of Contents Chapter 4 Introducing the Web Configurator 35 4.1 Web Configurator Overview 35 4.2 Accessing the Web Configurator 35 4.3 Resetting the PLA450 ...37 4.3.1 Procedure to Use the Reset Button 37 4.4 Navigating the Web Configurator 37 4.4.1 The Status Screen ...37 4.4.2 Navigation Panel ...40 4.4.3 Summary: Packet Statistics 41 4.4.4 Summary: Wireless Station Status 42 4.4.5 Summary: My ...
Table of Contents Chapter 4 Introducing the Web Configurator 35 4.1 Web Configurator Overview 35 4.2 Accessing the Web Configurator 35 4.3 Resetting the PLA450 ...37 4.3.1 Procedure to Use the Reset Button 37 4.4 Navigating the Web Configurator 37 4.4.1 The Status Screen ...37 4.4.2 Navigation Panel ...40 4.4.3 Summary: Packet Statistics 41 4.4.4 Summary: Wireless Station Status 42 4.4.5 Summary: My ...
User Guide
Page 14
....1 Selecting Language ...113 Chapter 14 Troubleshooting...115 14.1 Power, Hardware Connections, and LEDs 115 14.2 PLA450 Access and Login 116 14.3 Internet Access ...117 14.4 Resetting the PLA450 to Its Factory Defaults 118 14.5 Wireless Troubleshooting 119 14.6 HomePlug AV Troubleshooting 119 14.7 ENCRYPT Button Problems 120 14.8 Advanced Features ...121...
....1 Selecting Language ...113 Chapter 14 Troubleshooting...115 14.1 Power, Hardware Connections, and LEDs 115 14.2 PLA450 Access and Login 116 14.3 Internet Access ...117 14.4 Resetting the PLA450 to Its Factory Defaults 118 14.5 Wireless Troubleshooting 119 14.6 HomePlug AV Troubleshooting 119 14.7 ENCRYPT Button Problems 120 14.8 Advanced Features ...121...
User Guide
Page 25
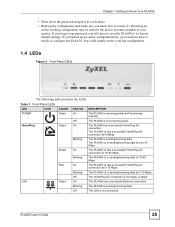
... AV connection at 0~10 Mbps. Amber On The PLA450 v2 has a successful HomePlug AV connection at over 40 Mbps. If you would not have to reset the PLA450 to its factory default settings. The PLA450 v2 is sending/receiving data at 10~40 Mbps.
... AV connection at 0~10 Mbps. Amber On The PLA450 v2 has a successful HomePlug AV connection at over 40 Mbps. If you would not have to reset the PLA450 to its factory default settings. The PLA450 v2 is sending/receiving data at 10~40 Mbps.
User Guide
Page 29
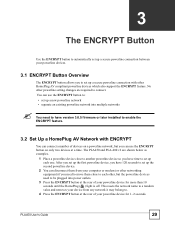
...an existing powerline network into power outlets. 3 Press the ENCRYPT button at the rear of your powerline device for 1~2 seconds. The PLA450 and PLA-400 v2 are required to connect. CHAPTER 3 The ENCRYPT Button Use the ENCRYPT button to automatically set up a secure powerline connection between your... support the ENCRYPT feature. No other networking equipment) if you need to have time to . 4 Press the ENCRYPT button at a time. This resets the network name to a random value and removes your device from your powerline device for more than 10 seconds until the HomePlug ( ) light is...
...an existing powerline network into power outlets. 3 Press the ENCRYPT button at the rear of your powerline device for 1~2 seconds. The PLA450 and PLA-400 v2 are required to connect. CHAPTER 3 The ENCRYPT Button Use the ENCRYPT button to automatically set up a secure powerline connection between your... support the ENCRYPT feature. No other networking equipment) if you need to have time to . 4 Press the ENCRYPT button at a time. This resets the network name to a random value and removes your device from your powerline device for more than 10 seconds until the HomePlug ( ) light is...
User Guide
Page 37
... PLA450 If you forget your password or cannot access the web configurator, you will need to use the RESET button at the back of the PLA450 to navigate the web configurator from the Status screen. 4.4.1 The Status Screen The following screen displays when you ... mode. " Not all configurations that you had previously saved, and the password will lose all screens are available when you will be reset to "1234". 4.3.1 Procedure to Use the Reset Button 1 Make sure the PWR LED is on page 111 lists which screens are in Advanced mode). Use the Config Mode > General...
... PLA450 If you forget your password or cannot access the web configurator, you will need to use the RESET button at the back of the PLA450 to navigate the web configurator from the Status screen. 4.4.1 The Status Screen The following screen displays when you ... mode. " Not all configurations that you had previously saved, and the password will lose all screens are available when you will be reset to "1234". 4.3.1 Procedure to Use the Reset Button 1 Make sure the PWR LED is on page 111 lists which screens are in Advanced mode). Use the Config Mode > General...

User Guide
Page 41
... port. TxPkts This is configurable. The Poll Interval(s) field is the number of received packets on this screen to backup and restore the configuration or reset the factory defaults to display or hide the advanced screens or features. RxPkts This is the number of transmitted packets on this screen to view...
... port. TxPkts This is configurable. The Poll Interval(s) field is the number of received packets on this screen to backup and restore the configuration or reset the factory defaults to display or hide the advanced screens or features. RxPkts This is the number of transmitted packets on this screen to view...

User Guide
Page 66
... This section shows how security settings are randomly-generated. When WPS is activated on both AP1 and Client 1 are unconfigured. In this case, AP1 must reset it becomes "configured". In this example, AP1 is the registrar, and Client 1 is better to use AP1 for the network). The following figure shows an...
... This section shows how security settings are randomly-generated. When WPS is activated on both AP1 and Client 1 are unconfigured. In this case, AP1 must reset it becomes "configured". In this example, AP1 is the registrar, and Client 1 is better to use AP1 for the network). The following figure shows an...
User Guide
Page 69
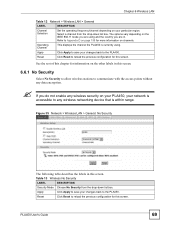
Reset Click Reset to reload the previous configuration for information on the other labels in this screen. Figure 35 Network > Wireless LAN > General: No Security The following table ... to communicate with the access points without any data encryption. " If you do not enable any wireless security on your PLA450, your particular region. Reset Click Reset to reload the previous configuration for more information on channels. Operating Channel This displays the channel the PLA450 is within range. Apply Click Apply to...
Reset Click Reset to reload the previous configuration for information on the other labels in this screen. Figure 35 Network > Wireless LAN > General: No Security The following table ... to communicate with the access points without any data encryption. " If you do not enable any wireless security on your PLA450, your particular region. Reset Click Reset to reload the previous configuration for more information on channels. Operating Channel This displays the channel the PLA450 is within range. Apply Click Apply to...
User Guide
Page 71
Reset Click Reset to the PLA450. Every Ethernet device has a unique MAC (Media Access Control) address. To change your changes back to reload the previous configuration for this ...
Reset Click Reset to the PLA450. Every Ethernet device has a unique MAC (Media Access Control) address. To change your changes back to reload the previous configuration for this ...
User Guide
Page 72
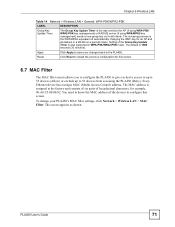
... the PLA450 Select Allow to permit access to the PLA450, MAC addresses not listed will be denied access to the PLA450 in these address fields. Reset Click Reset to reload the previous configuration for the list of the MAC address. Filter Action Define the filter action for this menu. Set This is...
... the PLA450 Select Allow to permit access to the PLA450, MAC addresses not listed will be denied access to the PLA450 in these address fields. Reset Click Reset to reload the previous configuration for the list of the MAC address. Filter Action Define the filter action for this menu. Set This is...

User Guide
Page 74
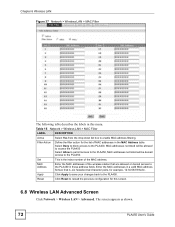
... IEEE802.11g compliant WLAN devices to achieve higher transmission rates than 802.11g. Dynamic Turbo uses two channels bonded together to associate with the PLA450. Reset Click Reset to reload the previous configuration for this mode. Select Disabled if your network support Super G but do not support Super G. Select Super G with Dynamic...
... IEEE802.11g compliant WLAN devices to achieve higher transmission rates than 802.11g. Dynamic Turbo uses two channels bonded together to associate with the PLA450. Reset Click Reset to reload the previous configuration for this mode. Select Disabled if your network support Super G but do not support Super G. Select Super G with Dynamic...
User Guide
Page 83
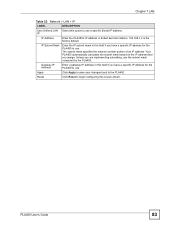
... save your changes back to begin configuring this screen afresh. The subnet mask specifies the network number portion of an IP address. Unless you assign. Reset Click Reset to the PLA450. IP Subnet Mask Enter the IP subnet mask in this field if you have a specific IP address for the PLA450 to...
... save your changes back to begin configuring this screen afresh. The subnet mask specifies the network number portion of an IP address. Unless you assign. Reset Click Reset to the PLA450. IP Subnet Mask Enter the IP subnet mask in this field if you have a specific IP address for the PLA450 to...
User Guide
Page 98
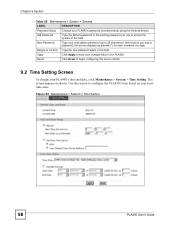
... DESCRIPTION Password Setup Change your PLA450's time and date, click Maintenance > System > Time Setting. Figure 52 Maintenance > System > Time Setting 98 PLA450 User's Guide Reset Click Reset to 30 characters). New Password Type your new system password (up to begin configuring this screen to configure the PLA450's time based on your changes...
... DESCRIPTION Password Setup Change your PLA450's time and date, click Maintenance > System > Time Setting. Figure 52 Maintenance > System > Time Setting 98 PLA450 User's Guide Reset Click Reset to 30 characters). New Password Type your new system password (up to begin configuring this screen to configure the PLA450's time based on your changes...
User Guide
Page 100
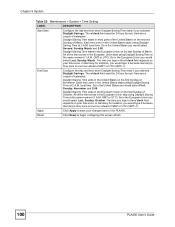
... Daylight Saving Time at the same moment (1 A.M. local time. So in the o'clock field depends on the last Sunday of GMT or UTC (GMT+1). Reset Click Reset to the PLA450. The o'clock field uses the 24 hour format. The time you type in the United States you would select First, Sunday, November...
... Daylight Saving Time at the same moment (1 A.M. local time. So in the o'clock field depends on the last Sunday of GMT or UTC (GMT+1). Reset Click Reset to the PLA450. The o'clock field uses the 24 hour format. The time you type in the United States you would select First, Sunday, November...

User Guide
Page 104
... Log Use the drop down list box to select which day of the week to send the logs. Apply Click Apply to enable syslog logging. Reset Click Reset to an external syslog server. If you select Weekly or Daily, specify a time of logs that will log the selected categories of log messages...
... Log Use the drop down list box to select which day of the week to send the logs. Apply Click Apply to enable syslog logging. Reset Click Reset to an external syslog server. If you select Weekly or Daily, specify a time of logs that will log the selected categories of log messages...
User Guide
Page 108
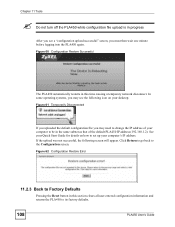
.... Click Return to go back to its factory defaults. 108 PLA450 User's Guide Figure 62 Configuration Restore Error 11.2.3 Back to Factory Defaults Pressing the Reset button in this section clears all user-entered configuration information and returns the PLA450 to the Configuration screen. Figure 60 Configuration Restore Successful The PLA450...
.... Click Return to go back to its factory defaults. 108 PLA450 User's Guide Figure 62 Configuration Restore Error 11.2.3 Back to Factory Defaults Pressing the Reset button in this section clears all user-entered configuration information and returns the PLA450 to the Configuration screen. Figure 60 Configuration Restore Successful The PLA450...
User Guide
Page 109
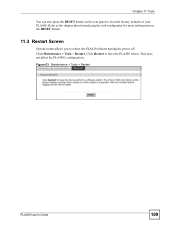
Refer to the chapter about introducing the web configurator for more information on the rear panel to reset the factory defaults of your PLA450. Click Restart to reboot the PLA450 without turning the power off. This does not affect the PLA450's configuration. Chapter 11 Tools You can also press the RESET button on the RESET button. 11.3 Restart Screen System restart allows you to have the PLA450 reboot. Click Maintenance > Tools > Restart. Figure 63 Maintenance > Tools > Restart PLA450 User's Guide 109
Refer to the chapter about introducing the web configurator for more information on the rear panel to reset the factory defaults of your PLA450. Click Restart to reboot the PLA450 without turning the power off. This does not affect the PLA450's configuration. Chapter 11 Tools You can also press the RESET button on the RESET button. 11.3 Restart Screen System restart allows you to have the PLA450 reboot. Click Maintenance > Tools > Restart. Figure 63 Maintenance > Tools > Restart PLA450 User's Guide 109
User Guide
Page 111
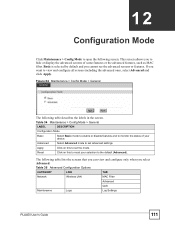
... (Advanced). This screen allows you want to set the mode. Apply Click on this to open the following table describes the labels in the screen. Reset Click on this to reset your device. CHAPTER 12 Configuration Mode Click Maintenance > Config Mode to set advanced settings.
... (Advanced). This screen allows you want to set the mode. Apply Click on this to open the following table describes the labels in the screen. Reset Click on this to reset your device. CHAPTER 12 Configuration Mode Click Maintenance > Config Mode to set advanced settings.
User Guide
Page 115
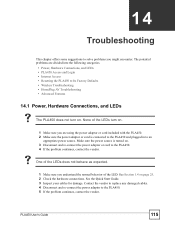
... on . 1 Make sure you are divided into the following categories. • Power, Hardware Connections, and LEDs • PLA450 Access and Login • Internet Access • Resetting the PLA450 to the PLA450. 5 If the problem continues, contact the vendor. Make sure the power source is connected to the PLA450 and plugged in...
... on . 1 Make sure you are divided into the following categories. • Power, Hardware Connections, and LEDs • PLA450 Access and Login • Internet Access • Resetting the PLA450 to the PLA450. 5 If the problem continues, contact the vendor. Make sure the power source is connected to the PLA450 and plugged in...
User Guide
Page 116
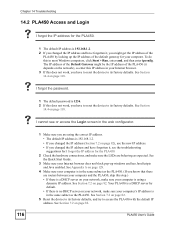
...get the IP address of the PLA450 by default. • If there is 192.168.1.2. • If you changed the IP address and have to reset the device to its factory defaults, and try to access the PLA450 with the default IP address. V I cannot see the troubleshooting suggestions for the .... See Section 7.2 on page 118. See the Quick Start Guide. 3 Make sure your computer is 1234. 2 If this does not work , you have to reset the device to its factory defaults. PLA450 User's Guide V I forgot the IP address for I forgot the password. 1 The default password is in most Windows computers...
...get the IP address of the PLA450 by default. • If there is 192.168.1.2. • If you changed the IP address and have to reset the device to its factory defaults, and try to access the PLA450 with the default IP address. V I cannot see the troubleshooting suggestions for the .... See Section 7.2 on page 118. See the Quick Start Guide. 3 Make sure your computer is 1234. 2 If this does not work , you have to reset the device to its factory defaults. PLA450 User's Guide V I forgot the IP address for I forgot the password. 1 The default password is in most Windows computers...


