
Quick Start Guide
Page 2
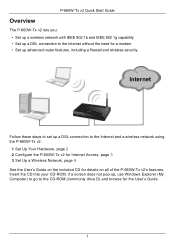
... the User's Guide. 1 Internet Follow these steps to set up a DSL connection to the Internet without the need for a modem • Set up advanced router features, including a firewall and wireless security. P-660W-Tx v2 Quick Start Guide Overview The P-660W-Tx v2 lets you: • Set up a wireless network with IEEE 802.1b and IEEE 802.1g capability • Set up a DSL connection to the Internet and a wireless network using the P-660W-Tx v2. 1 Set Up Your Hardware, page 2 2 Configure the P-660W-Tx v2 for Internet Access, page 3 3 Set Up a Wireless Network, page...
... the User's Guide. 1 Internet Follow these steps to set up a DSL connection to the Internet without the need for a modem • Set up advanced router features, including a firewall and wireless security. P-660W-Tx v2 Quick Start Guide Overview The P-660W-Tx v2 lets you: • Set up a wireless network with IEEE 802.1b and IEEE 802.1g capability • Set up a DSL connection to the Internet and a wireless network using the P-660W-Tx v2. 1 Set Up Your Hardware, page 2 2 Configure the P-660W-Tx v2 for Internet Access, page 3 3 Set Up a Wireless Network, page...
Quick Start Guide
Page 3
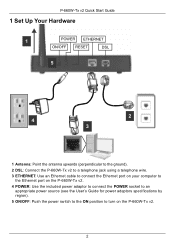
P-660W-Tx v2 Quick Start Guide 1 Set Up Your Hardware 1 POWER ETHERNET ON/OFF RESET DSL 5 2 4 3 1 Antenna: Point the antenna upwards (perpendicular to the ground). 2 DSL: Connect the P-660W-Tx v2 to a telephone jack using a telephone wire. 3 ETHERNET: Use an Ethernet cable to connect the Ethernet port on your computer to the Ethernet port on the P-660W-Tx v2. 4 POWER: Use the included power adaptor to connect the POWER socket to an appropriate power source (see the User's Guide for power adaptors specifications by region). 5 ON/OFF: Push the power switch to...
P-660W-Tx v2 Quick Start Guide 1 Set Up Your Hardware 1 POWER ETHERNET ON/OFF RESET DSL 5 2 4 3 1 Antenna: Point the antenna upwards (perpendicular to the ground). 2 DSL: Connect the P-660W-Tx v2 to a telephone jack using a telephone wire. 3 ETHERNET: Use an Ethernet cable to connect the Ethernet port on your computer to the Ethernet port on the P-660W-Tx v2. 4 POWER: Use the included power adaptor to connect the POWER socket to an appropriate power source (see the User's Guide for power adaptors specifications by region). 5 ON/OFF: Push the power switch to...
Quick Start Guide
Page 4
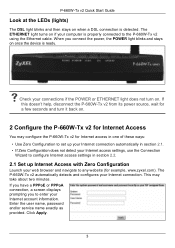
... Ethernet cable. Enter the user name, password and/or service name exactly as provided. The P-660W-Tx v2 automatically detects and configures your computer is properly connected to enter your Internet account information. The ETHERNET light turns on . P-660W-Tx v2 Quick Start Guide Look at the LEDs (lights) The DSL light blinks and then stays on once the device is ready. If you have a PPPoE or PPPoA connection, a screen displays prompting you connect the power...
... Ethernet cable. Enter the user name, password and/or service name exactly as provided. The P-660W-Tx v2 automatically detects and configures your computer is properly connected to enter your Internet account information. The ETHERNET light turns on . P-660W-Tx v2 Quick Start Guide Look at the LEDs (lights) The DSL light blinks and then stays on once the device is ready. If you have a PPPoE or PPPoA connection, a screen displays prompting you connect the power...
Quick Start Guide
Page 5
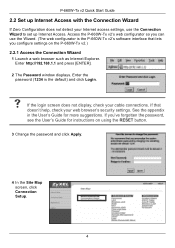
... check your cable connections. If you've forgotten the password, see the User's Guide for more suggestions. Enter the password (1234 is the P-660W-Tx v2's software interface that doesn't help, check your web browser's security settings. Access the P-660W-Tx v2's web configurator so you configure settings on using the RESET button. 3 Change the password and click Apply. 4 In the Site Map screen, click Connection Setup. 4 P-660W-Tx v2 Quick Start Guide 2.2 Set up Internet Access. If that lets you can use the Connection Wizard to set up Internet Access with the Connection Wizard...
... check your cable connections. If you've forgotten the password, see the User's Guide for more suggestions. Enter the password (1234 is the P-660W-Tx v2's software interface that doesn't help, check your web browser's security settings. Access the P-660W-Tx v2's web configurator so you configure settings on using the RESET button. 3 Change the password and click Apply. 4 In the Site Map screen, click Connection Setup. 4 P-660W-Tx v2 Quick Start Guide 2.2 Set up Internet Access. If that lets you can use the Connection Wizard to set up Internet Access with the Connection Wizard...
Quick Start Guide
Page 6
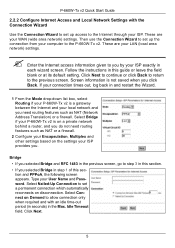
... you selected Bridge in step 1 of this section and PPPoA, the following screen appears. Select Bridge if your P-660W-Tx v2 is a gateway between the Internet and your local network and you by your ISP. Select Connect on the settings your ISP provides you do not need routing features such as NAT or a firewall. 2 Configure your WAN (wide area network) settings. P-660W-Tx v2 Quick Start Guide 2.2.2 Configure Internet Access and Local Network Settings with an idle time-out period...
... you selected Bridge in step 1 of this section and PPPoA, the following screen appears. Select Bridge if your P-660W-Tx v2 is a gateway between the Internet and your local network and you by your ISP. Select Connect on the settings your ISP provides you do not need routing features such as NAT or a firewall. 2 Configure your WAN (wide area network) settings. P-660W-Tx v2 Quick Start Guide 2.2.2 Configure Internet Access and Local Network Settings with an idle time-out period...
Quick Start Guide
Page 7
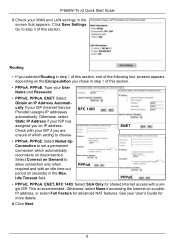
... choose. See your User's Guide for advanced NAT features. Otherwise, select Static IP Address if your ISP has assigned you chose in the Max. Idle Timeout field. P-660W-Tx v2 Quick Start Guide 3 Check your WAN and LAN settings in step 1 of this section, one of the following four screens appears depending on the Encapsulation you an IP address. Otherwise, select None if accessing the Internet on a public IP address, or select...
... choose. See your User's Guide for advanced NAT features. Otherwise, select Static IP Address if your ISP has assigned you chose in the Max. Idle Timeout field. P-660W-Tx v2 Quick Start Guide 3 Check your WAN and LAN settings in step 1 of this section, one of the following four screens appears depending on the Encapsulation you an IP address. Otherwise, select None if accessing the Internet on a public IP address, or select...
Quick Start Guide
Page 8
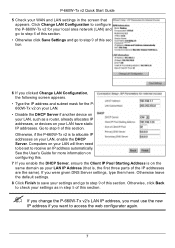
... LAN have static IP addresses. Otherwise, click Back to save your LAN, enable the DHCP Server. Otherwise leave the default settings. 8 Click Finish to check your settings as a router, already allocates IP addresses, or devices on configuring this. 7 If you clicked Change LAN Configuration, the following screen appears. • Type the IP address and subnet mask for your local area network (LAN) and go to step 6 of this section. • Otherwise click Save Settings and go to access the web configurator...
... LAN have static IP addresses. Otherwise, click Back to save your LAN, enable the DHCP Server. Otherwise leave the default settings. 8 Click Finish to check your settings as a router, already allocates IP addresses, or devices on configuring this. 7 If you clicked Change LAN Configuration, the following screen appears. • Type the IP address and subnet mask for your local area network (LAN) and go to step 6 of this section. • Otherwise click Save Settings and go to access the web configurator...
Quick Start Guide
Page 9
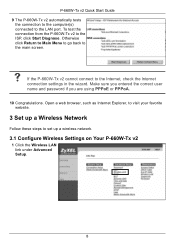
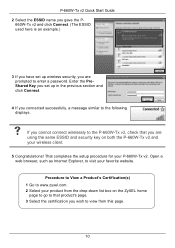
... Diagnose. Open a web browser, such as Internet Explorer, to visit your favorite website. 3 Set up a Wireless Network Follow these steps to the LAN port. Make sure you entered the correct user name and password if you are using PPPoE or PPPoA. 10 Congratulations. P-660W-Tx v2 Quick Start Guide 9 The P-660W-Tx v2 automatically tests the connection to the computer(s) connected to set up a wireless network. 3.1 Configure Wireless Settings on Your P-660W-Tx v2 1 Click the Wireless LAN link under Advanced Setup. 8 Otherwise...
... Diagnose. Open a web browser, such as Internet Explorer, to visit your favorite website. 3 Set up a Wireless Network Follow these steps to the LAN port. Make sure you entered the correct user name and password if you are using PPPoE or PPPoA. 10 Congratulations. P-660W-Tx v2 Quick Start Guide 9 The P-660W-Tx v2 automatically tests the connection to the computer(s) connected to set up a wireless network. 3.1 Configure Wireless Settings on Your P-660W-Tx v2 1 Click the Wireless LAN link under Advanced Setup. 8 Otherwise...

Quick Start Guide
Page 10
... strongest Security Mode that devices on your computer screen. In this screen, select WPA Compatible and type a Pre-Shared Key using Windows XP as you will need the ESSID and also the Pre-Shared Key if you connect your computer to the P-660W-Tx v2. 3.2 Connect to the P-660W-Tx v2 Wirelessly From Your Computer You can now connect to your P-660W-Tx v2 via a wireless connection, and access the Internet. P-660W-Tx v2 Quick Start Guide 3 Select Enable Wireless LAN. 4 ESSID: Type...
... strongest Security Mode that devices on your computer screen. In this screen, select WPA Compatible and type a Pre-Shared Key using Windows XP as you will need the ESSID and also the Pre-Shared Key if you connect your computer to the P-660W-Tx v2. 3.2 Connect to the P-660W-Tx v2 Wirelessly From Your Computer You can now connect to your P-660W-Tx v2 via a wireless connection, and access the Internet. P-660W-Tx v2 Quick Start Guide 3 Select Enable Wireless LAN. 4 ESSID: Type...
Quick Start Guide
Page 11
... Open a web browser, such as Internet Explorer, to visit your P-660W-Tx v2. That completes the setup procedure for your favorite website. P-660W-Tx v2 Quick Start Guide 2 Select the ESSID name you gave the P660W-Tx v2 and click Connect. (The ESSID used here is an example.) 3 If you have set up wireless security, you are using the same ESSID and security key on both the P-660W-Tx v2 and your product...
... Open a web browser, such as Internet Explorer, to visit your P-660W-Tx v2. That completes the setup procedure for your favorite website. P-660W-Tx v2 Quick Start Guide 2 Select the ESSID name you gave the P660W-Tx v2 and click Connect. (The ESSID used here is an example.) 3 If you have set up wireless security, you are using the same ESSID and security key on both the P-660W-Tx v2 and your product...


