

User Guide
Page 9
...Guide ...21 Introduction ...23 The Web Configurator ...29 Status Screens ...35 Tutorials ...41 Technical Reference ...77 Internet and Wireless Setup Wizard...79 WAN Setup ...93 LAN Setup ...109 Wireless LAN ...123 Network Address Translation (NAT) ...151 Firewall ...163 Filters ...181 Certificate ...189 Static Route ......193 Port Binding ...199 802.1Q/1P ...203 Quality of Service (QoS) ...209 Dynamic DNS Setup ...217 Remote Management ...219 Universal Plug-and-Play (UPnP) ...230 File Sharing ...241 Sharing a USB Printer ...245 CWMP ...259 System ...
...Guide ...21 Introduction ...23 The Web Configurator ...29 Status Screens ...35 Tutorials ...41 Technical Reference ...77 Internet and Wireless Setup Wizard...79 WAN Setup ...93 LAN Setup ...109 Wireless LAN ...123 Network Address Translation (NAT) ...151 Firewall ...163 Filters ...181 Certificate ...189 Static Route ......193 Port Binding ...199 802.1Q/1P ...203 Quality of Service (QoS) ...209 Dynamic DNS Setup ...217 Remote Management ...219 Universal Plug-and-Play (UPnP) ...230 File Sharing ...241 Sharing a USB Printer ...245 CWMP ...259 System ...

User Guide
Page 12
... Shared Files From a Computer 73 4.14 How to Share a USB Printer via Your ZyXEL Device 74 Part II: Technical Reference 77 Chapter 5 Internet and Wireless Setup Wizard 79 5.1 Overview ...79 5.2 Internet Access Wizard Setup ...79 5.2.1 Manual Configuration ...82 5.3 Wireless Connection Wizard Setup 87 5.3.1 Manually Assign a WPA-PSK key 90 5.3.2 Manually Assign a WEP Key 90...
... Shared Files From a Computer 73 4.14 How to Share a USB Printer via Your ZyXEL Device 74 Part II: Technical Reference 77 Chapter 5 Internet and Wireless Setup Wizard 79 5.1 Overview ...79 5.2 Internet Access Wizard Setup ...79 5.2.1 Manual Configuration ...82 5.3 Wireless Connection Wizard Setup 87 5.3.1 Manually Assign a WPA-PSK key 90 5.3.2 Manually Assign a WEP Key 90...
User Guide
Page 13
... IP Address Assignment ...106 6.4.5 Nailed-Up Connection (PPP 106 6.4.6 NAT ...107 6.5 Traffic Shaping ...107 6.5.1 ATM Traffic Classes ...108 Chapter 7 LAN Setup ...109 7.1 Overview ...109 7.1.1 What You Can Do in the LAN Screens 109 7.1.2 What You Need To Know About LAN 109 7.1.3 Before You Begin... LAN IP Alias Screen 115 7.6 The IPv6 Screen ...116 7.7 LAN Technical Reference ...119 7.7.1 LANs, WANs and the ZyXEL Device 119 7.7.2 DHCP Setup ...119 7.7.3 DNS Server Addresses ...119 7.7.4 LAN TCP/IP ...120 7.7.5 RIP Setup ...121 7.7.6 Multicast ...121 ADSL Router Series User's Guide 13
... IP Address Assignment ...106 6.4.5 Nailed-Up Connection (PPP 106 6.4.6 NAT ...107 6.5 Traffic Shaping ...107 6.5.1 ATM Traffic Classes ...108 Chapter 7 LAN Setup ...109 7.1 Overview ...109 7.1.1 What You Can Do in the LAN Screens 109 7.1.2 What You Need To Know About LAN 109 7.1.3 Before You Begin... LAN IP Alias Screen 115 7.6 The IPv6 Screen ...116 7.7 LAN Technical Reference ...119 7.7.1 LANs, WANs and the ZyXEL Device 119 7.7.2 DHCP Setup ...119 7.7.3 DNS Server Addresses ...119 7.7.4 LAN TCP/IP ...120 7.7.5 RIP Setup ...121 7.7.6 Multicast ...121 ADSL Router Series User's Guide 13
User Guide
Page 14
... You Start ...124 8.2 The AP Screen ...125 8.2.1 No Security ...126 8.2.2 WEP Encryption ...127 8.2.3 WPA(2)-PSK ...128 8.2.4 Wireless LAN Advanced Setup 128 8.2.5 MAC Filter ...130 8.3 The More AP Screen ...131 8.3.1 More AP Edit ...132 8.4 The WPS Screen ...133 8.5 The WPS Station...8.8.3 Wireless Security Overview 139 8.8.4 Signal Problems ...141 8.8.5 BSS ...142 8.8.6 MBSSID ...142 8.8.7 Wireless Distribution System (WDS 143 8.8.8 WiFi Protected Setup (WPS 143 Chapter 9 Network Address Translation (NAT 151 9.1 Overview ...151 9.1.1 What You Can Do in the NAT Screens 151 9.1.2 What You...
... You Start ...124 8.2 The AP Screen ...125 8.2.1 No Security ...126 8.2.2 WEP Encryption ...127 8.2.3 WPA(2)-PSK ...128 8.2.4 Wireless LAN Advanced Setup 128 8.2.5 MAC Filter ...130 8.3 The More AP Screen ...131 8.3.1 More AP Edit ...132 8.4 The WPS Screen ...133 8.5 The WPS Station...8.8.3 Wireless Security Overview 139 8.8.4 Signal Problems ...141 8.8.5 BSS ...142 8.8.6 MBSSID ...142 8.8.7 Wireless Distribution System (WDS 143 8.8.8 WiFi Protected Setup (WPS 143 Chapter 9 Network Address Translation (NAT 151 9.1 Overview ...151 9.1.1 What You Can Do in the NAT Screens 151 9.1.2 What You...

User Guide
Page 16
... You Need to Know About QoS 210 16.2 The General Screen ...210 16.2.1 The QoS Summary List Screen 211 16.3 The Queue Setup Screen ...212 16.4 The Class Setup Screen ...213 16.5 QoS Technical Reference ...215 16.5.1 IEEE 802.1p ...215 16.5.2 IP Precedence ...215 16.5.3 Automatic Priority Queue ...Assignment 216 Chapter 17 Dynamic DNS Setup ...217 17.1 Overview ...217 17.1.1 What You Can Do in the DDNS Screen 217 16 ADSL Router ...
... You Need to Know About QoS 210 16.2 The General Screen ...210 16.2.1 The QoS Summary List Screen 211 16.3 The Queue Setup Screen ...212 16.4 The Class Setup Screen ...213 16.5 QoS Technical Reference ...215 16.5.1 IEEE 802.1p ...215 16.5.2 IP Precedence ...215 16.5.3 Automatic Priority Queue ...Assignment 216 Chapter 17 Dynamic DNS Setup ...217 17.1 Overview ...217 17.1.1 What You Can Do in the DDNS Screen 217 16 ADSL Router ...
User Guide
Page 18
... X 251 21.6.1 Mac OS 10.3 and 10.4 ...251 21.6.2 Mac OS 10.5 and 10.6 ...254 Chapter 22 CWMP ...259 22.1 Overview ...259 22.2 The CWMP Setup Screen ...260 Chapter 23 System Settings...263 23.1 Overview ...263 23.1.1 What You Can Do in the System Settings Screens 263 23.2 The General Screen...
... X 251 21.6.1 Mac OS 10.3 and 10.4 ...251 21.6.2 Mac OS 10.5 and 10.6 ...254 Chapter 22 CWMP ...259 22.1 Overview ...259 22.2 The CWMP Setup Screen ...260 Chapter 23 System Settings...263 23.1 Overview ...263 23.1.1 What You Can Do in the System Settings Screens 263 23.2 The General Screen...
User Guide
Page 29
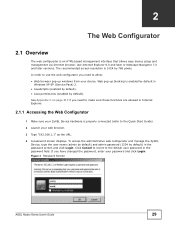
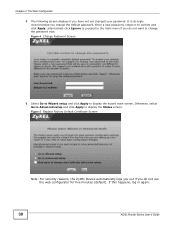
... use the web configurator you need to make sure these functions are allowed in Internet Explorer. 2.1.1 Accessing the Web Configurator 1 Make sure your ZyXEL Device hardware is enabled by default in Windows XP SP (Service Pack) 2. • JavaScripts (enabled by default). • Java permissions (enabled... by default). Web pop-up windows from your device. The recommended screen resolution is an HTML-based management interface that allows easy device setup and management via Internet browser. See Appendix C on page 317 if you have changed the password, enter your web browser. 3 Type...
... use the web configurator you need to make sure these functions are allowed in Internet Explorer. 2.1.1 Accessing the Web Configurator 1 Make sure your ZyXEL Device hardware is enabled by default in Windows XP SP (Service Pack) 2. • JavaScripts (enabled by default). • Java permissions (enabled... by default). Web pop-up windows from your device. The recommended screen resolution is an HTML-based management interface that allows easy device setup and management via Internet browser. See Appendix C on page 317 if you have changed the password, enter your web browser. 3 Type...
User Guide
Page 30
... want to confirm and click Apply; Enter a new password, retype it to change the default password. Otherwise, select Go to Advanced setup and click Apply to display the wizard main screen. It is strongly recommended you have not yet changed your password. Chapter 2 The...Configurator 5 The following screen displays if you change the password now. Figure 5 Replace Factory Default Certificate Screen Note: For security reasons, the ZyXEL Device automatically logs you out if you do not use the web configurator for five minutes (default). Figure 4 Change Password Screen 6 Select ...
... want to confirm and click Apply; Enter a new password, retype it to change the default password. Otherwise, select Go to Advanced setup and click Apply to display the wizard main screen. It is strongly recommended you have not yet changed your password. Chapter 2 The...Configurator 5 The following screen displays if you change the password now. Figure 5 Replace Factory Default Certificate Screen Note: For security reasons, the ZyXEL Device automatically logs you out if you do not use the web configurator for five minutes (default). Figure 4 Change Password Screen 6 Select ...

User Guide
Page 32
... this screen to individual MAC addresses (and host names). Client List Use this screen to configure and view your WPS (Wi-Fi Protected Setup) settings. More AP Use this screen to access the statistics and client list. WPS Use this screen to configure the wireless LAN settings... and WLAN authentication/security settings. WPS Station Use this screen to configure multiple BSSs on the ZyXEL Device. DoS Use this screen to start dropping sessions that do not become fully established (half-open screens to set the default action...
... this screen to individual MAC addresses (and host names). Client List Use this screen to configure and view your WPS (Wi-Fi Protected Setup) settings. More AP Use this screen to access the statistics and client list. WPS Use this screen to configure the wireless LAN settings... and WLAN authentication/security settings. WPS Station Use this screen to configure multiple BSSs on the ZyXEL Device. DoS Use this screen to start dropping sessions that do not become fully established (half-open screens to set the default action...

User Guide
Page 33
...to change your device's configuration (settings) or reset the factory default settings. Port Binding Use this screen to turn UPnP on the ZyXEL Device. SNMP Use this screen to configure and view port binding groups. Use this screen to configure through which interface(s) and from ...which IP address(es) users can access the SNMP agent on or off . Class Setup Use this screen to reboot the ZyXEL Device without turning the power off . Dynamic DNS This screen allows you to have not made available. FTP Use ...
...to change your device's configuration (settings) or reset the factory default settings. Port Binding Use this screen to turn UPnP on the ZyXEL Device. SNMP Use this screen to configure and view port binding groups. Use this screen to configure through which interface(s) and from ...which IP address(es) users can access the SNMP agent on or off . Class Setup Use this screen to reboot the ZyXEL Device without turning the power off . Dynamic DNS This screen allows you to have not made available. FTP Use ...
User Guide
Page 46
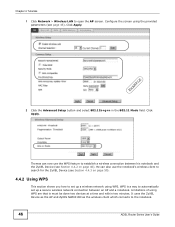
... WPS feature to establish a wireless connection between an AP and a notebook. He can now use the notebook's wireless client to search for the ZyXEL Device (see Section 4.4.3 on page 50). 4.4.2 Using WPS This section shows you how to automatically set up a secure wireless network connection between ...provided parameters (see Section 4.4.2 on page 46). Click Apply. It uses the ZyXEL Device as the AP and ZyXEL NWD210N as the wireless client which connects to open the AP screen. EXAMPLE 2 Click the Advanced Setup button and select 802.11b+g+n in the 802.11 Mode field. Configure the ...
... WPS feature to establish a wireless connection between an AP and a notebook. He can now use the notebook's wireless client to search for the ZyXEL Device (see Section 4.4.3 on page 50). 4.4.2 Using WPS This section shows you how to automatically set up a secure wireless network connection between ...provided parameters (see Section 4.4.2 on page 46). Click Apply. It uses the ZyXEL Device as the AP and ZyXEL NWD210N as the wireless client which connects to open the AP screen. EXAMPLE 2 Click the Advanced Setup button and select 802.11b+g+n in the 802.11 Mode field. Configure the ...

User Guide
Page 58
.... 58 ADSL Router Series User's Guide Traffic should be forwarded to communicate with the Doom server, Thomas can use port forwarding. Tutorial: NAT Port Forwarding Setup D=192.168.1.34 LAN port 666 WAN A 4.7.1 Port Forwarding Thomas needs to configure the port settings and IP address on the Internet (like A in the... below) to port 666 of the Doom server computer which has an IP address of the screens. 4.7 Setting Up NAT Forwarding for players on the ZyXEL Device. In order for a Game Server Thomas manages a Doom server on a computer behind the...
.... 58 ADSL Router Series User's Guide Traffic should be forwarded to communicate with the Doom server, Thomas can use port forwarding. Tutorial: NAT Port Forwarding Setup D=192.168.1.34 LAN port 666 WAN A 4.7.1 Port Forwarding Thomas needs to configure the port settings and IP address on the Internet (like A in the... below) to port 666 of the Doom server computer which has an IP address of the screens. 4.7 Setting Up NAT Forwarding for players on the ZyXEL Device. In order for a Game Server Thomas manages a Doom server on a computer behind the...
User Guide
Page 60
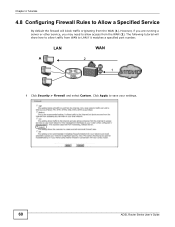
However, if you are running a server or other service, you may need to allow traffic from WAN to LAN if it matches a specified port number. Click Apply to save your settings. The following tutorial will block traffic originating from the WAN (1). Chapter 4 Tutorials 4.8 Configuring Firewall Rules to Allow a Specified Service By default the firewall will show how to allow access from the WAN (2). Tutorial: NAT Port Forwarding Setup LAN WAN A 2 1 1 Click Security > Firewall and select Custom. Tutorial: Advanced > QoS 60 ADSL Router Series User's Guide
However, if you are running a server or other service, you may need to allow traffic from WAN to LAN if it matches a specified port number. Click Apply to save your settings. The following tutorial will block traffic originating from the WAN (1). Chapter 4 Tutorials 4.8 Configuring Firewall Rules to Allow a Specified Service By default the firewall will show how to allow access from the WAN (2). Tutorial: NAT Port Forwarding Setup LAN WAN A 2 1 1 Click Security > Firewall and select Custom. Tutorial: Advanced > QoS 60 ADSL Router Series User's Guide
User Guide
Page 61
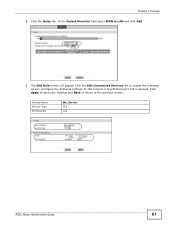
Chapter 4 Tutorials 2 Click the Rules tab. Click the Edit Customized Services link to LAN and click Add. In this tutorial, a hypothetical port 123 is allowed. Service Name Service Type Port Number Tutorial: Advanced > QoS > Queue Setup My_Service TCP 123 ADSL Router Series User's Guide 61 In the Packet Direction field select WAN to access the following settings. Tutorial: Advanced > QoS > Queue Setup 3 The Edit Rule screen will appear. Click Apply to save your settings and Back to return to the previous screen. Configure the following screen.
Chapter 4 Tutorials 2 Click the Rules tab. Click the Edit Customized Services link to LAN and click Add. In this tutorial, a hypothetical port 123 is allowed. Service Name Service Type Port Number Tutorial: Advanced > QoS > Queue Setup My_Service TCP 123 ADSL Router Series User's Guide 61 In the Packet Direction field select WAN to access the following settings. Tutorial: Advanced > QoS > Queue Setup 3 The Edit Rule screen will appear. Click Apply to save your settings and Back to return to the previous screen. Configure the following screen.

User Guide
Page 62
Tutorial: Advanced > QoS > Queue Setup 5 The firewall rule you configured, My_Service. The ZyXEL Device allows traffic from the WAN to the previous screen. Chapter 4 Tutorials 4 In the Edit Rule screen, select Active. In the Available Services field, select the service you configured appears in the table. Click Apply to save your settings and Back to return to LAN if it matches port 123. 62 ADSL Router Series User's Guide
Tutorial: Advanced > QoS > Queue Setup 5 The firewall rule you configured, My_Service. The ZyXEL Device allows traffic from the WAN to the previous screen. Chapter 4 Tutorials 4 In the Edit Rule screen, select Active. In the Available Services field, select the service you configured appears in the table. Click Apply to save your settings and Back to return to LAN if it matches port 123. 62 ADSL Router Series User's Guide
User Guide
Page 64
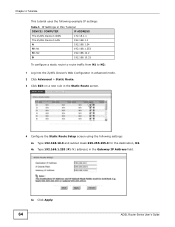
... 192.168.1.253 R's N2 192.168.10.2 B 192.168.10.33 To configure a static route to route traffic from N1 to N2: 1 Log into the ZyXEL Device's Web Configurator in advanced mode. 2 Click Advanced > Static Route. 3 Click Edit on a new rule in the Static Route screen. 4 Configure the Static Route... Setup screen using the following settings: 4a Type 192.168.10.0 and subnet mask 255.255.255.0 for the destination, N2. 4b Type 192.168.1.253 (R's ...
... 192.168.1.253 R's N2 192.168.10.2 B 192.168.10.33 To configure a static route to route traffic from N1 to N2: 1 Log into the ZyXEL Device's Web Configurator in advanced mode. 2 Click Advanced > Static Route. 3 Click Edit on a new rule in the Static Route screen. 4 Configure the Static Route... Setup screen using the following settings: 4a Type 192.168.10.0 and subnet mask 255.255.255.0 for the destination, N2. 4b Type 192.168.1.253 (R's ...
User Guide
Page 65
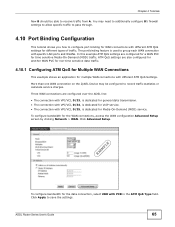
... different ATM QoS Settings. You may be able to receive traffic from A. Click Advanced Setup. Chapter 4 Tutorials Now B should be configured to record traffic statistics or calculate service charges. More than one WAN connection on the ZyXEL Device may need to additionally configure B's firewall settings to allow specific traffic to pass through... Media-On-Demand (MOD) traffic. In this example ATM QoS settings are configured for a WAN PVC for the WAN connections, access the WAN configuration Advanced Setup screen by clicking Network > WAN.
... different ATM QoS Settings. You may be able to receive traffic from A. Click Advanced Setup. Chapter 4 Tutorials Now B should be configured to record traffic statistics or calculate service charges. More than one WAN connection on the ZyXEL Device may need to additionally configure B's firewall settings to allow specific traffic to pass through... Media-On-Demand (MOD) traffic. In this example ATM QoS settings are configured for a WAN PVC for the WAN connections, access the WAN configuration Advanced Setup screen by clicking Network > WAN.

User Guide
Page 67
... to include in the previous section are bound as follows: Table 6 Port Binding Groups GROUP INDEX WAN CONNECTION 0 PVC0 - for Data 1 PVC1 - See the WAN Setup chapter (Chapter 6 on page 93) for more information on configuring port binding. See the Port Binding chapter (Chapter 14 on page 199) for more details...
... to include in the previous section are bound as follows: Table 6 Port Binding Groups GROUP INDEX WAN CONNECTION 0 PVC0 - for Data 1 PVC1 - See the WAN Setup chapter (Chapter 6 on page 93) for more information on configuring port binding. See the Port Binding chapter (Chapter 14 on page 199) for more details...

User Guide
Page 69
Tutorial: Advanced > QoS 2 Go to save your settings. Tutorial: Advanced > QoS > Queue Setup ADSL Router Series User's Guide 69 Chapter 4 Tutorials 1 Click Advanced > QoS and check Enabled. Click Apply to Advanced > QoS > Queue Setup. In the Queue Enable field select Enabled and in the Queue Priority field select 1. Then click Add.
Tutorial: Advanced > QoS 2 Go to save your settings. Tutorial: Advanced > QoS > Queue Setup ADSL Router Series User's Guide 69 Chapter 4 Tutorials 1 Click Advanced > QoS and check Enabled. Click Apply to Advanced > QoS > Queue Setup. In the Queue Enable field select Enabled and in the Queue Priority field select 1. Then click Add.

User Guide
Page 70
In the Rule Enable field select Enabled and follow the settings as shown in this to a queue created in the QoS > Queue Setup screen, which the rule should be applied 25 for SMTP. Link this example. This also maps your computer AA:FF:AA:FF:AA:FF. Select ...the IP protocol type - This maps e-mail traffic to queue 1 (see the Source Port Range field). Tutorial: Advanced > QoS > Class Setup Source MAC Source Port Range Protocol ID Queue Type the MAC address of your computer's MAC address to queue 1 created in the previous screen (see...
In the Rule Enable field select Enabled and follow the settings as shown in this to a queue created in the QoS > Queue Setup screen, which the rule should be applied 25 for SMTP. Link this example. This also maps your computer AA:FF:AA:FF:AA:FF. Select ...the IP protocol type - This maps e-mail traffic to queue 1 (see the Source Port Range field). Tutorial: Advanced > QoS > Class Setup Source MAC Source Port Range Protocol ID Queue Type the MAC address of your computer's MAC address to queue 1 created in the previous screen (see...
