
User Guide
Page 3
... 2.2.3 Mounting the Switch on a Rack 13 Chapter 3 Hardware Overview ...15 3.1 Front Panel Connections ...15 3.1.1 Ethernet Ports ...17 3.1.2 Dual Personality Interfaces ...18 3.1.3 SFP/SFP+ Slots ...18 3.1.4 Console Port ...20 3.2 Rear Panel ...20 3.2.1 Power Connector ...21 3.3 LEDs ...22 Chapter 4 The Web Configurator ...25 4.1 Introduction ...25 4.2 System Login ...25 4.3 The Web Configurator Layout ...26...
... 2.2.3 Mounting the Switch on a Rack 13 Chapter 3 Hardware Overview ...15 3.1 Front Panel Connections ...15 3.1.1 Ethernet Ports ...17 3.1.2 Dual Personality Interfaces ...18 3.1.3 SFP/SFP+ Slots ...18 3.1.4 Console Port ...20 3.2 Rear Panel ...20 3.2.1 Power Connector ...21 3.3 LEDs ...22 Chapter 4 The Web Configurator ...25 4.1 Introduction ...25 4.2 System Login ...25 4.3 The Web Configurator Layout ...26...
User Guide
Page 4
... Port Isolation ...45 5.7 How to Use IP Source Guard and DHCP Snooping to Prevent Spoofed Traffic 45 5.8 How to Use DHCP Relay on the Switch 48 5.8.1 Creating a VLAN ...49 5.8.2 Configuring DHCP Relay ...49 5.8.3 Troubleshooting ...50 5.9 How to Use Link Aggregation to Group Multiple Ports into One Logical ...Switch 60 5.12 How to Configure Access Control List (ACL) for Packets Filtering 63 5.13 How to Reset the Switch via the Console Port 66 Chapter 6 Troubleshooting...69 6.1 Power, Hardware Connections, and LEDs 69 6.2 Switch Access and Login ...70 Appendix A Legal Information...73 Index ...
... Port Isolation ...45 5.7 How to Use IP Source Guard and DHCP Snooping to Prevent Spoofed Traffic 45 5.8 How to Use DHCP Relay on the Switch 48 5.8.1 Creating a VLAN ...49 5.8.2 Configuring DHCP Relay ...49 5.8.3 Troubleshooting ...50 5.9 How to Use Link Aggregation to Group Multiple Ports into One Logical ...Switch 60 5.12 How to Configure Access Control List (ACL) for Packets Filtering 63 5.13 How to Reset the Switch via the Console Port 66 Chapter 6 Troubleshooting...69 6.1 Power, Hardware Connections, and LEDs 69 6.2 Switch Access and Login ...70 Appendix A Legal Information...73 Index ...
User Guide
Page 15
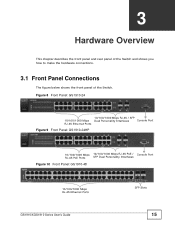
...-45 / SFP 10/100/1000 Mbps Dual Personality Interfaces Console Port RJ-45 Ethernet Ports Figure 9 Front Panel: GS1910-24HP 10/100/1000 Mbps RJ-45 PoE Ports 10/100/1000 Mbps RJ-45 PoE / SFP Dual Personality Interfaces Console Port Figure 10 Front Panel: GS1910-48 10/100/1000 Mbps RJ-45 Ethernet Ports...
...-45 / SFP 10/100/1000 Mbps Dual Personality Interfaces Console Port RJ-45 Ethernet Ports Figure 9 Front Panel: GS1910-24HP 10/100/1000 Mbps RJ-45 PoE Ports 10/100/1000 Mbps RJ-45 PoE / SFP Dual Personality Interfaces Console Port Figure 10 Front Panel: GS1910-48 10/100/1000 Mbps RJ-45 Ethernet Ports...
User Guide
Page 16
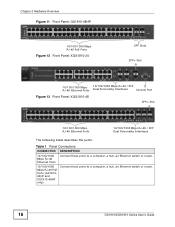
... or router. 10/100/1000 Mbps RJ-45 PoE Ports (GS191024HP and GS1910-48HP only) Connect these ports to a computer, a hub, an Ethernet switch or router. 16 GS1910/XGS1910 Series User's Guide Chapter 3 Hardware Overview Figure 11 Front Panel: GS1910-48HP 10/100/1000 Mbps RJ-45 PoE Ports Figure 12 Front Panel...: XGS1910-24 SFP Slots SFP+ Slot 10/100/1000 Mbps RJ-45 Ethernet Ports 10/100/1000 Mbps RJ-45 / SFP Dual Personality Interfaces Console Port Figure 13 Front Panel: XGS1910-48 SFP+ Slot 10...
... or router. 10/100/1000 Mbps RJ-45 PoE Ports (GS191024HP and GS1910-48HP only) Connect these ports to a computer, a hub, an Ethernet switch or router. 16 GS1910/XGS1910 Series User's Guide Chapter 3 Hardware Overview Figure 11 Front Panel: GS1910-48HP 10/100/1000 Mbps RJ-45 PoE Ports Figure 12 Front Panel...: XGS1910-24 SFP Slots SFP+ Slot 10/100/1000 Mbps RJ-45 Ethernet Ports 10/100/1000 Mbps RJ-45 / SFP Dual Personality Interfaces Console Port Figure 13 Front Panel: XGS1910-48 SFP+ Slot 10...

User Guide
Page 17
...of writing, this port is reserved for future use, such as firmware upgrade using Category 5/5e/6 1000Base-T Ethernet cables. SFP Slots (GS1910-48 and GS191048HP only) Use SFP transceivers in these slots for fiber-optic or copper connections to backbone Ethernet switches. In 10/100/1000 ...Mbps. SFP+ Slots (XGS1910-24 and XGS191048 only) Use SFP+ transceivers in these slots for fiber-optic connections to backbone Ethernet switches. Console Port At the time of the connected device. An auto-crossover (auto-MDI/MDI-X) port automatically works with one Small Form-Factor Pluggable...
...of writing, this port is reserved for future use, such as firmware upgrade using Category 5/5e/6 1000Base-T Ethernet cables. SFP Slots (GS1910-48 and GS191048HP only) Use SFP transceivers in these slots for fiber-optic or copper connections to backbone Ethernet switches. In 10/100/1000 ...Mbps. SFP+ Slots (XGS1910-24 and XGS191048 only) Use SFP+ transceivers in these slots for fiber-optic connections to backbone Ethernet switches. Console Port At the time of the connected device. An auto-crossover (auto-MDI/MDI-X) port automatically works with one Small Form-Factor Pluggable...
User Guide
Page 20
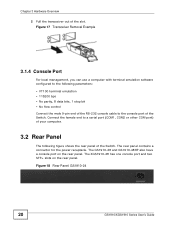
... panel of the Switch. Figure 18 Rear Panel: GS1910-24 20 GS1910/XGS1910 Series User's Guide Figure 17 Transceiver Removal Example 3.1.4 Console Port For local management, you can use a computer with terminal emulation software configured to the console port of the Switch. The GS1910-48 and GS1910-48HP also have a console port on the rear panel. Chapter 3 Hardware...
... panel of the Switch. Figure 18 Rear Panel: GS1910-24 20 GS1910/XGS1910 Series User's Guide Figure 17 Transceiver Removal Example 3.1.4 Console Port For local management, you can use a computer with terminal emulation software configured to the console port of the Switch. The GS1910-48 and GS1910-48HP also have a console port on the rear panel. Chapter 3 Hardware...
User Guide
Page 33
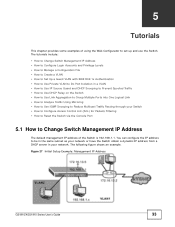
... Switch. CHAPTER 5 Tutorials This chapter provides some examples of the Switch is 192.168.1.1. Figure 27 Initial Setup Example: Management IP Address GS1910/XGS1910 Series User's Guide 33 The following figure shows an example. The tutorials include: • How to Change Switch Management IP Address ... your Switch • How to Configure Access Control List (ACL) for Packets Filtering • How to Reset the Switch via the Console Port 5.1 How to Change Switch Management IP Address The default management IP address of using the Web Configurator to Reduce Multicast Traffic Passing...
... Switch. CHAPTER 5 Tutorials This chapter provides some examples of the Switch is 192.168.1.1. Figure 27 Initial Setup Example: Management IP Address GS1910/XGS1910 Series User's Guide 33 The following figure shows an example. The tutorials include: • How to Change Switch Management IP Address ... your Switch • How to Configure Access Control List (ACL) for Packets Filtering • How to Reset the Switch via the Console Port 5.1 How to Change Switch Management IP Address The default management IP address of using the Web Configurator to Reduce Multicast Traffic Passing...
User Guide
Page 66
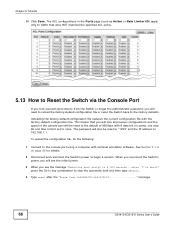
...reload the factory-default configuration file or reset the Switch back to Reset the Switch via the Console Port If you lock yourself (and others) from 0x40080000-0x4017ffff message. 66 GS1910/XGS1910 Series User's Guide The ACL configurations in 3.000 seconds - This means that does NOT...current configuration file with terminal emulation software. See Section 3.1.4 on page 20 for details. 2 Disconnect and reconnect the Switch's power to the console port using a computer with the factory-default configuration file. enter ^C to abort" press the Ctrl-c key combination to stop bit and ...
...reload the factory-default configuration file or reset the Switch back to Reset the Switch via the Console Port If you lock yourself (and others) from 0x40080000-0x4017ffff message. 66 GS1910/XGS1910 Series User's Guide The ACL configurations in 3.000 seconds - This means that does NOT...current configuration file with terminal emulation software. See Section 3.1.4 on page 20 for details. 2 Disconnect and reconnect the Switch's power to the console port using a computer with the factory-default configuration file. enter ^C to abort" press the Ctrl-c key combination to stop bit and ...
User Guide
Page 70
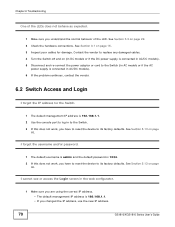
...Check the hardware connections. See Section 3.3 on page 15. 3 Inspect your cables for the Switch. 1 The default management IP address is 192.168.1.1. 2 Use the console port to log in the web configurator. 1 Make sure you are using the correct IP address. • The default management IP address is 1234. 2 If... this does not work , you changed the IP address, use the new IP address. 70 GS1910/XGS1910 Series User's Guide See Section 5.13 on page 66. I cannot see or access the Login screen in to the Switch. 3 If this does ...
...Check the hardware connections. See Section 3.3 on page 15. 3 Inspect your cables for the Switch. 1 The default management IP address is 192.168.1.1. 2 Use the console port to log in the web configurator. 1 Make sure you are using the correct IP address. • The default management IP address is 1234. 2 If... this does not work , you changed the IP address, use the new IP address. 70 GS1910/XGS1910 Series User's Guide See Section 5.13 on page 66. I cannot see or access the Login screen in to the Switch. 3 If this does ...

User Guide
Page 75
... binding 45 binding table 45 building 45 C certifications notices 73 viewing 73 changing the password 32 console port settings 20 copyright 73 D DHCP snooping 45 trusted ports 46 untrusted ports 46 disclaimer 73 documentation related 2 GS1910/XGS1910 Series User's Guide Index Index E Ethernet ports 17 default settings 17 F FCC interference statement 73...
... binding 45 binding table 45 building 45 C certifications notices 73 viewing 73 changing the password 32 console port settings 20 copyright 73 D DHCP snooping 45 trusted ports 46 untrusted ports 46 disclaimer 73 documentation related 2 GS1910/XGS1910 Series User's Guide Index Index E Ethernet ports 17 default settings 17 F FCC interference statement 73...