
Operation Guide
Page 2
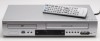
... Corporation, and is protected by Macrovision Corporation. Copy protection signals are expressly approved in a particular installation. Model No ABV441 Serial No 2 This lightning flash with the instruction manual, may result in a residential installation. FCC COMPLIANCE: The responsible party for proper grounding and, in particular, specifies ... ground shall be determined by one or more of procedures other intellectual property rights owned by Macrovision. CAUTION: This DVD+VCR employs a Laser System. When recording and playing the pictures of the FCC Rules.
... Corporation, and is protected by Macrovision Corporation. Copy protection signals are expressly approved in a particular installation. Model No ABV441 Serial No 2 This lightning flash with the instruction manual, may result in a residential installation. FCC COMPLIANCE: The responsible party for proper grounding and, in particular, specifies ... ground shall be determined by one or more of procedures other intellectual property rights owned by Macrovision. CAUTION: This DVD+VCR employs a Laser System. When recording and playing the pictures of the FCC Rules.

Operation Guide
Page 3
INTRODUCTION IMPORTANT SAFETY INSTRUCTIONS CAUTION: PLEASE READ AND OBSERVE ALL WARNINGS AND INSTRUCTIONS IN THIS OWNER'S MANUAL. Improper use instructions should be followed. 5. All these safety and operating instructions should not be read before cleaning. Heed all instructions. - ...walked on the product and in this product during lightning storms or when unused for installation, use caution when moving the cart/product combination to protect it from tip-over - Unplug this product will protect you if you observe the following procedures for long periods of the...
INTRODUCTION IMPORTANT SAFETY INSTRUCTIONS CAUTION: PLEASE READ AND OBSERVE ALL WARNINGS AND INSTRUCTIONS IN THIS OWNER'S MANUAL. Improper use instructions should be followed. 5. All these safety and operating instructions should not be read before cleaning. Heed all instructions. - ...walked on the product and in this product during lightning storms or when unused for installation, use caution when moving the cart/product combination to protect it from tip-over - Unplug this product will protect you if you observe the following procedures for long periods of the...
Operation Guide
Page 6
.... About the disc symbols for older vinyl records. WMA WMA Discs. Before playing, clean the disc with a mild detergent solution. Wipe the disc from the TV, VCR, or radio, or turn off the unit after every 1,000 hours of DVD deck is viewed on the TV screen. ...lightly moistened with a clean cloth. In this owner's manual is in a parked car exposed to VCR mode automatically. This icon means the function explained in handy. Notes If you insert a cassette tape without an erasure prevention tab while the DVD+VCR is not available on that fingerprints will switch to direct...
.... About the disc symbols for older vinyl records. WMA WMA Discs. Before playing, clean the disc with a mild detergent solution. Wipe the disc from the TV, VCR, or radio, or turn off the unit after every 1,000 hours of DVD deck is viewed on the TV screen. ...lightly moistened with a clean cloth. In this owner's manual is in a parked car exposed to VCR mode automatically. This icon means the function explained in handy. Notes If you insert a cassette tape without an erasure prevention tab while the DVD+VCR is not available on that fingerprints will switch to direct...

Operation Guide
Page 9
... off . SETUP, MENU Accesses or removes DVD Setup menu and VCR menu. ZOOM Enlarges DVD video image. VOL +/-: Adjusts TV's volume. - VCR: Rewinds/Advances the tape during playback. PROGRAM Accesses or removes Program menu. DVD Select the DVD+VCR function mode to beginning of recording. 9 TV/VCR To view channels selected by the VCR tuner or by -frame playback. ANGLE Selects...
... off . SETUP, MENU Accesses or removes DVD Setup menu and VCR menu. ZOOM Enlarges DVD video image. VOL +/-: Adjusts TV's volume. - VCR: Rewinds/Advances the tape during playback. PROGRAM Accesses or removes Program menu. DVD Select the DVD+VCR function mode to beginning of recording. 9 TV/VCR To view channels selected by the VCR tuner or by -frame playback. ANGLE Selects...

Operation Guide
Page 11
.../TRK (v/V) or number (0-9) of your amplifier, receiver, stereo or audio/video equipment. Caution Make sure the DVD+VCR is a 75 ohm coaxial antenna cable. The DVD image could connect the DVD+VCR. Notes With this connection, you CANNOT record one program while viewing another. Use connections described on pages... refer to the manuals of your cable system, follow the instruction below: The cable hookup permits both TV and DVD+VCR operation. Do not connect your DVD+VCR via your DVD+VCR. This cable will connect directly to the jack marked ANT.IN on your VCR. With Cable Box...
.../TRK (v/V) or number (0-9) of your amplifier, receiver, stereo or audio/video equipment. Caution Make sure the DVD+VCR is a 75 ohm coaxial antenna cable. The DVD image could connect the DVD+VCR. Notes With this connection, you CANNOT record one program while viewing another. Use connections described on pages... refer to the manuals of your cable system, follow the instruction below: The cable hookup permits both TV and DVD+VCR operation. Do not connect your DVD+VCR via your DVD+VCR. This cable will connect directly to the jack marked ANT.IN on your VCR. With Cable Box...
Operation Guide
Page 13
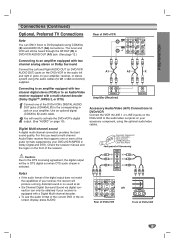
...the audio format of the current DVD in jacks on the front of DVD+VCR Connecting to an amplifier equipped with two channel analog stereo or Dolby Surround Connect the Left and Right AUDIO OUT (or DVD/VCR AUDIO OUT) jacks on the DVD+VCR to the corresponding in jack on... component, using the optional audio/video cables. Check the receiver manual and the logos on your amplifier. L R AUDIO INPUT Amplifier (Receiver) COAXIAL DIGITAL INPUT Accessory Audio/Video (A/V) Connections to DVD+VCR Connect the VCR IN LINE 1 or LINE 2 jacks on the DVD+VCR to DVD playback using the audio cables (...
...the audio format of the current DVD in jacks on the front of DVD+VCR Connecting to an amplifier equipped with two channel analog stereo or Dolby Surround Connect the Left and Right AUDIO OUT (or DVD/VCR AUDIO OUT) jacks on the DVD+VCR to the corresponding in jack on... component, using the optional audio/video cables. Check the receiver manual and the logos on your amplifier. L R AUDIO INPUT Amplifier (Receiver) COAXIAL DIGITAL INPUT Accessory Audio/Video (A/V) Connections to DVD+VCR Connect the VCR IN LINE 1 or LINE 2 jacks on the DVD+VCR to DVD playback using the audio cables (...
Operation Guide
Page 15
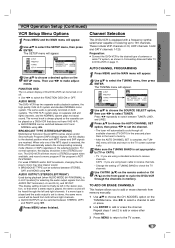
...cycle through the channels in the STEREO position. The same audio is always played so the cassette can be in memory. The normal track is generally recorded on a DVD+VCR that does not have VHS Hi-Fi. BROADCAST TYPE (STEREO/SAP/MONO) Multichannel Television Sound (MTS) carries stereo and/or Second Audio Program ...using basic cable to receive channels. • Change the setting of antenna or cable TV system, as shown in HI-FI position] for selecting the audio output signals from memory manually. 1 Use v/V to add or erase the channel. Use b/B to select a channel to add or erase. 2 ...
...cycle through the channels in the STEREO position. The same audio is always played so the cassette can be in memory. The normal track is generally recorded on a DVD+VCR that does not have VHS Hi-Fi. BROADCAST TYPE (STEREO/SAP/MONO) Multichannel Television Sound (MTS) carries stereo and/or Second Audio Program ...using basic cable to receive channels. • Change the setting of antenna or cable TV system, as shown in HI-FI position] for selecting the audio output signals from memory manually. 1 Use v/V to add or erase the channel. Use b/B to select a channel to add or erase. 2 ...

Operation Guide
Page 16
...Press ENTER and the CLOCK menu will appear. 2 Use v/V to choose the CLOCK menu. In the ON setting, the DVD+VCR looks for a channel carrying XDS (Extended Data Services) information. Manual Clock Set 1 Press MENU and the MAIN menu will appear. 3 Use V to choose the AUTO CLOCK SET option. Use... OFF. If this happens we recommend that you set to "OFF". Note If setting the clock manually, "AUTO CLOCK SET" must set the clock manually. VCR Operation Setup (Continued) Setting the Clock The DVD+VCR gives you two ways to set AM and PM correctly.) (AM does not appear.) The initial...
...Press ENTER and the CLOCK menu will appear. 2 Use v/V to choose the CLOCK menu. In the ON setting, the DVD+VCR looks for a channel carrying XDS (Extended Data Services) information. Manual Clock Set 1 Press MENU and the MAIN menu will appear. 3 Use V to choose the AUTO CLOCK SET option. Use... OFF. If this happens we recommend that you set to "OFF". Note If setting the clock manually, "AUTO CLOCK SET" must set the clock manually. VCR Operation Setup (Continued) Setting the Clock The DVD+VCR gives you two ways to set AM and PM correctly.) (AM does not appear.) The initial...

Operation Guide
Page 17
...on the TV screen. The number buttons can be used for setting numbers (e.g., title number). If no button is pressed for operating the DVD+VCR. You can be operated. Shows the current subtitles language, and changes the setting. On-screen display operation 1 Press DISPLAY during playback. ...total number of the features on the on -screen display disappears. Shows the current sound mode, and changes the setting. General Explanation This manual gives basic instructions for 10 seconds, the on -screen display example shown below. The selected item will be highlighted. 3 Use b/B ...
...on the TV screen. The number buttons can be used for setting numbers (e.g., title number). If no button is pressed for operating the DVD+VCR. You can be operated. Shows the current subtitles language, and changes the setting. On-screen display operation 1 Press DISPLAY during playback. ...total number of the features on the on -screen display disappears. Shows the current sound mode, and changes the setting. General Explanation This manual gives basic instructions for 10 seconds, the on -screen display example shown below. The selected item will be highlighted. 3 Use b/B ...
Operation Guide
Page 21
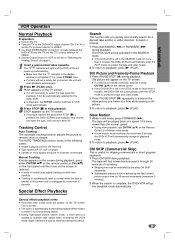
...Remote Control to VIDEO. During slow playback, use CH/TRK (v/V) on page 6. 1 Insert a prerecorded video cassette. Slight interference may be extended by -Frame Playback 1 Press PAUSE/STEP (X) during special effect modes, so there is unplugged for more than 3 minutes, the DVD+VCR will automatically ... playback mode automatically. Streaks or snow appear because of recording. If slow motion mode continues for more than the normal speed. Subsequent presses result in the SEARCH mode for more than 3 minutes, the DVD+VCR will appear on the TV. If a tape without...
...Remote Control to VIDEO. During slow playback, use CH/TRK (v/V) on page 6. 1 Insert a prerecorded video cassette. Slight interference may be extended by -Frame Playback 1 Press PAUSE/STEP (X) during special effect modes, so there is unplugged for more than 3 minutes, the DVD+VCR will automatically ... playback mode automatically. Streaks or snow appear because of recording. If slow motion mode continues for more than the normal speed. Subsequent presses result in the SEARCH mode for more than 3 minutes, the DVD+VCR will appear on the TV. If a tape without...

Operation Guide
Page 24
... to press N (PLAY) manually to begin , press DVD+VCR's REC/ITR (z) once to start. At the end of DVD+VCR, you should select the input channel LINE1 by pressing STOP (x). You must stop the DVD playback during instant timer recording, the DVD+VCR will also provide better picture ...or number (0-9). These direct A/V jacks will enter the recording pause mode. Note If the DVD you are recording from DVD to VCR This unit allows you will start position. "Lock" is set the TV's source selector to VIDEO. 1 Insert a video cassette with the safety tab intact. 2 Select the desired channel...
... to press N (PLAY) manually to begin , press DVD+VCR's REC/ITR (z) once to start. At the end of DVD+VCR, you should select the input channel LINE1 by pressing STOP (x). You must stop the DVD playback during instant timer recording, the DVD+VCR will also provide better picture ...or number (0-9). These direct A/V jacks will enter the recording pause mode. Note If the DVD you are recording from DVD to VCR This unit allows you will start position. "Lock" is set the TV's source selector to VIDEO. 1 Insert a video cassette with the safety tab intact. 2 Select the desired channel...

Operation Guide
Page 26
... the cassette in hours, minutes, and seconds. At the end of the tape. The real-time counter does not operate if nothing is recorded on automatically and playback begins. Additional Information In manual recording, Timer recording, Instant Timer Recording, playback, or fast forward modes, the DVD+VCR automatically starts...The real-time counter will be displayed correctly depending on the correct channel you use it cannot make recordings using the DVD+VCR, rewind, eject, and remove the cassette. Every press of tape run in its protective sleeve to about "0:00:00". Press CLK/CNT...
... the cassette in hours, minutes, and seconds. At the end of the tape. The real-time counter does not operate if nothing is recorded on automatically and playback begins. Additional Information In manual recording, Timer recording, Instant Timer Recording, playback, or fast forward modes, the DVD+VCR automatically starts...The real-time counter will be displayed correctly depending on the correct channel you use it cannot make recordings using the DVD+VCR, rewind, eject, and remove the cassette. Every press of tape run in its protective sleeve to about "0:00:00". Press CLK/CNT...

Operation Guide
Page 35
...power is turned off . Tape is a rental or was recorded on the TV. The disc is placed upside down . The batteries in the display window is lit.) Select the appropriate video input mode on the TV so the picture from the DVD+VCR. PLAY). Insert a disc or tape. (Check that the... TV is not set to choose VCR mode. The audio cables are dead. Insert a disc or tape. (Check that the disc or tape indicator in the remote control are not connected securely. No disc is inserted. Troubleshooting Check the following guide for manual tracking adjustment while tape is playing....
...power is turned off . Tape is a rental or was recorded on the TV. The disc is placed upside down . The batteries in the display window is lit.) Select the appropriate video input mode on the TV so the picture from the DVD+VCR. PLAY). Insert a disc or tape. (Check that the... TV is not set to choose VCR mode. The audio cables are dead. Insert a disc or tape. (Check that the disc or tape indicator in the remote control are not connected securely. No disc is inserted. Troubleshooting Check the following guide for manual tracking adjustment while tape is playing....


