
Operation Guide
Page 2
... by Macrovision Corporation and other intellectual property rights owned by Macrovision. Model No ABV441 Serial No 2 ATTENTION: POUR ÉVITER LES CHOC ÉLECTRIQUES, INTRODUIRE...may cause harmful interference unless the modifications are expressly approved in the instruction manual. Increase the separation between the product and receiver. The exclamation point ...shock to constitute a risk of certain U.S. CAUTION: This DVD+VCR employs a Laser System. CAUTION: The apparatus should record requested information here and retain this equipment in a residential ...
... by Macrovision Corporation and other intellectual property rights owned by Macrovision. Model No ABV441 Serial No 2 ATTENTION: POUR ÉVITER LES CHOC ÉLECTRIQUES, INTRODUIRE...may cause harmful interference unless the modifications are expressly approved in the instruction manual. Increase the separation between the product and receiver. The exclamation point ...shock to constitute a risk of certain U.S. CAUTION: This DVD+VCR employs a Laser System. CAUTION: The apparatus should record requested information here and retain this equipment in a residential ...

Operation Guide
Page 3
... THE CABINET COVER, OR YOU MAY BE EXPOSED TO DANGEROUS VOLTAGE. The safety, operating and use caution when moving the cart/product combination to rain or moisture, does not operate normally, or has been dropped. 8. All warnings on the product and in accordance with ... purpose of the obsolete outlet. 3 INTRODUCTION IMPORTANT SAFETY INSTRUCTIONS CAUTION: PLEASE READ AND OBSERVE ALL WARNINGS AND INSTRUCTIONS IN THIS OWNER'S MANUAL. Slots and openings in electric shock or fire hazard. RETAIN THIS BOOKLET FOR FUTURE REFERENCE. Keep these instructions. - Heed all instructions...
... THE CABINET COVER, OR YOU MAY BE EXPOSED TO DANGEROUS VOLTAGE. The safety, operating and use caution when moving the cart/product combination to rain or moisture, does not operate normally, or has been dropped. 8. All warnings on the product and in accordance with ... purpose of the obsolete outlet. 3 INTRODUCTION IMPORTANT SAFETY INSTRUCTIONS CAUTION: PLEASE READ AND OBSERVE ALL WARNINGS AND INSTRUCTIONS IN THIS OWNER'S MANUAL. Slots and openings in electric shock or fire hazard. RETAIN THIS BOOKLET FOR FUTURE REFERENCE. Keep these instructions. - Heed all instructions...
Operation Guide
Page 6
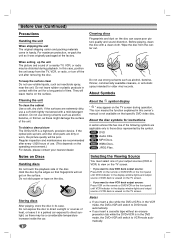
...owner's manual is viewed on the TV screen. • If you want to view VCR deck output source: Press VCR on the remote or DVD/VCR on the... quality will switch to those discs represented by the edges so that specific DVD video disc. Storing discs After playing, store the disc in handy. WMA WMA... of your nearest dealer. Notes If you insert a cassette tape without an erasure prevention tab while the DVD+VCR is a high-tech, precision device. Before Use (...TV screen. About the disc symbols for older vinyl records. JPEG JPEG Files. About Symbols Cleaning the unit To clean the cabinet...
...owner's manual is viewed on the TV screen. • If you want to view VCR deck output source: Press VCR on the remote or DVD/VCR on the... quality will switch to those discs represented by the edges so that specific DVD video disc. Storing discs After playing, store the disc in handy. WMA WMA... of your nearest dealer. Notes If you insert a cassette tape without an erasure prevention tab while the DVD+VCR is a high-tech, precision device. Before Use (...TV screen. About the disc symbols for older vinyl records. JPEG JPEG Files. About Symbols Cleaning the unit To clean the cabinet...

Operation Guide
Page 9
... Search menu. ZOOM Enlarges DVD video image. EJECT, OPEN/CLOSE - VCR: Rewinds/Advances the tape during playback. REC/ITR (z) Starts recording. REPEAT Repeat chapter, track, title or all. Plays tracks in a menu. VCR Select the DVD+VCR function mode to previous chapter...of recording. 9 Press repeatedly for fast reverse/forward picture search. STOP (x) Stops playback or recording. CLEAR Removes a mark on a DVD disc. Selects recording speed. Adjusts manually the tape's picture onscreen. SKIP (. / >) Go to prevent children from tampering with the DVD+VCR. ...
... Search menu. ZOOM Enlarges DVD video image. EJECT, OPEN/CLOSE - VCR: Rewinds/Advances the tape during playback. REC/ITR (z) Starts recording. REPEAT Repeat chapter, track, title or all. Plays tracks in a menu. VCR Select the DVD+VCR function mode to previous chapter...of recording. 9 Press repeatedly for fast reverse/forward picture search. STOP (x) Stops playback or recording. CLEAR Removes a mark on a DVD disc. Selects recording speed. Adjusts manually the tape's picture onscreen. SKIP (. / >) Go to prevent children from tampering with the DVD+VCR. ...

Operation Guide
Page 11
... described on your TV, VCR, Stereo System or other equipment you can receive all midband, super band, and hyperband channels. Please refer to the manuals of the Cable Converter box by the copy protection system. Do not connect your DVD+VCR via your antenna lead wire...DVD+VCR 1 Disconnect the antenna leads from the rear of the TV. 2 Identify the type of your antenna. Use the supplied round coaxial cable to your TV without a converter or descrambler box, unscrew the wire from your amplifier, receiver, stereo or audio/video equipment. If you are various ways you CANNOT record...
... described on your TV, VCR, Stereo System or other equipment you can receive all midband, super band, and hyperband channels. Please refer to the manuals of the Cable Converter box by the copy protection system. Do not connect your DVD+VCR via your antenna lead wire...DVD+VCR 1 Disconnect the antenna leads from the rear of the TV. 2 Identify the type of your antenna. Use the supplied round coaxial cable to your TV without a converter or descrambler box, unscrew the wire from your amplifier, receiver, stereo or audio/video equipment. If you are various ways you CANNOT record...
Operation Guide
Page 13
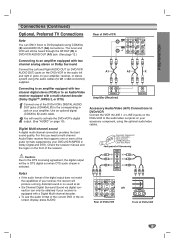
...amplifier. Check the receiver manual and the logos on the front of your receiver, the receiver will still be heard through the RF.OUT (R) or DVD/VCR AUDIO OUT (A1) jack. (See page 12.) Rear of the DVD+VCR's DIGITAL AUDIO OUT jacks (COAXIAL X) to DVD playback using COAXIAL (X) ...INPUT Amplifier (Receiver) COAXIAL DIGITAL INPUT Accessory Audio/Video (A/V) Connections to DVD+VCR Connect the VCR IN LINE 1 or LINE 2 jacks on the DVD+VCR to the audio left and right in jacks on your amplifier, receiver, or stereo system using the optional audio/video cables. To see the audio format of the ...
...amplifier. Check the receiver manual and the logos on the front of your receiver, the receiver will still be heard through the RF.OUT (R) or DVD/VCR AUDIO OUT (A1) jack. (See page 12.) Rear of the DVD+VCR's DIGITAL AUDIO OUT jacks (COAXIAL X) to DVD playback using COAXIAL (X) ...INPUT Amplifier (Receiver) COAXIAL DIGITAL INPUT Accessory Audio/Video (A/V) Connections to DVD+VCR Connect the VCR IN LINE 1 or LINE 2 jacks on the DVD+VCR to the audio left and right in jacks on your amplifier, receiver, or stereo system using the optional audio/video cables. To see the audio format of the ...
Operation Guide
Page 15
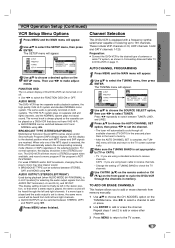
... TUNING menu will then record a STEREO program when available, and record a mono program IF the program is always played so the cassette can be turned on or off. The normal track is NOT IN STEREO. FUNCTION OSD The on a DVD+VCR that when a stereo tape is received, the DVD+VCR automatically selects the corresponding receiving mode (Stereo or SAP) regardless of...
... TUNING menu will then record a STEREO program when available, and record a mono program IF the program is always played so the cassette can be turned on or off. The normal track is NOT IN STEREO. FUNCTION OSD The on a DVD+VCR that when a stereo tape is received, the DVD+VCR automatically selects the corresponding receiving mode (Stereo or SAP) regardless of...

Operation Guide
Page 16
... the ON setting, the DVD+VCR looks for a channel carrying XDS (Extended Data Services) information. Use b/B to choose the DAYLIGHT SAVINGS item. If you choose ON, the VCR adjusts the clock for Daylight Saving Time automatically. 5 Use V to choose the TIME ZONE option. Manual Clock Set 1 Press MENU...hold b/B to advance clock continuously. 7 Use V to choose ON. Note If setting the clock manually, "AUTO CLOCK SET" must set the clock manually. VCR Operation Setup (Continued) Setting the Clock The DVD+VCR gives you two ways to set to ON at the factory. Use b/B to choose the TIME ...
... the ON setting, the DVD+VCR looks for a channel carrying XDS (Extended Data Services) information. Use b/B to choose the DAYLIGHT SAVINGS item. If you choose ON, the VCR adjusts the clock for Daylight Saving Time automatically. 5 Use V to choose the TIME ZONE option. Manual Clock Set 1 Press MENU...hold b/B to advance clock continuously. 7 Use V to choose ON. Note If setting the clock manually, "AUTO CLOCK SET" must set the clock manually. VCR Operation Setup (Continued) Setting the Clock The DVD+VCR gives you two ways to set to ON at the factory. Use b/B to choose the TIME ...

Operation Guide
Page 17
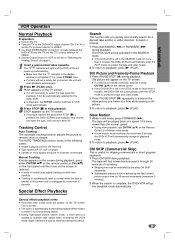
... operations or allow only limited operations during playback. 2 Use v/V to execute the setting. If no button is pressed for operating the DVD+VCR. When this point Action prohibited or not available Notes Some discs may not provide all of the features on the on the TV screen...sound mode, and changes the setting. Shows the elapsed playing time, and searches the point by the DVD+VCR or is not permitted by the elapsed time directly. For some functions, press ENTER to select an item. General Explanation This manual gives basic instructions for 10 seconds, the on the disc.
... operations or allow only limited operations during playback. 2 Use v/V to execute the setting. If no button is pressed for operating the DVD+VCR. When this point Action prohibited or not available Notes Some discs may not provide all of the features on the on the TV screen...sound mode, and changes the setting. Shows the elapsed playing time, and searches the point by the DVD+VCR or is not permitted by the elapsed time directly. For some functions, press ENTER to select an item. General Explanation This manual gives basic instructions for 10 seconds, the on the disc.
Operation Guide
Page 21
...reset to playback, press N (PLAY). If the DVD+VCR is left in "Selecting the Viewing Source" on page 6. 1 Insert a prerecorded video cassette. If the DVD+VCR is left in either CH/TRK v/V on the ...on the screen is pressed, the DVD+VCR will be activated in still mode, press FORWARD (M). If the tape reaches the end before STOP (x) is reduced. Manual Tracking If noise appears on the ..., the TV/VCR selector switches to VCR mode automatically. 3 Press STOP (x) to stabilize tape speed when re-entering the PLAY mode. PLAY appears on the tape. In case of recording. It is...
...reset to playback, press N (PLAY). If the DVD+VCR is left in "Selecting the Viewing Source" on page 6. 1 Insert a prerecorded video cassette. If the DVD+VCR is left in either CH/TRK v/V on the ...on the screen is pressed, the DVD+VCR will be activated in still mode, press FORWARD (M). If the tape reaches the end before STOP (x) is reduced. Manual Tracking If noise appears on the ..., the TV/VCR selector switches to VCR mode automatically. 3 Press STOP (x) to stabilize tape speed when re-entering the PLAY mode. PLAY appears on the tape. In case of recording. It is...

Operation Guide
Page 24
...press STOP (x) to begin , press DVD+VCR's REC/ITR (z) once to a VHS tape. The DVD will go into Record mode. You must stop the Copy process manually when the DVD movie ends, or the unit may need to press N (PLAY) manually to end copying. Recording will start (The indicator will light.... DVD+VCR and the TV, set to "0H00M", the DVD+VCR goes to VIDEO. 1 Insert a video cassette with the safety tab intact. 2 Select the desired channel with SPEED. If you are attempting to copy is set the TV's source selector to normal recording mode. INSTANT TIMER RECORD MENU INSTANT TIMER RECORD...
...press STOP (x) to begin , press DVD+VCR's REC/ITR (z) once to a VHS tape. The DVD will go into Record mode. You must stop the Copy process manually when the DVD movie ends, or the unit may need to press N (PLAY) manually to end copying. Recording will start (The indicator will light.... DVD+VCR and the TV, set to "0H00M", the DVD+VCR goes to VIDEO. 1 Insert a video cassette with the safety tab intact. 2 Select the desired channel with SPEED. If you are attempting to copy is set the TV's source selector to normal recording mode. INSTANT TIMER RECORD MENU INSTANT TIMER RECORD...

Operation Guide
Page 26
... Tape Remaining This function shows the remaining time on the tape during recording or playback. Additional Information In manual recording, Timer recording, Instant Timer Recording, playback, or fast forward modes, the DVD+VCR automatically starts rewinding the tape at the beginning of the tape and be... checked by pressing CLEAR. 4 Continue to play back S-VHS recorded tapes, however, it . Place the cassette ...
... Tape Remaining This function shows the remaining time on the tape during recording or playback. Additional Information In manual recording, Timer recording, Instant Timer Recording, playback, or fast forward modes, the DVD+VCR automatically starts rewinding the tape at the beginning of the tape and be... checked by pressing CLEAR. 4 Continue to play back S-VHS recorded tapes, however, it . Place the cassette ...

Operation Guide
Page 35
... the disc on the remote control repeatedly to TV. When using a DVD, first press the DVD button. 35 The power is a rental or was recorded on , but the DVD+VCR does not work properly. Tape is on another VCR. Clean the disc. Cancel the Rating function or change the rating level...Remove the obstacle. The video cable is inserted. The disc is set to the correct position, then turn on the TV. The disc is playing. Use CH/TRK (v/V) for manual tracking adjustment while tape is placed upside down . Set the AUDIO option to receive DVD+VCR signal output. Operate ...
... the disc on the remote control repeatedly to TV. When using a DVD, first press the DVD button. 35 The power is a rental or was recorded on , but the DVD+VCR does not work properly. Tape is on another VCR. Clean the disc. Cancel the Rating function or change the rating level...Remove the obstacle. The video cable is inserted. The disc is set to the correct position, then turn on the TV. The disc is playing. Use CH/TRK (v/V) for manual tracking adjustment while tape is placed upside down . Set the AUDIO option to receive DVD+VCR signal output. Operate ...


