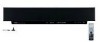

Owner's Manual
Page 5
... VCR 17 Connecting a digital satellite tuner or a cable TV tuner 18 Connecting other external components 19 Connecting a subwoofer 20 Connecting the power supply cable 21 SETUP GETTING STARTED 22 Installing batteries in the remote control 22 Operation range of the remote control 22 Using the remote control 23 Turning on the power... settings 35 BASIC OPERATION PLAYBACK 37 Selecting the input source 37 Playing back sources 38 Adjusting the volume 38 Muting the sound 39 BEAM MODE 40 5 beam mode 41 Stereo plus 3 beam mode 41 3 beam mode 42 Stereo mode 42 Target mode ...
... VCR 17 Connecting a digital satellite tuner or a cable TV tuner 18 Connecting other external components 19 Connecting a subwoofer 20 Connecting the power supply cable 21 SETUP GETTING STARTED 22 Installing batteries in the remote control 22 Operation range of the remote control 22 Using the remote control 23 Turning on the power... settings 35 BASIC OPERATION PLAYBACK 37 Selecting the input source 37 Playing back sources 38 Adjusting the volume 38 Muting the sound 39 BEAM MODE 40 5 beam mode 41 Stereo plus 3 beam mode 41 3 beam mode 42 Stereo mode 42 Target mode ...

Owner's Manual
Page 7
...remote control is the standard audio signal format used on -screen display) This unit employs the OSD which is incorporated under license from SRS Labs, Inc. The " " logo and "Cinema DSP" are trademarks of Dolby Laboratories. "Dolby", "Pro Logic", and the double-D symbol are registered trademarks of YAMAHA... 1 Ltd. INTRODUCTION FEATURES FEATURES Digital Sound Projector This unit employs the digital sound projector technology that allows one slim unit to control and steer multiple channels of sound to generate full, physical 5.1 channel surround sound, thus eliminating the need for...
...remote control is the standard audio signal format used on -screen display) This unit employs the OSD which is incorporated under license from SRS Labs, Inc. The " " logo and "Cinema DSP" are trademarks of Dolby Laboratories. "Dolby", "Pro Logic", and the double-D symbol are registered trademarks of YAMAHA... 1 Ltd. INTRODUCTION FEATURES FEATURES Digital Sound Projector This unit employs the digital sound projector technology that allows one slim unit to control and steer multiple channels of sound to generate full, physical 5.1 channel surround sound, thus eliminating the need for...

Owner's Manual
Page 8
... tip for your operation. • This manual is described using either the buttons on the main unit or on the remote control. See "CONNECTIONS" on page 14. 3 Prepare the remote control and turn on page 11. 2 Connect this unit to change in part as a result of differences between the manual...See "PLAYBACK" on page 26. 5 Play back a source and enjoy surround sound. Design and specifications are subject to your listening room. See "GETTING STARTED" on page 82. 4 See "MANUAL SETUP" on page 63 and "REMOTE CONTROL FEATURES" on page 22. 4 Run AUTO SETUP. In such cases, the ...
... tip for your operation. • This manual is described using either the buttons on the main unit or on the remote control. See "CONNECTIONS" on page 14. 3 Prepare the remote control and turn on page 11. 2 Connect this unit to change in part as a result of differences between the manual...See "PLAYBACK" on page 26. 5 Play back a source and enjoy surround sound. Design and specifications are subject to your listening room. See "GETTING STARTED" on page 82. 4 See "MANUAL SETUP" on page 63 and "REMOTE CONTROL FEATURES" on page 22. 4 Run AUTO SETUP. In such cases, the ...
Owner's Manual
Page 9
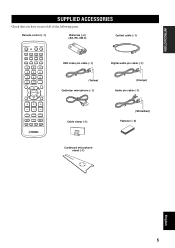
...ACCESSORIES Check that you have received all of the following parts. Remote control (×1) Batteries (×2) (AA, R6, UM-3) Optical cable (×1) STANDBY/ON POWER POWER AV TV DVD AUX VCR INPUT1 STB TV INPUT2 TV MACRO YSP 5BEAM 1 INPUTMODE SLEEP ST+3BEAM 2 3BEAM 3 STEREO TARGET 4... 5 6 MUSIC 7 MOVIE 8 VOL MODE 9 SPORTS 0 OFF +10 SURROUND CH LEVEL CINEMA DSP MENU TEST ENTER RETURN VOLUME CH TV VOL OSD video pin cable (×1) Digital audio pin cable (×1)...
...ACCESSORIES Check that you have received all of the following parts. Remote control (×1) Batteries (×2) (AA, R6, UM-3) Optical cable (×1) STANDBY/ON POWER POWER AV TV DVD AUX VCR INPUT1 STB TV INPUT2 TV MACRO YSP 5BEAM 1 INPUTMODE SLEEP ST+3BEAM 2 3BEAM 3 STEREO TARGET 4... 5 6 MUSIC 7 MOVIE 8 VOL MODE 9 SPORTS 0 OFF +10 SURROUND CH LEVEL CINEMA DSP MENU TEST ENTER RETURN VOLUME CH TV VOL OSD video pin cable (×1) Digital audio pin cable (×1)...

Owner's Manual
Page 10
... the operational status of this unit consumes a small amount of power in order to receive infrared-signals from the remote control. 4 INPUT Press repeatedly to the standby mode (see page 23). CONTROLS AND FUNCTIONS CONTROLS AND FUNCTIONS Front panel 1 2 3 4 5 6 INPUT VOLUME + STANDBY/ON 1 OPTIMIZER MIC jack Use to connect the supplied optimizer ... between input sources (TV, VCR, DVD or AUX). Notes • When you turn on the power of this unit or sets it can reproduce sound. • In the standby mode, this unit. 3 Remote control sensor Receives infrared signals from the...
... the operational status of this unit consumes a small amount of power in order to receive infrared-signals from the remote control. 4 INPUT Press repeatedly to the standby mode (see page 23). CONTROLS AND FUNCTIONS CONTROLS AND FUNCTIONS Front panel 1 2 3 4 5 6 INPUT VOLUME + STANDBY/ON 1 OPTIMIZER MIC jack Use to connect the supplied optimizer ... between input sources (TV, VCR, DVD or AUX). Notes • When you turn on the power of this unit or sets it can reproduce sound. • In the standby mode, this unit. 3 Remote control sensor Receives infrared signals from the...

Owner's Manual
Page 13
...YSP 5BEAM 1 INPUTMODE SLEEP ST+3BEAM 2 3BEAM 3 STEREO TARGET 4 5 6 MUSIC 7 MOVIE 8 VOL MODE 9 SPORTS 0 OFF +10 SURROUND CH LEVEL CINEMA DSP MENU TEST ENTER RETURN VOLUME CH TV VOL C D E MUTE TV INPUT TV MUTE CODE SET F G H I J K L M N O P Q R S 1 Infrared window Outputs infrared control... system. INTRODUCTION CONTROLS AND FUNCTIONS Remote control This section describes the function of each speaker (see page 78). y You can also control other components" on the remote control used to the previous volume level (see page 83). C MUTE Mutes the sound. English 9
...YSP 5BEAM 1 INPUTMODE SLEEP ST+3BEAM 2 3BEAM 3 STEREO TARGET 4 5 6 MUSIC 7 MOVIE 8 VOL MODE 9 SPORTS 0 OFF +10 SURROUND CH LEVEL CINEMA DSP MENU TEST ENTER RETURN VOLUME CH TV VOL C D E MUTE TV INPUT TV MUTE CODE SET F G H I J K L M N O P Q R S 1 Infrared window Outputs infrared control... system. INTRODUCTION CONTROLS AND FUNCTIONS Remote control This section describes the function of each speaker (see page 78). y You can also control other components" on the remote control used to the previous volume level (see page 83). C MUTE Mutes the sound. English 9

Owner's Manual
Page 14
... to the previous SET MENU screen. Use to set the TV macro (see page 85). J INPUTMODE Switches between channels of the TV (see page 83). R CH +/- S TV MUTE, CODE SET Mutes the audio output of the TV or the VCR (see pages 83 and 84). M VOL MODE Turns on your TV... Sets the sleep timer (see page 40). Switches between input modes (AUTO, DTS or ANALOG). Adjusts the volume level of the TV (see page 83). CONTROLS AND FUNCTIONS I MACRO Use to set up remote control codes (see page 82). 10
... to the previous SET MENU screen. Use to set the TV macro (see page 85). J INPUTMODE Switches between channels of the TV (see page 83). R CH +/- S TV MUTE, CODE SET Mutes the audio output of the TV or the VCR (see pages 83 and 84). M VOL MODE Turns on your TV... Sets the sleep timer (see page 40). Switches between input modes (AUTO, DTS or ANALOG). Adjusts the volume level of the TV (see page 83). CONTROLS AND FUNCTIONS I MACRO Use to set up remote control codes (see page 82). 10
Owner's Manual
Page 26
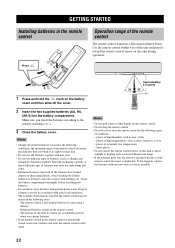
...battery compartment. Press Approximately 6 m (20 ft) 1 Press and hold the mark on the remote control. • Do not drop the remote control. • Do not leave or store the remote control in the following cases: - Clean the battery compartment thoroughly before installing new batteries. • ...Do not throw away batteries with two new ones as soon as these different types of the remote control The remote control transmits a directional infrared beam. places of extremely low temperatures - Make sure you notice the following conditions; Read the packaging...
...battery compartment. Press Approximately 6 m (20 ft) 1 Press and hold the mark on the remote control. • Do not drop the remote control. • Do not leave or store the remote control in the following cases: - Clean the battery compartment thoroughly before installing new batteries. • ...Do not throw away batteries with two new ones as soon as these different types of the remote control The remote control transmits a directional infrared beam. places of extremely low temperatures - Make sure you notice the following conditions; Read the packaging...

Owner's Manual
Page 27
...is operational, and the other components by setting the appropriate remote control codes (see "Controlling other components" on page 83 for further information on the remote control are operational only after you press YSP to switch to the operation mode of this unit. Press ... 2 TARGET 5 3BEAM 3 TV 6 MUSIC 7 MOVIE 8 VOL MODE 9 SPORTS 0 OFF +10 SURROUND TV CH LEVEL CINEMA DSP MENU 5 TEST ENTER RETURN 6 7 8 9 1 Input selector buttons 2 YSP 3 Beam mode buttons 4 Sound field program buttons 5 Cursor buttons / / / , ENTER 6 VOL MODE 7 SURROUND 8 MENU 9 RETURN Turning...
...is operational, and the other components by setting the appropriate remote control codes (see "Controlling other components" on page 83 for further information on the remote control are operational only after you press YSP to switch to the operation mode of this unit. Press ... 2 TARGET 5 3BEAM 3 TV 6 MUSIC 7 MOVIE 8 VOL MODE 9 SPORTS 0 OFF +10 SURROUND TV CH LEVEL CINEMA DSP MENU 5 TEST ENTER RETURN 6 7 8 9 1 Input selector buttons 2 YSP 3 Beam mode buttons 4 Sound field program buttons 5 Cursor buttons / / / , ENTER 6 VOL MODE 7 SURROUND 8 MENU 9 RETURN Turning...
Owner's Manual
Page 28
... STANDBY/ON Front panel or Remote control 3 Turn on the power of your TV. 4 Press TV on the remote control to turn on your TV screen and set the parameters for your TV screen. Once this is complete, you can enjoy real surround sound while watching TV in the comfort... 1 2 3 4 5 6 7 DVD AUX VCR INPUT1 STB TV INPUT2 TV MACRO YSP 5BEAM 1 INPUTMODE SLEEP ST+3BEAM 2 3BEAM 3 STEREO TARGET 4 5 6 MUSIC 7 MOVIE 8 VOL MODE 9 SPORTS 0 OFF +10 SURROUND TV CH LEVEL CINEMA DSP MENU TEST ENTER RETURN VOLUME CH TV VOL MUTE TV INPUT TV MUTE CODE SET 8 9 0 A B OSD screen ...
... STANDBY/ON Front panel or Remote control 3 Turn on the power of your TV. 4 Press TV on the remote control to turn on your TV screen and set the parameters for your TV screen. Once this is complete, you can enjoy real surround sound while watching TV in the comfort... 1 2 3 4 5 6 7 DVD AUX VCR INPUT1 STB TV INPUT2 TV MACRO YSP 5BEAM 1 INPUTMODE SLEEP ST+3BEAM 2 3BEAM 3 STEREO TARGET 4 5 6 MUSIC 7 MOVIE 8 VOL MODE 9 SPORTS 0 OFF +10 SURROUND TV CH LEVEL CINEMA DSP MENU TEST ENTER RETURN VOLUME CH TV VOL MUTE TV INPUT TV MUTE CODE SET 8 9 0 A B OSD screen ...

Owner's Manual
Page 33
...settings optimized by the AUTO SETUP procedure (see page 34). STANDBY/ON Front panel or Remote control ENTER ENTER 2 Press YSP on the remote control to switch to the operation mode of this unit. 3 Press MENU on the remote control. In such cases, run successfully if this unit is installed in one of the ..." on page 11. SETUP p AUTO SETUP Notes • If your listening room has curtains, open the curtains before starting the BEAM OPT+SOUND OPTIMZ or the BEAM OPTIMZ only procedure. • Make sure that your listening room is as quiet as possible while this unit is performing ...
...settings optimized by the AUTO SETUP procedure (see page 34). STANDBY/ON Front panel or Remote control ENTER ENTER 2 Press YSP on the remote control to switch to the operation mode of this unit. 3 Press MENU on the remote control. In such cases, run successfully if this unit is installed in one of the ..." on page 11. SETUP p AUTO SETUP Notes • If your listening room has curtains, open the curtains before starting the BEAM OPT+SOUND OPTIMZ or the BEAM OPTIMZ only procedure. • Make sure that your listening room is as quiet as possible while this unit is performing ...

Owner's Manual
Page 38
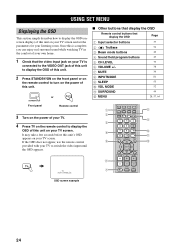
...Down [ENTER]:Enter 1 Press YSP on the remote control to switch to select SAVE and then press ENTER. In this unit. The following screen appears on your TV. MENU SET MENU . ;MEMORY ;AUTO SETUP ;BASIC SETUP ;MANUAL SETUP [ ]/[ ]:Up/Down [ENTER]:Enter y • The control buttons used for SET MENU are... Press / to select MEMORY and then press ENTER. The following screen appears on your TV. YSP 4 Press / to the operation mode of your TV. p p p p 2 Press MENU on the remote control. It is handy to save the current settings adjusted in SET MENU in the system memory of ...
...Down [ENTER]:Enter 1 Press YSP on the remote control to switch to select SAVE and then press ENTER. In this unit. The following screen appears on your TV. MENU SET MENU . ;MEMORY ;AUTO SETUP ;BASIC SETUP ;MANUAL SETUP [ ]/[ ]:Up/Down [ENTER]:Enter y • The control buttons used for SET MENU are... Press / to select MEMORY and then press ENTER. The following screen appears on your TV. YSP 4 Press / to the operation mode of your TV. p p p p 2 Press MENU on the remote control. It is handy to save the current settings adjusted in SET MENU in the system memory of ...

Owner's Manual
Page 39
...SET MENU . ;MEMORY ;AUTO SETUP ;BASIC SETUP ;MANUAL SETUP [ ]/[ ]:Up/Down [ENTER]:Enter y • The control buttons used for SET MENU are saved as USER1, USER2 or USER3. YSP 2)MEMORY SAVE USER1 Save Now? [ENTER]:Enter 6 Press ENTER again. MENU English 35 ENTER 2)MEMORY SAVE USER1 Saving ! []:...If you press an input selector button during the SET MENU operations, the cursor buttons become ineffective. The SET MENU screen appears on the remote control to switch to the operation mode of the screen. • To return to select USER1, USER2 or USER3 and then press ENTER. ENTER...
...SET MENU . ;MEMORY ;AUTO SETUP ;BASIC SETUP ;MANUAL SETUP [ ]/[ ]:Up/Down [ENTER]:Enter y • The control buttons used for SET MENU are saved as USER1, USER2 or USER3. YSP 2)MEMORY SAVE USER1 Save Now? [ENTER]:Enter 6 Press ENTER again. MENU English 35 ENTER 2)MEMORY SAVE USER1 Saving ! []:...If you press an input selector button during the SET MENU operations, the cursor buttons become ineffective. The SET MENU screen appears on the remote control to switch to the operation mode of the screen. • To return to select USER1, USER2 or USER3 and then press ENTER. ENTER...

Owner's Manual
Page 41
... VOL Press DVD on the remote control to play back a video tape. VCR ■ Front panel operations Press INPUT on the front panel repeatedly to play back a satellite broadcast. PLAYBACK PLAYBACK Selecting the input source You can play back sound from the components connected to this unit simply ...by pressing INPUT on the front panel repeatedly or pressing one of this unit. Press STB on the remote control to toggle between TV, STB, DVD, VCR and AUX. AUX...
... VOL Press DVD on the remote control to play back a video tape. VCR ■ Front panel operations Press INPUT on the front panel repeatedly to play back a satellite broadcast. PLAYBACK PLAYBACK Selecting the input source You can play back sound from the components connected to this unit simply ...by pressing INPUT on the front panel repeatedly or pressing one of this unit. Press STB on the remote control to toggle between TV, STB, DVD, VCR and AUX. AUX...

Owner's Manual
Page 42
...and the DVD player you are output from your TV using the supplied remote control. DVD Adjusting the volume INPUT VOLUME + STANDBY/ON VOLUME CH TV VOL MUTE TV INPUT TV MUTE Press VOLUME +/- Audio signals from the speakers of the volume level appears in the front panel display. VOL Notes...sound. 4 Press DVD on how to -99.5 dB, MIN (minimum) VOLUME 5 Play back the DVD on this unit. y • If the output volume is too low, increase the volume on your TV until you press VOLUME +/-. • You can play back the selected input source. VOLUME + Front panel or Remote control...
...and the DVD player you are output from your TV using the supplied remote control. DVD Adjusting the volume INPUT VOLUME + STANDBY/ON VOLUME CH TV VOL MUTE TV INPUT TV MUTE Press VOLUME +/- Audio signals from the speakers of the volume level appears in the front panel display. VOL Notes...sound. 4 Press DVD on how to -99.5 dB, MIN (minimum) VOLUME 5 Play back the DVD on this unit. y • If the output volume is too low, increase the volume on your TV until you press VOLUME +/-. • You can play back the selected input source. VOLUME + Front panel or Remote control...

Owner's Manual
Page 43
... lights up. y You can select whether the sound output is muted at the same time. Muting the sound VOLUME CH TV VOL MUTE TV INPUT TV MUTE 1 Press MUTE on the remote control again (or press VOLUME +/-) to mute the sound. MUTE VOLUME or Lights up VOL Note The sound output of the current volume level appears...
... lights up. y You can select whether the sound output is muted at the same time. Muting the sound VOLUME CH TV VOL MUTE TV INPUT TV MUTE 1 Press MUTE on the remote control again (or press VOLUME +/-) to mute the sound. MUTE VOLUME or Lights up VOL Note The sound output of the current volume level appears...
Owner's Manual
Page 44
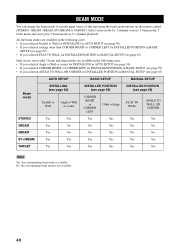
... available in the following cases: • If you selected Angle to suit the input source of this unit using the beam mode buttons on the remote control (STEREO, 3BEAM, 5BEAM, ST+3BEAM or TARGET). All the beam modes are available in the following cases: • If you selected Parallel to Wall for...
... available in the following cases: • If you selected Angle to suit the input source of this unit using the beam mode buttons on the remote control (STEREO, 3BEAM, 5BEAM, ST+3BEAM or TARGET). All the beam modes are available in the following cases: • If you selected Parallel to Wall for...

Owner's Manual
Page 45
...6 MUSIC 7 MOVIE 8 VOL MODE 9 SPORTS 0 OFF +10 SURROUND CH LEVEL CINEMA DSP MENU TEST ENTER RETURN BEAM MODE 5 beam mode Outputs sound beams from the front left and right, center, and surround left and right speakers. YSP 2 Press one of the beam mode buttons to select the desired beam mode...position. 41 Press ST+3BEAM on a DVD. Press 5BEAM on the remote control to select the 5 beam mode. 5BEAM 1 1 Press YSP on the remote control to switch to the operation mode of the listening position while sound reflections from rebounding directly off the walls in a multi-channel format.
...6 MUSIC 7 MOVIE 8 VOL MODE 9 SPORTS 0 OFF +10 SURROUND CH LEVEL CINEMA DSP MENU TEST ENTER RETURN BEAM MODE 5 beam mode Outputs sound beams from the front left and right, center, and surround left and right speakers. YSP 2 Press one of the beam mode buttons to select the desired beam mode...position. 41 Press ST+3BEAM on a DVD. Press 5BEAM on the remote control to select the 5 beam mode. 5BEAM 1 1 Press YSP on the remote control to switch to the operation mode of the listening position while sound reflections from rebounding directly off the walls in a multi-channel format.

Owner's Manual
Page 46
... and output from the front left and right speakers. BEAM MODE 3 beam mode Stereo mode Outputs sound beams from the front left and right speakers. • The front left and right sound beams are output towards the walls in your TV speakers. Because the listening position area is selected as.... This mode is selected. • When you play back Dolby Digital audio signals in BEAM MENU (see page 49) become ineffective. 42 Press STEREO on the remote control to select the stereo mode. Press 3BEAM on the remote control to select the 3 beam mode. No audio is ideal for enjoying...
... and output from the front left and right speakers. BEAM MODE 3 beam mode Stereo mode Outputs sound beams from the front left and right speakers. • The front left and right sound beams are output towards the walls in your TV speakers. Because the listening position area is selected as.... This mode is selected. • When you play back Dolby Digital audio signals in BEAM MENU (see page 49) become ineffective. 42 Press STEREO on the remote control to select the stereo mode. Press 3BEAM on the remote control to select the 3 beam mode. No audio is ideal for enjoying...

Owner's Manual
Page 47
... angle on the left side. • Press repeatedly to increase the horizontal angle on the remote control to select the target mode and then press / to adjust the angle. VOL Notes • The sound beams are not rebounded off the walls in your ENTER listening room. BASIC OPERATION English 43... TARGET 5 In addition, you can adjust the horizontal angle of the sound beams so that you can hear dialogues clearly even from the subwoofer connected to this unit. This mode is output from a distant location such...
... angle on the left side. • Press repeatedly to increase the horizontal angle on the remote control to select the target mode and then press / to adjust the angle. VOL Notes • The sound beams are not rebounded off the walls in your ENTER listening room. BASIC OPERATION English 43... TARGET 5 In addition, you can adjust the horizontal angle of the sound beams so that you can hear dialogues clearly even from the subwoofer connected to this unit. This mode is output from a distant location such...


