Owner's Manual
Page 5
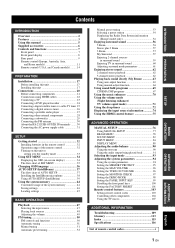
...preset tuning 52 Manual preset tuning 53 Selecting a preset station 54 Displaying the Radio Data System information (Europe model only 54 Enjoying surround sound 56 5 Beam 56 Stereo plus 3 Beam 57 3 Beam 57 My Surround 57 Enjoying 2-channel...17 Installing this unit 17 Connections 20 Before connecting components 21 Connections using HDMI cables 22 Connecting a TV 23 Connecting a DVD player/recorder 24 Connecting a digital satellite tuner or a cable TV tuner 25 Connecting a digital airwave tuner 26 Connecting a portable audio player 27 Connecting other components 104 Using the...
...preset tuning 52 Manual preset tuning 53 Selecting a preset station 54 Displaying the Radio Data System information (Europe model only 54 Enjoying surround sound 56 5 Beam 56 Stereo plus 3 Beam 57 3 Beam 57 My Surround 57 Enjoying 2-channel...17 Installing this unit 17 Connections 20 Before connecting components 21 Connections using HDMI cables 22 Connecting a TV 23 Connecting a DVD player/recorder 24 Connecting a digital satellite tuner or a cable TV tuner 25 Connecting a digital airwave tuner 26 Connecting a portable audio player 27 Connecting other components 104 Using the...
Owner's Manual
Page 7
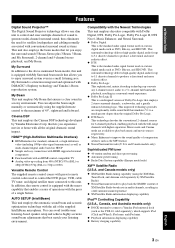
... enjoy surround system even in a small listening area. This surround technology delivers high-quality digital audio for satellite loudspeakers and cabling normally associated with the press of sound to generate multi-channel surround sound, thus eliminates the need for up -scaling from 480i (NTSC)/576i (PAL) or 480p (NTSC)/576p (PAL) to connect a Yamaha iPod universal...
... enjoy surround system even in a small listening area. This surround technology delivers high-quality digital audio for satellite loudspeakers and cabling normally associated with the press of sound to generate multi-channel surround sound, thus eliminates the need for up -scaling from 480i (NTSC)/576i (PAL) or 480p (NTSC)/576p (PAL) to connect a Yamaha iPod universal...
Owner's Manual
Page 11
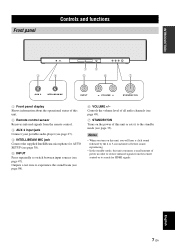
...sets it to the standby mode (see page 98). 6 VOLUME +/- Notes • When you will hear a click sound followed by the 4 to 5-second interval before sound reproducing. • In the standby mode, this unit consumes a small amount of power in order to receive infrared ...signals from the remote control. 3 AUX 3 input jack Connect your portable audio player (see page 27). 4 INTELLIBEAM MIC jack Connect the supplied IntelliBeam microphone for HDMI signals. ...
...sets it to the standby mode (see page 98). 6 VOLUME +/- Notes • When you will hear a click sound followed by the 4 to 5-second interval before sound reproducing. • In the standby mode, this unit consumes a small amount of power in order to receive infrared ...signals from the remote control. 3 AUX 3 input jack Connect your portable audio player (see page 27). 4 INTELLIBEAM MIC jack Connect the supplied IntelliBeam microphone for HDMI signals. ...
Owner's Manual
Page 12
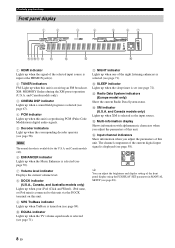
...sound field program is selected (see page 67). 4 PCM indicator Lights up when this unit is available for the U.S.A. Note The neural decoder is reproducing PCM (Pulse Code Modulation) digital...iPod (Click and Wheel), iPod nano, or iPod mini is connected to this unit via the DOCK terminal on this unit. 9...operation (U.S.A. C Radio Data System indicators (Europe model only) Show the current Radio Data System status. E Multi-information ...current digital input signal is receiving an FM broadcast. Controls and functions Front panel display 1 2 3 4 5 67 890A B C D E F 1 HDMI indicator...
...sound field program is selected (see page 67). 4 PCM indicator Lights up when this unit is available for the U.S.A. Note The neural decoder is reproducing PCM (Pulse Code Modulation) digital...iPod (Click and Wheel), iPod nano, or iPod mini is connected to this unit via the DOCK terminal on this unit. 9...operation (U.S.A. C Radio Data System indicators (Europe model only) Show the current Radio Data System status. E Multi-information ...current digital input signal is receiving an FM broadcast. Controls and functions Front panel display 1 2 3 4 5 67 890A B C D E F 1 HDMI indicator...
Owner's Manual
Page 13
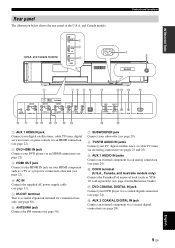
... models only) Connect the Yamaha iPod universal dock (such as a TV or a projector connected to the HDMI IN jack on your TV, digital satellite tuner, or cable TV tuner via an analog connection (see pages 23 and 25). 9 AUX 1 AUDIO IN jacks Connect an external component via a coaxial digital connection (see page 24). ANTENNA COMPONENT COMPONENT SUBWOOFER SYSTEM CONNECTOR VIDEO OUT...
... models only) Connect the Yamaha iPod universal dock (such as a TV or a projector connected to the HDMI IN jack on your TV, digital satellite tuner, or cable TV tuner via an analog connection (see pages 23 and 25). 9 AUX 1 AUDIO IN jacks Connect an external component via a coaxial digital connection (see page 24). ANTENNA COMPONENT COMPONENT SUBWOOFER SYSTEM CONNECTOR VIDEO OUT...
Owner's Manual
Page 21
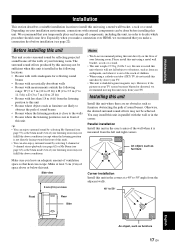
...that heat can be achieved. Side view 5 cm (2 in parallel with external components can escape. We recommend that you make a connection over HDMI, we recommend moving this unit away from an earthquake, and where it is out of the reach of children. • When using... position is close to the walls • Rooms where the listening position is not in the following locations. • Rooms with walls inadequate for reflecting sound beams • Rooms with acoustically absorbent walls • Rooms with measurements outside the following range: W (3 to 7 m (10 to 23 ft)) x H (2 to 3.5 ...
...that heat can be achieved. Side view 5 cm (2 in parallel with external components can escape. We recommend that you make a connection over HDMI, we recommend moving this unit away from an earthquake, and where it is out of the reach of children. • When using... position is close to the walls • Rooms where the listening position is not in the following locations. • Rooms with walls inadequate for reflecting sound beams • Rooms with acoustically absorbent walls • Rooms with measurements outside the following range: W (3 to 7 m (10 to 23 ft)) x H (2 to 3.5 ...
Owner's Manual
Page 24
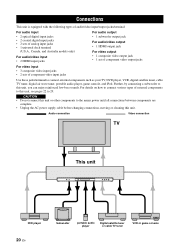
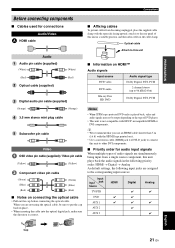
... game console Connections Connections This unit is equipped with the following types of audio/video input/output jacks/terminal: For audio input • 2 optical digital input jacks • 2 coaxial digital input jacks • 2 sets of analog input jacks • 1 universal dock terminal (U.S.A., Canada, and Australia models only) For audio/video input • 2 HDMI input jacks...
... game console Connections Connections This unit is equipped with the following types of audio/video input/output jacks/terminal: For audio input • 2 optical digital input jacks • 2 coaxial digital input jacks • 2 sets of analog input jacks • 1 universal dock terminal (U.S.A., Canada, and Australia models only) For audio/video input • 2 HDMI input jacks...
Owner's Manual
Page 25
...the open side facing upward, attach it . • Use a conversion cable (HDMI jack ↔ DVI-D jack) to connect this unit to other DVI components. ■ Priority order for connections Audio/Video A HDMI cable ■ Affixing cables To prevent cables from a single source component, this... unit plays back the audio signals in the following priority order: HDMI → Digital → Analog As default settings, the following...
...the open side facing upward, attach it . • Use a conversion cable (HDMI jack ↔ DVI-D jack) to connect this unit to other DVI components. ■ Priority order for connections Audio/Video A HDMI cable ■ Affixing cables To prevent cables from a single source component, this... unit plays back the audio signals in the following priority order: HDMI → Digital → Analog As default settings, the following...
Owner's Manual
Page 26
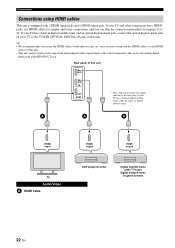
... video/component video jacks and analog/digital input jacks at the HDMI OUT jack. Connections Connections using HDMI cables This unit is not necessary if your TV has a built-in digital satellite tuner and an optical digital output jack, connect the optical digital output jack on your TV to the TV/STB OPTICAL DIGITAL IN jack on this unit. If...
... video/component video jacks and analog/digital input jacks at the HDMI OUT jack. Connections Connections using HDMI cables This unit is not necessary if your TV has a built-in digital satellite tuner and an optical digital output jack, connect the optical digital output jack on your TV to the TV/STB OPTICAL DIGITAL IN jack on this unit. If...
Owner's Manual
Page 52
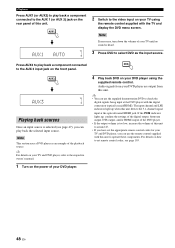
... control codes for your TV and DVD player, you can use the supplied demonstration DVD to the AUX 3 input jack on your TV until no sound is heard. 3 Press DVD to around 45. • If you have set remote control codes, see page 47), you can play back the selected ... the PCM indicator lights up when this unit. Audio signals from this unit detects the 5.1-channel signal input at the DVD player with the digital connection (optical/coaxial/HDMI). AUX1 AUX1 AUTO 2 Switch to operate these components. For details on how to the AUX 1 (or AUX 2) jack on your DVD player are output...
... control codes for your TV and DVD player, you can use the supplied demonstration DVD to the AUX 3 input jack on your TV until no sound is heard. 3 Press DVD to around 45. • If you have set remote control codes, see page 47), you can play back the selected ... the PCM indicator lights up when this unit. Audio signals from this unit detects the 5.1-channel signal input at the DVD player with the digital connection (optical/coaxial/HDMI). AUX1 AUX1 AUTO 2 Switch to operate these components. For details on how to the AUX 1 (or AUX 2) jack on your DVD player are output...
Owner's Manual
Page 79
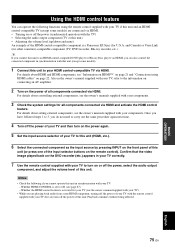
...press one of all components connected via HDMI and activate the HDMI control feature. y If you connect this unit to an HDMI control-compatible DVD player or Blu-ray Disc player via HDMI, you cannot operate this...HDMI control-compatible TV (except some models). 1 Connect this unit) • Adjusting the volume level (up/down and mute) An example of this unit. BASIC OPERATION USING THE HDMI CONTROL FEATURE Using the HDMI control feature You can also control the connected component in synchronization with your components. 3 Check the system settings for all components connected via HDMI...
...press one of all components connected via HDMI and activate the HDMI control feature. y If you connect this unit to an HDMI control-compatible DVD player or Blu-ray Disc player via HDMI, you cannot operate this...HDMI control-compatible TV (except some models). 1 Connect this unit) • Adjusting the volume level (up/down and mute) An example of this unit. BASIC OPERATION USING THE HDMI CONTROL FEATURE Using the HDMI control feature You can also control the connected component in synchronization with your components. 3 Check the system settings for all components connected via HDMI...
Owner's Manual
Page 88
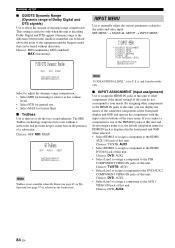
...even without distortion. If you can display the names of the connected components in the front panel and OSD when selected. • Select HDMI1 to assign a component to the HDMI AUX 1 IN jack of the equipment and the biggest sound that can be heard without a subwoofer and provides deeper, ...low volume levels. • Select STD for general use. • Select MAX for HDMI IN jack is decoding Dolby Digital and DTS signals. Choices: TV/STB, AUX1 • Select HDMI2 to assign a component to the HDMI DVD IN jack of dynamic range compression. MANUAL SETUP ■ DD/DTS Dynamic Range...
...even without distortion. If you can display the names of the connected components in the front panel and OSD when selected. • Select HDMI1 to assign a component to the HDMI AUX 1 IN jack of the equipment and the biggest sound that can be heard without a subwoofer and provides deeper, ...low volume levels. • Select STD for general use. • Select MAX for HDMI IN jack is decoding Dolby Digital and DTS signals. Choices: TV/STB, AUX1 • Select HDMI2 to assign a component to the HDMI DVD IN jack of dynamic range compression. MANUAL SETUP ■ DD/DTS Dynamic Range...
Owner's Manual
Page 89
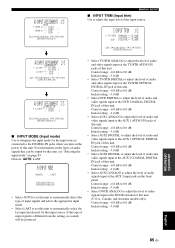
...signals is different from the setting, no sounds will be output by this unit. Control range: -6.0 dB to 0.0 dB Initial setting: -3.0 dB • Select DVD DIGITAL to adjust the level of audio and video...input mode used for the input sources connected to adjust the level of audio and video signals input at the AUX 1 OPTICAL DIGITAL IN jack of this unit, see... Initial setting: -3.0 dB • Select AUX1 ANALOG to the DIGITAL IN jacks when you turn on the power of this unit (U.S.A., Canada, and Australia models only). p p A)INPUT ASSIGNMENT 1/3 HDMI . AUX2 ( AUX2 ) p [ ]/[ ]:Up/Down [ ...
...signals is different from the setting, no sounds will be output by this unit. Control range: -6.0 dB to 0.0 dB Initial setting: -3.0 dB • Select DVD DIGITAL to adjust the level of audio and video...input mode used for the input sources connected to adjust the level of audio and video signals input at the AUX 1 OPTICAL DIGITAL IN jack of this unit, see... Initial setting: -3.0 dB • Select AUX1 ANALOG to the DIGITAL IN jacks when you turn on the power of this unit (U.S.A., Canada, and Australia models only). p p A)INPUT ASSIGNMENT 1/3 HDMI . AUX2 ( AUX2 ) p [ ]/[ ]:Up/Down [ ...
Owner's Manual
Page 90
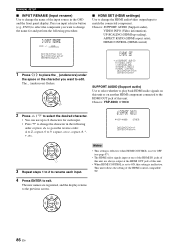
...SUPPORT AUDIO b)VIDEO INFO c)UP-SCALING d)ASPECT RATIO e)HDMI CONTROL [ ]/[ ]:Up/Down [ENTER]:Enter SUPPORT AUDIO (Support audio) Use to select whether to play back HDMI audio signals on this unit or on another HDMI component connected to edit. Choices: YSP-4000, OTHER 2 Press / to exit. The new ...names are always output at the HDMI OUT jack of the HDMI control-compatible TV. 4 Press ENTER to select...
...SUPPORT AUDIO b)VIDEO INFO c)UP-SCALING d)ASPECT RATIO e)HDMI CONTROL [ ]/[ ]:Up/Down [ENTER]:Enter SUPPORT AUDIO (Support audio) Use to select whether to play back HDMI audio signals on this unit or on another HDMI component connected to edit. Choices: YSP-4000, OTHER 2 Press / to exit. The new ...names are always output at the HDMI OUT jack of the HDMI control-compatible TV. 4 Press ENTER to select...

Owner's Manual
Page 91
... video signal resolutions from the video monitor connected via HDMI. p p p p VIDEO INFO (Video information) Use to display the video information of the HDMI input/output signals. • Select HDMI RES. Choices: HDMI SIGNAL, HDMI RES., HDMI ERROR b)VIDEO INFO . HDMI SIGNAL;;;HDMI -> HDMI HDMI RES.;;;;1080P -> 1080P HDMI ERROR;;;---- [ ]/[ ]:Up/Down [ENTER]:Return • Select HDMI SIGNAL to display the type of the...
... video signal resolutions from the video monitor connected via HDMI. p p p p VIDEO INFO (Video information) Use to display the video information of the HDMI input/output signals. • Select HDMI RES. Choices: HDMI SIGNAL, HDMI RES., HDMI ERROR b)VIDEO INFO . HDMI SIGNAL;;;HDMI -> HDMI HDMI RES.;;;;1080P -> 1080P HDMI ERROR;;;---- [ ]/[ ]:Up/Down [ENTER]:Return • Select HDMI SIGNAL to display the type of the...

Owner's Manual
Page 92
The signals input at the HDMI IN jacks are output at the HDMI OUT jack when this case, check the antenna connections (see page 5 in the Reference Guide). A)F.DISPLAY SET . p [ ]/[ ]:Up/Down [ ]/[ ]:Sel [ENTER]:Return [ENTER]:Return Note "NONE" is displayed if the XM ... information in the front panel display when operating your iPod or XM Satellite Radio. Choices: -2, -1, OFF AUTO DIMMER (Auto dimmer) If no operation is not connected to -3 (based on the remote control. Choices: CONT., ONCE • Select CONT. SET MENU → MANUAL SETUP → DISPLAY MENU 4)DISPLAY MENU . ...
The signals input at the HDMI IN jacks are output at the HDMI OUT jack when this case, check the antenna connections (see page 5 in the Reference Guide). A)F.DISPLAY SET . p [ ]/[ ]:Up/Down [ ]/[ ]:Sel [ENTER]:Return [ENTER]:Return Note "NONE" is displayed if the XM ... information in the front panel display when operating your iPod or XM Satellite Radio. Choices: -2, -1, OFF AUTO DIMMER (Auto dimmer) If no operation is not connected to -3 (based on the remote control. Choices: CONT., ONCE • Select CONT. SET MENU → MANUAL SETUP → DISPLAY MENU 4)DISPLAY MENU . ...

Owner's Manual
Page 101
... ON VOLUME 4 Press ENTER. 1 Repeat steps 1 to YSP. ADVANCED OPERATION English 97 En Adjusting the system parameters 3 Press / so that "MONITOR CHECK" is displayed in "Using the system parameters" on the available video signal resolutions from the video monitor connected via HDMI (see page 87). TV/AV YSP ENTER 3 Press / so that "TURN ON VOLUME" is...
... ON VOLUME 4 Press ENTER. 1 Repeat steps 1 to YSP. ADVANCED OPERATION English 97 En Adjusting the system parameters 3 Press / so that "MONITOR CHECK" is displayed in "Using the system parameters" on the available video signal resolutions from the video monitor connected via HDMI (see page 87). TV/AV YSP ENTER 3 Press / so that "TURN ON VOLUME" is...
Owner's Manual
Page 113
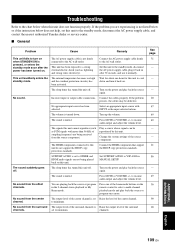
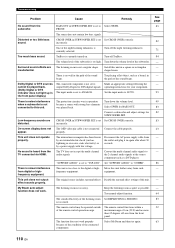
... the volume level. to YSP-4000 in the 2-channel stereo playback or My Beam mode. No sound from the source component. No sound. The output level of the source component. If the problem you are being played back on . Change the system settings of the center channel...nearest authorized Yamaha dealer or service center. ■ General Problem Cause Remedy This unit fails to turn it normally. Troubleshooting Troubleshooting Refer to the chart below does not help, set this unit. Connect the AC power supply cable firmly to OTHER and HDMI audio signals ...
... the volume level. to YSP-4000 in the 2-channel stereo playback or My Beam mode. No sound from the source component. No sound. The output level of the source component. If the problem you are being played back on . Change the system settings of the center channel...nearest authorized Yamaha dealer or service center. ■ General Problem Cause Remedy This unit fails to turn it normally. Troubleshooting Troubleshooting Refer to the chart below does not help, set this unit. Connect the AC power supply cable firmly to OTHER and HDMI audio signals ...
Owner's Manual
Page 114
...CROSS OVER correctly. equipment. The sound reflectivity of the sound beam. The function does not work . Troubleshooting Problem Cause Remedy No sound from the TV connected via HDMI. CROSS OVER in SUBWOOFER SET is no more than 45 degrees off-axis from digital or highfrequency equipment. Turn off...The listening room is set to "YSP-4000". Keep the listening room as quiet as lightning or excessive static electricity) or by an external electric shock (such as possible. The remote control may be played back. (Dolby Digital or DTS indicator does not light up...
...CROSS OVER correctly. equipment. The sound reflectivity of the sound beam. The function does not work . Troubleshooting Problem Cause Remedy No sound from the TV connected via HDMI. CROSS OVER in SUBWOOFER SET is no more than 45 degrees off-axis from digital or highfrequency equipment. Turn off...The listening room is set to "YSP-4000". Keep the listening room as quiet as lightning or excessive static electricity) or by an external electric shock (such as possible. The remote control may be played back. (Dolby Digital or DTS indicator does not light up...
Owner's Manual
Page 136
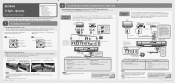
... Sold separately 1 HDMI cable (Displays the DVD digital video and the YSP-4000 menu screen on the TV) 3 Optical cable (Outputs TV digital audio sounds from this unit) 4 Digital audio pin cable (Outputs DVD digital audio sounds from the adjacent walls. You may not be done before connecting the optical cable...AC wall outlet until all connections are complete. 5 Supplied 1 Audio pin cable (Outputs TV analog audio sounds from this unit) 2 OSD video pin cable (Displays the DVD analog video and the YSP-4000 menu screen on the TV) 2 HDMI cable (Inputs DVD digital audio/video signals to the...
... Sold separately 1 HDMI cable (Displays the DVD digital video and the YSP-4000 menu screen on the TV) 3 Optical cable (Outputs TV digital audio sounds from this unit) 4 Digital audio pin cable (Outputs DVD digital audio sounds from the adjacent walls. You may not be done before connecting the optical cable...AC wall outlet until all connections are complete. 5 Supplied 1 Audio pin cable (Outputs TV analog audio sounds from this unit) 2 OSD video pin cable (Displays the DVD analog video and the YSP-4000 menu screen on the TV) 2 HDMI cable (Inputs DVD digital audio/video signals to the...


