Owner's Manual
Page 3
... filter/s. ii En Utilize power outlets that lets the sound come through loud and clear without affecting your sensitive hearing... in all installation instructions. Modifications not expressly approved by Yamaha may cause interference harmful to use of this product in...interference with this manual, meets FCC requirements. IMPORTANT: When connecting this product or the device that your FCC authorization to ... volume levels. IMPORTANT SAFETY INSTRUCTIONS FCC INFORMATION (for Class "B" digital devices. Failure to follow instructions could void your use the product...
... filter/s. ii En Utilize power outlets that lets the sound come through loud and clear without affecting your sensitive hearing... in all installation instructions. Modifications not expressly approved by Yamaha may cause interference harmful to use of this product in...interference with this manual, meets FCC requirements. IMPORTANT: When connecting this product or the device that your FCC authorization to ... volume levels. IMPORTANT SAFETY INSTRUCTIONS FCC INFORMATION (for Class "B" digital devices. Failure to follow instructions could void your use the product...

Owner's Manual
Page 4
...sound system in a well ventilated, cool, dry, clean place with Canadian ICES-003. WARNING THE POWER SUPPLY CABLE OF THIS UNIT MUST BE CONNECTED TO THE MAIN SOCKET OUTLET VIA A PROTECTIVE EARTHING CONNECTION...serial number of plug to liquid dripping or splashing. This Class B digital apparatus complies with at least 5 cm (2 in the mains lead ...on this unit, and/or personal injury. - Contact qualified Yamaha service personnel when any damage resulting from a wall outlet or ...No.: The serial number is hazardous if engaged in the home are complete. 8 Do not operate this unit. - Retain...
...sound system in a well ventilated, cool, dry, clean place with Canadian ICES-003. WARNING THE POWER SUPPLY CABLE OF THIS UNIT MUST BE CONNECTED TO THE MAIN SOCKET OUTLET VIA A PROTECTIVE EARTHING CONNECTION...serial number of plug to liquid dripping or splashing. This Class B digital apparatus complies with at least 5 cm (2 in the mains lead ...on this unit, and/or personal injury. - Contact qualified Yamaha service personnel when any damage resulting from a wall outlet or ...No.: The serial number is hazardous if engaged in the home are complete. 8 Do not operate this unit. - Retain...
Owner's Manual
Page 5
...16 Installing this unit 16 Connections 19 Before connecting components 20 Connections using HDMI cables 21 Connecting a TV 22 Connecting a DVD player/recorder 23 Connecting a digital satellite tuner or a cable TV tuner 24 Connecting a digital airwave tuner 25 Connecting a portable audio player 26 Connecting other components 97 Using the... preset tuning 50 Manual preset tuning 51 Selecting a preset station 52 Displaying the Radio Data System information (Europe model only 52 Enjoying surround sound 54 5 Beam 54 Stereo plus 3 Beam 55 3 Beam 55 My Surround 55 Enjoying 2-channel...
...16 Installing this unit 16 Connections 19 Before connecting components 20 Connections using HDMI cables 21 Connecting a TV 22 Connecting a DVD player/recorder 23 Connecting a digital satellite tuner or a cable TV tuner 24 Connecting a digital airwave tuner 25 Connecting a portable audio player 26 Connecting other components 97 Using the... preset tuning 50 Manual preset tuning 51 Selecting a preset station 52 Displaying the Radio Data System information (Europe model only 52 Enjoying surround sound 54 5 Beam 54 Stereo plus 3 Beam 55 3 Beam 55 My Surround 55 Enjoying 2-channel...
Owner's Manual
Page 7
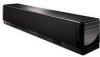
... the YDS-10, sold separately by Yamaha Electronics Corp. INTRODUCTION Features Features Digital Sound Projector™ The Digital Sound Projector technology allows one slim unit to control and steer multiple channels of sound to generate multi-channel surround sound, thus eliminates the need for satellite loudspeakers and cabling normally associated with conventional surround sound systems. This unit also employs the beam...
... the YDS-10, sold separately by Yamaha Electronics Corp. INTRODUCTION Features Features Digital Sound Projector™ The Digital Sound Projector technology allows one slim unit to control and steer multiple channels of sound to generate multi-channel surround sound, thus eliminates the need for satellite loudspeakers and cabling normally associated with conventional surround sound systems. This unit also employs the beam...
Owner's Manual
Page 9
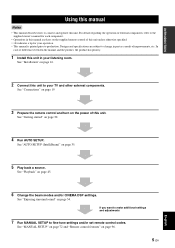
... 7 Run MANUAL SETUP to fine-tune settings and/or set remote control codes. See "Connections" on page 19. 3 Prepare the remote control and turn on page 96. 5 En English See "Enjoying surround sound" on page 45. 6 Change the beam modes and/or CINEMA DSP settings. In case...and the product, the product has priority. 1 Install this unit. INTRODUCTION Using this manual Using this manual Notes • This manual describes how to connect and operate this unit in this unit unless otherwise specified. • y indicates a tip for your operation. • This manual is printed prior...
... 7 Run MANUAL SETUP to fine-tune settings and/or set remote control codes. See "Connections" on page 19. 3 Prepare the remote control and turn on page 96. 5 En English See "Enjoying surround sound" on page 45. 6 Change the beam modes and/or CINEMA DSP settings. In case...and the product, the product has priority. 1 Install this unit. INTRODUCTION Using this manual Using this manual Notes • This manual describes how to connect and operate this unit in this unit unless otherwise specified. • y indicates a tip for your operation. • This manual is printed prior...
Owner's Manual
Page 10
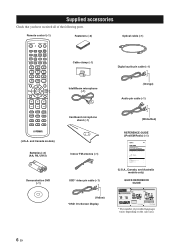
...iPod/XM Radio Overview This is a trademark of XM Satellite Radio Inc. Install this unit where there are for Yamaha YSP-3000 Digital Sound Projector. down and connect this unit to install this unit. y Hint • To enjoy better surround effects, place this unit on the... 5 Connecting XM Mini-Tuner Home Dock 5 Activating XM Satellite Radio ...6 Basic XM Satellite Radio operations ...6 Presetting the XM Satellite Radio channels 9 Displaying the XM Satellite Radio information 10 Troubleshooting ...11 (U.S.A., Canada, and Australia models only) QUICK REFERENCE GUIDE YSP-3000 QUICK ...
...iPod/XM Radio Overview This is a trademark of XM Satellite Radio Inc. Install this unit where there are for Yamaha YSP-3000 Digital Sound Projector. down and connect this unit to install this unit. y Hint • To enjoy better surround effects, place this unit on the... 5 Connecting XM Mini-Tuner Home Dock 5 Activating XM Satellite Radio ...6 Basic XM Satellite Radio operations ...6 Presetting the XM Satellite Radio channels 9 Displaying the XM Satellite Radio information 10 Troubleshooting ...11 (U.S.A., Canada, and Australia models only) QUICK REFERENCE GUIDE YSP-3000 QUICK ...
Owner's Manual
Page 11
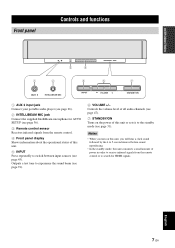
... of all audio channels (see page 47). 7 STANDBY/ON Turns on this unit, you will hear a click sound followed by the 4 to 5-second interval before sound reproducing. • In the standby mode, this unit consumes a small amount of power in order to receive infrared... and functions 3 4 1 2 5 6 7 AUX 3 INTELLIBEAM MIC INPUT VOLUME + STANDBY/ON 1 AUX 3 input jack Connect your portable audio player (see page 26). 2 INTELLIBEAM MIC jack Connect the supplied IntelliBeam microphone for AUTO SETUP (see page 36). 3 Remote control sensor Receives infrared signals from the remote control...
... of all audio channels (see page 47). 7 STANDBY/ON Turns on this unit, you will hear a click sound followed by the 4 to 5-second interval before sound reproducing. • In the standby mode, this unit consumes a small amount of power in order to receive infrared... and functions 3 4 1 2 5 6 7 AUX 3 INTELLIBEAM MIC INPUT VOLUME + STANDBY/ON 1 AUX 3 input jack Connect your portable audio player (see page 26). 2 INTELLIBEAM MIC jack Connect the supplied IntelliBeam microphone for AUTO SETUP (see page 36). 3 Remote control sensor Receives infrared signals from the remote control...
Owner's Manual
Page 12
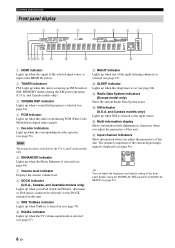
... the input source. C Radio Data System indicators (Europe model only) Show the current Radio Data System status. A NIGHT indicator Lights up... indicator (U.S.A. and Canada models only). 3 CINEMA DSP indicator Lights up when a sound field program is selected (see page 64). 4 PCM indicator Lights up when this... TruBass is turned on this unit is reproducing PCM (Pulse Code Modulation) digital audio signals. 5 Decoder indicators Light up when the corresponding decoder operates ... your iPod (Click and Wheel), iPod nano, or iPod mini is connected to this unit via the DOCK terminal on (see page 79). 0...
... the input source. C Radio Data System indicators (Europe model only) Show the current Radio Data System status. A NIGHT indicator Lights up... indicator (U.S.A. and Canada models only). 3 CINEMA DSP indicator Lights up when a sound field program is selected (see page 64). 4 PCM indicator Lights up when this... TruBass is turned on this unit is reproducing PCM (Pulse Code Modulation) digital audio signals. 5 Decoder indicators Light up when the corresponding decoder operates ... your iPod (Click and Wheel), iPod nano, or iPod mini is connected to this unit via the DOCK terminal on (see page 79). 0...
Owner's Manual
Page 13
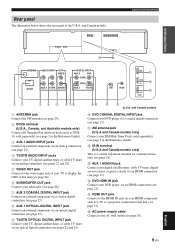
... AUX 1 TV/STB SUBWOOFER DIGITAL INPUT AUX 2 DVD COAXIAL OPTICAL AUX 1 TV/STB XM IR IN AUX 1 C DVD D IN E OUT HDMI 12 3 4 5 6 78 1 ANTENNA jack Connect the FM antenna (see page 29). 2 DOCK terminal (U.S.A., Canada, and Australia models only) Connect the Yamaha iPod universal dock (such as a TV or a projector connected to display the OSD of...
... AUX 1 TV/STB SUBWOOFER DIGITAL INPUT AUX 2 DVD COAXIAL OPTICAL AUX 1 TV/STB XM IR IN AUX 1 C DVD D IN E OUT HDMI 12 3 4 5 6 78 1 ANTENNA jack Connect the FM antenna (see page 29). 2 DOCK terminal (U.S.A., Canada, and Australia models only) Connect the Yamaha iPod universal dock (such as a TV or a projector connected to display the OSD of...

Owner's Manual
Page 20
Especially when you make a connection first before installing this unit is installed in ) of the wall when it is out of the reach of this unit y • You can enjoy surround sound by this unit may not be done before installation (see page 21). Side view 5 cm (2 in the exact ...8226; When using a cathode-ray tube (CRT) TV, do not recommend putting this unit). • You can be achieved. We recommend that you make a connection over HDMI, we recommend moving this unit, in the corner. Please install this unit using a metal wall bracket, a rack or a stand. Be sure to ...
Especially when you make a connection first before installing this unit is installed in ) of the wall when it is out of the reach of this unit y • You can enjoy surround sound by this unit may not be done before installation (see page 21). Side view 5 cm (2 in the exact ...8226; When using a cathode-ray tube (CRT) TV, do not recommend putting this unit). • You can be achieved. We recommend that you make a connection over HDMI, we recommend moving this unit, in the corner. Please install this unit using a metal wall bracket, a rack or a stand. Be sure to ...
Owner's Manual
Page 23
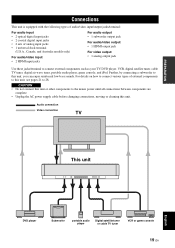
..., see pages 21 to 28. Further, by connecting a subwoofer to this unit, you can enjoy reinforced low-bass sounds. Audio connection Video connection TV This unit English DVD player Subwoofer portable audio player Digital satellite tuner or cable TV tuner VCR or game console 19 En PREPARATION Connections Connections This unit is equipped with the following types...
..., see pages 21 to 28. Further, by connecting a subwoofer to this unit, you can enjoy reinforced low-bass sounds. Audio connection Video connection TV This unit English DVD player Subwoofer portable audio player Digital satellite tuner or cable TV tuner VCR or game console 19 En PREPARATION Connections Connections This unit is equipped with the following types...
Owner's Manual
Page 24
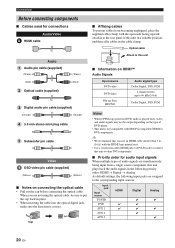
...96 kHz/24 bit) Dolby Digital, DTS, PCM Notes • When CPPM copy-protected DVD audio is played back, video and audio signals may not be output depending on connecting the optical cable • Pull out the cap before connecting the optical cable. Optical cable ...; Use a conversion cable (HDMI jack ↔ DVI-D jack) to connect this unit to other DVI components. ■ Priority order for connections Audio/Video A HDMI cable Audio Audio pin cable (supplied) (White) (Red) Optical cable (supplied) (White) (Red) Digital audio pin cable (supplied) (Orange) (Orange) 3.5 mm stereo mini ...
...96 kHz/24 bit) Dolby Digital, DTS, PCM Notes • When CPPM copy-protected DVD audio is played back, video and audio signals may not be output depending on connecting the optical cable • Pull out the cap before connecting the optical cable. Optical cable ...; Use a conversion cable (HDMI jack ↔ DVI-D jack) to connect this unit to other DVI components. ■ Priority order for connections Audio/Video A HDMI cable Audio Audio pin cable (supplied) (White) (Red) Optical cable (supplied) (White) (Red) Digital audio pin cable (supplied) (Orange) (Orange) 3.5 mm stereo mini ...
Owner's Manual
Page 25
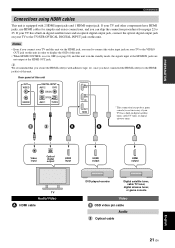
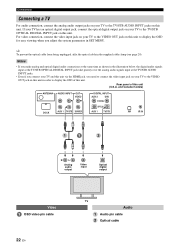
...HDMI output HDMI output TV Audio/Video A HDMI cable DVD player/recorder Digital satellite tuner, cable TV tuner, digital airwave tuner, or game console Video OSD video pin cable Audio Optical cable 21 En English PREPARATION Connections Connections using HDMI cables This unit is equipped with adhesive tape, etc. ... unit. • When HDMI CONTROL is set to the TV/STB OPTICAL DIGITAL INPUT jack on this unit is in digital satellite tuner, cable TV tuner, or digital airwave tuner. Notes • Even if you connect your TV and this unit via the HDMI jack, you secure the HDMI cable...
...HDMI output HDMI output TV Audio/Video A HDMI cable DVD player/recorder Digital satellite tuner, cable TV tuner, digital airwave tuner, or game console Video OSD video pin cable Audio Optical cable 21 En English PREPARATION Connections Connections using HDMI cables This unit is equipped with adhesive tape, etc. ... unit. • When HDMI CONTROL is set to the TV/STB OPTICAL DIGITAL INPUT jack on this unit is in digital satellite tuner, cable TV tuner, or digital airwave tuner. Notes • Even if you connect your TV and this unit via the HDMI jack, you secure the HDMI cable...
Owner's Manual
Page 26
... signals input at the TV/STB OPTICAL DIGITAL INPUT jack take priority over the analog audio signals input at the TV/STB AUDIO INPUT jacks. • Even if you connect your TV and this unit via the HDMI jack, you adjust the system parameters in SET MENU. Rear panel of this unit. y To... video input jack on your TV to the VIDEO OUT jack on this unit in order to the TV/STB OPTICAL DIGITAL INPUT jack on this unit. For video connection, connect the video input jack on your TV to the VIDEO OUT jack on this unit to the TV/STB AUDIO INPUT jacks...
... signals input at the TV/STB OPTICAL DIGITAL INPUT jack take priority over the analog audio signals input at the TV/STB AUDIO INPUT jacks. • Even if you connect your TV and this unit via the HDMI jack, you adjust the system parameters in SET MENU. Rear panel of this unit. y To... video input jack on your TV to the VIDEO OUT jack on this unit in order to the TV/STB OPTICAL DIGITAL INPUT jack on this unit. For video connection, connect the video input jack on your TV to the VIDEO OUT jack on this unit to the TV/STB AUDIO INPUT jacks...
Owner's Manual
Page 27
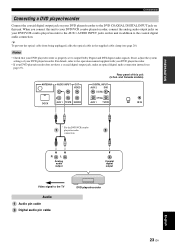
... your DVD player/recorder is properly set to output Dolby Digital and DTS digital audio signals. If not, adjust the system settings of this unit. Rear panel of your DVD player/recorder. Notes • Check that your DVD player/recorder to the coaxial digital audio connection. and Canada models) ANTENNA AUDIO INPUT OUT VIDEO DOCK...
... your DVD player/recorder is properly set to output Dolby Digital and DTS digital audio signals. If not, adjust the system settings of this unit. Rear panel of your DVD player/recorder. Notes • Check that your DVD player/recorder to the coaxial digital audio connection. and Canada models) ANTENNA AUDIO INPUT OUT VIDEO DOCK...
Owner's Manual
Page 28
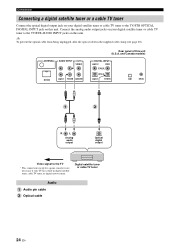
...COAXIAL OPTICAL AUX 1 TV/STB XM IR IN R L Analog audio output Optical digital output Video signal to the TV/STB AUDIO INPUT jacks on this unit. Connections Connecting a digital satellite tuner or a cable TV tuner Connect the optical digital output jack on your TV has a built-in the supplied cable clamp (see... 1 TV/STB SUBWOOFER Rear panel of this unit. Connect the analog audio output jacks on your digital satellite tuner or cable TV tuner to the TV * This connection (except for a game console) is not necessary if your digital satellite tuner or cable TV tuner to the TV/STB...
...COAXIAL OPTICAL AUX 1 TV/STB XM IR IN R L Analog audio output Optical digital output Video signal to the TV/STB AUDIO INPUT jacks on this unit. Connections Connecting a digital satellite tuner or a cable TV tuner Connect the optical digital output jack on your TV has a built-in the supplied cable clamp (see... 1 TV/STB SUBWOOFER Rear panel of this unit. Connect the analog audio output jacks on your digital satellite tuner or cable TV tuner to the TV * This connection (except for a game console) is not necessary if your digital satellite tuner or cable TV tuner to the TV/STB...

Owner's Manual
Page 29
... AUDIO INPUT OUT VIDEO DOCK AUX 1 TV/STB SUBWOOFER Rear panel of this unit in digital satellite tuner, cable TV tuner, or digital airwave tuner. Optical digital output Video signal to the TV * This connection (except for a game console) is not necessary if your TV has a built-in addition... to the TV/STB OPTICAL DIGITAL INPUT jack on your digital airwave tuner to the analog audio connection. By doing so, you can enjoy both analog and digital broadcasts. y To prevent the optical cable from being unplugged, affix the optical cable...
... AUDIO INPUT OUT VIDEO DOCK AUX 1 TV/STB SUBWOOFER Rear panel of this unit in digital satellite tuner, cable TV tuner, or digital airwave tuner. Optical digital output Video signal to the TV * This connection (except for a game console) is not necessary if your TV has a built-in addition... to the TV/STB OPTICAL DIGITAL INPUT jack on your digital airwave tuner to the analog audio connection. By doing so, you can enjoy both analog and digital broadcasts. y To prevent the optical cable from being unplugged, affix the optical cable...

Owner's Manual
Page 30
Connections Connecting a portable audio player Connect the analog audio output jack on your portable audio player to the AUX 3 input jack on the front panel of this unit. Front panel of this unit AUX 3 Analog audio output Portable audio player Audio 3.5 mm stereo mini plug cable 26 En
Connections Connecting a portable audio player Connect the analog audio output jack on your portable audio player to the AUX 3 input jack on the front panel of this unit. Front panel of this unit AUX 3 Analog audio output Portable audio player Audio 3.5 mm stereo mini plug cable 26 En
Owner's Manual
Page 31
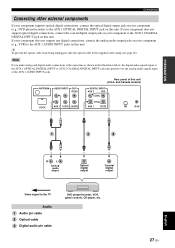
...INPUT OUT VIDEO DOCK AUX 1 TV/STB SUBWOOFER Rear panel of this unit. Note If you make analog and digital audio connections at the AUX 1 AUDIO INPUT jacks. y To prevent the optical cable from being unplugged, affix the optical cable ...20). Connections Connecting other external components If your component supports optical digital connections, connect the optical digital output jack on your component (e.g., DVD player/recorder) to the AUX 1 OPTICAL DIGITAL INPUT jack on this unit. If your component does not support optical digital connections, connect the coaxial digital output jack...
...INPUT OUT VIDEO DOCK AUX 1 TV/STB SUBWOOFER Rear panel of this unit. Note If you make analog and digital audio connections at the AUX 1 AUDIO INPUT jacks. y To prevent the optical cable from being unplugged, affix the optical cable ...20). Connections Connecting other external components If your component supports optical digital connections, connect the optical digital output jack on your component (e.g., DVD player/recorder) to the AUX 1 OPTICAL DIGITAL INPUT jack on this unit. If your component does not support optical digital connections, connect the coaxial digital output jack...
Owner's Manual
Page 32
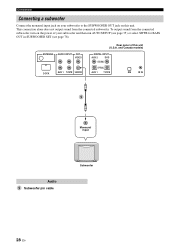
...DOCK AUX 1 TV/STB SUBWOOFER Rear panel of your subwoofer to the SUBWOOFER OUT jack on this unit (U.S.A. To output sound from the connected subwoofer. and Canada models) DIGITAL INPUT AUX 2 DVD COAXIAL OPTICAL AUX 1 TV/STB XM IR IN 5 Monaural input Audio 5 Subwoofer pin cable ...Subwoofer 28 En Connections Connecting a subwoofer Connect the monaural input jack on your subwoofer and then run AUTO SETUP (see page 35) or select SWFR for...
...DOCK AUX 1 TV/STB SUBWOOFER Rear panel of your subwoofer to the SUBWOOFER OUT jack on this unit (U.S.A. To output sound from the connected subwoofer. and Canada models) DIGITAL INPUT AUX 2 DVD COAXIAL OPTICAL AUX 1 TV/STB XM IR IN 5 Monaural input Audio 5 Subwoofer pin cable ...Subwoofer 28 En Connections Connecting a subwoofer Connect the monaural input jack on your subwoofer and then run AUTO SETUP (see page 35) or select SWFR for...


