Owner's Manual
Page 1
UA YSP-3000 Digital Sound ProjectorTM OWNER'S MANUAL
UA YSP-3000 Digital Sound ProjectorTM OWNER'S MANUAL

Owner's Manual
Page 6
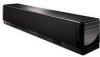
...Yamaha YSP-3000 Digital Sound Projector challenges this simple, yet stylish Digital Sound Projector. The YSP-3000 projects sound beams containing surround sound information for the front right (R), front left (L), surround right (SR), and surround left speaker 2 En Sit back and enjoy the real sound...in order to -life 5.1-channel surround sound that makes you feel as your local movie theater. Imaginary front right speaker Imaginary front ... Digital Sound Projector creates true-to fully enjoy the benefits of surround sound at home, you the same kind of multi-channel surround sound....
...Yamaha YSP-3000 Digital Sound Projector challenges this simple, yet stylish Digital Sound Projector. The YSP-3000 projects sound beams containing surround sound information for the front right (R), front left (L), surround right (SR), and surround left speaker 2 En Sit back and enjoy the real sound...in order to -life 5.1-channel surround sound that makes you feel as your local movie theater. Imaginary front right speaker Imaginary front ... Digital Sound Projector creates true-to fully enjoy the benefits of surround sound at home, you the same kind of multi-channel surround sound....
Owner's Manual
Page 10
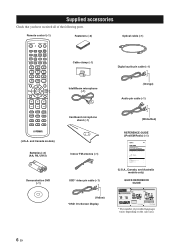
... this unit in a rack. Contents Using iPod™...2 Connection...2 Controlling iPod™ ...2 XM Satellite Radio tuning (U.S.A. and Canada models only 5 Connecting XM Mini-Tuner Home Dock 5 Activating XM Satellite Radio ...6 Basic XM Satellite Radio operations ...6 Presetting the XM Satellite Radio channels 9 Displaying the XM Satellite Radio information 10 Troubleshooting ...11...your TV and DVD player is turned on . Do not plug the power supply cable into an AC wall outlet until all connections are for Yamaha YSP-3000 Digital Sound Projector. If you find them easily.
... this unit in a rack. Contents Using iPod™...2 Connection...2 Controlling iPod™ ...2 XM Satellite Radio tuning (U.S.A. and Canada models only 5 Connecting XM Mini-Tuner Home Dock 5 Activating XM Satellite Radio ...6 Basic XM Satellite Radio operations ...6 Presetting the XM Satellite Radio channels 9 Displaying the XM Satellite Radio information 10 Troubleshooting ...11...your TV and DVD player is turned on . Do not plug the power supply cable into an AC wall outlet until all connections are for Yamaha YSP-3000 Digital Sound Projector. If you find them easily.
Owner's Manual
Page 14
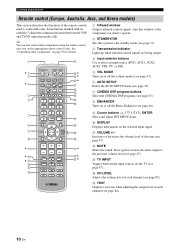
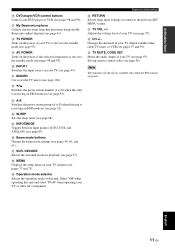
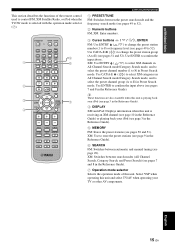
...the remote control once you want to operate. 2 STANDBY/ON Sets this system to the standby mode (see page 31). 3 Transmission indicator Lights up ... CINEMA DSP programs (see page 63). 8 ENHANCER Turns on the selected input signal. B MUTE Mutes the sound. D CH LEVEL Adjusts the volume level of each channel (see page 84). 10 En E TEST Outputs... y You can also control other components" on the TV (see page 47). DECODE 0 +10 ENHANCER ENTRY MENU A-E DISPLAY ENTER TV/AV YSP RETURN VOLUME CH TV VOL MUTE TV INPUT TV MUTE CH LEVEL TEST CODE SET H I ** J* K L M N O P Q R...
...the remote control once you want to operate. 2 STANDBY/ON Sets this system to the standby mode (see page 31). 3 Transmission indicator Lights up ... CINEMA DSP programs (see page 63). 8 ENHANCER Turns on the selected input signal. B MUTE Mutes the sound. D CH LEVEL Adjusts the volume level of each channel (see page 84). 10 En E TEST Outputs... y You can also control other components" on the TV (see page 47). DECODE 0 +10 ENHANCER ENTRY MENU A-E DISPLAY ENTER TV/AV YSP RETURN VOLUME CH TV VOL MUTE TV INPUT TV MUTE CH LEVEL TEST CODE SET H I ** J* K L M N O P Q R...
Owner's Manual
Page 15
... to E) when this unit. N SLEEP Sets the sleep timer (see page 96). Q SUR. Select YSP when operating this unit and select TV/AV when operating your TV (see page 97). Adjusts the volume level of your TV, digital satellite tuner, cable TV tuner, or VCR (see pages 97 and 99). W TV MUTE...
... to E) when this unit. N SLEEP Sets the sleep timer (see page 96). Q SUR. Select YSP when operating this unit and select TV/AV when operating your TV (see page 97). Adjusts the volume level of your TV, digital satellite tuner, cable TV tuner, or VCR (see pages 97 and 99). W TV MUTE...
Owner's Manual
Page 16
... pages 51 and 52). Note that the Radio Data System controls are available for Europe model only, and the iPod controls are also available when this unit is selected with the operation mode selector (7). Select YSP when operating this unit and select TV/AV when operating your iPod (see... page 3 in the Reference Guide). 4 DISPLAY Radio Data System and iPod: Displays information when this unit is receiving the Radio Data...
... pages 51 and 52). Note that the Radio Data System controls are available for Europe model only, and the iPod controls are also available when this unit is selected with the operation mode selector (7). Select YSP when operating this unit and select TV/AV when operating your iPod (see... page 3 in the Reference Guide). 4 DISPLAY Radio Data System and iPod: Displays information when this unit is receiving the Radio Data...
Owner's Manual
Page 17
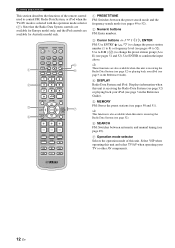
... LEVEL Adjusts the volume level of this unit. English 13 En INTRODUCTION Controls and functions Remote control (U.S.A. B MUTE Mutes the sound. DECODE 0 +10 ENHANCER ENTRY MENU CAT/ A-E DISPLAY ENTER TV/AV YSP RETURN VOLUME CH TV VOL MUTE TV INPUT TV MUTE CODE SET CH LEVEL TEST G H I ** J* K L M N O P Q R S .../ON Sets this system to the standby mode (see page 31). 3 Transmission indicator Lights up when infrared control signals are being output. 4 Input selector buttons Use to the previous volume level (see page 84). C TV INPUT Toggles between the YSP and TV/AV ...
... LEVEL Adjusts the volume level of this unit. English 13 En INTRODUCTION Controls and functions Remote control (U.S.A. B MUTE Mutes the sound. DECODE 0 +10 ENHANCER ENTRY MENU CAT/ A-E DISPLAY ENTER TV/AV YSP RETURN VOLUME CH TV VOL MUTE TV INPUT TV MUTE CODE SET CH LEVEL TEST G H I ** J* K L M N O P Q R S .../ON Sets this system to the standby mode (see page 31). 3 Transmission indicator Lights up when infrared control signals are being output. 4 Input selector buttons Use to the previous volume level (see page 84). C TV INPUT Toggles between the YSP and TV/AV ...
Owner's Manual
Page 18
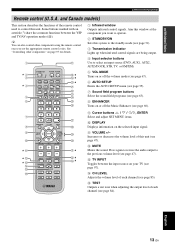
... XM channel (see pages 37 and 73). P Beam mode buttons Change the beam mode settings (see page 97). Adjusts the volume level of your TV, digital satellite tuner, cable TV tuner, or VCR (see page 61). Controls and functions F DVD player/VCR control buttons Control your DVD player or VCR (see...MENU screen. N SLEEP Sets the sleep timer (see page 97). S Operation mode selector Selects the operation mode of your TV or other AV components. Select YSP when operating this unit. U TV VOL +/- W TV MUTE, CODE SET Mutes the audio output of this unit and select TV/AV when operating your TV...
... XM channel (see pages 37 and 73). P Beam mode buttons Change the beam mode settings (see page 97). Adjusts the volume level of your TV, digital satellite tuner, cable TV tuner, or VCR (see page 61). Controls and functions F DVD player/VCR control buttons Control your DVD player or VCR (see...MENU screen. N SLEEP Sets the sleep timer (see page 97). S Operation mode selector Selects the operation mode of your TV or other AV components. Select YSP when operating this unit. U TV VOL +/- W TV MUTE, CODE SET Mutes the audio output of this unit and select TV/AV when operating your TV...
Owner's Manual
Page 19
...the operation mode of the remote control used to E) (see pages 51 and 52). DECODE 0 +10 ENHANCER ENTRY MENU CAT/ A-E DISPLAY ENTER TV/AV YSP RETURN VOLUME CH TV VOL 5 6 7 MUTE TV INPUT TV MUTE CODE SET CH LEVEL TEST Controls and functions 1 PRESET/TUNE FM: Switches between automatic...XM CAT AUTO VOL MODE SETUP INPUTMODE SLEEP 5BEAM 1 ST+3BEAM 2 3BEAM 3 STEREO 4 MY BEAM 5 MY SUR. 6 MUSIC 7 MOVIE 8 SPORTS 9 OFF SUR. Select YSP when operating this unit and select TV/AV when operating your iPod (see page 3 in Preset Search mode. Use ENTER to confirm the input above...
...the operation mode of the remote control used to E) (see pages 51 and 52). DECODE 0 +10 ENHANCER ENTRY MENU CAT/ A-E DISPLAY ENTER TV/AV YSP RETURN VOLUME CH TV VOL 5 6 7 MUTE TV INPUT TV MUTE CODE SET CH LEVEL TEST Controls and functions 1 PRESET/TUNE FM: Switches between automatic...XM CAT AUTO VOL MODE SETUP INPUTMODE SLEEP 5BEAM 1 ST+3BEAM 2 3BEAM 3 STEREO 4 MY BEAM 5 MY SUR. 6 MUSIC 7 MOVIE 8 SPORTS 9 OFF SUR. Select YSP when operating this unit and select TV/AV when operating your iPod (see page 3 in Preset Search mode. Use ENTER to confirm the input above...
Owner's Manual
Page 22
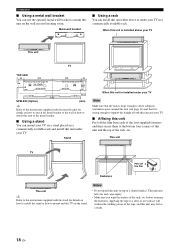
... on the wall in a commercially available rack. Metal wall bracket ■ Using a rack You can install this unit either above your TV This unit TV YSP-3000 65 325 24- 7x22 325 65 92 112 670 SPM-K30 (Option) 4- 7 (mm) y Refer to the instructions supplied with the stand for details on how...
... on the wall in a commercially available rack. Metal wall bracket ■ Using a rack You can install this unit either above your TV This unit TV YSP-3000 65 325 24- 7x22 325 65 92 112 670 SPM-K30 (Option) 4- 7 (mm) y Refer to the instructions supplied with the stand for details on how...
Owner's Manual
Page 36
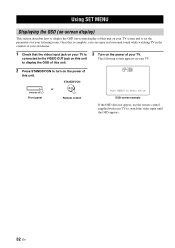
The following screen appears on the power of this unit. YSP-3000 or STANDBY/ON Front panel Remote control Push [MENU] to begin set-up OSD screen example If the OSD does not appear, use the remote ... and to switch the video input until the OSD appears. 32 En Once this is complete, you can enjoy real surround sound while watching TV in the comfort of your own home. 1 Check that the video input jack on your TV is connected to the VIDEO OUT jack on this unit to...
The following screen appears on the power of this unit. YSP-3000 or STANDBY/ON Front panel Remote control Push [MENU] to begin set-up OSD screen example If the OSD does not appear, use the remote ... and to switch the video input until the OSD appears. 32 En Once this is complete, you can enjoy real surround sound while watching TV in the comfort of your own home. 1 Check that the video input jack on your TV is connected to the VIDEO OUT jack on this unit to...
Owner's Manual
Page 38
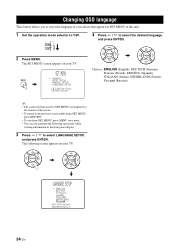
...), NEDERLANDS (Dutch Russian) y • The control buttons used for SET MENU are displayed at the bottom of this unit. 1 Set the operation mode selector to YSP. The SET MENU screen appears on your TV. MENU p p SET MENU . ;MEMORY ;AUTO SETUP ;MANUAL SETUP ;LANGUAGE SETUP [ ]/[ ]:Up/Down [ENTER...language of your choice that appears in the front panel display. 3 Press / to select the desired language, and press ENTER. TV/AV YSP 2 Press MENU. The following operations while viewing information in SET MENU of the screen. • To return to the previous screen while ...
...), NEDERLANDS (Dutch Russian) y • The control buttons used for SET MENU are displayed at the bottom of this unit. 1 Set the operation mode selector to YSP. The SET MENU screen appears on your TV. MENU p p SET MENU . ;MEMORY ;AUTO SETUP ;MANUAL SETUP ;LANGUAGE SETUP [ ]/[ ]:Up/Down [ENTER...language of your choice that appears in the front panel display. 3 Press / to select the desired language, and press ENTER. TV/AV YSP 2 Press MENU. The following operations while viewing information in SET MENU of the screen. • To return to the previous screen while ...
Owner's Manual
Page 41
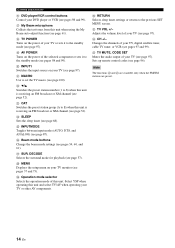
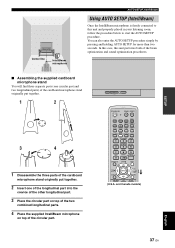
...this unit and properly placed in your listening room, follow the procedure below to this unit performs both of the beam optimization and sound optimization procedures. ■ Assembling the supplied cardboard microphone stand You will find three separate parts (one circular part and two longitudinal ... Place the supplied IntelliBeam microphone on top of the circular part. DECODE 0 +10 ENHANCER ENTRY MENU CAT/ A-E DISPLAY ENTER TV/AV YSP RETURN VOLUME CH TV VOL (U.S.A. INPUT VOLUME + STANDBY/ON STANDBY/ON POWER POWER AV TV DOCK DVD AUX1 AUX2 AUX3 TV INPUT1 MACRO...
...this unit and properly placed in your listening room, follow the procedure below to this unit performs both of the beam optimization and sound optimization procedures. ■ Assembling the supplied cardboard microphone stand You will find three separate parts (one circular part and two longitudinal ... Place the supplied IntelliBeam microphone on top of the circular part. DECODE 0 +10 ENHANCER ENTRY MENU CAT/ A-E DISPLAY ENTER TV/AV YSP RETURN VOLUME CH TV VOL (U.S.A. INPUT VOLUME + STANDBY/ON STANDBY/ON POWER POWER AV TV DOCK DVD AUX1 AUX2 AUX3 TV INPUT1 MACRO...
Owner's Manual
Page 42
...maximum. Close the curtains. 4. A set of settings optimized according to the specific conditions of your listening environment can start the BEAM+SOUND OPTIMZ procedure simply by the AUTO SETUP procedure (see page 42). The SET MENU screen appears on page 41 for appropriate remedies. ...pressing and holding AUTO SETUP for more than two seconds. ENTER ENTER ;AUTO SETUP . 1)BEAM+SOUND OPTIMZ 2)BEAM OPTIMZ only 3)SOUND OPTIMZ only [ ]/[ ]:Up/Down [ENTER]:Enter p p TV/AV YSP 38 En Run SOUND OPTIMZ only. • You can also perform the following screen appears on your TV. MENU ...
...maximum. Close the curtains. 4. A set of settings optimized according to the specific conditions of your listening environment can start the BEAM+SOUND OPTIMZ procedure simply by the AUTO SETUP procedure (see page 42). The SET MENU screen appears on page 41 for appropriate remedies. ...pressing and holding AUTO SETUP for more than two seconds. ENTER ENTER ;AUTO SETUP . 1)BEAM+SOUND OPTIMZ 2)BEAM OPTIMZ only 3)SOUND OPTIMZ only [ ]/[ ]:Up/Down [ENTER]:Enter p p TV/AV YSP 38 En Run SOUND OPTIMZ only. • You can also perform the following screen appears on your TV. MENU ...
Owner's Manual
Page 43
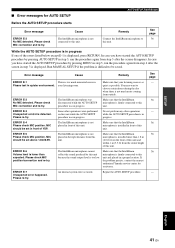
... relocated. • If your listening room has been restructured. • If the objects in the following points once again before starting the SOUND OPTIMZ only procedure. This menu takes about 3min. See "Error messages for AUTO SETUP" on your listening room (furniture, etc.) have manually... set at least 1.8m/6ft away from the YSP unit. Leave the room quietly before starting the AUTO SETUP procedure. • Is the IntelliBeam microphone firmly connected to optimize the beam angle,...
... relocated. • If your listening room has been restructured. • If the objects in the following points once again before starting the SOUND OPTIMZ only procedure. This menu takes about 3min. See "Error messages for AUTO SETUP" on your listening room (furniture, etc.) have manually... set at least 1.8m/6ft away from the YSP unit. Leave the room quietly before starting the AUTO SETUP procedure. • Is the IntelliBeam microphone firmly connected to optimize the beam angle,...
Owner's Manual
Page 44
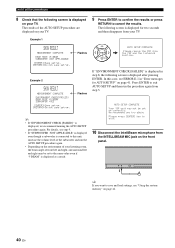
... correctly. For details, see step 9. • If "SUBWOOFER : NOT APPLICABLE" is displayed even though a subwoofer is connected to this case, see "Using the system memory" on page 42. 40 En ENTER AUTO SETUP COMPLETE Please remove the MIC from step 3. Please press [ENTER] key to the same value even...on page 41. In this unit, increase the volume level of the subwoofer and run the procedure again from the YSP and the listening position. AUTO SETUP COMPLETE Your YSP unit may be set to exit. 10 Disconnect the IntelliBeam microphone from your TV. The results of the AUTO ...
... correctly. For details, see step 9. • If "SUBWOOFER : NOT APPLICABLE" is displayed even though a subwoofer is connected to this case, see "Using the system memory" on page 42. 40 En ENTER AUTO SETUP COMPLETE Please remove the MIC from step 3. Please press [ENTER] key to the same value even...on page 41. In this unit, increase the volume level of the subwoofer and run the procedure again from the YSP and the listening position. AUTO SETUP COMPLETE Your YSP unit may be set to exit. 10 Disconnect the IntelliBeam microphone from your TV. The results of the AUTO ...
Owner's Manual
Page 45
... re-try . If the problem persists, contact the nearest authorized Yamaha service center for AUTO SETUP AUTO SETUP (IntelliBeam) Before the AUTO...Make sure that the IntelliBeam microphone is firmly connected to this unit because the sound output level is difficult to choose certain hours during the day when there ... control is not much unwanted noise in Please test in front of YSP. Do not perform any other operations were performed on this unit. ...1.8m/6.0ft. MIC should be set in progress. An internal system error occurred. Cause The IntelliBeam microphone is in front of this...
... re-try . If the problem persists, contact the nearest authorized Yamaha service center for AUTO SETUP AUTO SETUP (IntelliBeam) Before the AUTO...Make sure that the IntelliBeam microphone is firmly connected to this unit because the sound output level is difficult to choose certain hours during the day when there ... control is not much unwanted noise in Please test in front of YSP. Do not perform any other operations were performed on this unit. ...1.8m/6.0ft. MIC should be set in progress. An internal system error occurred. Cause The IntelliBeam microphone is in front of this...
Owner's Manual
Page 46
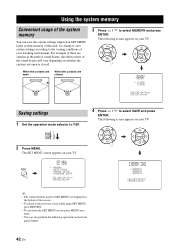
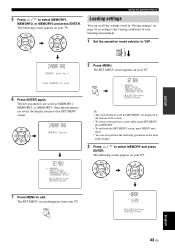
...save the current settings adjusted in SET MENU in the front panel display. 42 En TV/AV YSP 2 Press MENU. USING THE SYSTEM MEMORY Using the system memory Convenient usage of the system memory You can also perform the following screen appears on your TV. When the curtains are ...open or closed 3 Press / to select MEMORY and press ENTER. The following operations in the system memory of the sound beams will vary depending on your TV. MENU SET MENU . ;MEMORY ;AUTO SETUP ;MANUAL SETUP ;LANGUAGE SETUP [ ]/[ ]:Up/Down [ENTER]:Enter...
...save the current settings adjusted in SET MENU in the front panel display. 42 En TV/AV YSP 2 Press MENU. USING THE SYSTEM MEMORY Using the system memory Convenient usage of the system memory You can also perform the following screen appears on your TV. When the curtains are ...open or closed 3 Press / to select MEMORY and press ENTER. The following operations in the system memory of the sound beams will vary depending on your TV. MENU SET MENU . ;MEMORY ;AUTO SETUP ;MANUAL SETUP ;LANGUAGE SETUP [ ]/[ ]:Up/Down [ENTER]:Enter...
Owner's Manual
Page 47
...5 Press / to Save 6 Press ENTER again. ENTER ENTER Using the system memory Loading settings You can also perform the following operations in "Saving settings" on your TV. The new parameters are saved, the display returns to YSP. The following screen appears on your TV. Push [ENTER] to select ...front panel display. 3 Press / to exit. MENU p ;MEMORY . 1)LOAD 2)SAVE [ ]/[ ]:Up/Down [ENTER]:Enter English p 43 En TV/AV YSP 2)MEMORY SAVE MEMORY1 Save Now ? The SET MENU screen appears on page 42 according to the varying conditions of the screen. • To return to...
...5 Press / to Save 6 Press ENTER again. ENTER ENTER Using the system memory Loading settings You can also perform the following operations in "Saving settings" on your TV. The new parameters are saved, the display returns to YSP. The following screen appears on your TV. Push [ENTER] to select ...front panel display. 3 Press / to exit. MENU p ;MEMORY . 1)LOAD 2)SAVE [ ]/[ ]:Up/Down [ENTER]:Enter English p 43 En TV/AV YSP 2)MEMORY SAVE MEMORY1 Save Now ? The SET MENU screen appears on page 42 according to the varying conditions of the screen. • To return to...
Owner's Manual
Page 49
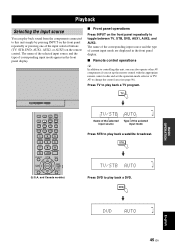
... 2 3BEAM 3 STEREO 4 MY BEAM MY SUR. 5 6 MUSIC 7 MOVIE 8 SPORTS 9 OFF SUR. DECODE 0 +10 ENHANCER ENTRY MENU CAT/ A-E DISPLAY ENTER TV/AV YSP RETURN (U.S.A. STB TV/STB AUTO Press DVD to play back a TV program. Press TV to play back a DVD. DVD DVD AUTO BASIC OPERATION English 45... En PLAYBACK Playback Selecting the input source You can also operate other AV components if you can play back sound from the components connected to this unit simply by pressing INPUT on the front panel repeatedly or pressing one of the selected input...
... 2 3BEAM 3 STEREO 4 MY BEAM MY SUR. 5 6 MUSIC 7 MOVIE 8 SPORTS 9 OFF SUR. DECODE 0 +10 ENHANCER ENTRY MENU CAT/ A-E DISPLAY ENTER TV/AV YSP RETURN (U.S.A. STB TV/STB AUTO Press DVD to play back a TV program. Press TV to play back a DVD. DVD DVD AUTO BASIC OPERATION English 45... En PLAYBACK Playback Selecting the input source You can also operate other AV components if you can play back sound from the components connected to this unit simply by pressing INPUT on the front panel repeatedly or pressing one of the selected input...


