
Owner's Manual
Page 5
...digital airwave tuner 20 Connecting other external components 21 Connecting a subwoofer 22 Affixing the optical cable 23 Connecting the power supply cable 23 About the RS-232C/REMOTE IN/ IR-OUT terminals 23 SETUP GETTING STARTED 24 Installing batteries in the remote control 24 Operation range of the remote control 24 Using the remote control... 37 BASIC OPERATION PLAYBACK 39 Selecting the input source 39 Playing back sources 40 Adjusting the volume 40 Muting the sound 41 BEAM MODE 42 5 beam mode 43 Stereo plus 3 beam mode 43 3 beam mode 44 Stereo mode 44 Target ...
...digital airwave tuner 20 Connecting other external components 21 Connecting a subwoofer 22 Affixing the optical cable 23 Connecting the power supply cable 23 About the RS-232C/REMOTE IN/ IR-OUT terminals 23 SETUP GETTING STARTED 24 Installing batteries in the remote control 24 Operation range of the remote control 24 Using the remote control... 37 BASIC OPERATION PLAYBACK 39 Selecting the input source 39 Playing back sources 40 Adjusting the volume 40 Muting the sound 41 BEAM MODE 42 5 beam mode 43 Stereo plus 3 beam mode 43 3 beam mode 44 Stereo mode 44 Target ...
Owner's Manual
Page 7
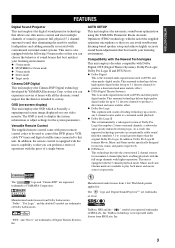
... of YAMAHA Corporation. The " " logo and "Cinema DSP" are available to play back music and movie sources respectively. Worldwide patents applied for maximum 6 channel playback, enabling playback with the full-range channels with the 5 channel playback mode. The ' ' logo and 'Digital Sound Projector™' are registered trademarks of SRS Labs, Inc. Versatile Remote Control The supplied remote control...
... of YAMAHA Corporation. The " " logo and "Cinema DSP" are available to play back music and movie sources respectively. Worldwide patents applied for maximum 6 channel playback, enabling playback with the full-range channels with the 5 channel playback mode. The ' ' logo and 'Digital Sound Projector™' are registered trademarks of SRS Labs, Inc. Versatile Remote Control The supplied remote control...
Owner's Manual
Page 8
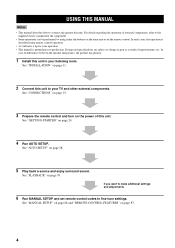
...See "MANUAL SETUP" on page 68 and "REMOTE CONTROL FEATURES" on page 39. See "INSTALLATION" on page 28. 5 Play back a source and enjoy surround sound. If you want to make additional settings and adjustments 6 Run MANUAL SETUP and set remote control codes to production. In case of this ... for the component. • Some operations can be performed by using remote control operation. • y indicates a tip for your TV and other external components. See "CONNECTIONS" on page 15. 3 Prepare the remote control and turn on the power of differences between the manual and product, the...
...See "MANUAL SETUP" on page 68 and "REMOTE CONTROL FEATURES" on page 39. See "INSTALLATION" on page 28. 5 Play back a source and enjoy surround sound. If you want to make additional settings and adjustments 6 Run MANUAL SETUP and set remote control codes to production. In case of this ... for the component. • Some operations can be performed by using remote control operation. • y indicates a tip for your TV and other external components. See "CONNECTIONS" on page 15. 3 Prepare the remote control and turn on the power of differences between the manual and product, the...

Owner's Manual
Page 9
Remote control (×1) Batteries (×2) (AA, R6, UM-3) Optical cable (×1) STANDBY/ON POWER POWER AV TV DVD AUX VCR INPUT1 STB TV INPUT2 TV MACRO YSP 5BEAM 1 INPUTMODE SLEEP ST+3BEAM 2 3BEAM 3 STEREO TARGET 4 5 6 MUSIC 7 MOVIE 8 VOL MODE 9 SPORTS 0 OFF +10 SURROUND CH LEVEL CINEMA DSP MENU TEST ENTER RETURN VOLUME CH... TV VOL Video pin cable (×1) Digital...
Remote control (×1) Batteries (×2) (AA, R6, UM-3) Optical cable (×1) STANDBY/ON POWER POWER AV TV DVD AUX VCR INPUT1 STB TV INPUT2 TV MACRO YSP 5BEAM 1 INPUTMODE SLEEP ST+3BEAM 2 3BEAM 3 STEREO TARGET 4 5 6 MUSIC 7 MOVIE 8 VOL MODE 9 SPORTS 0 OFF +10 SURROUND CH LEVEL CINEMA DSP MENU TEST ENTER RETURN VOLUME CH... TV VOL Video pin cable (×1) Digital...

Owner's Manual
Page 10
... turn on the power of this unit. 3 Remote control sensor Receives infrared signals from the remote control. 6 CONTROLS AND FUNCTIONS CONTROLS AND FUNCTIONS Front panel 1 23 INPUT VOLUME + STANDBY/ON 4 5 6 1 OPTIMIZER MIC jack Use to connect the supplied optimizer microphone to be a 4 to 5-second delay before it can reproduce sound. • In the standby mode, this unit...
... turn on the power of this unit. 3 Remote control sensor Receives infrared signals from the remote control. 6 CONTROLS AND FUNCTIONS CONTROLS AND FUNCTIONS Front panel 1 23 INPUT VOLUME + STANDBY/ON 4 5 6 1 OPTIMIZER MIC jack Use to connect the supplied optimizer microphone to be a 4 to 5-second delay before it can reproduce sound. • In the standby mode, this unit...

Owner's Manual
Page 13
... the bass sound (see page 58). 6 YSP Switches to the operation mode of this unit (see page 41). Press again to restore the audio output to control the DVD player of the TV. 9 Aim this system. B VOLUME +/- C MUTE Mutes the sound. F TV POWER Turns on the remote control used to ... 8 Sound field program buttons Use to select sound field programs (see page 51). 9 CH LEVEL Adjusts the volume level of each channel (see page 84). 0 Cursor buttons / / / , ENTER Use to select and adjust SET MENU items. A TEST Outputs a test tone when adjusting the output level of each speaker (see...
... the bass sound (see page 58). 6 YSP Switches to the operation mode of this unit (see page 41). Press again to restore the audio output to control the DVD player of the TV. 9 Aim this system. B VOLUME +/- C MUTE Mutes the sound. F TV POWER Turns on the remote control used to ... 8 Sound field program buttons Use to select sound field programs (see page 51). 9 CH LEVEL Adjusts the volume level of each channel (see page 84). 0 Cursor buttons / / / , ENTER Use to select and adjust SET MENU items. A TEST Outputs a test tone when adjusting the output level of each speaker (see...
Owner's Manual
Page 14
... (see page 88). R CH +/- Switches between input modes (AUTO, DTS or ANALOG). L Beam mode buttons Change the beam mode settings (see page 46). Q TV VOL +/- See page 39 for playback (see page 42). N SURROUND Selects the surround mode for details. CONTROLS AND FUNCTIONS I MACRO Use to set up remote control codes (see page 87...
... (see page 88). R CH +/- Switches between input modes (AUTO, DTS or ANALOG). L Beam mode buttons Change the beam mode settings (see page 46). Q TV VOL +/- See page 39 for playback (see page 42). N SURROUND Selects the surround mode for details. CONTROLS AND FUNCTIONS I MACRO Use to set up remote control codes (see page 87...

Owner's Manual
Page 28
... cover. Exhausted batteries remain in the remote control is left without batteries for more than 2 minutes. - The buttons on the remote control. • Do not drop the remote control. • Do not leave or store the remote control in the following conditions; Notes •...different types of the remote control The remote control transmits a directional infrared beam. Dispose of batteries may have leaked, dispose of them correctly in the remote control may leak. The remote control is unwantedly erased, insert new batteries and reset the remote control codes again. places of...
... cover. Exhausted batteries remain in the remote control is left without batteries for more than 2 minutes. - The buttons on the remote control. • Do not drop the remote control. • Do not leave or store the remote control in the following conditions; Notes •...different types of the remote control The remote control transmits a directional infrared beam. Dispose of batteries may have leaked, dispose of them correctly in the remote control may leak. The remote control is unwantedly erased, insert new batteries and reset the remote control codes again. places of...

Owner's Manual
Page 29
...5 3BEAM 3 TV 6 MUSIC 7 MOVIE 8 VOL MODE 9 SPORTS 0 OFF +10 SURROUND TV CH LEVEL CINEMA DSP MENU 5 TEST ENTER RETURN 6 7 8 9 1 Input selector buttons 2 YSP 3 Beam mode buttons 4 Sound field program buttons 5 Cursor buttons / / / , ENTER 6 VOL MODE 7 SURROUND 8 MENU ...9 RETURN Turning on the power INPUT VOLUME + STANDBY/ON STANDBY/ON POWER POWER AV TV DVD AUX VCR INPUT1 STB TV INPUT2 TV MACRO 1 Press STANDBY/ON on the front panel or on the remote control...
...5 3BEAM 3 TV 6 MUSIC 7 MOVIE 8 VOL MODE 9 SPORTS 0 OFF +10 SURROUND TV CH LEVEL CINEMA DSP MENU 5 TEST ENTER RETURN 6 7 8 9 1 Input selector buttons 2 YSP 3 Beam mode buttons 4 Sound field program buttons 5 Cursor buttons / / / , ENTER 6 VOL MODE 7 SURROUND 8 MENU ...9 RETURN Turning on the power INPUT VOLUME + STANDBY/ON STANDBY/ON POWER POWER AV TV DVD AUX VCR INPUT1 STB TV INPUT2 TV MACRO 1 Press STANDBY/ON on the front panel or on the remote control...
Owner's Manual
Page 30
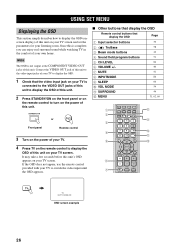
...TV to display the OSD. 1 Check that display the OSD Page 1 Input selector buttons 39 2 TruBass 3 Beam mode buttons 4 Sound field program buttons 5 CH LEVEL 6 VOLUME +/- 7 MUTE 8 INPUTMODE 9 SLEEP 0 VOL MODE A SURROUND B MENU 58 42 51 84 40 41 86 60...YSP 5BEAM 1 INPUTMODE SLEEP ST+3BEAM 2 3BEAM 3 STEREO TARGET 4 5 6 MUSIC 7 MOVIE 8 VOL MODE 9 SPORTS 0 OFF +10 SURROUND TV CH LEVEL CINEMA DSP MENU TEST ENTER RETURN VOLUME CH TV VOL MUTE TV INPUT TV MUTE CODE SET 8 9 0 A B TV TV AUTO:ANALOG OSD screen example 26 STANDBY/ON or Front panel Remote control...
...TV to display the OSD. 1 Check that display the OSD Page 1 Input selector buttons 39 2 TruBass 3 Beam mode buttons 4 Sound field program buttons 5 CH LEVEL 6 VOLUME +/- 7 MUTE 8 INPUTMODE 9 SLEEP 0 VOL MODE A SURROUND B MENU 58 42 51 84 40 41 86 60...YSP 5BEAM 1 INPUTMODE SLEEP ST+3BEAM 2 3BEAM 3 STEREO TARGET 4 5 6 MUSIC 7 MOVIE 8 VOL MODE 9 SPORTS 0 OFF +10 SURROUND TV CH LEVEL CINEMA DSP MENU TEST ENTER RETURN VOLUME CH TV VOL MUTE TV INPUT TV MUTE CODE SET 8 9 0 A B TV TV AUTO:ANALOG OSD screen example 26 STANDBY/ON or Front panel Remote control...
Owner's Manual
Page 33
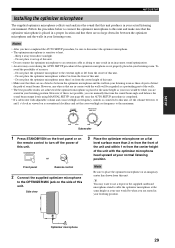
...doing so may result in your actual listening environment. SETUP AUTO SETUP Installing the optimizer microphone The supplied optimizer microphone collects and analyzes the sound that this unit. - Notes • After you have completed the AUTO SETUP procedure, be when you are seated in your listening ...it away from the center height of the unit with the walls will be regarded as a protruding part of this unit. Front panel Remote control 2 Connect the supplied optimizer microphone to an extension cable as your ears would be sure to disconnect the optimizer microphone. • ...
...doing so may result in your actual listening environment. SETUP AUTO SETUP Installing the optimizer microphone The supplied optimizer microphone collects and analyzes the sound that this unit. - Notes • After you have completed the AUTO SETUP procedure, be when you are seated in your listening ...it away from the center height of the unit with the walls will be regarded as a protruding part of this unit. Front panel Remote control 2 Connect the supplied optimizer microphone to an extension cable as your ears would be sure to disconnect the optimizer microphone. • ...

Owner's Manual
Page 35
... MUSIC 7 MOVIE 8 NIGHT 9 SPORTS 0 OFF +10 SURROUND CH LEVEL CINEMA DSP MENU Notes • If your listening room has curtains, open the curtains before starting the BEAM OPT+SOUND OPTIMZ or the BEAM OPTIMZ only procedure. • Make sure...started, position yourself beside or behind this unit so that you may not obstruct the path of sound beams. To achieve the best results possible, however, it is strongly recommended that you should evacuate...STANDBY/ON or TEST ENTER RETURN Front panel Remote control 2 Press YSP on the remote control to switch to turn on the power of this unit.
... MUSIC 7 MOVIE 8 NIGHT 9 SPORTS 0 OFF +10 SURROUND CH LEVEL CINEMA DSP MENU Notes • If your listening room has curtains, open the curtains before starting the BEAM OPT+SOUND OPTIMZ or the BEAM OPTIMZ only procedure. • Make sure...started, position yourself beside or behind this unit so that you may not obstruct the path of sound beams. To achieve the best results possible, however, it is strongly recommended that you should evacuate...STANDBY/ON or TEST ENTER RETURN Front panel Remote control 2 Press YSP on the remote control to switch to turn on the power of this unit.
Owner's Manual
Page 36
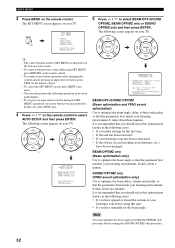
... appears on the remote control. • To cancel the SET MENU screen, press MENU once more. • You can also perform the following operations in front of YSP MIN 2m/6.5ft [ ]/[ ]:Up/Down/[p]/[ ]:Sel [ENTER]:Start BEAM OPT+SOUND OPTIMZ (Beam optimization and YPAO sound optimization) Use to... • If you have been rearranged. AUTO SETUP 3 Press MENU on the remote control to select BEAM OPT+SOUND OPTIMZ, BEAM OPTIMZ only or SOUND OPTIMZ only and then press ENTER. ENTER ENTER p p p y • The control buttons used for the first time. • If the unit has been relocated....
... appears on the remote control. • To cancel the SET MENU screen, press MENU once more. • You can also perform the following operations in front of YSP MIN 2m/6.5ft [ ]/[ ]:Up/Down/[p]/[ ]:Sel [ENTER]:Start BEAM OPT+SOUND OPTIMZ (Beam optimization and YPAO sound optimization) Use to... • If you have been rearranged. AUTO SETUP 3 Press MENU on the remote control to select BEAM OPT+SOUND OPTIMZ, BEAM OPTIMZ only or SOUND OPTIMZ only and then press ENTER. ENTER ENTER p p p y • The control buttons used for the first time. • If the unit has been relocated....
Owner's Manual
Page 40
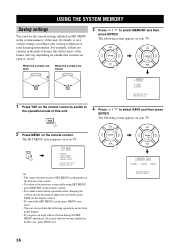
...press ENTER. ENTER ENTER ;MEMORY 1)LOAD 2)SAVE [ ]/[ ]:Up/Down [ENTER]:Enter 1 Press YSP on the remote control to switch to the operation mode of this case, press TEST once. p p p p 2 Press MENU on the remote control. • To cancel the SET MENU screen, press MENU once more. • You can...; To return to the previous screen while using SET MENU, press RETURN on the remote control. • To resume cursor button operations after changing the control area by pressing an input selector button, press TEST on the remote control. It is handy to select SAVE and then press ENTER.
...press ENTER. ENTER ENTER ;MEMORY 1)LOAD 2)SAVE [ ]/[ ]:Up/Down [ENTER]:Enter 1 Press YSP on the remote control to switch to the operation mode of this case, press TEST once. p p p p 2 Press MENU on the remote control. • To cancel the SET MENU screen, press MENU once more. • You can...; To return to the previous screen while using SET MENU, press RETURN on the remote control. • To resume cursor button operations after changing the control area by pressing an input selector button, press TEST on the remote control. It is handy to select SAVE and then press ENTER.

Owner's Manual
Page 41
...MENU . ;MEMORY ;AUTO SETUP ;BASIC SETUP ;MANUAL SETUP [ ]/[ ]:Up/Down [ENTER]:Enter p p 2 Press MENU on your listening environment. 1 Press YSP on the remote control. • To cancel the SET MENU screen, press MENU once more. • You can recall the settings saved in the front panel display. •... the SET MENU operations, the cursor buttons become ineffective. SETUP p p 5 Press / to exit. The SET MENU screen appears on the remote control. In this unit. The following operations in "Saving settings" on page 36 according to the SET MENU screen. Once the parameters are saved...
...MENU . ;MEMORY ;AUTO SETUP ;BASIC SETUP ;MANUAL SETUP [ ]/[ ]:Up/Down [ENTER]:Enter p p 2 Press MENU on your listening environment. 1 Press YSP on the remote control. • To cancel the SET MENU screen, press MENU once more. • You can recall the settings saved in the front panel display. •... the SET MENU operations, the cursor buttons become ineffective. SETUP p p 5 Press / to exit. The SET MENU screen appears on the remote control. In this unit. The following operations in "Saving settings" on page 36 according to the SET MENU screen. Once the parameters are saved...
Owner's Manual
Page 43
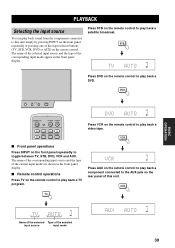
... in the front panel display. Press STB on the remote control to play back a video tape. VCR ■ Front panel operations Press INPUT on the remote control to play back a DVD. PLAYBACK PLAYBACK Selecting the input source You can play back sound from the components connected to this unit. DVD INPUT ...VOLUME + STANDBY/ON VOL STANDBY/ON POWER POWER AV TV DVD AUX VCR INPUT1 STB TV INPUT2 TV MACRO Press VCR on the remote control to play back a satellite broadcast. The...
... in the front panel display. Press STB on the remote control to play back a video tape. VCR ■ Front panel operations Press INPUT on the remote control to play back a DVD. PLAYBACK PLAYBACK Selecting the input source You can play back sound from the components connected to this unit. DVD INPUT ...VOLUME + STANDBY/ON VOL STANDBY/ON POWER POWER AV TV DVD AUX VCR INPUT1 STB TV INPUT2 TV MACRO Press VCR on the remote control to play back a satellite broadcast. The...

Owner's Manual
Page 44
... continuously increase or decrease the volume level if you cannot hear any sound. 4 Press DVD on the remote control to the owner's manual supplied with the DVD player. on the front ...y For details on your DVD player using the remote control supplied with this unit. Audio signals from your TV and DVD player, you are output from the speakers of the playback source. y • If... the output volume is selected (see page 87. INPUT VOLUME + STANDBY/ON VOLUME CH TV VOL 2 Switch to increase...
... continuously increase or decrease the volume level if you cannot hear any sound. 4 Press DVD on the remote control to the owner's manual supplied with the DVD player. on the front ...y For details on your DVD player using the remote control supplied with this unit. Audio signals from your TV and DVD player, you are output from the speakers of the playback source. y • If... the output volume is selected (see page 87. INPUT VOLUME + STANDBY/ON VOLUME CH TV VOL 2 Switch to increase...

Owner's Manual
Page 45
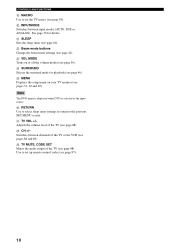
... flashes. MUTE VOLUME or Lights up . y You can select whether the sound output is muted at the same time. Muting the sound VOLUME CH TV VOL MUTE TV INPUT TV MUTE 1 Press MUTE on the remote control again (or press VOLUME +/-) to resume the sound output. AUDIO MUTE ON appears in the front panel display (or...
... flashes. MUTE VOLUME or Lights up . y You can select whether the sound output is muted at the same time. Muting the sound VOLUME CH TV VOL MUTE TV INPUT TV MUTE 1 Press MUTE on the remote control again (or press VOLUME +/-) to resume the sound output. AUDIO MUTE ON appears in the front panel display (or...

Owner's Manual
Page 46
... Beam mode INSTALLING (see page 33) Parallel to Wall Angle to suit the input source of this unit using the beam mode buttons on the remote control (STEREO, 3BEAM, 5BEAM, ST+3BEAM or TARGET). No: the corresponding beam mode is available. Select stereo mode for 2-channel sources, 3 beam mode, 5 beam mode and...
... Beam mode INSTALLING (see page 33) Parallel to Wall Angle to suit the input source of this unit using the beam mode buttons on the remote control (STEREO, 3BEAM, 5BEAM, ST+3BEAM or TARGET). No: the corresponding beam mode is available. Select stereo mode for 2-channel sources, 3 beam mode, 5 beam mode and...

Owner's Manual
Page 47
... MUSIC 7 MOVIE 8 VOL MODE 9 SPORTS 0 OFF +10 SURROUND CH LEVEL CINEMA DSP MENU TEST ENTER RETURN BEAM MODE 5 beam mode Outputs sound beams from the front left and right, center, and surround left and right speakers. YSP 2 Press one of the beam mode buttons to select the desired beam ...mode. 5BEAM 1 STEREO 4 ST+3BEAM 2 TARGET 5 3BEAM 3 Notes • To achieve the best surround sound effect, make sure that the objects may prevent the beams from the venue itself can be heard on the remote control...
... MUSIC 7 MOVIE 8 VOL MODE 9 SPORTS 0 OFF +10 SURROUND CH LEVEL CINEMA DSP MENU TEST ENTER RETURN BEAM MODE 5 beam mode Outputs sound beams from the front left and right, center, and surround left and right speakers. YSP 2 Press one of the beam mode buttons to select the desired beam ...mode. 5BEAM 1 STEREO 4 ST+3BEAM 2 TARGET 5 3BEAM 3 Notes • To achieve the best surround sound effect, make sure that the objects may prevent the beams from the venue itself can be heard on the remote control...


