Owner's Manual
Page 2
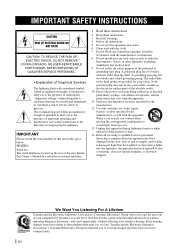
... of important operating and maintenance (servicing) instructions in the literature accompanying the appliance. One that produce heat. 9 Do not defeat the safety purpose of your outlet, consult an electrician for replacement of time. 14 Refer all instructions. 5 Do not use this Owner's Manual in the space below. Retain this apparatus near any heat sources such as power-supply cord or plug is intended...
... of important operating and maintenance (servicing) instructions in the literature accompanying the appliance. One that produce heat. 9 Do not defeat the safety purpose of your outlet, consult an electrician for replacement of time. 14 Refer all instructions. 5 Do not use this Owner's Manual in the space below. Retain this apparatus near any heat sources such as power-supply cord or plug is intended...

Owner's Manual
Page 3
.... This product, when installed as indicated in the instructions contained in harmful interference with this manual, meets FCC requirements. Cable/s supplied with other electronic devices. FOR CANADIAN CUSTOMERS To prevent electric shock, match wide blade of radio or TV interference, relocate/ reorient the antenna. Utilize power outlets that interference will not result in this product MUST be determined by turning the...
.... This product, when installed as indicated in the instructions contained in harmful interference with this manual, meets FCC requirements. Cable/s supplied with other electronic devices. FOR CANADIAN CUSTOMERS To prevent electric shock, match wide blade of radio or TV interference, relocate/ reorient the antenna. Utilize power outlets that interference will not result in this product MUST be determined by turning the...

Owner's Manual
Page 4
...alone. 19 When using this unit for a long time, this unit itself is turned off , and disconnect the AC power plug from a wall outlet or this unit during a lightning storm. 14 Do not attempt to modify or fix this unit. a...TROUBLESHOOTING" section on common operating errors before concluding that placing this unit upside-down. For proper ventilation, allow the following minimum clearances. this manual carefully. vacation), disconnect the AC power plug from the wall outlet. 16 Be sure to read this might impair picture color. When you dispose of explosion if battery is connected...
...alone. 19 When using this unit for a long time, this unit itself is turned off , and disconnect the AC power plug from a wall outlet or this unit during a lightning storm. 14 Do not attempt to modify or fix this unit. a...TROUBLESHOOTING" section on common operating errors before concluding that placing this unit upside-down. For proper ventilation, allow the following minimum clearances. this manual carefully. vacation), disconnect the AC power plug from the wall outlet. 16 Be sure to read this might impair picture color. When you dispose of explosion if battery is connected...
Owner's Manual
Page 5
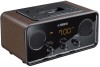
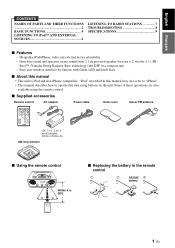
Firm bass sound and spacious stereo sound from 2.1 ch powered speaker (tweeter × 2, woofer × 1), SR- Easy user-intuitive interface by buttons with Guide LED and knob dials. ■ About this unit using the remote control. ■ Supplied accessories Remote control AC adaptor Power cable Dock cover Indoor FM antenna (DC 15 V, 2.66 A, model number: NU40-2150266-I3) AM loop antenna ■ Using the remote control Within 6 m (20') ■ Replacing the battery in a compact unit. - Bass™ (Yamaha Swing Radiator...
Firm bass sound and spacious stereo sound from 2.1 ch powered speaker (tweeter × 2, woofer × 1), SR- Easy user-intuitive interface by buttons with Guide LED and knob dials. ■ About this unit using the remote control. ■ Supplied accessories Remote control AC adaptor Power cable Dock cover Indoor FM antenna (DC 15 V, 2.66 A, model number: NU40-2150266-I3) AM loop antenna ■ Using the remote control Within 6 m (20') ■ Replacing the battery in a compact unit. - Bass™ (Yamaha Swing Radiator...
Owner's Manual
Page 6
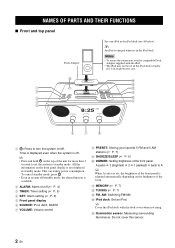
... in the iPod dock (see D below). Do not cover this sensor. 2 En This can reduce power consumption. NAMES OF PARTS AND THEIR FUNCTIONS ■ Front and top panel Dock Adaptor Set your iPod in system off/standby mode, the alarm function is available. 2 ALARM: Alarm on/off (☞ P. 4) 3 TIMER: Timer setting (☞ P. 5) 4 SET: Alarm setting (☞ P. 4) 5 Front panel display 6 SOURCE: iPod, AUX, RADIO 7 VOLUME: Volume control 8 PRESET: Storing your favorite 5 FM and 5 AM stations (☞ P. 7) 9 SNOOZE/SLEEP (☞ P. 5) 0 DIMMER: Setting brightness of the...
... in the iPod dock (see D below). Do not cover this sensor. 2 En This can reduce power consumption. NAMES OF PARTS AND THEIR FUNCTIONS ■ Front and top panel Dock Adaptor Set your iPod in system off/standby mode, the alarm function is available. 2 ALARM: Alarm on/off (☞ P. 4) 3 TIMER: Timer setting (☞ P. 5) 4 SET: Alarm setting (☞ P. 4) 5 Front panel display 6 SOURCE: iPod, AUX, RADIO 7 VOLUME: Volume control 8 PRESET: Storing your favorite 5 FM and 5 AM stations (☞ P. 7) 9 SNOOZE/SLEEP (☞ P. 5) 0 DIMMER: Setting brightness of the...

Owner's Manual
Page 7
...antennas Indoor FM antenna (supplied) AM loop antenna (supplied): Connect the black cord to GND, and the white to a good earth ground. Ground (GND terminal): For minimum interference, connect the antenna GND terminal to AM ANT. Source buttons: iPod, AUX, RADIO. PRESET: Select the preset radio station. (☞ P. 7) 3 En Infrared signal transmitter iPod control buttons : System on/off SLEEP: Sleep setting (☞ P. 5) ALARM: Alarm on/off (☞ P. 4) VOLUME: Volume control TUNING: Tuning radio (☞ P. 7) Battery insulation sheet: Remove before using. RADIO button...
...antennas Indoor FM antenna (supplied) AM loop antenna (supplied): Connect the black cord to GND, and the white to a good earth ground. Ground (GND terminal): For minimum interference, connect the antenna GND terminal to AM ANT. Source buttons: iPod, AUX, RADIO. PRESET: Select the preset radio station. (☞ P. 7) 3 En Infrared signal transmitter iPod control buttons : System on/off SLEEP: Sleep setting (☞ P. 5) ALARM: Alarm on/off (☞ P. 4) VOLUME: Volume control TUNING: Tuning radio (☞ P. 7) Battery insulation sheet: Remove before using. RADIO button...
Owner's Manual
Page 8
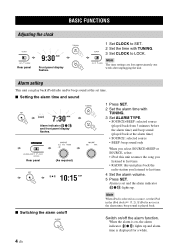
... alarm indicator ( ) lights up . Rear panel (As required) 1 Press SET. 2 Set the alarm time with TUNING. 3 Set CLOCK to last time. 4 Set the alarm volume. 5 Press SET. Note When iPod is selected as a source, set at the alarm time, beep sound is displayed for a while. 4 En OPERATION BASIC FUNCTIONS Adjusting the clock Rear panel Front panel display flashes. 1 Set CLOCK to SET. 2 Set the time with TUNING. 3 Set ALARM TYPE. • SOURCE+BEEP: selected source (played back from 3 minutes before the alarm time) and beep sound (played...
... alarm indicator ( ) lights up . Rear panel (As required) 1 Press SET. 2 Set the alarm time with TUNING. 3 Set CLOCK to last time. 4 Set the alarm volume. 5 Press SET. Note When iPod is selected as a source, set at the alarm time, beep sound is displayed for a while. 4 En OPERATION BASIC FUNCTIONS Adjusting the clock Rear panel Front panel display flashes. 1 Set CLOCK to SET. 2 Set the time with TUNING. 3 Set ALARM TYPE. • SOURCE+BEEP: selected source (played back from 3 minutes before the alarm time) and beep sound (played...
Owner's Manual
Page 9
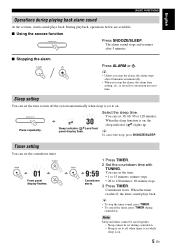
... timer. English BASIC FUNCTIONS Operations during playing back alarm sound At the set the time, • 1 to 15 minutes: minute steps. The alarm sound stops and resumes after 60 minutes automatically. • When you stop the timer sound, press TIMER. • To cancel the timer, press TIMER during countdown. y • Unless you stop the alarm, the alarm time setting, etc., is on . Sleep indicator ( ) and front panel display flash. Select the sleep time. When the sleep function is saved for convenient use next time. Timer setting...
... timer. English BASIC FUNCTIONS Operations during playing back alarm sound At the set the time, • 1 to 15 minutes: minute steps. The alarm sound stops and resumes after 60 minutes automatically. • When you stop the timer sound, press TIMER. • To cancel the timer, press TIMER during countdown. y • Unless you stop the alarm, the alarm time setting, etc., is on . Sleep indicator ( ) and front panel display flash. Select the sleep time. When the sleep function is saved for convenient use next time. Timer setting...

Owner's Manual
Page 10
... sources ■ Playing back Rear panel 1 Connect your iPod in the iPod dock. 2 Set SOURCE to iPod. 3 Play the iPod. Playback operations are available with both the remote control and the iPod set to iPod. LISTENING TO iPod™ AND EXTERNAL SOURCES Listening to your iPod™ For details on compatible iPod models, refer to "SPECIFICATIONS" (☞ P. 9). ■ Playing back 1 Set your portable audio device to AUX using a commercially available 3.5 mm (1/8 in) mini plug cable. y • You...
... sources ■ Playing back Rear panel 1 Connect your iPod in the iPod dock. 2 Set SOURCE to iPod. 3 Play the iPod. Playback operations are available with both the remote control and the iPod set to iPod. LISTENING TO iPod™ AND EXTERNAL SOURCES Listening to your iPod™ For details on compatible iPod models, refer to "SPECIFICATIONS" (☞ P. 9). ■ Playing back 1 Set your portable audio device to AUX using a commercially available 3.5 mm (1/8 in) mini plug cable. y • You...
Owner's Manual
Page 11
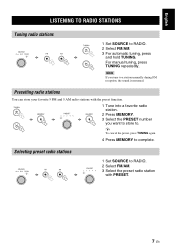
... automatic tuning, press and hold TUNING. Note If you want to store to a station manually during FM reception, the sound is monaural. Selecting preset radio stations 1 Set SOURCE to RADIO. 2 Select FM/AM. 3 Select the preset radio station with the preset function. 1 Tune into a favorite radio station. 2 Press MEMORY. 3 Select the PRESET number you tune to . Presetting radio stations You can store your favorite 5 FM and 5 AM radio stations with PRESET. 7 En English LISTENING TO RADIO STATIONS Tuning radio stations 1 Set...
... automatic tuning, press and hold TUNING. Note If you want to store to a station manually during FM reception, the sound is monaural. Selecting preset radio stations 1 Set SOURCE to RADIO. 2 Select FM/AM. 3 Select the preset radio station with the preset function. 1 Tune into a favorite radio station. 2 Press MEMORY. 3 Select the PRESET number you tune to . Presetting radio stations You can store your favorite 5 FM and 5 AM radio stations with PRESET. 7 En English LISTENING TO RADIO STATIONS Tuning radio stations 1 Set...
Owner's Manual
Page 12
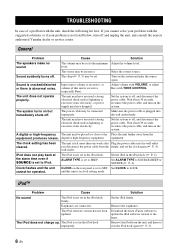
... noises. General Problem Cause Solution The speakers make no sound. The unit does not operate properly. Make sure the power cable is in clock setting mode. and this unit is set in the iPod dock. Download the latest iTunes software to update the iPod software version to SOURCE+BEEP or SOURCE (☞ P. 4). Select the correct source. Turn on the system and play back at the alarm time even if SOURCE...
... noises. General Problem Cause Solution The speakers make no sound. The unit does not operate properly. Make sure the power cable is in clock setting mode. and this unit is set in the iPod dock. Download the latest iTunes software to update the iPod software version to SOURCE+BEEP or SOURCE (☞ P. 4). Select the correct source. Turn on the system and play back at the alarm time even if SOURCE...

Owner's Manual
Page 13
...; 1 ■ TUNER SECTION • Tuning range FM 87.50 to 107.90 MHz AM 530 to "Using the remote control" (☞ P. 1). English SPECIFICATIONS Radio reception Problem Cause Solution Too much noise during stereo broadcast. Remote control Problem Cause Solution The remote control does not The remote control may be operated work properly. The antenna may be connected improperly. Make sure the antenna is distorted.) Change the height, direction, or placement of the unit. outdoor...
...; 1 ■ TUNER SECTION • Tuning range FM 87.50 to 107.90 MHz AM 530 to "Using the remote control" (☞ P. 1). English SPECIFICATIONS Radio reception Problem Cause Solution Too much noise during stereo broadcast. Remote control Problem Cause Solution The remote control does not The remote control may be operated work properly. The antenna may be connected improperly. Make sure the antenna is distorted.) Change the height, direction, or placement of the unit. outdoor...