
Owner's Manual
Page 3
...the illustrations and names of Digital Theater Systems, Inc. 1 English In this case, the operations performed by using the remote control are registered trademarks of the package contents etc. G Virtual Surround (by using headphones) (SILENT CINEMA) This system also... FEATURES 1 CHECKING THE ACCESSORIES 2 INSTALLING BATTERIES IN THE REMOTE CONTROL 2 CONTROLS AND FUNCTIONS 3 SETTING UP THE SYSTEM 5 CONNECTIONS 7 Connecting audio components 8 Connecting the speakers 9 Connecting the power cable 10 ADJUSTING SPEAKER OUTPUT LEVELS 11 OPERATION PLAYING A SOURCE 12 ...
...the illustrations and names of Digital Theater Systems, Inc. 1 English In this case, the operations performed by using the remote control are registered trademarks of the package contents etc. G Virtual Surround (by using headphones) (SILENT CINEMA) This system also... FEATURES 1 CHECKING THE ACCESSORIES 2 INSTALLING BATTERIES IN THE REMOTE CONTROL 2 CONTROLS AND FUNCTIONS 3 SETTING UP THE SYSTEM 5 CONNECTIONS 7 Connecting audio components 8 Connecting the speakers 9 Connecting the power cable 10 ADJUSTING SPEAKER OUTPUT LEVELS 11 OPERATION PLAYING A SOURCE 12 ...
Owner's Manual
Page 4
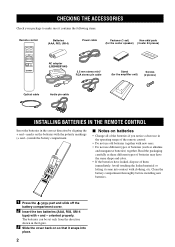
CHECKING THE ACCESSORIES Check your package to make sure it contains the following items. Remote control INPUT MODE REAR S.WOOFER VOLUME MUTE TEST Batteries (AAA, R03, UM-4) Power cable Fastener (1 set only from the direction shown in the figure.... mini/ RCA stereo pin cable Stand (for the amplifier unit) Screws (2 pieces) Optical cable Audio pin cable INSTALLING BATTERIES IN THE REMOTE CONTROL Insert the batteries in the operating range of the remote control. • Do not use old batteries together with the polarity markings (+ and -) inside the battery compartment. 2 1 3 I ...
CHECKING THE ACCESSORIES Check your package to make sure it contains the following items. Remote control INPUT MODE REAR S.WOOFER VOLUME MUTE TEST Batteries (AAA, R03, UM-4) Power cable Fastener (1 set only from the direction shown in the figure.... mini/ RCA stereo pin cable Stand (for the amplifier unit) Screws (2 pieces) Optical cable Audio pin cable INSTALLING BATTERIES IN THE REMOTE CONTROL Insert the batteries in the operating range of the remote control. • Do not use old batteries together with the polarity markings (+ and -) inside the battery compartment. 2 1 3 I ...
Owner's Manual
Page 5
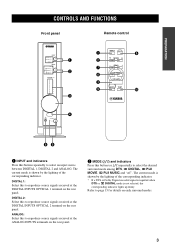
... lights up dimly. DIGITAL 2: Select this to reproduce source signals received at the DIGITAL INPUTS OPTICAL 1 terminal on each surround modes. 3 English PREPARATION CONTROLS AND FUNCTIONS Front panel Remote control INPUT DIGITAL 1 DIGITAL 2 ANALOG MODE DTS DIGITAL PL MOVIE PL MUSIC VOLUME TRIM 7 +6 6 +4 5 +2 4 0 3 -2 2 -4 1 -6 1 2 3 1 INPUT 5 2 MODE 7 REAR 8 S.WOOFER VOLUME 3 9 MUTE TEST 0 SILENT STANDBY/ON...
... lights up dimly. DIGITAL 2: Select this to reproduce source signals received at the DIGITAL INPUTS OPTICAL 1 terminal on each surround modes. 3 English PREPARATION CONTROLS AND FUNCTIONS Front panel Remote control INPUT DIGITAL 1 DIGITAL 2 ANALOG MODE DTS DIGITAL PL MOVIE PL MUSIC VOLUME TRIM 7 +6 6 +4 5 +2 4 0 3 -2 2 -4 1 -6 1 2 3 1 INPUT 5 2 MODE 7 REAR 8 S.WOOFER VOLUME 3 9 MUTE TEST 0 SILENT STANDBY/ON...
Owner's Manual
Page 6
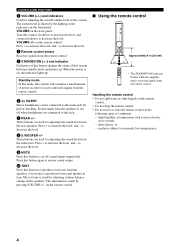
...in places subject to extremely low temperatures. 4 VOLUME on the remote control. • Do not drop the remote control. • Do not leave or store the remote control in turn. Sound output from the speakers is reproduced from the remote control. to increase the level, and - Press + to decrease ...shown by pressing VOLUME +/- Press this button again to increase the level, and - on the remote control. The current level is on the front panel. I Using the remote control SILENT Approximately 6 m (20 feet) 30° 30° * The STANDBY/ON indicator ...
...in places subject to extremely low temperatures. 4 VOLUME on the remote control. • Do not drop the remote control. • Do not leave or store the remote control in turn. Sound output from the speakers is reproduced from the remote control. to increase the level, and - Press + to decrease ...shown by pressing VOLUME +/- Press this button again to increase the level, and - on the remote control. The current level is on the front panel. I Using the remote control SILENT Approximately 6 m (20 feet) 30° 30° * The STANDBY/ON indicator ...
Owner's Manual
Page 13
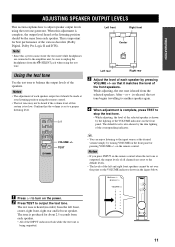
...SILENT jack when using the test tone. After - The default level is too low. Notes • If you press INPUT on the remote control when the test tone is being outputted. PREPARATION ADJUSTING SPEAKER OUTPUT LEVELS This section explains how to the input source at the desired volume simply... are connected to the amplifier unit, be heard if the volume level of the VOLUME indicators on the remote control. y • You can enjoy listening to adjust speaker output levels using the remote control. • The test tone may not be sure to a proper listening level. on the front panel...
...SILENT jack when using the test tone. After - The default level is too low. Notes • If you press INPUT on the remote control when the test tone is being outputted. PREPARATION ADJUSTING SPEAKER OUTPUT LEVELS This section explains how to the input source at the desired volume simply... are connected to the amplifier unit, be heard if the volume level of the VOLUME indicators on the remote control. y • You can enjoy listening to adjust speaker output levels using the remote control. • The test tone may not be sure to a proper listening level. on the front panel...
Owner's Manual
Page 14
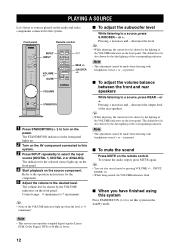
... audio output, press MUTE again. PLAYING A SOURCE Let's listen to sources played on the audio and video components connected to a source, press REAR - Front panel Remote control INPUT DIGITAL 1 DIGITAL 2 ANALOG MODE DTS DIGITAL PL MOVIE PL MUSIC VOLUME TRIM 7 +6 6 +4 5 +2 4 0 3 -2 2 -4 1 -6 INPUT INPUT ...a source, press S.WOOFER - y • While adjusting, the current level is shown by the lighting of the VOLUME indicators on the remote control. Note • The adjustment cannot be made when listening with headphones even if + or - Pressing + increases and - I When you ...
... audio output, press MUTE again. PLAYING A SOURCE Let's listen to sources played on the audio and video components connected to a source, press REAR - Front panel Remote control INPUT DIGITAL 1 DIGITAL 2 ANALOG MODE DTS DIGITAL PL MOVIE PL MUSIC VOLUME TRIM 7 +6 6 +4 5 +2 4 0 3 -2 2 -4 1 -6 INPUT INPUT ...a source, press S.WOOFER - y • While adjusting, the current level is shown by the lighting of the VOLUME indicators on the remote control. Note • The adjustment cannot be made when listening with headphones even if + or - Pressing + increases and - I When you ...
Owner's Manual
Page 15
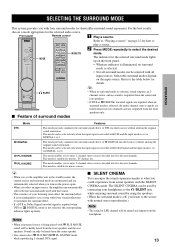
... This system provides you with Dolby Digital and the input mode is set to DIGITAL 1 or 2. The indicator for theaterlike surround sound enjoyment. Front panel Remote control 1 Play a source. Refer to "Playing a source" on the input source. This mode can be selected only when the input signal is in the standby mode...
... This system provides you with Dolby Digital and the input mode is set to DIGITAL 1 or 2. The indicator for theaterlike surround sound enjoyment. Front panel Remote control 1 Play a source. Refer to "Playing a source" on the input source. This mode can be selected only when the input signal is in the standby mode...
Owner's Manual
Page 16
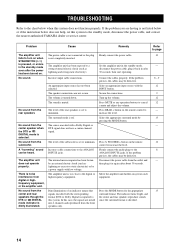
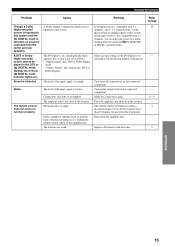
No sound from such equipment. An appropriate input source has not been selected. The surround mode is decoded. 10 - 8 - 9 12 9 12 12 - 13 - 12 8 - 13 14 The internal microcomputer has been frozen by an external electric shock (such as lightning and strong static...on . Firmly connect the audio plugs to the chart below does not help, set to turn on the remote control to the standby mode, disconnect the power cable, and contact the nearest authorized YAMAHA dealer or service center. Press the MODE button for the appropriate surround format. TROUBLESHOOTING Refer to the ANALOG...
No sound from such equipment. An appropriate input source has not been selected. The surround mode is decoded. 10 - 8 - 9 12 9 12 12 - 13 - 12 8 - 13 14 The internal microcomputer has been frozen by an external electric shock (such as lightning and strong static...on . Firmly connect the audio plugs to the chart below does not help, set to turn on the remote control to the standby mode, disconnect the power cable, and contact the nearest authorized YAMAHA dealer or service center. Press the MODE button for the appropriate surround format. TROUBLESHOOTING Refer to the ANALOG...
Owner's Manual
Page 17
... 9 - 4 - 2 APPENDIX English 15 Make the connections again. Direct sunlight or lighting (from the monitor. Refer to the monitor. The remote control does not work nor function properly. Turn down the output level on the connected component. Place the amplifier unit away from an inverter type of... fluorescent lamp, etc.) is striking the remote control sensor of the amplifier unit. Cause A Dolby Digital 2-channel encoded source is inputted to the instruction manual of 6 m (...
... 9 - 4 - 2 APPENDIX English 15 Make the connections again. Direct sunlight or lighting (from the monitor. Refer to the monitor. The remote control does not work nor function properly. Turn down the output level on the connected component. Place the amplifier unit away from an inverter type of... fluorescent lamp, etc.) is striking the remote control sensor of the amplifier unit. Cause A Dolby Digital 2-channel encoded source is inputted to the instruction manual of 6 m (...


