

Owner's Manual
Page 1
U B HOME THEATER SOUND SYSTEM TSS-10 INPUT DIGITAL 1 DIGITAL 2 ANALOG MODE DTS DIGITAL PL MOVIE PL MUSIC VOLUME TRIM 7 +6 6 +4 5 +2 4 0 3 -2 2 -4 1 -6 SILENT Active Servo Technology STANDBY/ON TSS-10 HOME THEATER SOUND SYSTEM INPUT MODE REAR S.WOOFER VOLUME MUTE TEST OWNER'S MANUAL
U B HOME THEATER SOUND SYSTEM TSS-10 INPUT DIGITAL 1 DIGITAL 2 ANALOG MODE DTS DIGITAL PL MOVIE PL MUSIC VOLUME TRIM 7 +6 6 +4 5 +2 4 0 3 -2 2 -4 1 -6 SILENT Active Servo Technology STANDBY/ON TSS-10 HOME THEATER SOUND SYSTEM INPUT MODE REAR S.WOOFER VOLUME MUTE TEST OWNER'S MANUAL
Owner's Manual
Page 2
...system upside-down. Using this system away from the wall outlet, grasp the plug; Contact qualified YAMAHA service personnel when any damage resulting from use force on switches, knobs and/or cables. 10 When disconnecting the power cable from other than specified is located on the top of the amplifier... on this system must be held responsible for any objects filled with at least 20 cm on the top, 10 cm on this system in the mains lead of power. YAMAHA will not be connected to the terminal which is marked with a humidifier) to avoid condensation inside this system rises...
...system upside-down. Using this system away from the wall outlet, grasp the plug; Contact qualified YAMAHA service personnel when any damage resulting from use force on switches, knobs and/or cables. 10 When disconnecting the power cable from other than specified is located on the top of the amplifier... on this system must be held responsible for any objects filled with at least 20 cm on the top, 10 cm on this system in the mains lead of power. YAMAHA will not be connected to the terminal which is marked with a humidifier) to avoid condensation inside this system rises...
Owner's Manual
Page 3
... ACCESSORIES 2 INSTALLING BATTERIES IN THE REMOTE CONTROL 2 CONTROLS AND FUNCTIONS 3 SETTING UP THE SYSTEM 5 CONNECTIONS 7 Connecting audio components 8 Connecting the speakers 9 Connecting the power cable 10 ADJUSTING SPEAKER OUTPUT LEVELS 11 OPERATION PLAYING A SOURCE 12 SELECTING THE SURROUND MODE 13 OPERATION APPENDIX APPENDIX TROUBLESHOOTING 14 GLOSSARY 16 SPECIFICATIONS 17 I About this...
... ACCESSORIES 2 INSTALLING BATTERIES IN THE REMOTE CONTROL 2 CONTROLS AND FUNCTIONS 3 SETTING UP THE SYSTEM 5 CONNECTIONS 7 Connecting audio components 8 Connecting the speakers 9 Connecting the power cable 10 ADJUSTING SPEAKER OUTPUT LEVELS 11 OPERATION PLAYING A SOURCE 12 SELECTING THE SURROUND MODE 13 OPERATION APPENDIX APPENDIX TROUBLESHOOTING 14 GLOSSARY 16 SPECIFICATIONS 17 I About this...

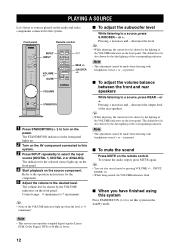
Owner's Manual
Page 4
marks on the batteries with the polarity markings (+ and -) inside the battery compartment. 2 1 3 I Notes on so that it snaps into contact with clothing, etc. The batteries can be set ) Non-skid pads (for the center speaker) (3 sets: 24 pieces) AC adaptor (LSE9802B1540) 3.5 mm stereo mini/ RCA stereo pin cable Stand (for the amplifier unit) Screws (2 pieces) Optical cable Audio pin cable INSTALLING BATTERIES IN THE REMOTE CONTROL Insert the batteries in the operating range of the remote control. • Do not use different types of batteries (such as these different ...
marks on the batteries with the polarity markings (+ and -) inside the battery compartment. 2 1 3 I Notes on so that it snaps into contact with clothing, etc. The batteries can be set ) Non-skid pads (for the center speaker) (3 sets: 24 pieces) AC adaptor (LSE9802B1540) 3.5 mm stereo mini/ RCA stereo pin cable Stand (for the amplifier unit) Screws (2 pieces) Optical cable Audio pin cable INSTALLING BATTERIES IN THE REMOTE CONTROL Insert the batteries in the operating range of the remote control. • Do not use different types of batteries (such as these different ...
Owner's Manual
Page 5
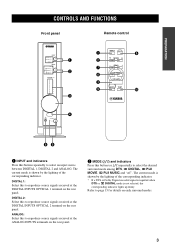
ANALOG: Select this to reproduce source signals received at the ANALOG INPUTS terminals on the rear panel. 2 MODE (k/n) and indicators Press this button (or k/n) repeatedly to page 13 for details on each surround modes. 3 English The current mode is not selected, the corresponding indicator lights up dimly. Refer to select the desired surround mode among DTS, DIGITAL, PLII MOVIE, PLII MUSIC and "off". DIGITAL 2: Select this to select an input source between DIGITAL 1, DIGITAL 2 and ANALOG. The current mode is shown by the lighting of the corresponding indicator. * If a DTS or ...
ANALOG: Select this to reproduce source signals received at the ANALOG INPUTS terminals on the rear panel. 2 MODE (k/n) and indicators Press this button (or k/n) repeatedly to page 13 for details on each surround modes. 3 English The current mode is not selected, the corresponding indicator lights up dimly. Refer to select the desired surround mode among DTS, DIGITAL, PLII MOVIE, PLII MUSIC and "off". DIGITAL 2: Select this to select an input source between DIGITAL 1, DIGITAL 2 and ANALOG. The current mode is shown by the lighting of the corresponding indicator. * If a DTS or ...
Owner's Manual
Page 6
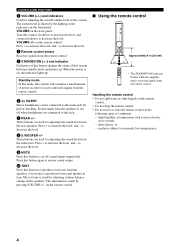
Press + to increase the level, and - The adjustment is used for adjusting volume balance among all the speakers. I Using the remote control SILENT Approximately 6 m (20 feet) 30° 30° * The STANDBY/ON indicator flashes while the amplifier unit is receiving signals from each speaker in the following types of conditions: - high humidity or temperature such as near a heater, stove or bath; - on the remote control. • Do not drop the remote control. • Do not leave or store the remote control in turn. Press + to increase the level, and - Handling the ...
Press + to increase the level, and - The adjustment is used for adjusting volume balance among all the speakers. I Using the remote control SILENT Approximately 6 m (20 feet) 30° 30° * The STANDBY/ON indicator flashes while the amplifier unit is receiving signals from each speaker in the following types of conditions: - high humidity or temperature such as near a heater, stove or bath; - on the remote control. • Do not drop the remote control. • Do not leave or store the remote control in turn. Press + to increase the level, and - Handling the ...
Owner's Manual
Page 7
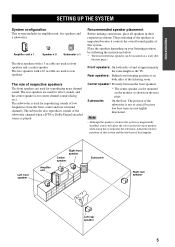
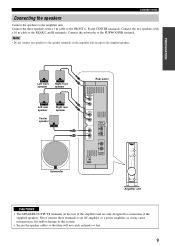
... positioning of this system near the television. Note • Although the speaker system in their respective positions. Amplifier unit x 1 Speaker x 5 Subwoofer x 1 The three speakers with a 10 m cable are not highly directional. The role of the listening room. Recommended speaker placement Before making connections, place all speakers in this system is magnetically...
... positioning of this system near the television. Note • Although the speaker system in their respective positions. Amplifier unit x 1 Speaker x 5 Subwoofer x 1 The three speakers with a 10 m cable are not highly directional. The role of the listening room. Recommended speaker placement Before making connections, place all speakers in this system is magnetically...
Owner's Manual
Page 8
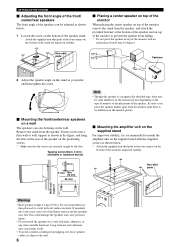
... out of the flimsy surface and the speakers may cause them on the type of monitor or the placement of the speaker. Non-skid 10؇ pads 10؇ Fastener 2 Adjust the speaker angle on top of the monitor with nails, adhesives, or any other unstable hardware. SETTING UP THE SYSTEM Ⅵ... screw (Diam. 4 mm) (Available in the figure, and hang the slits on the rear of the speaker on a wall with an inclination of more than 10 degrees.
... out of the flimsy surface and the speakers may cause them on the type of monitor or the placement of the speaker. Non-skid 10؇ pads 10؇ Fastener 2 Adjust the speaker angle on top of the monitor with nails, adhesives, or any other unstable hardware. SETTING UP THE SYSTEM Ⅵ... screw (Diam. 4 mm) (Available in the figure, and hang the slits on the rear of the speaker on a wall with an inclination of more than 10 degrees.
Owner's Manual
Page 9
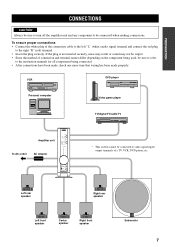
... AC outlet Amplifier unit AC adaptor INPUT DIGITAL 1 DIGITAL 2 ANALOG MODE DTS DIGITAL PL MOVIE PL MUSIC VOLUME TRIM 7 +6 6 +4 5 +2 4 0 3 -2 2 -4 1 -6 SILENT Active Servo Technology STANDBY/ON TSS-10 HOME THEATER SOUND SYSTEM * This system cannot be connected to video signal input/ output terminals of the connection cable to the left "L" (white) audio signal...
... AC outlet Amplifier unit AC adaptor INPUT DIGITAL 1 DIGITAL 2 ANALOG MODE DTS DIGITAL PL MOVIE PL MUSIC VOLUME TRIM 7 +6 6 +4 5 +2 4 0 3 -2 2 -4 1 -6 SILENT Active Servo Technology STANDBY/ON TSS-10 HOME THEATER SOUND SYSTEM * This system cannot be connected to video signal input/ output terminals of the connection cable to the left "L" (white) audio signal...
Owner's Manual
Page 10
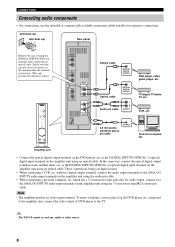
... on the DVD player, etc. To enjoy watching a source played on the amplifier unit using the 3.5 mm stereo mini/RCA stereo pin cable. y • The TSS-10 cannot record any audio or video source. 8
... on the DVD player, etc. To enjoy watching a source played on the amplifier unit using the 3.5 mm stereo mini/RCA stereo pin cable. y • The TSS-10 cannot record any audio or video source. 8
Owner's Manual
Page 11
... to an AV amplifier or a power amplifier, as it may cause misoperation, fire and/or damage to the amplifier unit. Connect the three speakers with a 10 m cable to the SUBWOOFER terminal.
... to an AV amplifier or a power amplifier, as it may cause misoperation, fire and/or damage to the amplifier unit. Connect the three speakers with a 10 m cable to the SUBWOOFER terminal.
Owner's Manual
Page 12
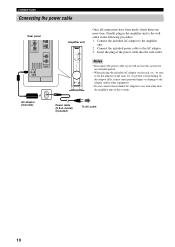
... adaptor on the rack, etc., be sure to fix the adaptor on the rack, etc. AC adaptor (included) Power cable (U.S.A. model) (included) To AC outlet 10 CONNECTIONS Connecting the power cable Rear panel CENTER 1 2 S. Finally, plug in the amplifier unit to the AC adaptor. 3. Connect the included AC adaptor to any...
... adaptor on the rack, etc., be sure to fix the adaptor on the rack, etc. AC adaptor (included) Power cable (U.S.A. model) (included) To AC outlet 10 CONNECTIONS Connecting the power cable Rear panel CENTER 1 2 S. Finally, plug in the amplifier unit to the AC adaptor. 3. Connect the included AC adaptor to any...
Owner's Manual
Page 13
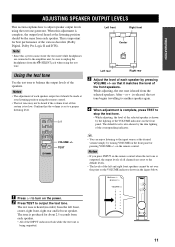
Note • Since this system is set over the point on the VOLUME indicator shown in order) from the SILENT jack when using the test tone. so that the volume is too low. The test tone is complete, the output level heard at the listening position should be set to a proper listening level. When this adjustment is heard (in the figure below. 1 Press to turn on the front panel or pressing VOLUME +/- Notes • If you press INPUT on the remote control when the test tone is shown by turning VOLUME on the power. 2 Press TEST to output the test tone. on the ...
Note • Since this system is set over the point on the VOLUME indicator shown in order) from the SILENT jack when using the test tone. so that the volume is too low. The test tone is complete, the output level heard at the listening position should be set to a proper listening level. When this adjustment is heard (in the figure below. 1 Press to turn on the front panel or pressing VOLUME +/- Notes • If you press INPUT on the remote control when the test tone is shown by turning VOLUME on the power. 2 Press TEST to output the test tone. on the ...
Owner's Manual
Page 14
The volume level is also shown by the VOLUME indicators on the source component. The default level is shown by the dim lighting of the VOLUME indicators on the front panel. y • While adjusting, the current level is also shown by the lighting of the corresponding indicator. Note • The adjustment cannot be made when listening with headphones even if + or - or +. decreases the output level of the corresponding indicator. is pressed. Front panel Remote control INPUT DIGITAL 1 DIGITAL 2 ANALOG MODE DTS DIGITAL PL MOVIE PL MUSIC ...
The volume level is also shown by the VOLUME indicators on the source component. The default level is shown by the dim lighting of the VOLUME indicators on the front panel. y • While adjusting, the current level is also shown by the lighting of the corresponding indicator. Note • The adjustment cannot be made when listening with headphones even if + or - or +. decreases the output level of the corresponding indicator. is pressed. Front panel Remote control INPUT DIGITAL 1 DIGITAL 2 ANALOG MODE DTS DIGITAL PL MOVIE PL MUSIC ...
Owner's Manual
Page 15
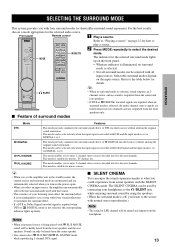
For the best results, choose a mode appropriate for details. Selectable surround modes depend on the front panel. This mode can be selected with Dolby Digital and the input mode is off, you listen to enjoy 2-channel stereo sources decoded into five discrete channels. This mode can be selected only when the input signal is encoded with DTS and the input mode is set to DIGITAL 1 or 2. Notes • When a monaural source is selected. • Not all input sources. The SILENT CINEMA can be selected only when the input signal is encoded with all surround modes can ...
For the best results, choose a mode appropriate for details. Selectable surround modes depend on the front panel. This mode can be selected with Dolby Digital and the input mode is off, you listen to enjoy 2-channel stereo sources decoded into five discrete channels. This mode can be selected only when the input signal is encoded with DTS and the input mode is set to DIGITAL 1 or 2. Notes • When a monaural source is selected. • Not all input sources. The SILENT CINEMA can be selected only when the input signal is encoded with all surround modes can ...
Owner's Manual
Page 16
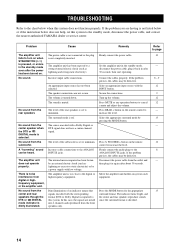
... speaker connections are having is pressed, or enters in again after about 30 seconds. The volume is not completely inserted. The surround mode is decoded. 10 - 8 - 9 12 9 12 12 - 13 - 12 8 - 13 14 The indicator turns bright, and the center and rear speakers reproduce sounds since the ...Refer to the chart below does not help, set this system to the standby mode, disconnect the power cable, and contact the nearest authorized YAMAHA dealer or service center. Problem Cause Remedy Refer to page The amplifier unit fails to increase the level. In this system. Turn up the...
... speaker connections are having is pressed, or enters in again after about 30 seconds. The volume is not completely inserted. The surround mode is decoded. 10 - 8 - 9 12 9 12 12 - 13 - 12 8 - 13 14 The indicator turns bright, and the center and rear speakers reproduce sounds since the ...Refer to the chart below does not help, set this system to the standby mode, disconnect the power cable, and contact the nearest authorized YAMAHA dealer or service center. Problem Cause Remedy Refer to page The amplifier unit fails to increase the level. In this system. Turn up the...
Owner's Manual
Page 17
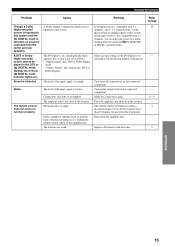
Connections are weak. referring to this system. Cause A Dolby Digital 2-channel encoded source is inputted to the instruction manual of the player. Remedy If the input source is compatible with 5.1 channels, select "5.1-channel mode" on the connected component. Place the amplifier unit away from an inverter type of fluorescent lamp, etc.) is striking the remote control sensor of 6 m (20 feet) and no sound is outputted from the center and rear speakers. Refer to the monitor. Noise. The remote control does not work nor function properly. The level of the input ...
Connections are weak. referring to this system. Cause A Dolby Digital 2-channel encoded source is inputted to the instruction manual of the player. Remedy If the input source is compatible with 5.1 channels, select "5.1-channel mode" on the connected component. Place the amplifier unit away from an inverter type of fluorescent lamp, etc.) is striking the remote control sensor of 6 m (20 feet) and no sound is outputted from the center and rear speakers. Refer to the monitor. Noise. The remote control does not work nor function properly. The level of the input ...
Owner's Manual
Page 18
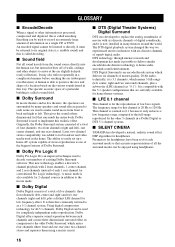
... 1 rear channel for this channel is able to 120 Hz. I Dolby Surround In movie theaters and in a Dolby Digital or DTS 5.1 channel systems. I SILENT CINEMA YAMAHA has developed a natural, realistic sound effect DSP algorithm for broadcast and video media used to make sound move from the sound source directly into two...
... 1 rear channel for this channel is able to 120 Hz. I Dolby Surround In movie theaters and in a Dolby Digital or DTS 5.1 channel systems. I SILENT CINEMA YAMAHA has developed a natural, realistic sound effect DSP algorithm for broadcast and video media used to make sound move from the sound source directly into two...
Owner's Manual
Page 19
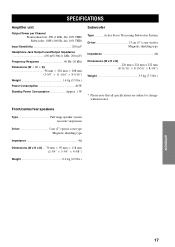
SPECIFICATIONS Amplifier unit Output Power per Channel Front/center/rear: 6W (1 kHz, 4Ω, 10% THD) Subwoofer: 18W (100 Hz, 4Ω, 10% THD) Input Sensitivity 200 mV Headphone Jack Output Level/Output Impedance 450 mV/30Ω (1 kHz, 200 mV) Frequency Response 40 Hz-20 kHz Dimensions (W &#...
SPECIFICATIONS Amplifier unit Output Power per Channel Front/center/rear: 6W (1 kHz, 4Ω, 10% THD) Subwoofer: 18W (100 Hz, 4Ω, 10% THD) Input Sensitivity 200 mV Headphone Jack Output Level/Output Impedance 450 mV/30Ω (1 kHz, 200 mV) Frequency Response 40 Hz-20 kHz Dimensions (W &#...
Owner's Manual
Page 20
... If this product is found to be the source of interference, which can not locate the appropriate retailer, please contact Yamaha Electronics Corp., U.S.A. 6660 Orangethorpe Ave, Buena Park, CA 90620. Compliance with FCC regulations does not guarantee that interference will... interference, relocate/reorient the antenna. This equipment generates/uses radio frequencies and, if not installed and used . OF GERMANY YAMAHA ELECTRONIQUE FRANCE S.A. Follow all installations. Cable/s supplied with the requirements listed in to comply with this manual, meets FCC requirements...
... If this product is found to be the source of interference, which can not locate the appropriate retailer, please contact Yamaha Electronics Corp., U.S.A. 6660 Orangethorpe Ave, Buena Park, CA 90620. Compliance with FCC regulations does not guarantee that interference will... interference, relocate/reorient the antenna. This equipment generates/uses radio frequencies and, if not installed and used . OF GERMANY YAMAHA ELECTRONIQUE FRANCE S.A. Follow all installations. Cable/s supplied with the requirements listed in to comply with this manual, meets FCC requirements...