
Owner's Manual
Page 5
...remote control 9 Installing batteries in the remote control 9 Using the remote control 9 Connections 10 Placing speakers 10 Connecting speakers 11 Information on jacks and cable plugs 13 Connecting a TV monitor or projector 14 Connecting other components 15 Connecting a Yamaha iPod universal dock or Bluetooth™ wireless audio receiver...Using iPod 30 Controlling iPod 30 Using Bluetooth™ components 32 Pairing the Bluetooth™ wireless audio receiver and your Bluetooth component 32 Playback of the Bluetooth™ component 32 ADVANCED OPERATION Setting the option menu...
...remote control 9 Installing batteries in the remote control 9 Using the remote control 9 Connections 10 Placing speakers 10 Connecting speakers 11 Information on jacks and cable plugs 13 Connecting a TV monitor or projector 14 Connecting other components 15 Connecting a Yamaha iPod universal dock or Bluetooth™ wireless audio receiver...Using iPod 30 Controlling iPod 30 Using Bluetooth™ components 32 Pairing the Bluetooth™ wireless audio receiver and your Bluetooth component 32 Playback of the Bluetooth™ component 32 ADVANCED OPERATION Setting the option menu...
Owner's Manual
Page 7
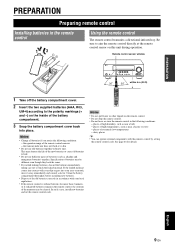
... operation. • Some operations can be performed by Yamaha in accordance with a license agreement. and other U.S. Supplied accessories Check that you received all of the parts on the remote control. In case of differences between the front panel and the remote control, the key name on the remote control is given in parentheses. • This...
... operation. • Some operations can be performed by Yamaha in accordance with a license agreement. and other U.S. Supplied accessories Check that you received all of the parts on the remote control. In case of differences between the front panel and the remote control, the key name on the remote control is given in parentheses. • This...
Owner's Manual
Page 10
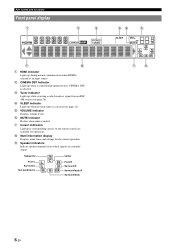
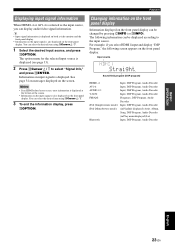
g Cursor indicators Light up if corresponding cursors on the remote control are currently output. i Speaker indicators Indicate speaker terminals from an FM/ AM station (see page 22). e VOLUME indicator Displays volume levels. MUTE SW...is muted. f MUTE indicator Flashes when audio is selected. h Multi information display Displays menu items and settings for operations. b CINEMA DSP indicator Lights up while receiving a radio broadcast signal from which signals are available for the current operation. Subwoofer Front L Surround L Surround back L SW L CR SL SR SBL SB ...
g Cursor indicators Light up if corresponding cursors on the remote control are currently output. i Speaker indicators Indicate speaker terminals from an FM/ AM station (see page 22). e VOLUME indicator Displays volume levels. MUTE SW...is muted. f MUTE indicator Flashes when audio is selected. h Multi information display Displays menu items and settings for operations. b CINEMA DSP indicator Lights up while receiving a radio broadcast signal from which signals are available for the current operation. Subwoofer Front L Surround L Surround back L SW L CR SL SR SBL SB ...

Owner's Manual
Page 11
... To control external components using the rExternal component operation keys separately from the remote control. Selects a Yamaha iPod universal dock/ Bluetooth wireless audio receiver connected to the previous screen or ends the menu display. Changes tuning frequencies...Displays the option menu (see page 30). Selects the FM/AM tuner. INTRODUCTION PREPARATION BASIC OPERATION ADVANCED OPERATION Remote control a d g h i j k l n r TRANSMIT CODE SET POWER SOURCE 1 1 5 SLEEP POWER HDMI 2 3 4 AV 2 3 4 AUDIO 6 1 2 V-AUX [ A ] [ B ] DOCK TUNER FM AM ...
... To control external components using the rExternal component operation keys separately from the remote control. Selects a Yamaha iPod universal dock/ Bluetooth wireless audio receiver connected to the previous screen or ends the menu display. Changes tuning frequencies...Displays the option menu (see page 30). Selects the FM/AM tuner. INTRODUCTION PREPARATION BASIC OPERATION ADVANCED OPERATION Remote control a d g h i j k l n r TRANSMIT CODE SET POWER SOURCE 1 1 5 SLEEP POWER HDMI 2 3 4 AV 2 3 4 AUDIO 6 1 2 V-AUX [ A ] [ B ] DOCK TUNER FM AM ...
Owner's Manual
Page 12
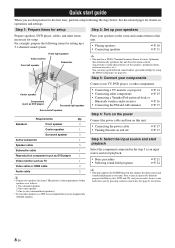
... • Connecting a TV monitor or projector ☞P. 14 • Connecting other components ☞P. 15 • Connecting a Yamaha iPod universal dock or Bluetooth wireless audio receiver ☞P. 16 • Connecting the FM and AM antennas ☞P. 17 Step 4: Turn on the power Connect the power ...; Prepare two speakers (for Blu-ray disc, DVD and CD, and you can enjoy good balanced sound without special knowledge by pressing a remote control key. The priority of the requirement of other speakers is a CRT, we recommend that changes the input source and sound field program ...
... • Connecting a TV monitor or projector ☞P. 14 • Connecting other components ☞P. 15 • Connecting a Yamaha iPod universal dock or Bluetooth wireless audio receiver ☞P. 16 • Connecting the FM and AM antennas ☞P. 17 Step 4: Turn on the power Connect the power ...; Prepare two speakers (for Blu-ray disc, DVD and CD, and you can enjoy good balanced sound without special knowledge by pressing a remote control key. The priority of the requirement of other speakers is a CRT, we recommend that changes the input source and sound field program ...
Owner's Manual
Page 13
...ADVANCED OPERATION ADDITIONAL INFORMATION APPENDIX English 9 En Notes • Do not spill water or other liquids on this remote control by setting the remote control code. places of the remote control narrows - dusty places y • You can operate external components with new ones. the operation range...as alkaline and manganese batteries) together. Be sure to touch the leaked material. In such a case, install new batteries and set the remote control code. This may be different even though they look the same. • If you notice the following conditions: - places of...
...ADVANCED OPERATION ADDITIONAL INFORMATION APPENDIX English 9 En Notes • Do not spill water or other liquids on this remote control by setting the remote control code. places of the remote control narrows - dusty places y • You can operate external components with new ones. the operation range...as alkaline and manganese batteries) together. Be sure to touch the leaked material. In such a case, install new batteries and set the remote control code. This may be different even though they look the same. • If you notice the following conditions: - places of...
Owner's Manual
Page 19
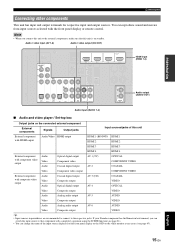
... OPTICAL Video Composite output VIDEO Audio Analog audio output AV 5 AUDIO Video Composite output VIDEO Audio Analog audio output AV 6 AUDIO Video Composite output VIDEO y • Input sources in parentheses are recommended to connect to the respective jacks. If your Yamaha component has the Remote in/out terminal, you connect this unit to that...
... OPTICAL Video Composite output VIDEO Audio Analog audio output AV 5 AUDIO Video Composite output VIDEO Audio Analog audio output AV 6 AUDIO Video Composite output VIDEO y • Input sources in parentheses are recommended to connect to the respective jacks. If your Yamaha component has the Remote in/out terminal, you connect this unit to that...
Owner's Manual
Page 21
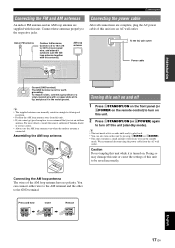
... We recommend disconnecting the power cable from this antenna). You can also turn off 1 Press ASTANDBY/ON on the front panel (or fPOWER on the remote control) to play back. • You can connect either wire to the AM terminal and the other to the respective jacks. To reduce noises, connect... unit while it in the standby mode. Caution Do not unplug this unit into an AC wall outlet. For more details, consult the nearest authorized Yamaha dealer or service center. • Always use the AM loop antenna together with a copper plate at its tip, and place it is not for ...
... We recommend disconnecting the power cable from this antenna). You can also turn off 1 Press ASTANDBY/ON on the front panel (or fPOWER on the remote control) to play back. • You can connect either wire to the AM terminal and the other to the respective jacks. To reduce noises, connect... unit while it in the standby mode. Caution Do not unplug this unit into an AC wall outlet. For more details, consult the nearest authorized Yamaha dealer or service center. • Always use the AM loop antenna together with a copper plate at its tip, and place it is not for ...

Owner's Manual
Page 25
... Input source Sound field program BD/DVD TV CD RADIO HDMI 1 AV 1 AV 3 TUNER Straight Straight Straight 7ch Enhancer y • When this unit is not improved, the problem may cause a speaker malfunction. Switching remotely controlled external components linked to select an input source. INTRODUCTION PREPARATION BASIC... AV1 y • You can turn on standby, you to switch between external components linked to scene selections. 1 Register the remote control code of an iPod or Bluetooth component using this unit by pressing the SCENE key. Volume VOL. For selecting radio stations or...
... Input source Sound field program BD/DVD TV CD RADIO HDMI 1 AV 1 AV 3 TUNER Straight Straight Straight 7ch Enhancer y • When this unit is not improved, the problem may cause a speaker malfunction. Switching remotely controlled external components linked to select an input source. INTRODUCTION PREPARATION BASIC... AV1 y • You can turn on standby, you to switch between external components linked to scene selections. 1 Register the remote control code of an iPod or Bluetooth component using this unit by pressing the SCENE key. Volume VOL. For selecting radio stations or...
Owner's Manual
Page 26
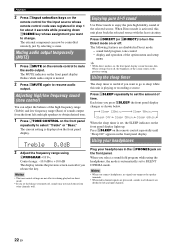
... (or jDIRECT) to resume audio output. When the sleep timer is on, the front panel display screen becomes dim. Press eSLEEP on the remote control repeatedly until "Sleep Off" appears on the front panel display lights up. The external component can adjust the balance of the high frequency range...returns to sleep while this unit plays back the selected source with the least circuitry. Muting audio output temporarily (MUTE) 1 Press qMUTE on the remote control to +10.0 dB The display returns the previous screen soon after you release the key. Notes • The tone control settings are ...
... (or jDIRECT) to resume audio output. When the sleep timer is on, the front panel display screen becomes dim. Press eSLEEP on the remote control repeatedly until "Sleep Off" appears on the front panel display lights up. The external component can adjust the balance of the high frequency range...returns to sleep while this unit plays back the selected source with the least circuitry. Muting audio output temporarily (MUTE) 1 Press qMUTE on the remote control to +10.0 dB The display returns the previous screen soon after you release the key. Notes • The tone control settings are ...
Owner's Manual
Page 27
..., DSP Program, Audio Decoder AUDIO1-2: Input, DSP Program, Audio Decoder V-AUX: Input, DSP Program, Audio Decoder FM/AM: Frequency, DSP Program, Audio Decoder iPod (Simple remote mode): Input, DSP Program, Audio Decoder iPod (Menu browse mode): (in PlayInfo displayed) Artist, Album, Song, DSP Program, Audio Decoder (in Play menu displayed) List...
..., DSP Program, Audio Decoder AUDIO1-2: Input, DSP Program, Audio Decoder V-AUX: Input, DSP Program, Audio Decoder FM/AM: Frequency, DSP Program, Audio Decoder iPod (Simple remote mode): Input, DSP Program, Audio Decoder iPod (Menu browse mode): (in PlayInfo displayed) Artist, Album, Song, DSP Program, Audio Decoder (in Play menu displayed) List...
Owner's Manual
Page 28
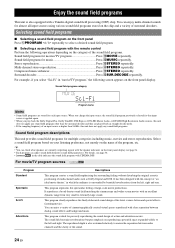
... input source is applied again. • When you select "Sci-Fi" in the table indicates the sound field program with the remote control Perform the following screen appears on the front panel Press KPROGRAM l / h repeatedly to ensure the separation between dialog, sound effects... Digital and DTS. For details, see page 6). • Each program can enjoy a variety of cinematographically created virtual spaces reproduced with a Yamaha digital sound field processing (DSP) chip. y • You can enjoy multi-channel sounds for precisely reproducing the sound design of action and...
... input source is applied again. • When you select "Sci-Fi" in the table indicates the sound field program with the remote control Perform the following screen appears on the front panel Press KPROGRAM l / h repeatedly to ensure the separation between dialog, sound effects... Digital and DTS. For details, see page 6). • Each program can enjoy a variety of cinematographically created virtual spaces reproduced with a Yamaha digital sound field processing (DSP) chip. y • You can enjoy multi-channel sounds for precisely reproducing the sound design of action and...
Owner's Manual
Page 32
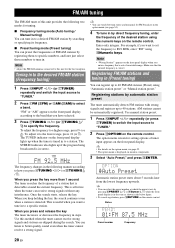
... around the current frequency. Registering FM/AM stations and tuning in (Preset tuning) You can register up when the tuner is out of receivable range. Note • Adjust the FM/AM antennas connected to 88.9 MHz, enter "889" using sNumeric keys. Once the search starts... pressing hPRESET k / n or nCursor k / n while the front panel display is detected. This is correct. Make sure that is displayed on the remote control. STEREO TUNED FM 92.5 MHz The frequency changes in the following two modes for tuning. ■ Frequency tuning mode (Auto tuning / Manual tuning...
... around the current frequency. Registering FM/AM stations and tuning in (Preset tuning) You can register up when the tuner is out of receivable range. Note • Adjust the FM/AM antennas connected to 88.9 MHz, enter "889" using sNumeric keys. Once the search starts... pressing hPRESET k / n or nCursor k / n while the front panel display is detected. This is correct. Make sure that is displayed on the remote control. STEREO TUNED FM 92.5 MHz The frequency changes in the following two modes for tuning. ■ Frequency tuning mode (Auto tuning / Manual tuning...

Owner's Manual
Page 33
... "Empty" appears on the display if you select a preset number to "TUNER." 2 Press mOPTION on the remote control. The option menu screen for setting options of tuner input appears on the remote control or leave the tuner without any operations for more than the last preset number. 3 Press EPRESET l /... h (or hPRESET k / n) on the remote control to select the preset number to register. INTRODUCTION PREPARATION BASIC OPERATION During the automatic station preset, the upper area of the screen changes...
... "Empty" appears on the display if you select a preset number to "TUNER." 2 Press mOPTION on the remote control. The option menu screen for setting options of tuner input appears on the remote control or leave the tuner without any operations for more than the last preset number. 3 Press EPRESET l /... h (or hPRESET k / n) on the remote control to select the preset number to register. INTRODUCTION PREPARATION BASIC OPERATION During the automatic station preset, the upper area of the screen changes...

Owner's Manual
Page 34
...(such as the YDS-11, sold separately) connected to the DOCK terminal on the rear panel of Yamaha iPod universal dock. The following sections describe the procedure when using the remote control while looking at the menu displayed on the video monitor. Using iPod™ Once you have stationed... your iPod in a Yamaha iPod universal dock (such as MP3 format) stored on your iPod (see page 24). ...
...(such as the YDS-11, sold separately) connected to the DOCK terminal on the rear panel of Yamaha iPod universal dock. The following sections describe the procedure when using the remote control while looking at the menu displayed on the video monitor. Using iPod™ Once you have stationed... your iPod in a Yamaha iPod universal dock (such as MP3 format) stored on your iPod (see page 24). ...
Owner's Manual
Page 36
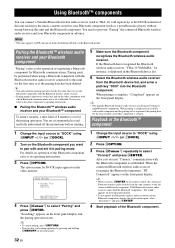
...To cancel pairing, press nRETURN. • You can also start pairing operation by pressing and holding DMEMORY on the remote control, the connected Bluetooth wireless audio receiver searches and connects to select "Connect" and press nENTER. y • When you execute "Connect," communication with up...is registered, the pairing data for instance, is cleared. Using Bluetooth™ components You can connect a Yamaha Bluetooth wireless audio receiver (such as a portable music player) without wiring between this unit and the Bluetooth component. Pairing the Bluetooth™ wireless...
...To cancel pairing, press nRETURN. • You can also start pairing operation by pressing and holding DMEMORY on the remote control, the connected Bluetooth wireless audio receiver searches and connects to select "Connect" and press nENTER. y • When you execute "Connect," communication with up...is registered, the pairing data for instance, is cleared. Using Bluetooth™ components You can connect a Yamaha Bluetooth wireless audio receiver (such as a portable music player) without wiring between this unit and the Bluetooth component. Pairing the Bluetooth™ wireless...
Owner's Manual
Page 37
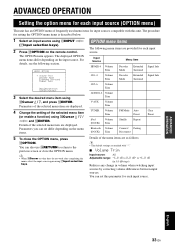
...) Reduces any change in volume when switching input sources by correcting volume differences between input sources. The displayed OPTION menu items differ depending on the remote control. Parameters of the selected menu item are displayed. 4 Change the setting of the selected menu item are provided for setting the OPTION menu items...
...) Reduces any change in volume when switching input sources by correcting volume differences between input sources. The displayed OPTION menu items differ depending on the remote control. Parameters of the selected menu item are displayed. 4 Change the setting of the selected menu item are provided for setting the OPTION menu items...

Owner's Manual
Page 40
... press nCursor l / h to select the sound field program. 36 En An asterisk (*) appears on the left of the sound field parameter name displayed on the remote control. To initialize the parameters of the sound field effect to be used with the sound field program after setting the parameters from its default...
... press nCursor l / h to select the sound field program. 36 En An asterisk (*) appears on the left of the sound field parameter name displayed on the remote control. To initialize the parameters of the sound field effect to be used with the sound field program after setting the parameters from its default...
Owner's Manual
Page 42
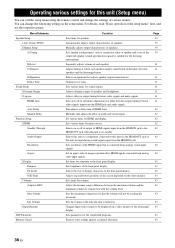
... of audio and visual output. Adjusts delay in the setup menu. Sets parameters for the listening environment. You can call the setup menu using the remote control and change the following settings in output timing between speakers and the listening position. Manually fine adjusts the delay of speakers. Sets various items...
... of audio and visual output. Adjusts delay in the setup menu. Sets parameters for the listening environment. You can call the setup menu using the remote control and change the following settings in output timing between speakers and the listening position. Manually fine adjusts the delay of speakers. Sets various items...

Owner's Manual
Page 43
... in the Manual Setup menu, press nCursor k / n. Two kinds of speakers based on both video display (OSD) and front panel display. For details on the remote control. After Auto Setup (YPAO) is "Manual Setup" for your preference if necessary. ■ A)Config Sets speaker configurations, such as follows. Fine adjust the parameters...
... in the Manual Setup menu, press nCursor k / n. Two kinds of speakers based on both video display (OSD) and front panel display. For details on the remote control. After Auto Setup (YPAO) is "Manual Setup" for your preference if necessary. ■ A)Config Sets speaker configurations, such as follows. Fine adjust the parameters...

