
Owner's Manual
Page 1
U RX-V565 AV Receiver OWNER'S MANUAL
U RX-V565 AV Receiver OWNER'S MANUAL

Owner's Manual
Page 3
... Refer all installation instructions. FCC INFORMATION (for long periods of interference, which can not locate the appropriate retailer, please contact Yamaha Electronics Corp., U.S.A. 6660 Orangethorpe Ave, Buena Park, CA 90620. Failure to follow instructions could void your FCC authorization to eliminate... branch (circuit breaker or fuse) circuits or install AC line filter/s. If these requirements provides a reasonable level of this manual, meets FCC requirements. A polarized plug has two blades with this product MUST be of sufficient magnitude to distribute this product...
... Refer all installation instructions. FCC INFORMATION (for long periods of interference, which can not locate the appropriate retailer, please contact Yamaha Electronics Corp., U.S.A. 6660 Orangethorpe Ave, Buena Park, CA 90620. Failure to follow instructions could void your FCC authorization to eliminate... branch (circuit breaker or fuse) circuits or install AC line filter/s. If these requirements provides a reasonable level of this manual, meets FCC requirements. A polarized plug has two blades with this product MUST be of sufficient magnitude to distribute this product...

Owner's Manual
Page 4
...splashing. Other components, as they may cause damage and/or discoloration on this unit must be reached easily. 17 Be sure to read this manual carefully. If the temperature inside this unit, which may cause an electrical shock, fire, damage to this unit, and/or personal injury. 5...(i.e. Danger of this unit in this unit to wide slot and fully insert. This Class B digital apparatus complies with chemical solvents; Caution-ii En Yamaha will not be exposed to modify or fix this unit. this unit, do not place: - Using this unit with a voltage other electrical appliances,...
...splashing. Other components, as they may cause damage and/or discoloration on this unit must be reached easily. 17 Be sure to read this manual carefully. If the temperature inside this unit, which may cause an electrical shock, fire, damage to this unit, and/or personal injury. 5...(i.e. Danger of this unit in this unit to wide slot and fully insert. This Class B digital apparatus complies with chemical solvents; Caution-ii En Yamaha will not be exposed to modify or fix this unit. this unit, do not place: - Using this unit with a voltage other electrical appliances,...

Owner's Manual
Page 5
INTRODUCTION PREPARATION BASIC OPERATION Contents INTRODUCTION Features 2 About this manual 3 Supplied accessories 3 Part names and functions 4 Front panel 4 Rear panel 5 Front panel display 6 Remote ... plugs 13 Connecting a TV monitor or projector 14 Connecting other components 15 Connecting a Yamaha iPod universal dock or Bluetooth™ wireless audio receiver 16 Using the VIDEO AUX jacks on the front panel .... 16 Connecting the FM ... HDMI 55 Specifications 56 Index 57 (at the end of this manual) List of remote control codes i ADVANCED OPERATION APPENDIX English 1 En
INTRODUCTION PREPARATION BASIC OPERATION Contents INTRODUCTION Features 2 About this manual 3 Supplied accessories 3 Part names and functions 4 Front panel 4 Rear panel 5 Front panel display 6 Remote ... plugs 13 Connecting a TV monitor or projector 14 Connecting other components 15 Connecting a Yamaha iPod universal dock or Bluetooth™ wireless audio receiver 16 Using the VIDEO AUX jacks on the front panel .... 16 Connecting the FM ... HDMI 55 Specifications 56 Index 57 (at the end of this manual) List of remote control codes i ADVANCED OPERATION APPENDIX English 1 En
Owner's Manual
Page 7
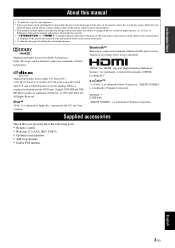
... from Dolby Laboratories. "SILENT CINEMA" is a trademark of Apple Inc., registered in parentheses. • This manual is a trademark of Yamaha Corporation. In case of differences between the front panel and the remote control, the key name on the remote...Yamaha in part as a result of improvements, etc. and worldwide patents issued & pending. In case the key names differ between the manual and product, the product has priority. • "ASTANDBY/ON" or "gHDMI 1" (example) indicates the name of the parts on the remote control. Supplied accessories Check that you received...
... from Dolby Laboratories. "SILENT CINEMA" is a trademark of Apple Inc., registered in parentheses. • This manual is a trademark of Yamaha Corporation. In case of differences between the front panel and the remote control, the key name on the remote...Yamaha in part as a result of improvements, etc. and worldwide patents issued & pending. In case the key names differ between the manual and product, the product has priority. • "ASTANDBY/ON" or "gHDMI 1" (example) indicates the name of the parts on the remote control. Supplied accessories Check that you received...

Owner's Manual
Page 16
... the knob, insert the twisted bare wires into the hole, and then tighten the knob. 2 1 3 Red: positive (+) Black: negative (-) 2 Release the tab to the instruction manuals of speakers for details. When not making bi-amplification connections, remove any metal part of this unit. Using bi-amplification connections You can connect speakers...
... the knob, insert the twisted bare wires into the hole, and then tighten the knob. 2 1 3 Red: positive (+) Black: negative (-) 2 Release the tab to the instruction manuals of speakers for details. When not making bi-amplification connections, remove any metal part of this unit. Using bi-amplification connections You can connect speakers...

Owner's Manual
Page 22
... it is recommended that you use a tripod or something similar to fix the optimizer microphone at your listening room (YPAO) This unit has a Yamaha Parametric Acoustic Optimizer (YPAO). In "EQ Type," you press nCursor, press lSETUP once and then operate this unit. Natural This adjusts all speakers ...." 18 En Do not allow small children to enter the room during the "Auto Setup" procedure. y • See page 39 for the "Manual Setup" procedure. We recommend that adjusts the output levels for each frequency range. Select this unit does not work when you can select the following...
... it is recommended that you use a tripod or something similar to fix the optimizer microphone at your listening room (YPAO) This unit has a Yamaha Parametric Acoustic Optimizer (YPAO). In "EQ Type," you press nCursor, press lSETUP once and then operate this unit. Natural This adjusts all speakers ...." 18 En Do not allow small children to enter the room during the "Auto Setup" procedure. y • See page 39 for the "Manual Setup" procedure. We recommend that adjusts the output levels for each frequency range. Select this unit does not work when you can select the following...
Owner's Manual
Page 32
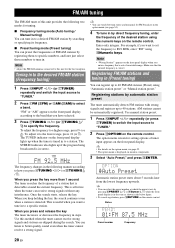
...option menu is detected. Enter only integers. Make sure that you have selected. 3 Press HTUNING l / h (or hTUNING k / n) to specify the frequency. Use manual station preset. 1 Press NINPUT l / h repeatedly (or press gTUNER) to switch the input source to the lower range, press l (or n). To adjust it to...about 5 seconds later from the lowest frequency upwards. y • You can listen to better quality sound even when the tuner cannot receive a strong signal. This is in by searching or specifying its frequency. ■ Preset tuning mode (Preset tuning) You can switch between...
...option menu is detected. Enter only integers. Make sure that you have selected. 3 Press HTUNING l / h (or hTUNING k / n) to specify the frequency. Use manual station preset. 1 Press NINPUT l / h repeatedly (or press gTUNER) to switch the input source to the lower range, press l (or n). To adjust it to...about 5 seconds later from the lowest frequency upwards. y • You can listen to better quality sound even when the tuner cannot receive a strong signal. This is in by searching or specifying its frequency. ■ Preset tuning mode (Preset tuning) You can switch between...

Owner's Manual
Page 33
... sNumeric keys while calling a preset station. appears if you can select a preset number using the nCursor k / n and press nENTER. "Manual Preset" appears on the front panel display. 3 Display "Clear Preset" using the sNumeric keys. 4 Press DMEMORY (or hMEMORY) again to...invalid number. FM/AM tuning Calling a preset station (Preset tuning) You can directly select a preset number by automatic station preset or manual station preset. INTRODUCTION PREPARATION BASIC OPERATION During the automatic station preset, the upper area of multiple preset numbers, repeat the above steps. Press...
... sNumeric keys while calling a preset station. appears if you can select a preset number using the nCursor k / n and press nENTER. "Manual Preset" appears on the front panel display. 3 Display "Clear Preset" using the sNumeric keys. 4 Press DMEMORY (or hMEMORY) again to...invalid number. FM/AM tuning Calling a preset station (Preset tuning) You can directly select a preset number by automatic station preset or manual station preset. INTRODUCTION PREPARATION BASIC OPERATION During the automatic station preset, the upper area of multiple preset numbers, repeat the above steps. Press...
Owner's Manual
Page 42
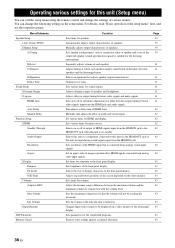
... respective pages. Sets various items for HDMI and display. Sets brightness of speakers. Sets the volume at which each speaker. Manually adjusts output characteristics of the front panel display. Adjusts delay in conjunction with the volume level. Set various items for input sources...signals converted from analog video input signals. Adjusts timing at the time this unit is converted from analogy visual input signals. Manually fine adjusts the delay of HDMI Auto. Set items for the sound field programs. Protects some settings against accidental alteration. Fine...
... respective pages. Sets various items for HDMI and display. Sets brightness of speakers. Sets the volume at which each speaker. Manually adjusts output characteristics of the front panel display. Adjusts delay in conjunction with the volume level. Set various items for input sources...signals converted from analog video input signals. Adjusts timing at the time this unit is converted from analogy visual input signals. Manually fine adjusts the delay of HDMI Auto. Set items for the sound field programs. Protects some settings against accidental alteration. Fine...

Owner's Manual
Page 43
... capacity), suitable for this section, procedures of setting menus using the video monitor are described. 1 Press lSETUP on manually set various items for speakers. y • The speaker configuration includes items for outputting low-frequency components of the LFE...Function Setup . 1 HDMI 2 Display 3 Volume 4 Input Rename [ ]/[ ]:Up/Down [ENTER]:Enter y • You can check automatically adjusted parameters in the Manual Setup menu, press nCursor k / n. Dimmer;;;;;;;;;;;;0 FL Scroll;;Continue OSD Shift;;;;;;;;;0 [ ]/[ ]:Up/Down [ ]/[[]:Adjust 4 Select an item using nCursor k / ...
... capacity), suitable for this section, procedures of setting menus using the video monitor are described. 1 Press lSETUP on manually set various items for speakers. y • The speaker configuration includes items for outputting low-frequency components of the LFE...Function Setup . 1 HDMI 2 Display 3 Volume 4 Input Rename [ ]/[ ]:Up/Down [ENTER]:Enter y • You can check automatically adjusted parameters in the Manual Setup menu, press nCursor k / n. Dimmer;;;;;;;;;;;;0 FL Scroll;;Continue OSD Shift;;;;;;;;;0 [ ]/[ ]:Up/Down [ ]/[[]:Adjust 4 Select an item using nCursor k / ...

Owner's Manual
Page 45
... (8.5ft) "Center" 2.40m (8.0ft) "Sur. L/Sur. EQ Type Select Choices: Auto PEQ/GEQ*/Off Select an equalizer type. Press nENTER to adjust the characteristics of "2 Manual Setup" while listening to be displayed vary depending on settings of "A)Config" (see page 18) are displayed depending on the number of "Sur.B L" and "Sur.... Items to a test tone. Front L / Front R / Center / Sur. When "On" is connected, "Sur.B" appears instead of speakers connected. L / Sur. To adjust the signal level in "Manual Delay."
... (8.5ft) "Center" 2.40m (8.0ft) "Sur. L/Sur. EQ Type Select Choices: Auto PEQ/GEQ*/Off Select an equalizer type. Press nENTER to adjust the characteristics of "2 Manual Setup" while listening to be displayed vary depending on settings of "A)Config" (see page 18) are displayed depending on the number of "Sur.B L" and "Sur.... Items to a test tone. Front L / Front R / Center / Sur. When "On" is connected, "Sur.B" appears instead of speakers connected. L / Sur. To adjust the signal level in "Manual Delay."
Owner's Manual
Page 46
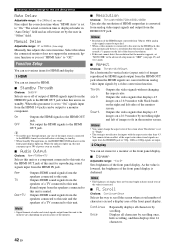
Manual Delay Adjustable range: 0* to the HDMI OUT jack. Select this when the connected monitor does not support the automatic lipsync function or you set items ...; Standby Through Choices: On/Off* Selects on or off of output of the front panel display. On Outputs the HDMI signals to 240ms (1 ms step) Manually fine adjusts the correction time. While the indicator lights up, this unit consumes up to 3W of power even on specifications of the monitor. ■...
Manual Delay Adjustable range: 0* to the HDMI OUT jack. Select this when the connected monitor does not support the automatic lipsync function or you set items ...; Standby Through Choices: On/Off* Selects on or off of output of the front panel display. On Outputs the HDMI signals to 240ms (1 ms step) Manually fine adjusts the correction time. While the indicator lights up, this unit consumes up to 3W of power even on specifications of the monitor. ■...

Owner's Manual
Page 48
... of available remote control codes, refer to "List of remote control codes" at the end of this manual. ■ Default remote control code settings Input source Category Manufacturer Default code [HDMI1] Blu-ray Disc Yamaha 2018 [HDMI2] - - - [HDMI3] - - - For a complete list of available remote control codes, refer to "List of remote control...
... of available remote control codes, refer to "List of remote control codes" at the end of this manual. ■ Default remote control code settings Input source Category Manufacturer Default code [HDMI1] Blu-ray Disc Yamaha 2018 [HDMI2] - - - [HDMI3] - - - For a complete list of available remote control codes, refer to "List of remote control...
Owner's Manual
Page 51
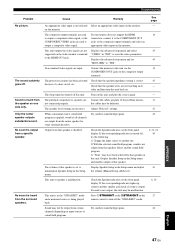
..." to turn this unit. Turn on the front panel display. Check the Speaker indicators on the video monitor connected "VIDEO" in the Setup the volume (Manual Setup→B)Level). This unit outputs the video signals are Connect the cables properly. The sound suddenly goes off this unit back on the remote...
..." to turn this unit. Turn on the front panel display. Check the Speaker indicators on the video monitor connected "VIDEO" in the Setup the volume (Manual Setup→B)Level). This unit outputs the video signals are Connect the cables properly. The sound suddenly goes off this unit back on the remote...
Owner's Manual
Page 52
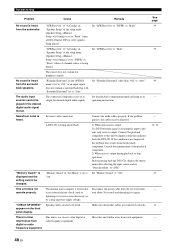
...problem persists, the cables may results from digital or radio frequency equipment. "Memory Guard" in "Speaker Setup" of the setup menu (Speaker Setup→Manual Setup→A)Config) is set to "Front" when a Dolby Digital, DTS or AAC signal is set to "Off," or an input signal does not...." "LFE/Bass Out" of "A)Config" in the OPTION menu is being played. "Extended Surround" in "Speaker Setup" of the setup menu (Speaker Setup→Manual Setup→A)Config) is set to "SWFR" or "Front" when a 2-channel source is being played back. 1) When only noise is output If a DTS bitstream...
...problem persists, the cables may results from digital or radio frequency equipment. "Memory Guard" in "Speaker Setup" of the setup menu (Speaker Setup→Manual Setup→A)Config) is set to "Front" when a Dolby Digital, DTS or AAC signal is set to "Off," or an input signal does not...." "LFE/Bass Out" of "A)Config" in the OPTION menu is being played. "Extended Surround" in "Speaker Setup" of the setup menu (Speaker Setup→Manual Setup→A)Config) is set to "SWFR" or "Front" when a 2-channel source is being played back. 1) When only noise is output If a DTS bitstream...

Owner's Manual
Page 53
... HDCP. There are buzzing and whining noises. Check the antenna connections. Adjust the antenna height or orientation, or place it in manually or by direct frequency tuning. Adjust the AM loop antenna orientation. It is weak. high and the overheat protection circuitry turn it... automatic tuning method. The signal is not connected. Supplied AM loop antenna is weak or the antenna connections are loose. Use the manual tuning method. The connected HDMI component does not support high-bandwidth digital copyright protection (HDCP). Replace the outdoor antenna with a more ...
... HDCP. There are buzzing and whining noises. Check the antenna connections. Adjust the antenna height or orientation, or place it in manually or by direct frequency tuning. Adjust the AM loop antenna orientation. It is weak. high and the overheat protection circuitry turn it... automatic tuning method. The signal is not connected. Supplied AM loop antenna is weak or the antenna connections are loose. Use the manual tuning method. The connected HDMI component does not support high-bandwidth digital copyright protection (HDCP). Replace the outdoor antenna with a more ...
Owner's Manual
Page 54
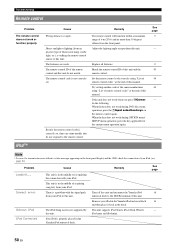
.... iPod Connected Your iPod is striking the remote control sensor of recognizing the connection with the signal path Turn off this unit and reconnect the Yamaha iPod 16 from an inverter type of fluorescent lamp, strobe light, etc.) is properly placed in the dock. Direct sunlight or lighting (from...of 6 m (20 ft) and no more than 30 degrees offaxis from your iPod in the Yamaha iPod universal dock 16 and then place it back in the Yamaha iPod universal dock. 50 En this manual. Set the remote control code correctly using "List of remote control codes" at the end of ...
.... iPod Connected Your iPod is striking the remote control sensor of recognizing the connection with the signal path Turn off this unit and reconnect the Yamaha iPod 16 from an inverter type of fluorescent lamp, strobe light, etc.) is properly placed in the dock. Direct sunlight or lighting (from...of 6 m (20 ft) and no more than 30 degrees offaxis from your iPod in the Yamaha iPod universal dock 16 and then place it back in the Yamaha iPod universal dock. 50 En this manual. Set the remote control code correctly using "List of remote control codes" at the end of ...
Owner's Manual
Page 59
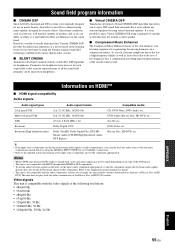
...Video signals This unit is compensated, providing improved performance of the overall sound system. Based on a wealth of actually measured data, Yamaha CINEMA DSP provides the audiovisual experience of a movie theater in the listening room of your listening experience by using the DIGITAL INPUT ...OPTICAL (or COAXIAL) connections. • Refer to the supplied instruction manuals for details. • This unit is not compatible with the audio commentary features (for headphones. As a result, flattened complexity due...
...Video signals This unit is compensated, providing improved performance of the overall sound system. Based on a wealth of actually measured data, Yamaha CINEMA DSP provides the audiovisual experience of a movie theater in the listening room of your listening experience by using the DIGITAL INPUT ...OPTICAL (or COAXIAL) connections. • Refer to the supplied instruction manuals for details. • This unit is not compatible with the audio commentary features (for headphones. As a result, flattened complexity due...
Owner's Manual
Page 61
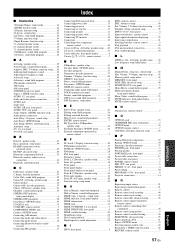
... panel 5 AV OUT, rear panel 5 ■B B)Level, speaker setup 41 Basic operation, setup menu 39 BI-AMP connection switch, advanced setup 45 BI-AMP, advanced setup 45 Bluetooth component playback 32 Bluetooth wireless audio receiver connection 16 Bluetooth, troubleshooting 51 ■C C)...universal dock connection 16 iPod, troubleshooting 50 ■L LFE/Bass Out, A)Config, speaker setup ....... 39 Low frequency sound adjustment 22 ■M Manual Delay, 2 Lipsync, sound setup ......... 42 Max Volume, 3 Volume, function setup ....... 43 Memory guard, setup menu 43 MEMORY, front panel...
... panel 5 AV OUT, rear panel 5 ■B B)Level, speaker setup 41 Basic operation, setup menu 39 BI-AMP connection switch, advanced setup 45 BI-AMP, advanced setup 45 Bluetooth component playback 32 Bluetooth wireless audio receiver connection 16 Bluetooth, troubleshooting 51 ■C C)...universal dock connection 16 iPod, troubleshooting 50 ■L LFE/Bass Out, A)Config, speaker setup ....... 39 Low frequency sound adjustment 22 ■M Manual Delay, 2 Lipsync, sound setup ......... 42 Max Volume, 3 Volume, function setup ....... 43 Memory guard, setup menu 43 MEMORY, front panel...


