Owner's Manual
Page 5
... 4 Getting started 5 Quick start guide 6 PREPARATION Connections 12 Optimizing the speaker setting for your listening room 37 Using AUTO SETUP 37 BASIC OPERATION Playback 42 Basic procedure 42 Selecting audio input jacks (AUDIO SELECT 43 Selecting the MULTI CH INPUT component......... ...zone configuration 111 Connecting the Zone 2 and Zone 3 components 111 Controlling Zone 2 or Zone 3 112 Advanced setup 117 Using the advanced setup menu 117 ADDITIONAL INFORMATION Troubleshooting 121 Resetting the system 129 Glossary 130 Sound field program information 134 Parametric equalizer ...
... 4 Getting started 5 Quick start guide 6 PREPARATION Connections 12 Optimizing the speaker setting for your listening room 37 Using AUTO SETUP 37 BASIC OPERATION Playback 42 Basic procedure 42 Selecting audio input jacks (AUDIO SELECT 43 Selecting the MULTI CH INPUT component......... ...zone configuration 111 Connecting the Zone 2 and Zone 3 components 111 Controlling Zone 2 or Zone 3 112 Advanced setup 117 Using the advanced setup menu 117 ADDITIONAL INFORMATION Troubleshooting 121 Resetting the system 129 Glossary 130 Sound field program information 134 Parametric equalizer ...
Owner's Manual
Page 7
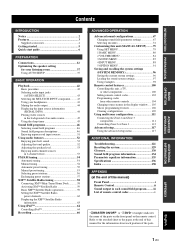
...scaling from 480i (NTSC)/576i (PAL) or 480p/576p to 720p, 1080i or 1080p iPod™ controlling capability ◆ DOCK terminal to connect a Yamaha iPod universal dock (such as the YDS-10, sold separately), which supports iPod (Click and Wheel), iPod nano, and iPod mini Other features ◆...; YPAO (Yamaha Parametric Room Acoustic Optimizer) for automatic speaker setup ◆ 192-kHz/24-bit D/A converter ◆ OSD (on-screen display) menus that allow you to optimize this unit ...
...scaling from 480i (NTSC)/576i (PAL) or 480p/576p to 720p, 1080i or 1080p iPod™ controlling capability ◆ DOCK terminal to connect a Yamaha iPod universal dock (such as the YDS-10, sold separately), which supports iPod (Click and Wheel), iPod nano, and iPod mini Other features ◆...; YPAO (Yamaha Parametric Room Acoustic Optimizer) for automatic speaker setup ◆ 192-kHz/24-bit D/A converter ◆ OSD (on-screen display) menus that allow you to optimize this unit ...
Owner's Manual
Page 15
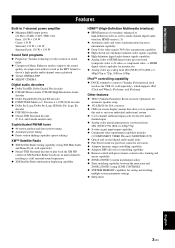
... unit ☞ P. 42 • Enjoying FM/AM radio programs ☞ P. 54 • Enjoying XM Satellite Radio programs ☞ P. 58 • Using your listening room (AUTO SETUP) ☞ P. 37 • Setting the remote control ☞ P. 100 Additional features • Displaying the current input source signal information in the OSD ☞ P. 44 •...
... unit ☞ P. 42 • Enjoying FM/AM radio programs ☞ P. 54 • Enjoying XM Satellite Radio programs ☞ P. 58 • Using your listening room (AUTO SETUP) ☞ P. 37 • Setting the remote control ☞ P. 100 Additional features • Displaying the current input source signal information in the OSD ☞ P. 44 •...
Owner's Manual
Page 18
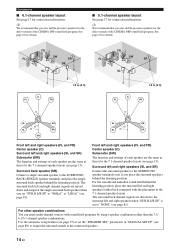
... the surround speakers behind the listening position. For other speaker combinations You can enjoy multi-channel sources with the placement in "MANUAL SETUP" (see page 80) to the SURROUND BACK (SINGLE) speaker terminals and place the single surround back speaker behind the listening position...and right speakers farther back compared with sound field programs by using a speaker combination other than the 7.1/ 6.1/5.1-channel speaker combinations. Use the automatic setup feature (see page 37) or set "SUR.B L/R SP" to "NONE" (see page 13). The surround back left and right channel ...
... the surround speakers behind the listening position. For other speaker combinations You can enjoy multi-channel sources with the placement in "MANUAL SETUP" (see page 80) to the SURROUND BACK (SINGLE) speaker terminals and place the single surround back speaker behind the listening position...and right speakers farther back compared with sound field programs by using a speaker combination other than the 7.1/ 6.1/5.1-channel speaker combinations. Use the automatic setup feature (see page 37) or set "SUR.B L/R SP" to "NONE" (see page 13). The surround back left and right channel ...
Owner's Manual
Page 19
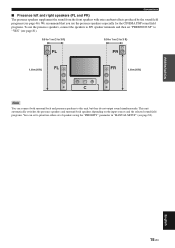
... selected sound field programs. You can connect both surround back and presence speakers to prioritize either set of speakers using the "PRIORITY" parameter in "MANUAL SETUP" (see page 46). English 15 En PREPARATION Connections ■ Presence left and right speakers (PL and PR) The presence speakers supplement the sound from the...
... selected sound field programs. You can connect both surround back and presence speakers to prioritize either set of speakers using the "PRIORITY" parameter in "MANUAL SETUP" (see page 46). English 15 En PREPARATION Connections ■ Presence left and right speakers (PL and PR) The presence speakers supplement the sound from the...
Owner's Manual
Page 20
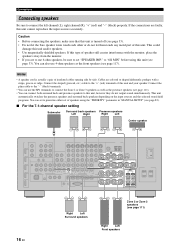
... of this unit and your speaker. You can connect both surround back and presence speakers to "6Ω MIN" before using the "PRIORITY" parameter in "MANUAL SETUP" (see page 82). ■ For the 7.1-channel speaker setting Subwoofer Surround back speakers Presence speakers Left Right Right Left Center speaker 16 En SUB WOOFER...
... of this unit and your speaker. You can connect both surround back and presence speakers to "6Ω MIN" before using the "PRIORITY" parameter in "MANUAL SETUP" (see page 82). ■ For the 7.1-channel speaker setting Subwoofer Surround back speakers Presence speakers Left Right Right Left Center speaker 16 En SUB WOOFER...
Owner's Manual
Page 23
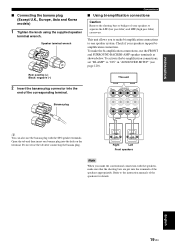
... the end of the speakers for details. This unit allows you make the conventional connection with the SP2 speaker terminals. Refer to "ON" in "ADVANCED SETUP" (see page 120). Red: positive (+) Black: negative (-) This unit 2 Insert the banana plug connector into the hole on the terminal.
... the end of the speakers for details. This unit allows you make the conventional connection with the SP2 speaker terminals. Refer to "ON" in "ADVANCED SETUP" (see page 120). Red: positive (+) Black: negative (-) This unit 2 Insert the banana plug connector into the hole on the terminal.
Owner's Manual
Page 25
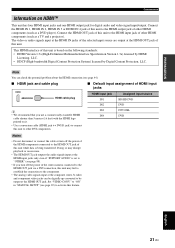
... at the HDMI input jacks only even if "SUPPORT AUDIO" is set to "OTHER" (see page 92) to activate this unit to "ON" in "MANUAL SETUP" (see page 88). • If you use a commercially available HDMI cable shorter than 5 meters (16 feet) with the HDMI logo printed on the following standards...
... at the HDMI input jacks only even if "SUPPORT AUDIO" is set to "OTHER" (see page 92) to activate this unit to "ON" in "MANUAL SETUP" (see page 88). • If you use a commercially available HDMI cable shorter than 5 meters (16 feet) with the HDMI logo printed on the following standards...
Owner's Manual
Page 33
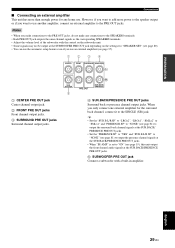
... more than enough power for the surround back channel, connect it to the SINGLE (SB) jack. Notes • When you want to use the automatic setup feature even if you only connect one external amplifier for any connections to the PRE OUT jacks.
... more than enough power for the surround back channel, connect it to the SINGLE (SB) jack. Notes • When you want to use the automatic setup feature even if you only connect one external amplifier for any connections to the PRE OUT jacks.
Owner's Manual
Page 37
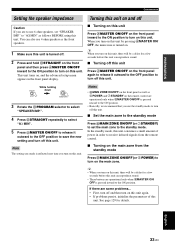
... zone to the standby mode Press BMAIN ZONE ON/OFF (or 7STANDBY) to the ON position. This unit turns on, and the advanced setup menu appears in order to receive infrared signals from the remote control. ■ Turning on the main zone from the standby mode Press BMAIN ZONE ON/OFF (or...
... zone to the standby mode Press BMAIN ZONE ON/OFF (or 7STANDBY) to the ON position. This unit turns on, and the advanced setup menu appears in order to receive infrared signals from the remote control. ■ Turning on the main zone from the standby mode Press BMAIN ZONE ON/OFF (or...
Owner's Manual
Page 38
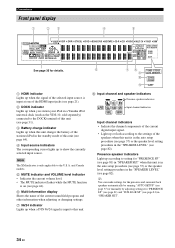
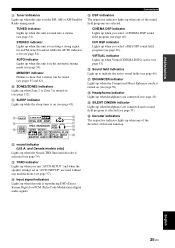
... level setting procedure in the "SPEAKER LEVEL" (see page 82). y You can make settings for the presence and surround back speakers automatically by running "AUTO SETUP" (see page 37) or manually by adjusting settings for "PRESENCE SP" (see page 81) and "SUR.B L/R SP" (see page 81) in the standby mode...selected input source is input at one of the HDMI input jacks (see page 21). 2 DOCK indicator Lights up when you station your iPod in a Yamaha iPod universal dock (such as the YDS-10, sold separately) connected to the DOCK terminal of this unit (see page 31). 3 Battery charge indicator Lights...
... level setting procedure in the "SPEAKER LEVEL" (see page 82). y You can make settings for the presence and surround back speakers automatically by running "AUTO SETUP" (see page 37) or manually by adjusting settings for "PRESENCE SP" (see page 81) and "SUR.B L/R SP" (see page 81) in the standby mode...selected input source is input at one of the HDMI input jacks (see page 21). 2 DOCK indicator Lights up when you station your iPod in a Yamaha iPod universal dock (such as the YDS-10, sold separately) connected to the DOCK terminal of this unit (see page 31). 3 Battery charge indicator Lights...
Owner's Manual
Page 39
... H I SILENT CINEMA indicator Lights up when Virtual CINEMA DSP is on (see page 46). D Input signal indicators Lights up when this unit is receiving a strong signal for an FM stereo broadcast while the AUTO indicator is lit (see page 54). G ENHANCER indicator Lights up when the Compressed Music ...you select a CINEMA DSP sound field program (see page 46). CINEMA DSP indicator Lights up when you run "AUTO SETUP" and when the speaker settings set in "AUTO SETUP" are connected and a sound field program is selected (see page 51). PREPARATION 9 Tuner indicators Lights up when this...
... H I SILENT CINEMA indicator Lights up when Virtual CINEMA DSP is on (see page 46). D Input signal indicators Lights up when this unit is receiving a strong signal for an FM stereo broadcast while the AUTO indicator is lit (see page 54). G ENHANCER indicator Lights up when the Compressed Music ...you select a CINEMA DSP sound field program (see page 46). CINEMA DSP indicator Lights up when you run "AUTO SETUP" and when the speaker settings set in "AUTO SETUP" are connected and a sound field program is selected (see page 51). PREPARATION 9 Tuner indicators Lights up when this...
Owner's Manual
Page 41
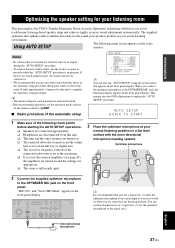
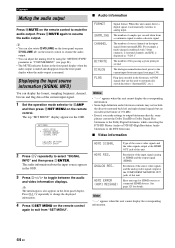
...10063; The room is normal for your listening room This unit employs the YPAO (Yamaha Parametric Room Acoustic Optimizer) technology which lets you avoid troublesome listening-based speaker setup and achieves highly accurate sound adjustments automatically. START [ ]/[ ]: UP/DOWN [ENTER]:...OPTIMIZER MIC PHONES VIDEO AUX SLEEP Omni-directional microphone y It is recommended that you get out of the automatic setup [ p AUTO SETUP SETUP;;;;;;;;;AUTO WIRING;;;;;;;CHECK DISTANCE;;;;;CHECK SIZE;;;;;;;;;CHECK EQ;;;;;;;;;NATURAL LEVEL;;;;;;;;CHECK . y • The initial setting for ...
...10063; The room is normal for your listening room This unit employs the YPAO (Yamaha Parametric Room Acoustic Optimizer) technology which lets you avoid troublesome listening-based speaker setup and achieves highly accurate sound adjustments automatically. START [ ]/[ ]: UP/DOWN [ENTER]:...OPTIMIZER MIC PHONES VIDEO AUX SLEEP Omni-directional microphone y It is recommended that you get out of the automatic setup [ p AUTO SETUP SETUP;;;;;;;;;AUTO WIRING;;;;;;;CHECK DISTANCE;;;;;CHECK SIZE;;;;;;;;;CHECK EQ;;;;;;;;;NATURAL LEVEL;;;;;;;;CHECK . y • The initial setting for ...
Owner's Manual
Page 42
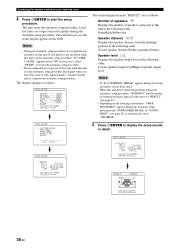
...are set to "REVERSE". It takes approximately 3 minutes for your listening room 4 Press 3ENTER to complete the automatic setup procedure. AUTO SETUP SETUP;;;;;;;;;AUTO WIRING;;;;;;;CHECK DISTANCE;;;;;CHECK SIZE;;;;;;;;;CHECK EQ;;;;;;;;;NATURAL LEVEL;;;;;;;;CHECK . START [ ]/[ ]: UP/DOWN [ENTER]: Start... ]/[ ]: UP/DOWN [ENTER]: Detail RESULT WIRING FRONT L;;;;;OK [p]/[[]: Select [ENTER]: Return 38 En Notes • During the automatic setup procedure, do not perform any operation while this unit is in detail. The display changes as follows. Keep quiet when you perform any...
...are set to "REVERSE". It takes approximately 3 minutes for your listening room 4 Press 3ENTER to complete the automatic setup procedure. AUTO SETUP SETUP;;;;;;;;;AUTO WIRING;;;;;;;CHECK DISTANCE;;;;;CHECK SIZE;;;;;;;;;CHECK EQ;;;;;;;;;NATURAL LEVEL;;;;;;;;CHECK . START [ ]/[ ]: UP/DOWN [ENTER]: Start... ]/[ ]: UP/DOWN [ENTER]: Detail RESULT WIRING FRONT L;;;;;OK [p]/[[]: Select [ENTER]: Return 38 En Notes • During the automatic setup procedure, do not perform any operation while this unit is in detail. The display changes as follows. Keep quiet when you perform any...
Owner's Manual
Page 43
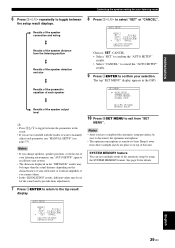
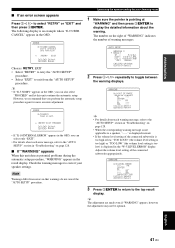
... if you are not satisfied with the results or want to manually adjust each speaker SET MENU . ;AUTO SETUP ;MANUAL SETUP ;SYSTEM MEMORY ;SIGNAL INFO Results of each parameter, run "AUTO SETUP" again to exit from direct sunlight and do not place it on the characteristics of the automatic..., be longer than the actual distance depending on top of the speaker detection and size 8 Press 3l / h to toggle between the setup result displays. PREPARATION Optimizing the speaker setting for your listening room 6 Press 3l / h repeatedly to heat. Notes • After you change speakers,...
... if you are not satisfied with the results or want to manually adjust each speaker SET MENU . ;AUTO SETUP ;MANUAL SETUP ;SYSTEM MEMORY ;SIGNAL INFO Results of each parameter, run "AUTO SETUP" again to exit from direct sunlight and do not place it on the characteristics of the automatic..., be longer than the actual distance depending on top of the speaker detection and size 8 Press 3l / h to toggle between the setup result displays. PREPARATION Optimizing the speaker setting for your listening room 6 Press 3l / h repeatedly to heat. Notes • After you change speakers,...
Owner's Manual
Page 44
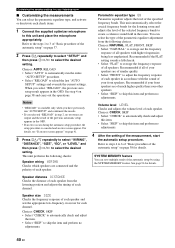
...items. 1 Connect the supplied optimizer microphone to skip this item and perform no adjustments. 4 After the setting of the measurement, start the automatic setup procedure. Choices: CHECK, SKIP • Select "CHECK" to automatically check and adjust this item. • Select "SKIP" to this unit ...which speakers are of much higher quality than your other speakers. • Select "SKIP" to 3 of "Basic procedure of the automatic setup" on page 38 for details. Optimizing the speaker setting for your listening room ■ Customizing the measurements You can save multiple result of...
...items. 1 Connect the supplied optimizer microphone to skip this item and perform no adjustments. 4 After the setting of the measurement, start the automatic setup procedure. Choices: CHECK, SKIP • Select "CHECK" to automatically check and adjust this item. • Select "SKIP" to this unit ...which speakers are of much higher quality than your other speakers. • Select "SKIP" to 3 of "Basic procedure of the automatic setup" on page 38 for details. Optimizing the speaker setting for your listening room ■ Customizing the measurements You can save multiple result of...
Owner's Manual
Page 45
... warning displays. The number on page 128. • When the corresponding warning message is not applicable to the "AUTO SETUP" section in the OSD. PR SL --- WARNING W-3:LEVEL ERROR --- WARNING W-1:OUT OF PHASE Reverse channel FL --- FR... CENTER PL --- --- Optimizing the speaker setting for more accurate adjustment. AUTO SETUP WARNING 2 . RESULT SP : 5/4/0.1 DIST: 14.0/17.0ft LVL : -10.0/+5.0dB >SET CANCEL [ p [ ]/[ ]: UP/DOWN [ENTER]: Detail ...
... warning displays. The number on page 128. • When the corresponding warning message is not applicable to the "AUTO SETUP" section in the OSD. PR SL --- WARNING W-3:LEVEL ERROR --- WARNING W-1:OUT OF PHASE Reverse channel FL --- FR... CENTER PL --- --- Optimizing the speaker setting for more accurate adjustment. AUTO SETUP WARNING 2 . RESULT SP : 5/4/0.1 DIST: 14.0/17.0ft LVL : -10.0/+5.0dB >SET CANCEL [ p [ ]/[ ]: UP/DOWN [ENTER]: Detail ...
Owner's Manual
Page 48
The top "SET MENU" display appears in the bitstream, or PCM signals that cue this unit. SET MENU ;AUTO SETUP . ;MANUAL SETUP ;SYSTEM MEMORY ;SIGNAL INFO [ ]/[ ]: UP/DOWN [ENTER]: Enter 2 Press 3n repeatedly to CAMP and then press FSET MENU on the remote control. y The information is ...
The top "SET MENU" display appears in the bitstream, or PCM signals that cue this unit. SET MENU ;AUTO SETUP . ;MANUAL SETUP ;SYSTEM MEMORY ;SIGNAL INFO [ ]/[ ]: UP/DOWN [ENTER]: Enter 2 Press 3n repeatedly to CAMP and then press FSET MENU on the remote control. y The information is ...
Owner's Manual
Page 79
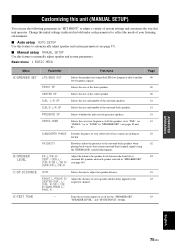
... speakers. CROSS OVER Selects the crossover frequency of your subwoofer if bass sounds are lacking or unclear. Customizing this unit (MANUAL SETUP) You can use the following parameters in "SPEAKER SET" (see pages 80 and 81). PRESENCE SP Selects whether this unit uses... delay applied to adjust a variety of your listening environment. ■ Auto setup AUTO SETUP Use this feature to automatically adjust speaker and system parameters (see page 37). ■ Manual setup MANUAL SETUP Use this feature to adjust the speaker distance. SUBWOOFER PHASE Switches the phase ...
... speakers. CROSS OVER Selects the crossover frequency of your subwoofer if bass sounds are lacking or unclear. Customizing this unit (MANUAL SETUP) You can use the following parameters in "SPEAKER SET" (see pages 80 and 81). PRESENCE SP Selects whether this unit uses... delay applied to adjust a variety of your listening environment. ■ Auto setup AUTO SETUP Use this feature to automatically adjust speaker and system parameters (see page 37). ■ Manual setup MANUAL SETUP Use this feature to adjust the speaker distance. SUBWOOFER PHASE Switches the phase ...
Owner's Manual
Page 80
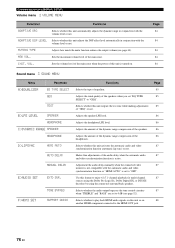
... HEADPHONE C)DYNAMIC RANGE SPEAKER HEADPHONE D)LIPSYNC HDMI AUTO AUTO DELAY MANUAL DELAY E)AUDIO SET EXTD SUR. Adjusts the headphone LFE level. Customizing this unit (MANUAL SETUP) Volume menu 2 VOLUME MENU Parameter Functions ADAPTIVE DRC Selects whether this unit automatically adjusts the dynamic range in conjunction with the volume level or not...
... HEADPHONE C)DYNAMIC RANGE SPEAKER HEADPHONE D)LIPSYNC HDMI AUTO AUTO DELAY MANUAL DELAY E)AUDIO SET EXTD SUR. Adjusts the headphone LFE level. Customizing this unit (MANUAL SETUP) Volume menu 2 VOLUME MENU Parameter Functions ADAPTIVE DRC Selects whether this unit automatically adjusts the dynamic range in conjunction with the volume level or not...

