
Owner's Manual
Page 1
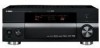
U RX-V1800 AV Receiver OWNER'S MANUAL
U RX-V1800 AV Receiver OWNER'S MANUAL
Owner's Manual
Page 3
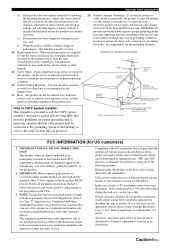
... provides a reasonable level of assurance that is in proper operating condition. 22 Wall or Ceiling Mounting - Modifications not expressly approved by Yamaha may result in damage and will not occur in all installation instructions. this product in a residential environment will not result in harmful ...indicated in the instructions contained in this product in the USA. 3 NOTE: This product has been tested and found in the users manual, may result in fire, electric shock, or other controls may void your FCC authorization to use the product. 2 IMPORTANT: When connecting...
... provides a reasonable level of assurance that is in proper operating condition. 22 Wall or Ceiling Mounting - Modifications not expressly approved by Yamaha may result in damage and will not occur in all installation instructions. this product in a residential environment will not result in harmful ...indicated in the instructions contained in this product in the USA. 3 NOTE: This product has been tested and found in the users manual, may result in fire, electric shock, or other controls may void your FCC authorization to use the product. 2 IMPORTANT: When connecting...

Owner's Manual
Page 4
...time (i.e. Using this unit with a humidifier) to consume a very small quantity of this unit with a newspaper, tablecloth, curtain, etc. Contact qualified Yamaha service personnel when any service is designed to prevent condensation inside this unit rises, it in a well ventilated, cool, dry, clean place - In ...blade of this unit. Cet appareil numérique de la classe B est conforme à la norme NMB-003 du Canada. Retain this manual carefully. Caution: Read this before concluding that this unit, and/or personal injury. a room with a higher voltage than specified. 13 To ...
...time (i.e. Using this unit with a humidifier) to consume a very small quantity of this unit with a newspaper, tablecloth, curtain, etc. Contact qualified Yamaha service personnel when any service is designed to prevent condensation inside this unit rises, it in a well ventilated, cool, dry, clean place - In ...blade of this unit. Cet appareil numérique de la classe B est conforme à la norme NMB-003 du Canada. Retain this manual carefully. Caution: Read this before concluding that this unit, and/or personal injury. a room with a higher voltage than specified. 13 To ...
Owner's Manual
Page 5
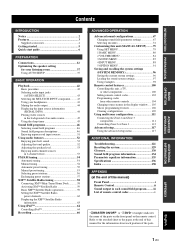
...64 Controlling iPod 64 Recording 66 ADVANCED OPERATION Advanced sound configurations 67 Changing sound field parameter settings 67 Selecting decoders 72 Customizing this unit (MANUAL SETUP).........75 Using SET MENU 79 1 BASIC MENU 80 2 VOLUME MENU 84 3 SOUND MENU 85 4 INPUT MENU 88 5 OPTION MENU...system 129 Glossary 130 Sound field program information 134 Parametric equalizer information 135 Specifications 136 Index 138 APPENDIX (at the end of this manual) Front Panel i Remote Control ii Sound output in each position of the parts on the front panel or the remote control....
...64 Controlling iPod 64 Recording 66 ADVANCED OPERATION Advanced sound configurations 67 Changing sound field parameter settings 67 Selecting decoders 72 Customizing this unit (MANUAL SETUP).........75 Using SET MENU 79 1 BASIC MENU 80 2 VOLUME MENU 84 3 SOUND MENU 85 4 INPUT MENU 88 5 OPTION MENU...system 129 Glossary 130 Sound field program information 134 Parametric equalizer information 135 Specifications 136 Index 138 APPENDIX (at the end of this manual) Front Panel i Remote Control ii Sound output in each position of the parts on the front panel or the remote control....

Owner's Manual
Page 6
...Ltd. "HDMI", the "HDMI" logo and "High-Definition Multimedia Interface" are subject to this manual for your operation. • Some operations can be registered in some jurisdictions. YAMAHA CORPORATION hereby grants the user a non-exclusive, non-transferable, limited right of HDMI Licensing LLC.... In case the button names differ between the manual and product, the product has priority. • "AMASTER ON/OFF" or "1DVD" (example) indicates the name of YAMAHA CORPORATION. iPodTM "iPod" is too late, Yamaha and the Electronic Industries Association's Consumer Electronics Group...
...Ltd. "HDMI", the "HDMI" logo and "High-Definition Multimedia Interface" are subject to this manual for your operation. • Some operations can be registered in some jurisdictions. YAMAHA CORPORATION hereby grants the user a non-exclusive, non-transferable, limited right of HDMI Licensing LLC.... In case the button names differ between the manual and product, the product has priority. • "AMASTER ON/OFF" or "1DVD" (example) indicates the name of YAMAHA CORPORATION. iPodTM "iPod" is too late, Yamaha and the Electronic Industries Association's Consumer Electronics Group...
Owner's Manual
Page 15
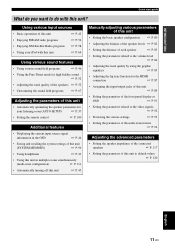
...; Using headphones ☞ P. 43 • Using this unit in multiple rooms simultaneously (multi-zone configuration) ☞ P. 111 • Automatically turning off this unit ☞ P. 45 Manually adjusting various parameters of this unit • Setting the basic speaker configuration ☞ P. 80 • Adjusting the balance of the speaker levels ☞ P. 82 •...
...; Using headphones ☞ P. 43 • Using this unit in multiple rooms simultaneously (multi-zone configuration) ☞ P. 111 • Automatically turning off this unit ☞ P. 45 Manually adjusting various parameters of this unit • Setting the basic speaker configuration ☞ P. 80 • Adjusting the balance of the speaker levels ☞ P. 82 •...
Owner's Manual
Page 18
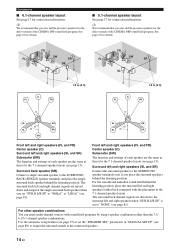
... recommend that you also add the presence speakers for connection information. For other speaker combinations You can enjoy multi-channel sources with the placement in "MANUAL SETUP" (see page 13). Front left and right speakers (SL and SR) Subwoofer (SW) The function and settings of the CINEMA DSP sound field program...
... recommend that you also add the presence speakers for connection information. For other speaker combinations You can enjoy multi-channel sources with the placement in "MANUAL SETUP" (see page 13). Front left and right speakers (SL and SR) Subwoofer (SW) The function and settings of the CINEMA DSP sound field program...
Owner's Manual
Page 19
... 1.8 m (6 ft) C Note You can connect both surround back and presence speakers to SP1 speaker terminals and then set of speakers using the "PRIORITY" parameter in "MANUAL SETUP" (see page 46). English 15 En We recommend that you use the presence speakers especially for the CINEMA DSP sound field programs. To use...
... 1.8 m (6 ft) C Note You can connect both surround back and presence speakers to SP1 speaker terminals and then set of speakers using the "PRIORITY" parameter in "MANUAL SETUP" (see page 46). English 15 En We recommend that you use the presence speakers especially for the CINEMA DSP sound field programs. To use...
Owner's Manual
Page 20
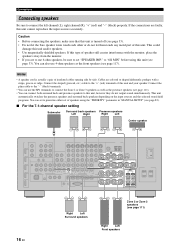
Connections Connecting speakers Be sure to "6Ω MIN" before using the "PRIORITY" parameter in "MANUAL SETUP" (see page 82). ■ For the 7.1-channel speaker setting Subwoofer Surround back speakers Presence speakers Left Right Right Left Center speaker 16 En SUB ...
Connections Connecting speakers Be sure to "6Ω MIN" before using the "PRIORITY" parameter in "MANUAL SETUP" (see page 82). ■ For the 7.1-channel speaker setting Subwoofer Surround back speakers Presence speakers Left Right Right Left Center speaker 16 En SUB ...
Owner's Manual
Page 23
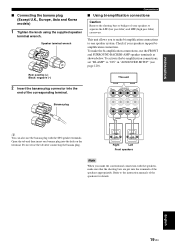
... LPF (low pass filter) and HPF (high pass filter) crossovers. Right Left Front speakers Note When you to make bi-amplification connections to the instruction manuals of your speakers support biamplification connection. This unit allows you make the conventional connection with the SP2 speaker terminals. Banana plug R + SURROUND BACK/ BI-AMP...
... LPF (low pass filter) and HPF (high pass filter) crossovers. Right Left Front speakers Note When you to make bi-amplification connections to the instruction manuals of your speakers support biamplification connection. This unit allows you make the conventional connection with the SP2 speaker terminals. Banana plug R + SURROUND BACK/ BI-AMP...
Owner's Manual
Page 25
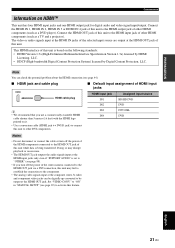
... Notes • Do not disconnect or connect the cable or turn off the power of other HDMI components (such as a DVD player). to "ON" in "MANUAL SETUP" (see page 88). • If you use a commercially available HDMI cable shorter than 5 meters (16 feet) with the HDMI logo printed on HDMI™...
... Notes • Do not disconnect or connect the cable or turn off the power of other HDMI components (such as a DVD player). to "ON" in "MANUAL SETUP" (see page 88). • If you use a commercially available HDMI cable shorter than 5 meters (16 feet) with the HDMI logo printed on HDMI™...
Owner's Manual
Page 26
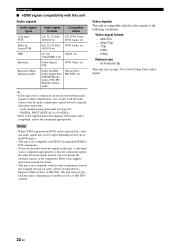
Refer to the supplied instruction manuals of the input source component, and set the input source component appropriately so that the component outputs the audio bitstream signals directly (does not decode ...-HD Master Audio, DTS-HD High Resolution Audio Blu-ray Disc, HD DVD, etc. DIGITAL INPUT OPTICAL (or COAXIAL) • Refer to the supplied instruction manuals for example, the special audio contents downloaded via Internet) of Blu-ray Disc or HD DVD. This unit does not play back the audio sources...
Refer to the supplied instruction manuals of the input source component, and set the input source component appropriately so that the component outputs the audio bitstream signals directly (does not decode ...-HD Master Audio, DTS-HD High Resolution Audio Blu-ray Disc, HD DVD, etc. DIGITAL INPUT OPTICAL (or COAXIAL) • Refer to the supplied instruction manuals for example, the special audio contents downloaded via Internet) of Blu-ray Disc or HD DVD. This unit does not play back the audio sources...
Owner's Manual
Page 38
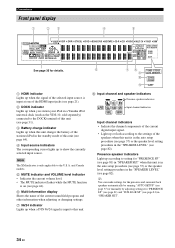
... the currently selected input source. y You can make settings for the presence and surround back speakers automatically by running "AUTO SETUP" (see page 37) or manually by adjusting settings for "PRESENCE SP" (see page 81) and "SUR.B L/R SP" (see page 81) in the "SPEAKER LEVEL" (see page 64). 4 Input source ...96/24 signal is input at one of the HDMI input jacks (see page 21). 2 DOCK indicator Lights up when you station your iPod in a Yamaha iPod universal dock (such as the YDS-10, sold separately) connected to the DOCK terminal of this unit (see page 31). 3 Battery charge indicator Lights...
... the currently selected input source. y You can make settings for the presence and surround back speakers automatically by running "AUTO SETUP" (see page 37) or manually by adjusting settings for "PRESENCE SP" (see page 81) and "SUR.B L/R SP" (see page 81) in the "SPEAKER LEVEL" (see page 64). 4 Input source ...96/24 signal is input at one of the HDMI input jacks (see page 21). 2 DOCK indicator Lights up when you station your iPod in a Yamaha iPod universal dock (such as the YDS-10, sold separately) connected to the DOCK terminal of this unit (see page 31). 3 Battery charge indicator Lights...
Owner's Manual
Page 41
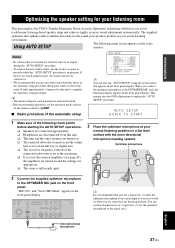
... to CAMP. ■ Basic procedure of a tripod (etc.) to fix the optimizer microphone to explain the "AUTO SETUP" procedure. This manual uses the OSD illustrations to the tripod (etc.). AUTO SETUP ENTER TO START 1 Make sure of the room while this unit analyzes the ...sound your listening room This unit employs the YPAO (Yamaha Parametric Room Acoustic Optimizer) technology which lets you leave the room. AUDIO TONE SELECT CONTROL A/B/C/D/E CATEGORY STRAIGHT EFFECT YPAO PRESET/TUNING/CH PRESET...
... to CAMP. ■ Basic procedure of a tripod (etc.) to fix the optimizer microphone to explain the "AUTO SETUP" procedure. This manual uses the OSD illustrations to the tripod (etc.). AUTO SETUP ENTER TO START 1 Make sure of the room while this unit analyzes the ...sound your listening room This unit employs the YPAO (Yamaha Parametric Room Acoustic Optimizer) technology which lets you leave the room. AUDIO TONE SELECT CONTROL A/B/C/D/E CATEGORY STRAIGHT EFFECT YPAO PRESET/TUNING/CH PRESET...
Owner's Manual
Page 43
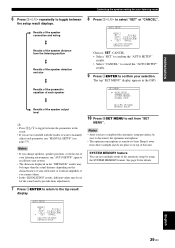
...top "SET MENU" display appears in the result. • If you are not satisfied with the results or want to manually adjust each speaker SET MENU . ;AUTO SETUP ;MANUAL SETUP ;SYSTEM MEMORY ;SIGNAL INFO Results of the speaker output level y • Press 3k / n to toggle between... The optimizer microphone is sensitive to heat. Notes • If you change speakers, speaker positions, or the layout of your listening environment, run "MANUAL SETUP" (see page 75). PREPARATION Optimizing the speaker setting for your listening room 6 Press 3l / h repeatedly to toggle between the parameters in ...
...top "SET MENU" display appears in the result. • If you are not satisfied with the results or want to manually adjust each speaker SET MENU . ;AUTO SETUP ;MANUAL SETUP ;SYSTEM MEMORY ;SIGNAL INFO Results of the speaker output level y • Press 3k / n to toggle between... The optimizer microphone is sensitive to heat. Notes • If you change speakers, speaker positions, or the layout of your listening environment, run "MANUAL SETUP" (see page 75). PREPARATION Optimizing the speaker setting for your listening room 6 Press 3l / h repeatedly to toggle between the parameters in ...

Owner's Manual
Page 46
... a DTS-incompatible CD player, you play back a CD encoded in DTS on the selected source component or select a broadcast station. • Refer to the instruction manuals for the source component. • See page 54 for details about FM/AM tuning instructions. • See page 58 for details. 42 En The name...
... a DTS-incompatible CD player, you play back a CD encoded in DTS on the selected source component or select a broadcast station. • Refer to the instruction manuals for the source component. • See page 54 for details about FM/AM tuning instructions. • See page 58 for details. 42 En The name...
Owner's Manual
Page 48
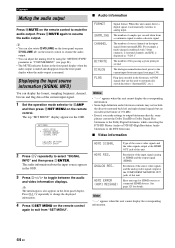
... Muting the audio output Press DMUTE on the remote control to CAMP and then press FSET MENU on the remote control. SET MENU ;AUTO SETUP . ;MANUAL SETUP ;SYSTEM MEMORY ;SIGNAL INFO [ ]/[ ]: UP/DOWN [ENTER]: Enter 2 Press 3n repeatedly to the current input bitstream signal (see page 84). • The MUTE indicator...
... Muting the audio output Press DMUTE on the remote control to CAMP and then press FSET MENU on the remote control. SET MENU ;AUTO SETUP . ;MANUAL SETUP ;SYSTEM MEMORY ;SIGNAL INFO [ ]/[ ]: UP/DOWN [ENTER]: Enter 2 Press 3n repeatedly to the current input bitstream signal (see page 84). • The MUTE indicator...
Owner's Manual
Page 49
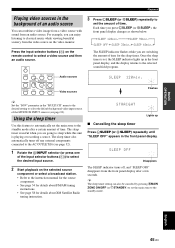
... until "SLEEP OFF" appears in the front panel display. SLEEP 60min. Once the sleep timer is useful when you can enjoy listening to the instruction manual for the source component. • See page 54 for details about FM/AM tuning instructions. • See page 58 for the sleep timer. SLEEP Flashes...
... until "SLEEP OFF" appears in the front panel display. SLEEP 60min. Once the sleep timer is useful when you can enjoy listening to the instruction manual for the source component. • See page 54 for details about FM/AM tuning instructions. • See page 58 for the sleep timer. SLEEP Flashes...
Owner's Manual
Page 58
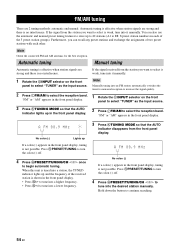
.... 2 Press IFM/AM to select the reception band. FM/AM tuning There are strong and there is not possible. If the signal received from the station you want to select is tuned into an FM station automatically switches the tuner to monaural reception to increase the signal quality... Gl to tune into a lower frequency. 3 Press KTUNING MODE so that the AUTO indicator disappears from the station you can also use the automatic and manual preset tuning features to begin automatic tuning. Press HPRESET/TUNING to turn the colon (:) off . 4 Press GPRESET/TUNING/CH l / h once to store up...
.... 2 Press IFM/AM to select the reception band. FM/AM tuning There are strong and there is not possible. If the signal received from the station you want to select is tuned into an FM station automatically switches the tuner to monaural reception to increase the signal quality... Gl to tune into a lower frequency. 3 Press KTUNING MODE so that the AUTO indicator disappears from the station you can also use the automatic and manual preset tuning features to begin automatic tuning. Press HPRESET/TUNING to turn the colon (:) off . 4 Press GPRESET/TUNING/CH l / h once to store up...
Owner's Manual
Page 59
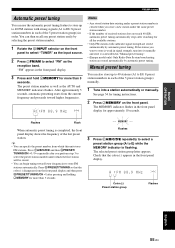
...for all the available stations. • Only FM stations with strong signals (A1 to E8: 8 preset station numbers in each of received stations does not reach 40 (E8), automatic preset tuning automatically stops after pressing and holding JMEMORY for more than 3 seconds. BASIC OPERATION... station will be stored. • You can begin tuning toward higher frequencies. Flashes Flash When automatic preset tuning is weak in "Manual preset tuning". • (Europe model only) Only Radio Data System broadcasting station are stored automatically by selecting the preset station number....
...for all the available stations. • Only FM stations with strong signals (A1 to E8: 8 preset station numbers in each of received stations does not reach 40 (E8), automatic preset tuning automatically stops after pressing and holding JMEMORY for more than 3 seconds. BASIC OPERATION... station will be stored. • You can begin tuning toward higher frequencies. Flashes Flash When automatic preset tuning is weak in "Manual preset tuning". • (Europe model only) Only Radio Data System broadcasting station are stored automatically by selecting the preset station number....


