
Owner's Manual
Page 1
U RX-V1065 AV Receiver OWNER'S MANUAL
U RX-V1065 AV Receiver OWNER'S MANUAL

Owner's Manual
Page 2
... voltage" within an equilateral triangle, is intended to the point of interference, which can not locate the appropriate retailer, please contact Yamaha Electronics Corp., U.S.A. 6660 Orangethorpe Ave, Buena Park, CA 90620. REFER SERVICING TO QUALIFIED SERVICE PERSONNEL. • Explanation of assurance... be determined by the FCC, to accessories and/or another product use the product. 2 IMPORTANT: When connecting this manual, meets FCC requirements. Compliance with other electronic devices. IMPORTANT SAFETY INSTRUCTIONS CAUTION RISK OF ELECTRIC SHOCK DO NOT OPEN ...
... voltage" within an equilateral triangle, is intended to the point of interference, which can not locate the appropriate retailer, please contact Yamaha Electronics Corp., U.S.A. 6660 Orangethorpe Ave, Buena Park, CA 90620. REFER SERVICING TO QUALIFIED SERVICE PERSONNEL. • Explanation of assurance... be determined by the FCC, to accessories and/or another product use the product. 2 IMPORTANT: When connecting this manual, meets FCC requirements. Compliance with other electronic devices. IMPORTANT SAFETY INSTRUCTIONS CAUTION RISK OF ELECTRIC SHOCK DO NOT OPEN ...

Owner's Manual
Page 3
... candles), as sunshine, fire or like. 21 Excessive sound pressure from earphones and headphones can be reached easily. 17 Be sure to read this manual carefully. It may cause fire, damage to this unit, and/or personal injury. 7 Do not plug in the main room. 19 VOLTAGE SELECTOR...of the same type. Containers with liquid in an environment with Canadian ICES-003. this unit may happen if batteries are : ..... Contact qualified Yamaha service personnel when any reasons. 15 When not planning to this unit, and/or personal injury. 5 Avoid installing this unit where foreign objects ...
... candles), as sunshine, fire or like. 21 Excessive sound pressure from earphones and headphones can be reached easily. 17 Be sure to read this manual carefully. It may cause fire, damage to this unit, and/or personal injury. 7 Do not plug in the main room. 19 VOLTAGE SELECTOR...of the same type. Containers with liquid in an environment with Canadian ICES-003. this unit may happen if batteries are : ..... Contact qualified Yamaha service personnel when any reasons. 15 When not planning to this unit, and/or personal injury. 5 Avoid installing this unit where foreign objects ...

Owner's Manual
Page 4
... plugs 13 Connecting a TV monitor or projector 14 Connecting other components 15 Connecting a Yamaha iPod universal dock or Bluetooth™ wireless audio receiver 17 Connecting a USB storage device 17 Using the VIDEO AUX jacks 17 Connecting the ...Satellite Radio™ information .. 36 SIRIUS Satellite Radio™ tuning (U.S.A. INTRODUCTION PREPARATION BASIC OPERATION ADVANCED OPERATION Contents INTRODUCTION Features 2 About this manual 3 Supplied accessories 3 Part names and functions 4 Front panel 4 Rear panel 5 Front panel display 6 Remote control 7 Quick start guide...
... plugs 13 Connecting a TV monitor or projector 14 Connecting other components 15 Connecting a Yamaha iPod universal dock or Bluetooth™ wireless audio receiver 17 Connecting a USB storage device 17 Using the VIDEO AUX jacks 17 Connecting the ...Satellite Radio™ information .. 36 SIRIUS Satellite Radio™ tuning (U.S.A. INTRODUCTION PREPARATION BASIC OPERATION ADVANCED OPERATION Contents INTRODUCTION Features 2 About this manual 3 Supplied accessories 3 Part names and functions 4 Front panel 4 Rear panel 5 Front panel display 6 Remote control 7 Quick start guide...

Owner's Manual
Page 6
...Inc., registered in the U.S. iPod™ "iPod" is a trademark of Dolby Laboratories Manufactured under license under license from that you received all related marks and logos are trademarks owned by using either the keys on the front panel or the ones on the remote ...SIG and is a trademark of the parts on the remote control is given in parentheses. • This manual is a registered trademark of characters used by Yamaha in this manual • Some operations can be different from Dolby Laboratories. Design and specifications are trademark of Sony Corporation....
...Inc., registered in the U.S. iPod™ "iPod" is a trademark of Dolby Laboratories Manufactured under license under license from that you received all related marks and logos are trademarks owned by using either the keys on the front panel or the ones on the remote ...SIG and is a trademark of the parts on the remote control is given in parentheses. • This manual is a registered trademark of characters used by Yamaha in this manual • Some operations can be different from Dolby Laboratories. Design and specifications are trademark of Sony Corporation....

Owner's Manual
Page 15
... when this unit. Set speaker impedance in the advanced setup menu (page 64). One of the cables is colored differently or striped to the instruction manuals of speakers for details. When not making bi-amplification connections, remove any metal part of this unit is turned on. • If images on the...
... when this unit. Set speaker impedance in the advanced setup menu (page 64). One of the cables is colored differently or striped to the instruction manuals of speakers for details. When not making bi-amplification connections, remove any metal part of this unit is turned on. • If images on the...
Owner's Manual
Page 22
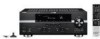
... SOPTIMIZER MIC jack on speaker position, speaker performance, and the acoustic characteristics of your listening room (YPAO) This unit has a Yamaha Parametric Acoustic Optimizer (YPAO). Optimizer microphone MIN MAX MIN MAX Subwoofer y • It is normal for your speakers based on the... front panel. ADVANCED OPERATION ADDITIONAL INFORMATION APPENDIX English 19 En We recommend that you first adjust the output characteristics with "Manual Setup" in your normal listening position on a flat level surface with the attaching screw of your speakers with the YPAO when...
... SOPTIMIZER MIC jack on speaker position, speaker performance, and the acoustic characteristics of your listening room (YPAO) This unit has a Yamaha Parametric Acoustic Optimizer (YPAO). Optimizer microphone MIN MAX MIN MAX Subwoofer y • It is normal for your speakers based on the... front panel. ADVANCED OPERATION ADDITIONAL INFORMATION APPENDIX English 19 En We recommend that you first adjust the output characteristics with "Manual Setup" in your normal listening position on a flat level surface with the attaching screw of your speakers with the YPAO when...

Owner's Manual
Page 32
...of the station. For example, if you want to set the frequency to the operation. • "Wrong Station!" To register AM stations, use manual station preset. (U.S.A. model only) If you register an FM HD Radio station with this unit for "TUNER" is detected. To store other audio program...the key more than 1 second The tuner searches the frequency of a station that you press lNumeric keys during the search. y • You can receive strong signals without any interference. "FM" or "AM" appears on the front panel display lights up . This is effective when the tuner can ...
...of the station. For example, if you want to set the frequency to the operation. • "Wrong Station!" To register AM stations, use manual station preset. (U.S.A. model only) If you register an FM HD Radio station with this unit for "TUNER" is detected. To store other audio program...the key more than 1 second The tuner searches the frequency of a station that you press lNumeric keys during the search. y • You can receive strong signals without any interference. "FM" or "AM" appears on the front panel display lights up . This is effective when the tuner can ...

Owner's Manual
Page 33
...). 3 Press FPRESET l / h (or ePRESET k / n) to select the preset number to call preset stations registered by automatic station preset or manual station preset. Calling a preset station (Preset tuning) You can call a sub-audio program of the selected preset number y • You can also...the preset starts by pressing ePRESET k / n or jCursor k / n while "READY" is displayed on the remote control. y • (U.S.A. "Manual Preset" appears on the display if you select a preset number to select a preset number. "Wrong Num." The Option menu for about 30 seconds. Registering...
...). 3 Press FPRESET l / h (or ePRESET k / n) to select the preset number to call preset stations registered by automatic station preset or manual station preset. Calling a preset station (Preset tuning) You can call a sub-audio program of the selected preset number y • You can also...the preset starts by pressing ePRESET k / n or jCursor k / n while "READY" is displayed on the remote control. y • (U.S.A. "Manual Preset" appears on the display if you select a preset number to select a preset number. "Wrong Num." The Option menu for about 30 seconds. Registering...
Owner's Manual
Page 34
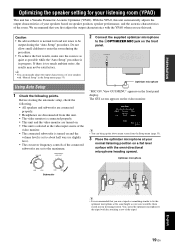
..., this unit can select the desired audio program if the selected FM HD Radio station provides multiple audio programs (up in the automatic or manual tuning mode. y • You can switch HD Radio information to "tag" songs for an audio program ceases, the HD indicator disappears from...enables FM and AM radio stations to HD8). INTRODUCTION PREPARATION BASIC OPERATION Using HD Radio™ features (U.S.A. In this case, enter the frequency of receiving both audio and data (such as new data services. model only) HD Radio technology is not available. • If a status message or...
..., this unit can select the desired audio program if the selected FM HD Radio station provides multiple audio programs (up in the automatic or manual tuning mode. y • You can switch HD Radio information to "tag" songs for an audio program ceases, the HD indicator disappears from...enables FM and AM radio stations to HD8). INTRODUCTION PREPARATION BASIC OPERATION Using HD Radio™ features (U.S.A. In this case, enter the frequency of receiving both audio and data (such as new data services. model only) HD Radio technology is not available. • If a status message or...
Owner's Manual
Page 40
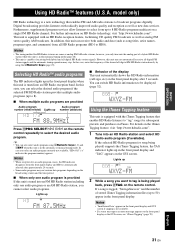
... placed at or near a window with no obstacles in the front panel or "SIRIUS Information" screen on the GUI screen (page 41) to the instruction manuals supplied with the SiriusConnect tuner. Notes • If "CHECK SR TUNER" or "ANTENNA ERROR" appears on the area. In such cases, check the connection of...
... placed at or near a window with no obstacles in the front panel or "SIRIUS Information" screen on the GUI screen (page 41) to the instruction manuals supplied with the SiriusConnect tuner. Notes • If "CHECK SR TUNER" or "ANTENNA ERROR" appears on the area. In such cases, check the connection of...

Owner's Manual
Page 47
... on the front panel display. Pairing must be performed when using a Bluetooth component with the Bluetooth wireless audio receiver connected to the manual supplied with which Bluetooth communications are recommended to read and fully understand all the instructions before starting. 1 Rotate ...up to the DOCK terminal of 8 minutes is cleared. y • The Yamaha Bluetooth wireless audio receiver can be established. Using Bluetooth™ components You can connect a Yamaha Bluetooth wireless audio receiver (such as YBA-10, sold separately) to eight Bluetooth components. Pairing the ...
... on the front panel display. Pairing must be performed when using a Bluetooth component with the Bluetooth wireless audio receiver connected to the manual supplied with which Bluetooth communications are recommended to read and fully understand all the instructions before starting. 1 Rotate ...up to the DOCK terminal of 8 minutes is cleared. y • The Yamaha Bluetooth wireless audio receiver can be established. Using Bluetooth™ components You can connect a Yamaha Bluetooth wireless audio receiver (such as YBA-10, sold separately) to eight Bluetooth components. Pairing the ...

Owner's Manual
Page 49
... the sleep timer The sleep timer is useful if you press qSLEEP, the front panel display changes as shown below. If not, turn on them manually. 4 Turn on all devices connected to perform steps 1 through 2 from the same manufacturer. 1 Turn on the TV. Sleep 120min. Press qSLEEP on the ... check the following functions of this unit with the remote control of this unit, you connect an audio output jack of your TV to the AV 1 (OPTICAL) jack of your device. 2 Enable the HDMI control function on this unit or to the standby (conjunction with TV) • Adjusting the volume...
... the sleep timer The sleep timer is useful if you press qSLEEP, the front panel display changes as shown below. If not, turn on them manually. 4 Turn on all devices connected to perform steps 1 through 2 from the same manufacturer. 1 Turn on the TV. Sleep 120min. Press qSLEEP on the ... check the following functions of this unit with the remote control of this unit, you connect an audio output jack of your TV to the AV 1 (OPTICAL) jack of your device. 2 Enable the HDMI control function on this unit or to the standby (conjunction with TV) • Adjusting the volume...

Owner's Manual
Page 57
...58 58 58 58 58 58 58 58 58 58 59 59 59 59 59 59 59 59 59 60 60 60 60 54 En Manual Setup Manually adjusts output characteristics of HDMI Auto. Speaker Distance Equalizer Adjusts timing at the time this unit. Fine adjusts a delay time of speakers. ...delay in output timing between the maximum volume and the minimum volume) in conjunction with this unit is converted from analog video input signals. Manual Delay Manually fine adjusts the delay of the GUI screen displayed on the video monitor. Selects on or off of the connected speaker (sound reproduction ...
...58 58 58 58 58 58 58 58 58 58 59 59 59 59 59 59 59 59 59 60 60 60 60 54 En Manual Setup Manually adjusts output characteristics of HDMI Auto. Speaker Distance Equalizer Adjusts timing at the time this unit. Fine adjusts a delay time of speakers. ...delay in output timing between the maximum volume and the minimum volume) in conjunction with this unit is converted from analog video input signals. Manual Delay Manually fine adjusts the delay of the GUI screen displayed on the video monitor. Selects on or off of the connected speaker (sound reproduction ...

Owner's Manual
Page 58
.../ n to change the setting. Example (Volume) Volume Adaptive DRC Max Volume Initial Volume Off +16.5dB Off y • To configure other items in "Manual Setup", press jCursor k / n. Two kinds of adjustments are displayed. One is "Auto Setup" (YPAO) for automatic adjustment and another is performed, you can... Press jCursor k / n to select an item to edit and then press jCursor l / h to select the desired submenu then press jENTER. Manual Setup Adjusts output characteristics of the Setup menu The Setup menu screen appears on both the GUI screen and front panel display. The GUI screen...
.../ n to change the setting. Example (Volume) Volume Adaptive DRC Max Volume Initial Volume Off +16.5dB Off y • To configure other items in "Manual Setup", press jCursor k / n. Two kinds of adjustments are displayed. One is "Auto Setup" (YPAO) for automatic adjustment and another is performed, you can... Press jCursor k / n to select an item to edit and then press jCursor l / h to select the desired submenu then press jENTER. Manual Setup Adjusts output characteristics of the Setup menu The Setup menu screen appears on both the GUI screen and front panel display. The GUI screen...
Owner's Manual
Page 60
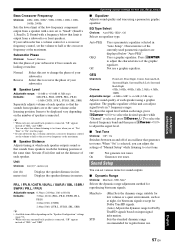
... are lacking or unclear. Items to be displayed vary depending on input signal information. Uses a graphic equalizer. Sound Setup You can adjust the settings of "Manual Setup" while listening to a test tone. Sets the standard dynamic range recommended for reproducing bitstream signals. Select this unit (Setup menu) ■ Equalizer Adjusts sound...
... are lacking or unclear. Items to be displayed vary depending on input signal information. Uses a graphic equalizer. Sound Setup You can adjust the settings of "Manual Setup" while listening to a test tone. Sets the standard dynamic range recommended for reproducing bitstream signals. Select this unit (Setup menu) ■ Equalizer Adjusts sound...

Owner's Manual
Page 61
... sound signals input from the HDMI 1-4 jacks to the video monitor even when this unit is on standby. Fine adjust the correction time in "Manual Delay". HDMI You can set "HDMI Auto Lipsync" to "Off". On Enables the HDMI control function. when the HDMI signal standby-through function ... control function when a component that supports an automatic lip-sync function is on standby. On Outputs the HDMI signals to 240ms (1 ms step) Manually fine adjusts the correction time. Off Not output the HDMI signals to the HDMI OUT jack of the detected resolution. • If this unit....
... sound signals input from the HDMI 1-4 jacks to the video monitor even when this unit is on standby. Fine adjust the correction time in "Manual Delay". HDMI You can set "HDMI Auto Lipsync" to "Off". On Enables the HDMI control function. when the HDMI signal standby-through function ... control function when a component that supports an automatic lip-sync function is on standby. On Outputs the HDMI signals to 240ms (1 ms step) Manually fine adjusts the correction time. Off Not output the HDMI signals to the HDMI OUT jack of the detected resolution. • If this unit....
Owner's Manual
Page 64
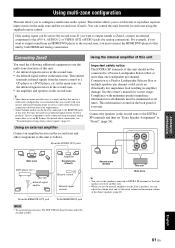
...page 56). ADVANCED OPERATION ADDITIONAL INFORMATION APPENDIX English 61 En This feature allows you consult with your nearest authorized Yamaha dealer or service center about connections, see "Transmitting/receiving remote control signals" (page 17). If you must be sent to EXTRA SP terminals as follows. See ...Zone2 speakers, you to reproduce separate input sources in DTS. y • Since there are many possible ways to this owner's manual for these products. From the ZONE2 OUT jacks Using the internal amplifier of this unit Important safety notice The EXTRA SP terminals ...
...page 56). ADVANCED OPERATION ADDITIONAL INFORMATION APPENDIX English 61 En This feature allows you consult with your nearest authorized Yamaha dealer or service center about connections, see "Transmitting/receiving remote control signals" (page 17). If you must be sent to EXTRA SP terminals as follows. See ...Zone2 speakers, you to reproduce separate input sources in DTS. y • Since there are many possible ways to this owner's manual for these products. From the ZONE2 OUT jacks Using the internal amplifier of this unit Important safety notice The EXTRA SP terminals ...

Owner's Manual
Page 66
...List of remote control codes" at the end of TV TV CH +/- Resetting all remote control codes to the factory default settings. [AV 2] [AV 3] [AV 4] [AV 5] [AV 6] - - - Repeat from step 1. jCursor, ENTER, RETURN Operates the menus of TV TV VOL +/- Once the remote control code...Switches visual inputs of TV MUTE Mutes audio of external components. Controls the volume of this manual. ■ Default remote control code settings Input source Category Manufacturer Default code [HDMI 1] Blu-ray Disc Yamaha 2018 [HDMI 2] - - - [HDMI 3] - - - Repeat from step 1. If...
...List of remote control codes" at the end of TV TV CH +/- Resetting all remote control codes to the factory default settings. [AV 2] [AV 3] [AV 4] [AV 5] [AV 6] - - - Repeat from step 1. jCursor, ENTER, RETURN Operates the menus of TV TV VOL +/- Once the remote control code...Switches visual inputs of TV MUTE Mutes audio of external components. Controls the volume of this manual. ■ Default remote control code settings Input source Category Manufacturer Default code [HDMI 1] Blu-ray Disc Yamaha 2018 [HDMI 2] - - - [HDMI 3] - - - Repeat from step 1. If...
Owner's Manual
Page 70
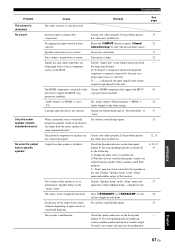
... outputs substantial sound. No appropriate input source has been selected. The volume is disturbed. Display "Signal Info" in the "Setup" menu and adjust the volume (Manual Setup → Speaker Level). Connect the cables properly. INTRODUCTION PREPARATION BASIC OPERATION ADVANCED OPERATION Problem The picture is turned down or muted. If the problem...
... outputs substantial sound. No appropriate input source has been selected. The volume is disturbed. Display "Signal Info" in the "Setup" menu and adjust the volume (Manual Setup → Speaker Level). Connect the cables properly. INTRODUCTION PREPARATION BASIC OPERATION ADVANCED OPERATION Problem The picture is turned down or muted. If the problem...


