
Owner's Manual
Page 4
... Guard 60 Using multi-zone configuration 61 Connecting Zone2 61 Controlling Zone2 62 Controlling other components 15 Connecting a Yamaha iPod universal dock or Bluetooth™ wireless audio receiver 17 Connecting a USB storage device 17 Using the VIDEO AUX jacks 17 Connecting the FM and AM antennas... 18 Connecting the power cable 18 Turning this unit on HDMI 81 Specifications 82 Index 83 (at the end of this unit (Setup menu 54 Basic operation of remote control codes...
... Guard 60 Using multi-zone configuration 61 Connecting Zone2 61 Controlling Zone2 62 Controlling other components 15 Connecting a Yamaha iPod universal dock or Bluetooth™ wireless audio receiver 17 Connecting a USB storage device 17 Using the VIDEO AUX jacks 17 Connecting the FM and AM antennas... 18 Connecting the power cable 18 Turning this unit on HDMI 81 Specifications 82 Index 83 (at the end of this unit (Setup menu 54 Basic operation of remote control codes...
Owner's Manual
Page 10
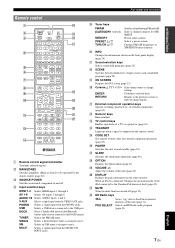
INTRODUCTION PREPARATION BASIC OPERATION ADVANCED OPERATION Part names and functions Remote control a b c d e f g h i j k MAIN ZONE2 TRANSMIT CODE SET POWER SOURCE 1 1 5 SLEEP POWER HDMI 2 3 4 AV 2 3 4 AUDIO 6 1 2 V-AUX PHONO USB DOCK TUNER SIRIUS CATEGORY FM AM INFO ...an input source. c SOURCE POWER Switches an external component on and off . DOCK Selects a Yamaha iPod universal dock/Bluetooth wireless audio receiver connected to be operated by the remote control (page 62). h SCENE Switches between FM and AM. k External component operation keys Operate...
INTRODUCTION PREPARATION BASIC OPERATION ADVANCED OPERATION Part names and functions Remote control a b c d e f g h i j k MAIN ZONE2 TRANSMIT CODE SET POWER SOURCE 1 1 5 SLEEP POWER HDMI 2 3 4 AV 2 3 4 AUDIO 6 1 2 V-AUX PHONO USB DOCK TUNER SIRIUS CATEGORY FM AM INFO ...an input source. c SOURCE POWER Switches an external component on and off . DOCK Selects a Yamaha iPod universal dock/Bluetooth wireless audio receiver connected to be operated by the remote control (page 62). h SCENE Switches between FM and AM. k External component operation keys Operate...

Owner's Manual
Page 12
...battery compartment cover. 2 Insert the two supplied batteries (AAA, R03, UM-4) according to aim the remote control directly at the remote control sensor on this remote control by setting the remote control code (page 63). Notes • Do not spill water or other liquids on the inside of high ...temperatures - If the leaked material comes into place. In such a case, install new batteries and set the remote control code. This may be cleared. places of the remote control narrows - places of the new batteries or cause old batteries to touch the leaked material. ADVANCED OPERATION...
...battery compartment cover. 2 Insert the two supplied batteries (AAA, R03, UM-4) according to aim the remote control directly at the remote control sensor on this remote control by setting the remote control code (page 63). Notes • Do not spill water or other liquids on the inside of high ...temperatures - If the leaked material comes into place. In such a case, install new batteries and set the remote control code. This may be cleared. places of the remote control narrows - places of the new batteries or cause old batteries to touch the leaked material. ADVANCED OPERATION...

Owner's Manual
Page 26
...control) You can operate an external component with the least circuitry. y • If you change the input source setting, register the remote control code of the selected source. The MUTE indicator on the video monitor. The GUI screen appears on the front panel display flashes while audio... output is activated, this unit by setting a remote control code for the external component for TUNER, SIRIUS and XM input sources. 2 While holding down the desired hSCENE key, press and hold ...
...control) You can operate an external component with the least circuitry. y • If you change the input source setting, register the remote control code of the selected source. The MUTE indicator on the video monitor. The GUI screen appears on the front panel display flashes while audio... output is activated, this unit by setting a remote control code for the external component for TUNER, SIRIUS and XM input sources. 2 While holding down the desired hSCENE key, press and hold ...

Owner's Manual
Page 41
... Press HTUNING/CH l / h (or eTUN./CH k / n) repeatedly to select the channel category. the channel is locked, "PIN:___" appears on the remote control and then press lENT to confirm the input number. • Instead of service. - For example, to cancel (page 40). • If the selected ...channel is locked (page 40). - Enter the four-digit Parental Lock code number by entering the channel number, see "Direct number access" on the GUI screen) appear. • You can wait a few seconds until this page....
... Press HTUNING/CH l / h (or eTUN./CH k / n) repeatedly to select the channel category. the channel is locked, "PIN:___" appears on the remote control and then press lENT to confirm the input number. • Instead of service. - For example, to cancel (page 40). • If the selected ...channel is locked (page 40). - Enter the four-digit Parental Lock code number by entering the channel number, see "Direct number access" on the GUI screen) appear. • You can wait a few seconds until this page....

Owner's Manual
Page 43
...Cat / Ch Lock / Unlock 9 Repeat steps 6 through 8 to lock all the desired channels. 10 Press jRETURN repeatedly to confirm the code number. To cancel this unit is already registered and you select in the channel or unlocking the channel. If the channel is entered, "...Wrong" appears on the remote control. SIRIUS Satellite Radio™ tuning (U.S.A. Code number 4 Press jENTER. Enter the correct code number. • If you want to step 3. SIRIUS PIN: Note • If an incorrect number...
...Cat / Ch Lock / Unlock 9 Repeat steps 6 through 8 to lock all the desired channels. 10 Press jRETURN repeatedly to confirm the code number. To cancel this unit is already registered and you select in the channel or unlocking the channel. If the channel is entered, "...Wrong" appears on the remote control. SIRIUS Satellite Radio™ tuning (U.S.A. Code number 4 Press jENTER. Enter the correct code number. • If you want to step 3. SIRIUS PIN: Note • If an incorrect number...

Owner's Manual
Page 66
... components are assigned to the factory default settings. [AV 2] [AV 3] [AV 4] [AV 5] [AV 6] - - - DOCK Yamaha 5011 Tuner Yamaha 5007 Tuner Yamaha 5017 Tuner Yamaha 5009 - - - For a complete list of available remote control codes, refer to control external components. • The remote control keys for controls of TV regardless of a ballpoint pen. The following remote control codes are available only when the external components have...
... components are assigned to the factory default settings. [AV 2] [AV 3] [AV 4] [AV 5] [AV 6] - - - DOCK Yamaha 5011 Tuner Yamaha 5007 Tuner Yamaha 5017 Tuner Yamaha 5009 - - - For a complete list of available remote control codes, refer to control external components. • The remote control keys for controls of TV regardless of a ballpoint pen. The following remote control codes are available only when the external components have...

Owner's Manual
Page 68
If it fails, nTRANSMIT blinks six times. To switch to ID2: Press lNumeric keys to enter "5019". Once the remote control code is set to "ID1". Repeat from step 1. y • If you initialize the settings of this unit, "REMOTE ID" (remote control code of this unit) is registered, nTRANSMIT blinks twice. Advanced setup BASIC OPERATION ADVANCED OPERATION ADDITIONAL INFORMATION APPENDIX English 65 En INTRODUCTION PREPARATION 3 Enter the desired remote control ID code. To switch to ID1: Press lNumeric keys to enter "5020".
If it fails, nTRANSMIT blinks six times. To switch to ID2: Press lNumeric keys to enter "5019". Once the remote control code is set to "ID1". Repeat from step 1. y • If you initialize the settings of this unit, "REMOTE ID" (remote control code of this unit) is registered, nTRANSMIT blinks twice. Advanced setup BASIC OPERATION ADVANCED OPERATION ADDITIONAL INFORMATION APPENDIX English 65 En INTRODUCTION PREPARATION 3 Enter the desired remote control ID code. To switch to ID1: Press lNumeric keys to enter "5020".

Owner's Manual
Page 76
... Connect error There is striking the remote control sensor of 6 m (20 ft) and no more than 30 degrees offaxis from your iPod to the remote control. Direct sunlight or lighting (from your iPod (page 17). Even if the remote control code is in the Yamaha iPod universal dock. Note •...; In case of a transmission error without a status message appearing on the remote control again. iPod Connected Your iPod is not supported by Use an iPod...
... Connect error There is striking the remote control sensor of 6 m (20 ft) and no more than 30 degrees offaxis from your iPod to the remote control. Direct sunlight or lighting (from your iPod (page 17). Even if the remote control code is in the Yamaha iPod universal dock. Note •...; In case of a transmission error without a status message appearing on the remote control again. iPod Connected Your iPod is not supported by Use an iPod...

Owner's Manual
Page 86
... Setup 58 Auto Preset, Option menu 48 Auto Setup (YPAO), troubleshooting 75 Auto Setup, Speaker Setup 55 Automatic setup 19 AV 1-6 jack, rear panel 5 AV OUT jack, rear panel 5 ■B Basic operation, Setup menu 55 Bass Crossover Frequency, Manual Setup, Speaker Setup 57 BI.....6 Clear Preset, Option menu 48 COAXIAL jack 13 CODE SET, remote control 7 COMPONENT VIDEO jack 13 Connect, Option menu 49 Connecting audio and video player 15 Connecting audio player 16 Connecting Bluetooth wireless audio receiver 17 Connecting external amplifier 16 Connecting external decoder 16 ...
... Setup 58 Auto Preset, Option menu 48 Auto Setup (YPAO), troubleshooting 75 Auto Setup, Speaker Setup 55 Automatic setup 19 AV 1-6 jack, rear panel 5 AV OUT jack, rear panel 5 ■B Basic operation, Setup menu 55 Bass Crossover Frequency, Manual Setup, Speaker Setup 57 BI.....6 Clear Preset, Option menu 48 COAXIAL jack 13 CODE SET, remote control 7 COMPONENT VIDEO jack 13 Connect, Option menu 49 Connecting audio and video player 15 Connecting audio player 16 Connecting Bluetooth wireless audio receiver 17 Connecting external amplifier 16 Connecting external decoder 16 ...
Owner's Manual
Page 87
... 5 Receiving remote control signal 17 Registering input source, SCENE function 23 Registering SIRIUS Satellite Radio channel 39 Registering sound field program, SCENE function 23 Registering XM Satellite Radio channel ....... 35 Remote control 7 Remote control code resetting 63 Remote control code setting 63 Remote control ID setting 64 Remote control signal transmitter, remote control 7 Remote control, controlling other component 63 Remote control, preparation 9 Remote...
... 5 Receiving remote control signal 17 Registering input source, SCENE function 23 Registering SIRIUS Satellite Radio channel 39 Registering sound field program, SCENE function 23 Registering XM Satellite Radio channel ....... 35 Remote control 7 Remote control code resetting 63 Remote control code setting 63 Remote control ID setting 64 Remote control signal transmitter, remote control 7 Remote control, controlling other component 63 Remote control, preparation 9 Remote...


