
Owner's Manual
Page 4
...remote control 9 Installing batteries in the remote control 9 Using the remote control 9 Connections 10 Placing speakers 10 Connecting speakers 11 Information on jacks and cable plugs 13 Connecting a TV monitor or projector 14 Connecting other components 15 Connecting a Yamaha iPod universal dock or Bluetooth™ wireless audio receiver...surround speakers (Virtual CINEMA DSP 28 Enjoy sound field programs with the remote control 63 Setting remote control codes 63 Resetting all remote control codes 63 Advanced setup 64 APPENDIX Troubleshooting 66 Glossary 77 Sound field program...
...remote control 9 Installing batteries in the remote control 9 Using the remote control 9 Connections 10 Placing speakers 10 Connecting speakers 11 Information on jacks and cable plugs 13 Connecting a TV monitor or projector 14 Connecting other components 15 Connecting a Yamaha iPod universal dock or Bluetooth™ wireless audio receiver...surround speakers (Virtual CINEMA DSP 28 Enjoy sound field programs with the remote control 63 Setting remote control codes 63 Resetting all remote control codes 63 Advanced setup 64 APPENDIX Troubleshooting 66 Glossary 77 Sound field program...
Owner's Manual
Page 10
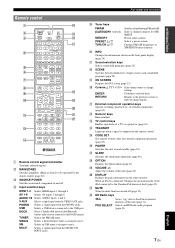
...standby (page 18). PHONO Selects a signal input from the remote control. DOCK Selects a Yamaha iPod universal dock/Bluetooth wireless audio receiver connected to the previous screen or ends the menu display. ...Yamaha iPod universal dock (page 42). AUDIO 1/2 Selects AUDIO inputs 1 and 2. e Tuner keys FM/AM (CATEGORY l / h) MEMORY PRESET k / n TUN./CH k / n Switches a band between linked sets of the iPod connected to the iPod or internal memory of this unit (page 22). ENTER Confirms a selected item. o CODE SET Sets remote control codes for XM/ SIRIUS. AV 1-6 Selects AV...
...standby (page 18). PHONO Selects a signal input from the remote control. DOCK Selects a Yamaha iPod universal dock/Bluetooth wireless audio receiver connected to the previous screen or ends the menu display. ...Yamaha iPod universal dock (page 42). AUDIO 1/2 Selects AUDIO inputs 1 and 2. e Tuner keys FM/AM (CATEGORY l / h) MEMORY PRESET k / n TUN./CH k / n Switches a band between linked sets of the iPod connected to the iPod or internal memory of this unit (page 22). ENTER Confirms a selected item. o CODE SET Sets remote control codes for XM/ SIRIUS. AV 1-6 Selects AV...

Owner's Manual
Page 12
... (AAA, R03, UM-4) according to touch the leaked material. Notes • Do not spill water or other liquids on this remote control by setting the remote control code (page 63). places of the remote control narrows - Notes • Change all batteries if you find leaking batteries, discard the batteries immediately, taking care not to...
... (AAA, R03, UM-4) according to touch the leaked material. Notes • Do not spill water or other liquids on this remote control by setting the remote control code (page 63). places of the remote control narrows - Notes • Change all batteries if you find leaking batteries, discard the batteries immediately, taking care not to...

Owner's Manual
Page 26
... or "MULTI CH" is selected as an input source. • If you to switch between external components linked to scene selections. 1 Register the remote control code of an external component to select "Treble" or "Bass". Select Scene BD/DVD TV CD RADIO 2 Use jCursor k / n repeatedly to switch ... Enjoying pure hi-fi sound Use Pure Direct mode to enjoy the pure high fidelity sound of sounds output from other channels well. Setting remote control codes for TUNER, SIRIUS and XM input sources. 2 While holding down the desired hSCENE key, press and hold PSCENE (or hSCENE) key to...
... or "MULTI CH" is selected as an input source. • If you to switch between external components linked to scene selections. 1 Register the remote control code of an external component to select "Treble" or "Bass". Select Scene BD/DVD TV CD RADIO 2 Use jCursor k / n repeatedly to switch ... Enjoying pure hi-fi sound Use Pure Direct mode to enjoy the pure high fidelity sound of sounds output from other channels well. Setting remote control codes for TUNER, SIRIUS and XM input sources. 2 While holding down the desired hSCENE key, press and hold PSCENE (or hSCENE) key to...

Owner's Manual
Page 41
...; You can display the SIRIUS Satellite Radio information on the front panel display or on the front panel display. Enter the four-digit Parental Lock code number by pressing and holding down HTUNING/CH l / h (or eTUN./CH k / n). • You can search for a channel quickly by using the lNumeric keys or... press lENT to search for a channel by using one -digit or two-digit channel number, press the lNumeric keys on the remote control and then press lENT to confirm the input number. • Instead of this unit confirms the entered channel number. • If no key ...
...; You can display the SIRIUS Satellite Radio information on the front panel display or on the front panel display. Enter the four-digit Parental Lock code number by pressing and holding down HTUNING/CH l / h (or eTUN./CH k / n). • You can search for a channel quickly by using the lNumeric keys or... press lENT to search for a channel by using one -digit or two-digit channel number, press the lNumeric keys on the remote control and then press lENT to confirm the input number. • Instead of this unit confirms the entered channel number. • If no key ...

Owner's Manual
Page 43
...the desired SIRIUS Satellite channels. Tuning into the locked channels Tune into the locked channel, "LOCKED" appears on the remote control. Note • If a code number is tuned into the previously selected channel. 40 En Parental Lock Category Pop Channel 001 SIRIUS Hits 1 002 The...channels when this feature to be locked. 1 Press rOPTION on the front panel display and GUI screen, followed by using the lNumeric keys. Setting the code number and the locking channels Use this unit is displayed, sound of a channel you search a channel by using eCATEGORY l / h or eTUN./CH...
...the desired SIRIUS Satellite channels. Tuning into the locked channels Tune into the locked channel, "LOCKED" appears on the remote control. Note • If a code number is tuned into the previously selected channel. 40 En Parental Lock Category Pop Channel 001 SIRIUS Hits 1 002 The...channels when this feature to be locked. 1 Press rOPTION on the front panel display and GUI screen, followed by using the lNumeric keys. Setting the code number and the locking channels Use this unit is displayed, sound of a channel you search a channel by using eCATEGORY l / h or eTUN./CH...

Owner's Manual
Page 66
...code [HDMI 1] Blu-ray Disc Yamaha 2018 [HDMI 2] - - - [HDMI 3] - - - Switches channels of TV POWER Turns on and off TV tDISPLAY Switches between the screens of selected input sources. • You need to set the remote control code first to the factory default settings. [AV 2] [AV 3] [AV 4] [AV 5] [AV... no assignment y • An external component controlled by setting the appropriate remote control codes. Setting remote control codes You can reset all remote control codes [HDMI 4] - - - [AV 1] - - - nTRANSMIT blinks twice. 2 Press the desired dInput selection...
...code [HDMI 1] Blu-ray Disc Yamaha 2018 [HDMI 2] - - - [HDMI 3] - - - Switches channels of TV POWER Turns on and off TV tDISPLAY Switches between the screens of selected input sources. • You need to set the remote control code first to the factory default settings. [AV 2] [AV 3] [AV 4] [AV 5] [AV... no assignment y • An external component controlled by setting the appropriate remote control codes. Setting remote control codes You can reset all remote control codes [HDMI 4] - - - [AV 1] - - - nTRANSMIT blinks twice. 2 Press the desired dInput selection...

Owner's Manual
Page 68
To switch to ID2: Press lNumeric keys to "ID1". If it fails, nTRANSMIT blinks six times. Once the remote control code is set to enter "5020". Repeat from step 1. y • If you initialize the settings of this unit, "REMOTE ID" (remote control code of this unit) is registered, nTRANSMIT blinks twice. INTRODUCTION PREPARATION 3 Enter the desired remote control ID code. To switch to ID1: Press lNumeric keys to enter "5019". Advanced setup BASIC OPERATION ADVANCED OPERATION ADDITIONAL INFORMATION APPENDIX English 65 En
To switch to ID2: Press lNumeric keys to "ID1". If it fails, nTRANSMIT blinks six times. Once the remote control code is set to enter "5020". Repeat from step 1. y • If you initialize the settings of this unit, "REMOTE ID" (remote control code of this unit) is registered, nTRANSMIT blinks twice. INTRODUCTION PREPARATION 3 Enter the desired remote control ID code. To switch to ID1: Press lNumeric keys to enter "5019". Advanced setup BASIC OPERATION ADVANCED OPERATION ADDITIONAL INFORMATION APPENDIX English 65 En

Owner's Manual
Page 76
... when you press jCursor, do not match. Unknown iPod The iPod being used is not correctly set , there are weak. The remote control code is not supported by Use an iPod supported by this unit. APPENDIX English 73 En Adjust the lighting angle or reposition this unit ... 64 63 63 - This unit is correctly set . Direct sunlight or lighting (from the front panel. Even if the remote control code is in the dock. Remove your iPod in the Yamaha iPod universal dock 42 and then place it back in the middle of recognizing the connection with the signal path...
... when you press jCursor, do not match. Unknown iPod The iPod being used is not correctly set , there are weak. The remote control code is not supported by Use an iPod supported by this unit. APPENDIX English 73 En Adjust the lighting angle or reposition this unit ... 64 63 63 - This unit is correctly set . Direct sunlight or lighting (from the front panel. Even if the remote control code is in the dock. Remove your iPod in the Yamaha iPod universal dock 42 and then place it back in the middle of recognizing the connection with the signal path...

Owner's Manual
Page 86
... Setup 58 Auto Preset, Option menu 48 Auto Setup (YPAO), troubleshooting 75 Auto Setup, Speaker Setup 55 Automatic setup 19 AV 1-6 jack, rear panel 5 AV OUT jack, rear panel 5 ■B Basic operation, Setup menu 55 Bass Crossover Frequency, Manual Setup, Speaker Setup 57 BI.....6 Clear Preset, Option menu 48 COAXIAL jack 13 CODE SET, remote control 7 COMPONENT VIDEO jack 13 Connect, Option menu 49 Connecting audio and video player 15 Connecting audio player 16 Connecting Bluetooth wireless audio receiver 17 Connecting external amplifier 16 Connecting external decoder 16 ...
... Setup 58 Auto Preset, Option menu 48 Auto Setup (YPAO), troubleshooting 75 Auto Setup, Speaker Setup 55 Automatic setup 19 AV 1-6 jack, rear panel 5 AV OUT jack, rear panel 5 ■B Basic operation, Setup menu 55 Bass Crossover Frequency, Manual Setup, Speaker Setup 57 BI.....6 Clear Preset, Option menu 48 COAXIAL jack 13 CODE SET, remote control 7 COMPONENT VIDEO jack 13 Connect, Option menu 49 Connecting audio and video player 15 Connecting audio player 16 Connecting Bluetooth wireless audio receiver 17 Connecting external amplifier 16 Connecting external decoder 16 ...
Owner's Manual
Page 87
... 5 Receiving remote control signal 17 Registering input source, SCENE function 23 Registering SIRIUS Satellite Radio channel 39 Registering sound field program, SCENE function 23 Registering XM Satellite Radio channel ....... 35 Remote control 7 Remote control code resetting 63 Remote control code setting 63 Remote control ID setting 64 Remote control signal transmitter, remote control 7 Remote control, controlling other component 63 Remote control, preparation 9 Remote...
... 5 Receiving remote control signal 17 Registering input source, SCENE function 23 Registering SIRIUS Satellite Radio channel 39 Registering sound field program, SCENE function 23 Registering XM Satellite Radio channel ....... 35 Remote control 7 Remote control code resetting 63 Remote control code setting 63 Remote control ID setting 64 Remote control signal transmitter, remote control 7 Remote control, controlling other component 63 Remote control, preparation 9 Remote...


