Owner's Manual
Page 3
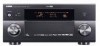
If you do not want to lights up the backlight corresponding to "Simplified remote control" on page 132. DECODE 6 7 8 THX STRAIGHT 9 0 M N R O P 3 En (U.S.A. Simplified remote control This products is equipped with the simplified remote control. J K L Q CLASSICAL 1 CLASSICAL 2 LIVE/CLUB ENTERTAIN 1 2 3 4 MOVIE 5...) F G H I Backlight mode The remote control is supplied with the motion sensor and the remote control lights up the backlight when this unit (see page 124). Remote control 1 2 POWER POWER STANDBY POWER TV AV MULTI V-AUX PHONO MD TAPE BD HD ...
If you do not want to lights up the backlight corresponding to "Simplified remote control" on page 132. DECODE 6 7 8 THX STRAIGHT 9 0 M N R O P 3 En (U.S.A. Simplified remote control This products is equipped with the simplified remote control. J K L Q CLASSICAL 1 CLASSICAL 2 LIVE/CLUB ENTERTAIN 1 2 3 4 MOVIE 5...) F G H I Backlight mode The remote control is supplied with the motion sensor and the remote control lights up the backlight when this unit (see page 124). Remote control 1 2 POWER POWER STANDBY POWER TV AV MULTI V-AUX PHONO MD TAPE BD HD ...

Owner's Manual
Page 6
... the menu browse mode 78 The functions of the play information display 79 Using Network/USB features 80 Navigating the network and USB menus 80 Remote control operation 81 Using a PC server or Yamaha MCX-2000 82 Installing Windows Media Player 11 on your PC 82 Registering this unit on the...front panel display 77 Displaying the XM Satellite Radio information in the video monitor 77 Using iPod 78 Controlling iPod 78 Remote control operation 78 Controlling iPod in the simple remote mode 78 Controlling iPod in the GUI menu 57 Basic operation of the GUI menu by using the GUI menu 72...
... the menu browse mode 78 The functions of the play information display 79 Using Network/USB features 80 Navigating the network and USB menus 80 Remote control operation 81 Using a PC server or Yamaha MCX-2000 82 Installing Windows Media Player 11 on your PC 82 Registering this unit on the...front panel display 77 Displaying the XM Satellite Radio information in the video monitor 77 Using iPod 78 Controlling iPod 78 Remote control operation 78 Controlling iPod in the simple remote mode 78 Controlling iPod in the GUI menu 57 Basic operation of the GUI menu by using the GUI menu 72...

Owner's Manual
Page 7
... 4 .......... 140 Setting the sleep timer for the information about each position of the parts on the front panel or the remote control. Introduction Preparation Basic Operation Internal Source Operation Advanced Operation Advanced sound configurations 86 Selecting decoders 86 Selecting decoders for 2-channel sources... according to the environment of the listening room 119 Controlling this unit by using the Web browser (Web Control Center 120 Remote control features 121 Controlling this unit, a TV, or other components 121 Controlling this unit 121 Controlling a TV 121 Controlling...
... 4 .......... 140 Setting the sleep timer for the information about each position of the parts on the front panel or the remote control. Introduction Preparation Basic Operation Internal Source Operation Advanced Operation Advanced sound configurations 86 Selecting decoders 86 Selecting decoders for 2-channel sources... according to the environment of the listening room 119 Controlling this unit by using the Web browser (Web Control Center 120 Remote control features 121 Controlling this unit, a TV, or other components 121 Controlling this unit 121 Controlling a TV 121 Controlling...
Owner's Manual
Page 8
... Digital Corporation. All rights reserved. In case of differences between the front panel and the remote control, the button name on the front panel or the remote control. YAMAHA CORPORATION hereby grants the user a nonexclusive, non-transferable, limited right of use to this ...manual, the illustrations of the GUI are examples when you set the GUI language to change in the U.S. and foreign patent, patent pending and other countries. This receiver...
... Digital Corporation. All rights reserved. In case of differences between the front panel and the remote control, the button name on the front panel or the remote control. YAMAHA CORPORATION hereby grants the user a nonexclusive, non-transferable, limited right of use to this ...manual, the illustrations of the GUI are examples when you set the GUI language to change in the U.S. and foreign patent, patent pending and other countries. This receiver...

Owner's Manual
Page 9
Introduction Introduction Features 10 Getting started 11 Supplied accessories ...11 Using the remote control ...12 Opening and closing the front panel door 12 Quick start guide 13 Preparation: Check the items 13 Step 1: Set up your speakers ...14 Step 2: Connect your Blu-ray Disc/HD DVD player and other components 16 Step 3: Turn on the power and start playback 17 What do you want to do with this unit 18
Introduction Introduction Features 10 Getting started 11 Supplied accessories ...11 Using the remote control ...12 Opening and closing the front panel door 12 Quick start guide 13 Preparation: Check the items 13 Step 1: Set up your speakers ...14 Step 2: Connect your Blu-ray Disc/HD DVD player and other components 16 Step 3: Turn on the power and start playback 17 What do you want to do with this unit 18

Owner's Manual
Page 10
...+ 140 W Front presence: 50 W + 50 W Rear presence: 50 W + 50 W Sound field programs ☞ P. 58 ◆ Proprietary Yamaha technology for the creation of sound fields ◆ THX Ultra2 Plus surround modes ☞ P. 87 ◆ CINEMA DSP HD³ mode for creating ...remote control ☞ P. 132 ◆ Advanced amplifier assign capability ☞ P. 142 ◆ Flexible assignable trigger out jack ☞ P. 114 ◆ Zone switching capability between the main zone and Zone 2/Zone 3/ Zone 4 using a Web browser ☞ P. 120 Automatic speaker setup features ◆ Advanced YPAO (Yamaha...
...+ 140 W Front presence: 50 W + 50 W Rear presence: 50 W + 50 W Sound field programs ☞ P. 58 ◆ Proprietary Yamaha technology for the creation of sound fields ◆ THX Ultra2 Plus surround modes ☞ P. 87 ◆ CINEMA DSP HD³ mode for creating ...remote control ☞ P. 132 ◆ Advanced amplifier assign capability ☞ P. 142 ◆ Flexible assignable trigger out jack ☞ P. 114 ◆ Zone switching capability between the main zone and Zone 2/Zone 3/ Zone 4 using a Web browser ☞ P. 120 Automatic speaker setup features ◆ Advanced YPAO (Yamaha...
Owner's Manual
Page 11
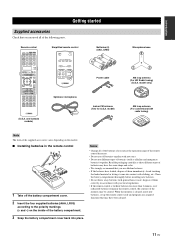
... • Change all of the batteries if you received all of the battery compartment. Read the packaging carefully as alkaline and manganese batteries) together. Avoid touching the leaked material or letting it come into place. 11 En Remote control POWER POWER STANDBY POWER TV AV MULTI V-AUX PHONO BD HD DVD CBL SAT...
... • Change all of the batteries if you received all of the battery compartment. Read the packaging carefully as alkaline and manganese batteries) together. Avoid touching the leaked material or letting it come into place. 11 En Remote control POWER POWER STANDBY POWER TV AV MULTI V-AUX PHONO BD HD DVD CBL SAT...

Owner's Manual
Page 12
...front panel door, open , press gently on the operation mode selector position. If you can control. Aim this window at the remote control sensor on this unit detects motions, change the backlight mode (see page 139). [4] Information display Shows the name of high... temperatures, such as near a heater or stove - Getting started Using the remote control The remote control transmits a directional infrared ray. Remote control sensor MAIN ZONE ON/OFF MASTER ON OFF INPUT AUDIO SELECT SPEAKERS A B SILENT CINEMA YPAO MULTI ZONE STRAIGHT...
...front panel door, open , press gently on the operation mode selector position. If you can control. Aim this window at the remote control sensor on this unit detects motions, change the backlight mode (see page 139). [4] Information display Shows the name of high... temperatures, such as near a heater or stove - Getting started Using the remote control The remote control transmits a directional infrared ray. Remote control sensor MAIN ZONE ON/OFF MASTER ON OFF INPUT AUDIO SELECT SPEAKERS A B SILENT CINEMA YPAO MULTI ZONE STRAIGHT...
Owner's Manual
Page 16
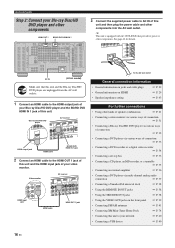
... the HDMI input jack of your network ☞ P. 40 • Connecting a USB device ☞ P. 40 16 En Video monitor AV receiver HDMI input jack HDMI cable HDMI OUT 1 jack To the AC wall outlet General connection information • General information on jacks and cable ... ☞ P. 36 • Connecting a DVD player via multi-channel analog audio connection ☞ P. 37 • Connecting a Yamaha iPod universal dock ☞ P. 38 • Using the REMOTE IN/OUT jacks ☞ P. 38 • Using the TRIGGER OUT jacks ☞ P. 38 • Using the VIDEO AUX...
... the HDMI input jack of your network ☞ P. 40 • Connecting a USB device ☞ P. 40 16 En Video monitor AV receiver HDMI input jack HDMI cable HDMI OUT 1 jack To the AC wall outlet General connection information • General information on jacks and cable ... ☞ P. 36 • Connecting a DVD player via multi-channel analog audio connection ☞ P. 37 • Connecting a Yamaha iPod universal dock ☞ P. 38 • Using the REMOTE IN/OUT jacks ☞ P. 38 • Using the TRIGGER OUT jacks ☞ P. 38 • Using the VIDEO AUX...

Owner's Manual
Page 17
... in the front panel display, this unit does not accepts the front panel operations and stores the remote control operations. See page 43 for each input source (BD/HD DVD, etc.). See pages 47 to receive infrared signals from the standby mode, press AMAIN ZONE ON/OFF on the front panel (or... EPOWER on the remote control). y The recommended sound field program is the "HDMI OUT SEL" setting correct? Â Set...
... in the front panel display, this unit does not accepts the front panel operations and stores the remote control operations. See page 43 for each input source (BD/HD DVD, etc.). See pages 47 to receive infrared signals from the standby mode, press AMAIN ZONE ON/OFF on the front panel (or... EPOWER on the remote control). y The recommended sound field program is the "HDMI OUT SEL" setting correct? Â Set...

Owner's Manual
Page 18
... ☞ P. 65 • Adjusting the tonal quality of the speakers ☞ P. 65 • Customizing the sound field programs ☞ P. 86 Additional features • Setting the remote control ☞ P. 121 • Displaying the current input source signal information in the GUI ☞ P. 114 • Saving and recalling the system settings of this...
... ☞ P. 65 • Adjusting the tonal quality of the speakers ☞ P. 65 • Customizing the sound field programs ☞ P. 86 Additional features • Setting the remote control ☞ P. 121 • Displaying the current input source signal information in the GUI ☞ P. 114 • Saving and recalling the system settings of this...

Owner's Manual
Page 20
...ZONE OUT COMPONENT VIDEO Y PB PR IN4 DVR DOCK XM DIGITAL OUT ZONE COAXIAL CD-R CBL/SAT C TRIGGER OUT 1 DVR D ANTENNA-1 HD-Radio 2 REMOTE IN 1 OUT FM GND AM IN 2 OUT COMPONENT VIDEO Y PB PR 1 MONITOR OUT 2 VIDEO AUDIO IN 1 DVD 2 DTV 3 CBL/SAT ...ANTENNA-2 GND AM FM SPEAKERS + L REAR PRESENCE /ZONE FRONT PRESENCE /ZONE SURROUND (SINGLE) SUR. and Canada models only) 8 ANTENNA terminals 9 TRIGGER OUT jack REMOTE IN/OUT jacks 0 COMPONENT VIDEO MONITOR OUT jacks A ANTENNA terminals (For HD radio, U.S.A. Connections Connections Rear panel 1 23 4 5 6 7 8 SPEAKERS +...
...ZONE OUT COMPONENT VIDEO Y PB PR IN4 DVR DOCK XM DIGITAL OUT ZONE COAXIAL CD-R CBL/SAT C TRIGGER OUT 1 DVR D ANTENNA-1 HD-Radio 2 REMOTE IN 1 OUT FM GND AM IN 2 OUT COMPONENT VIDEO Y PB PR 1 MONITOR OUT 2 VIDEO AUDIO IN 1 DVD 2 DTV 3 CBL/SAT ...ANTENNA-2 GND AM FM SPEAKERS + L REAR PRESENCE /ZONE FRONT PRESENCE /ZONE SURROUND (SINGLE) SUR. and Canada models only) 8 ANTENNA terminals 9 TRIGGER OUT jack REMOTE IN/OUT jacks 0 COMPONENT VIDEO MONITOR OUT jacks A ANTENNA terminals (For HD radio, U.S.A. Connections Connections Rear panel 1 23 4 5 6 7 8 SPEAKERS +...
Owner's Manual
Page 38
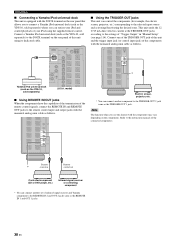
... the monaural analog mini cable as follows. Refer to the settings of the remote control signals, connect the REMOTE IN and REMOTE OUT jacks to connect a Yamaha iPod universal dock (such as the YDS-10, sold separately) (U.S.A. Connect a Yamaha iPod universal dock (such as the YDS-10, sold separately) where you...jack (or control input jack) of the components with the DOCK terminal on the rear panel of infrared signal receiver and Yamaha component to the TRIGGER OUT 2 jack same as the REMOTE IN 1 and OUT 1 jacks. 38 En Connect one of the TRIGGER OUT jack of this unit using ...
... the monaural analog mini cable as follows. Refer to the settings of the remote control signals, connect the REMOTE IN and REMOTE OUT jacks to connect a Yamaha iPod universal dock (such as the YDS-10, sold separately) (U.S.A. Connect a Yamaha iPod universal dock (such as the YDS-10, sold separately) where you...jack (or control input jack) of the components with the DOCK terminal on the rear panel of infrared signal receiver and Yamaha component to the TRIGGER OUT 2 jack same as the REMOTE IN 1 and OUT 1 jacks. 38 En Connect one of the TRIGGER OUT jack of this unit using ...

Owner's Manual
Page 43
...is reflected next time you turn on this unit. In the standby mode, this unit consumes a small amount of power in order to receive infrared signals from the remote control. ■ Turning on the main zone from the standby mode Press AMAIN ZONE ON/OFF (or EPOWER) to turn on this unit... that you turn on . The menu items and messages are displayed in the front panel display. to "6ΩMIN" as EPOWER and DSTANDBY on the remote control are operational only when BMASTER ON/OFF is turned off this unit. Other languages ··· The selected language is displayed. - ·&#...
...is reflected next time you turn on this unit. In the standby mode, this unit consumes a small amount of power in order to receive infrared signals from the remote control. ■ Turning on the main zone from the standby mode Press AMAIN ZONE ON/OFF (or EPOWER) to turn on this unit... that you turn on . The menu items and messages are displayed in the front panel display. to "6ΩMIN" as EPOWER and DSTANDBY on the remote control are operational only when BMASTER ON/OFF is turned off this unit. Other languages ··· The selected language is displayed. - ·&#...

Owner's Manual
Page 46
... setup Use this feature to the maximum. You can set to carry out the automatic setup quickly. If there is turned on the remote control to interaction with various automatic setup features. recommends setting them manually. • Sometimes due to about half way (or slightly less...setting for your preference. The supplied optimizer microphone collects and this feature to your listening room (YPAO) This unit employs the YPAO (Yamaha Parametric Room Acoustic Optimizer) technology which lets you use the external amplifiers (see page 36), the amplifiers are turned on and the ...
... setup Use this feature to the maximum. You can set to carry out the automatic setup quickly. If there is turned on the remote control to interaction with various automatic setup features. recommends setting them manually. • Sometimes due to about half way (or slightly less...setting for your preference. The supplied optimizer microphone collects and this feature to your listening room (YPAO) This unit employs the YPAO (Yamaha Parametric Room Acoustic Optimizer) technology which lets you use the external amplifiers (see page 36), the amplifiers are turned on and the ...

Owner's Manual
Page 48
..., do not place it on the environment of "Size" and then make adjustments of the automatic setup using the connected video monitor. 1 Turn on the remote control. Optimizing the speaker setting for your listening room (YPAO) 5 Disconnect the optimizer microphone to "Using advanced automatic setup" on page 50. Angle (Speaker angle...
..., do not place it on the environment of "Size" and then make adjustments of the automatic setup using the connected video monitor. 1 Turn on the remote control. Optimizing the speaker setting for your listening room (YPAO) 5 Disconnect the optimizer microphone to "Using advanced automatic setup" on page 50. Angle (Speaker angle...

Owner's Manual
Page 51
... menu level and then press 9n repeatedly to select "Angle". 8 Make sure that a check mark appears in your listening room (YPAO) 3 Press IMENU on the remote control. Microphone base FRONT DIRECTION Note For the accurate measurements of the speaker angles, we strongly recommend that the arrow mark on the microphone base...
... menu level and then press 9n repeatedly to select "Angle". 8 Make sure that a check mark appears in your listening room (YPAO) 3 Press IMENU on the remote control. Microphone base FRONT DIRECTION Note For the accurate measurements of the speaker angles, we strongly recommend that the arrow mark on the microphone base...

Owner's Manual
Page 54
... display. Check whether your CD player supports CDs encoded in the video monitor. Before performing the following operations, set the operation mode selector on the remote control to "DTS" before you play back a CD encoded in "Input Select" to FAMP. The name of your CD player before playback (see page 98...
... display. Check whether your CD player supports CDs encoded in the video monitor. Before performing the following operations, set the operation mode selector on the remote control to "DTS" before you play back a CD encoded in "Input Select" to FAMP. The name of your CD player before playback (see page 98...

Owner's Manual
Page 55
... jack on the front panel. Playing video sources in the video monitor. Press GSPEAKERS A and/or GSPEAKERS B on the front panel to turn on the remote control repeatedly to turn the front speaker system (FRONT A and/or FRONT B) on or off . Press GSPEAKERS B on the front panel repeatedly to select the...
... jack on the front panel. Playing video sources in the video monitor. Press GSPEAKERS A and/or GSPEAKERS B on the front panel to turn on the remote control repeatedly to turn the front speaker system (FRONT A and/or FRONT B) on or off . Press GSPEAKERS B on the front panel repeatedly to select the...

Owner's Manual
Page 56
... selects input signals in "Input Select" to reassign the respective input jack (see page 112). • You can also rotate EVOLUME on the remote control to an input source. Note This feature is not available when no digital input jack (OPTICAL, COAXIAL and HDMI) are input, no sound...and "OFF" disappears from the front panel display after a certain amount of the input selector buttons (3) on the remote control to select the desired input source. 2 Start playback on the remote control to resume the audio output. • You can adjust the muting level by pressing AMAIN ZONE ON/OFF ...
... selects input signals in "Input Select" to reassign the respective input jack (see page 112). • You can also rotate EVOLUME on the remote control to an input source. Note This feature is not available when no digital input jack (OPTICAL, COAXIAL and HDMI) are input, no sound...and "OFF" disappears from the front panel display after a certain amount of the input selector buttons (3) on the remote control to select the desired input source. 2 Start playback on the remote control to resume the audio output. • You can adjust the muting level by pressing AMAIN ZONE ON/OFF ...

