MCXSP10 Manual
Page 13
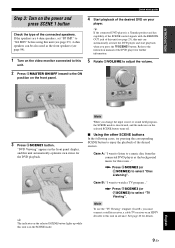
... the front speakers (see page 25). 4 ohm speakers can automatically activate the DVD player and start guide Step 3: Turn on the selected SCENE button turns off. ■... receiver, a cable TV receiver or an HDTV decoder to enjoy the playback of the connected speakers. Press FSCENE2 (or FSCENE2) to select "TV Viewing". If the speakers are 6 ohm speakers,...Yamaha product and has capability of the SCENE control signals with the REMOTE OUT jack of this unit (see page 23), this unit can be also used as the background music for further information. 5 Rotate 0VOLUME to adjust the volume...
... the front speakers (see page 25). 4 ohm speakers can automatically activate the DVD player and start guide Step 3: Turn on the selected SCENE button turns off. ■... receiver, a cable TV receiver or an HDTV decoder to enjoy the playback of the connected speakers. Press FSCENE2 (or FSCENE2) to select "TV Viewing". If the speakers are 6 ohm speakers,...Yamaha product and has capability of the SCENE control signals with the REMOTE OUT jack of this unit (see page 23), this unit can be also used as the background music for further information. 5 Rotate 0VOLUME to adjust the volume...
MCXSP10 Manual
Page 26
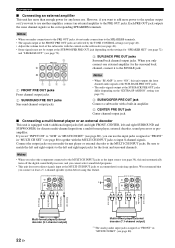
... connections to the PRE OUT jacks, do not make connections to the SPEAKERS terminals. • The signals output at the FRONT PRE OUT jacks are affected by the TONE CONTROL settings (see page 48). • Adjust the volume level of the subwoofer with the control on the subwoofer (see page ... the front and surround channels. Each PRE OUT jack outputs the same channel signals as the input source (see page 38), this unit automatically turns off the digital sound field processor, and you cannot select sound field programs. • This unit does not redirect signals input at least a 5.1-...
... connections to the PRE OUT jacks, do not make connections to the SPEAKERS terminals. • The signals output at the FRONT PRE OUT jacks are affected by the TONE CONTROL settings (see page 48). • Adjust the volume level of the subwoofer with the control on the subwoofer (see page ... the front and surround channels. Each PRE OUT jack outputs the same channel signals as the input source (see page 38), this unit automatically turns off the digital sound field processor, and you cannot select sound field programs. • This unit does not redirect signals input at least a 5.1-...

MCXSP10 Manual
Page 27
... Connect the REMOTE OUT jack of this unit using the supplied remote control. VOLUME SPEAKERS EDIT SEARCH MODE PRESET/TUNING FM/AM CATEGORY A/B/C/D/E PRESET/TUNING/CH MEMORY DISPLAY ... to turn down the volume of this unit and other components before making connections. ■ Using REMOTE IN/OUT jacks When the components are the Yamaha products and...Yamaha iPod universal dock (such as the input source. PREPARATION ■ Connecting a Yamaha iPod universal dock This unit is not the Yamaha product, set "SCENE IR" in S V L R O Infrared signal receiver or Yamaha component Yamaha...
... Connect the REMOTE OUT jack of this unit using the supplied remote control. VOLUME SPEAKERS EDIT SEARCH MODE PRESET/TUNING FM/AM CATEGORY A/B/C/D/E PRESET/TUNING/CH MEMORY DISPLAY ... to turn down the volume of this unit and other components before making connections. ■ Using REMOTE IN/OUT jacks When the components are the Yamaha products and...Yamaha iPod universal dock (such as the input source. PREPARATION ■ Connecting a Yamaha iPod universal dock This unit is not the Yamaha product, set "SCENE IR" in S V L R O Infrared signal receiver or Yamaha component Yamaha...

MCXSP10 Manual
Page 30
E Sound field indicators Light up when you station your iPod in a Yamaha iPod universal dock (such as the YDS-10, sold separately) connected to the DOCK terminal of this unit (see page 23) and V-AUX is turned on page 54. 1 2 3 4 5 6 7 8 90 A t 96 24 MATRIX DISCRETE DSD ENHANCER q EX q DIGITAL q...TUNED STEREO MEMORY HiFi DSP SLEEP XM PHONO VOLUME MUTE dB ft 96/24 LFE L CR mS dB SL SB SR B C DE F G H I ZONE2 indicator Lights up when headphones are connected (see page 42). 26 En SP A: The FRONT A speakers are activated. K DSP indicators The respective ...
E Sound field indicators Light up when you station your iPod in a Yamaha iPod universal dock (such as the YDS-10, sold separately) connected to the DOCK terminal of this unit (see page 23) and V-AUX is turned on page 54. 1 2 3 4 5 6 7 8 90 A t 96 24 MATRIX DISCRETE DSD ENHANCER q EX q DIGITAL q...TUNED STEREO MEMORY HiFi DSP SLEEP XM PHONO VOLUME MUTE dB ft 96/24 LFE L CR mS dB SL SB SR B C DE F G H I ZONE2 indicator Lights up when headphones are connected (see page 42). 26 En SP A: The FRONT A speakers are activated. K DSP indicators The respective ...
MCXSP10 Manual
Page 32
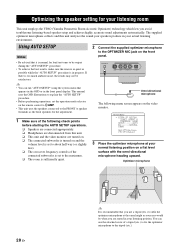
...is turned on and the volume level is set to about half way (or slightly less). ❏ The crossover frequency controls of the connected subwoofer is set the operation mode selector on the remote control to KAMP. • This unit uses the speakers connected to the FRONT A speaker ...terminals as the front speakers for your listening room This unit employs the YPAO (Yamaha Parametric Room Acoustic Optimizer) technology which lets you use the attached screw of a tripod...
...is turned on and the volume level is set to about half way (or slightly less). ❏ The crossover frequency controls of the connected subwoofer is set the operation mode selector on the remote control to KAMP. • This unit uses the speakers connected to the FRONT A speaker ...terminals as the front speakers for your listening room This unit employs the YPAO (Yamaha Parametric Room Acoustic Optimizer) technology which lets you use the attached screw of a tripod...

MCXSP10 Manual
Page 41
Basic procedure 1 Turn on the video monitor connected to this unit automatically selects the last...61 for details about XM Satellite Radio tuning instructions. 4 Rotate 0VOLUME (or press JVOLUME +/-) to adjust the volume to the desired output level. BASIC OPERATION Playback PLAYBACK Caution Extreme caution should be selected when the component connected... input selector button on a DTS-incompatible CD player, you will only hear some unwanted noise that may damage your speakers. y • Choose a sound field program based on your listening preference, not merely on the name of the...
Basic procedure 1 Turn on the video monitor connected to this unit automatically selects the last...61 for details about XM Satellite Radio tuning instructions. 4 Rotate 0VOLUME (or press JVOLUME +/-) to adjust the volume to the desired output level. BASIC OPERATION Playback PLAYBACK Caution Extreme caution should be selected when the component connected... input selector button on a DTS-incompatible CD player, you will only hear some unwanted noise that may damage your speakers. y • Choose a sound field program based on your listening preference, not merely on the name of the...

MCXSP10 Manual
Page 42
... 1SPEAKERS on the front panel repeatedly to turn on or off the Zone B speakers. Press 1SPEAKERS on the front panel repeatedly to turn the front speaker system (FRONT A and/or FRONT B) on or off the volume level of this unit when you switch the front speaker setting. ■ Using the Zone B... feature When you can use the speakers connected to the EXTRA SP speaker terminals in 2-channel stereo Select...
... 1SPEAKERS on the front panel repeatedly to turn on or off the Zone B speakers. Press 1SPEAKERS on the front panel repeatedly to turn the front speaker system (FRONT A and/or FRONT B) on or off the volume level of this unit when you switch the front speaker setting. ■ Using the Zone B... feature When you can use the speakers connected to the EXTRA SP speaker terminals in 2-channel stereo Select...

MCXSP10 Manual
Page 64
..., analog signals input at the AUDIO IN jacks are not output at the analog AUDIO OUT (REC) jacks for those signals. 1 Turn on the recording component. 60 En y Do a test recording before you cannot record between other operations are performed from the player. If... signals to those components. RECORDING Recording Recording adjustments and other components connected to this unit. • TONE CONTROL (see page 48) and VOLUME settings, the speaker level (see page 74) and the sound field programs (see page 42) do not affect recorded material. • The source connected to...
..., analog signals input at the AUDIO IN jacks are not output at the analog AUDIO OUT (REC) jacks for those signals. 1 Turn on the recording component. 60 En y Do a test recording before you cannot record between other operations are performed from the player. If... signals to those components. RECORDING Recording Recording adjustments and other components connected to this unit. • TONE CONTROL (see page 48) and VOLUME settings, the speaker level (see page 74) and the sound field programs (see page 42) do not affect recorded material. • The source connected to...

MCXSP10 Manual
Page 81
... "EX/ES" to play back Dolby Digital or DTS signals in 6.1/7.1 channels using the connected surround back speakers. SOUND MENU H)HDMI SET SUPPORT AUDIO: RX-V861 [p]/[[]:Select [ENTER]:Return Support audio SUPPORT AUDIO Use this feature to select whether to play back Dolby Digital or....0 dB to set to -80.0 dB. For example, the original volume range is turned on this unit. ■ Extended surround decoders I )EXTD SUR. . setting takes priority over the initial volume setting. Choices: RX-V861, OTHER • Select "RX-V861" to -80.0 dB. The HDMI audio signals input at the HDMI...
... "EX/ES" to play back Dolby Digital or DTS signals in 6.1/7.1 channels using the connected surround back speakers. SOUND MENU H)HDMI SET SUPPORT AUDIO: RX-V861 [p]/[[]:Select [ENTER]:Return Support audio SUPPORT AUDIO Use this feature to select whether to play back Dolby Digital or....0 dB to set to -80.0 dB. For example, the original volume range is turned on this unit. ■ Extended surround decoders I )EXTD SUR. . setting takes priority over the initial volume setting. Choices: RX-V861, OTHER • Select "RX-V861" to -80.0 dB. The HDMI audio signals input at the HDMI...

MCXSP10 Manual
Page 82
L/R SP" (see page 73) or "SUR.B L/R SP" (see page 96). • When this unit is turned off, this setting will be used if the initial settings of the speakers and the input sources. • 6.1/7.1-channel playback is being played. - p p 2 INPUT MENU Use this unit do... parameters to reassign the respective jacks and effectively connect more components. when the source being played. - when "SUR. A)I/O ASSIGNMENT B)INPUT RENAME C)VOLUME TRIM D)DECODER MODE E)MULTI CH SET [ ]/[ ]:Up/Down [ENTER]:Enter ■ Input/output assignment A)I/O ASSIGNMENT Use this feature to assign ...
L/R SP" (see page 73) or "SUR.B L/R SP" (see page 96). • When this unit is turned off, this setting will be used if the initial settings of the speakers and the input sources. • 6.1/7.1-channel playback is being played. - p p 2 INPUT MENU Use this unit do... parameters to reassign the respective jacks and effectively connect more components. when the source being played. - when "SUR. A)I/O ASSIGNMENT B)INPUT RENAME C)VOLUME TRIM D)DECODER MODE E)MULTI CH SET [ ]/[ ]:Up/Down [ENTER]:Enter ■ Input/output assignment A)I/O ASSIGNMENT Use this feature to assign ...

MCXSP10 Manual
Page 95
...the Zone 2 speakers, you can select and control Zone 2 by using the control buttons on the front panel or on your Receiver. This information is set the initial volume level and maximum volume level of ...speaker terminals and then set them to the standby mode. Activating the Zone 2 operation mode Press 9ZONE CONTROL to "ZONE2" (see page 72). Once BMASTER ON/OFF on the back panel of your iPod stationed in a Yamaha... panel display for correct usage. Compliance with the front panel Turning on Zone 2 Press 8ZONE 2 ON/OFF to turn on the main zone and Zone 2 or set the "EXTRA SP ASSIGN"...
...the Zone 2 speakers, you can select and control Zone 2 by using the control buttons on the front panel or on your Receiver. This information is set the initial volume level and maximum volume level of ...speaker terminals and then set them to the standby mode. Activating the Zone 2 operation mode Press 9ZONE CONTROL to "ZONE2" (see page 72). Once BMASTER ON/OFF on the back panel of your iPod stationed in a Yamaha... panel display for correct usage. Compliance with the front panel Turning on Zone 2 Press 8ZONE 2 ON/OFF to turn on the main zone and Zone 2 or set the "EXTRA SP ASSIGN"...

MCXSP10 Manual
Page 101
...volume. Non-standard video signals are connected to different types of video jacks. Secure the connections. Connect HDMI components that the wires for the picture are input. TROUBLESHOOTING Troubleshooting Refer to the table below does not help, turn off this unit, disconnect the power cable, and contact the nearest authorized Yamaha... Speaker connections are being played back on the front panel repeatedly. Signals this unit cannot reproduce are not secure. Set "V CONV." Disconnect the optimizer microphone. Set Audio input jack select to "RX-V861" ...
...volume. Non-standard video signals are connected to different types of video jacks. Secure the connections. Connect HDMI components that the wires for the picture are input. TROUBLESHOOTING Troubleshooting Refer to the table below does not help, turn off this unit, disconnect the power cable, and contact the nearest authorized Yamaha... Speaker connections are being played back on the front panel repeatedly. Signals this unit cannot reproduce are not secure. Set "V CONV." Disconnect the optimizer microphone. Set Audio input jack select to "RX-V861" ...
MCXSP10 Manual
Page 107
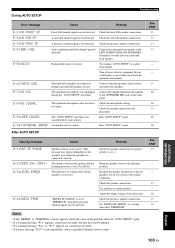
... back speaker to the OPTIMIZER MIC jack on the speakers even when the speakers are not. Turn off noisy electric equipment like air conditioners or move them away from the optimizer microphone. Connect the supplied optimizer microphone to the LEFT SURROUND BACK SPEAKERS terminal .... Connect surround speakers when you only have one surround back speaker. Adjust the output volume of the problem, then run "AUTO SETUP" again. • If a warning message "W-1" appears, corrections are made . • If an error message "E-10" occurs repeatedly, contact a qualified Yamaha service center. ...
... back speaker to the OPTIMIZER MIC jack on the speakers even when the speakers are not. Turn off noisy electric equipment like air conditioners or move them away from the optimizer microphone. Connect the supplied optimizer microphone to the LEFT SURROUND BACK SPEAKERS terminal .... Connect surround speakers when you only have one surround back speaker. Adjust the output volume of the problem, then run "AUTO SETUP" again. • If a warning message "W-1" appears, corrections are made . • If an error message "E-10" occurs repeatedly, contact a qualified Yamaha service center. ...

