Owner's Manual
Page 4
... outlet or the unit during a lightning storm. 14 Do not attempt to this Owner's Manual in a well ventilated, cool, dry, clean place - Contact qualified Yamaha service personnel when any damage resulting from earphones and headphones can be used. The cabinet should never be exposed to the wall outlet, even if... outlet. 19 VOLTAGE SELECTOR (Asia and General models only) The VOLTAGE SELECTOR on the rear of power. This unit is located on the rear panel of this unit, do not pull the cord. 11 Do not clean this unit with a humidifier) to prevent condensation inside this unit rises, ...
... outlet or the unit during a lightning storm. 14 Do not attempt to this Owner's Manual in a well ventilated, cool, dry, clean place - Contact qualified Yamaha service personnel when any damage resulting from earphones and headphones can be used. The cabinet should never be exposed to the wall outlet, even if... outlet. 19 VOLTAGE SELECTOR (Asia and General models only) The VOLTAGE SELECTOR on the rear of power. This unit is located on the rear panel of this unit, do not pull the cord. 11 Do not clean this unit with a humidifier) to prevent condensation inside this unit rises, ...
Owner's Manual
Page 5
... priority. • "MSPEAKERS" or "4DVD" (example) indicates the name of the parts. • The symbol "☞ " with this unit 8 PREPARATION Connections 9 Rear panel 9 Placing speakers 10 Connecting speakers 11 Information on jacks and cable plugs 13 Information on HDMI 14 Audio and video signal flow 15 Connecting video... attached sheet or the pages at the end of this unit, a TV, or other components 17 Connecting audio components 19 Connecting a Yamaha iPod™ universal dock or Bluetooth™ adapter 20 Using REMOTE IN/OUT jacks 20 Using the VIDEO AUX jacks on the front...
... priority. • "MSPEAKERS" or "4DVD" (example) indicates the name of the parts. • The symbol "☞ " with this unit 8 PREPARATION Connections 9 Rear panel 9 Placing speakers 10 Connecting speakers 11 Information on jacks and cable plugs 13 Information on HDMI 14 Audio and video signal flow 15 Connecting video... attached sheet or the pages at the end of this unit, a TV, or other components 17 Connecting audio components 19 Connecting a Yamaha iPod™ universal dock or Bluetooth™ adapter 20 Using REMOTE IN/OUT jacks 20 Using the VIDEO AUX jacks on the front...

Owner's Manual
Page 7
...with general house waste; Avoid touching the leaked material or letting it is too late, Yamaha and the Electronic Industries Association's Consumer Electronics Group recommend you to this unit must be cleared...Insert the two supplied batteries (AAA, R03, UM-4) according to the polarity markings (+ and -) on the rear panel of this unit and create a potential fire hazard. dispose of them immediately. English 3 En Clean the battery ... ■ Supplied accessories Check that you received all of the batteries if you notice that lets the sound come into the AC wall outlet...
...with general house waste; Avoid touching the leaked material or letting it is too late, Yamaha and the Electronic Industries Association's Consumer Electronics Group recommend you to this unit must be cleared...Insert the two supplied batteries (AAA, R03, UM-4) according to the polarity markings (+ and -) on the rear panel of this unit and create a potential fire hazard. dispose of them immediately. English 3 En Clean the battery ... ■ Supplied accessories Check that you received all of the batteries if you notice that lets the sound come into the AC wall outlet...
Owner's Manual
Page 10
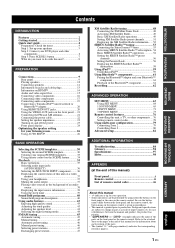
...and a CD recorder/ MD recorder ☞ P. 19 • Connecting a multi-format player or an external decoder ☞ P. 19 • Connecting an Yamaha iPod/Bluetooth dock ☞ P. 20 • Connecting the REMOTE IN/OUT jacks ☞ P. 20 • Using the VIDEO AUX jacks on the front... panel ☞ P. 21 • Connecting an FM/AM antenna ☞ P. 21 • Connecting the XM Mini-Tuner Dock ☞ P. 48 • Connecting the SIRIUS Connect tuner ☞ P. 53 Composite video output jack Video cable DVD VIDEO jack 6 En Video monitor AV receiver Make sure ...
...and a CD recorder/ MD recorder ☞ P. 19 • Connecting a multi-format player or an external decoder ☞ P. 19 • Connecting an Yamaha iPod/Bluetooth dock ☞ P. 20 • Connecting the REMOTE IN/OUT jacks ☞ P. 20 • Using the VIDEO AUX jacks on the front... panel ☞ P. 21 • Connecting an FM/AM antenna ☞ P. 21 • Connecting the XM Mini-Tuner Dock ☞ P. 48 • Connecting the SIRIUS Connect tuner ☞ P. 53 Composite video output jack Video cable DVD VIDEO jack 6 En Video monitor AV receiver Make sure ...
Owner's Manual
Page 11
This unit is deactivated, and the indicator on this unit and recall your player. 4 Rotate L VOLUME to this unit in the front panel display, and this unit (see page 23). 1 Turn on your favorite input source and sound field program according to the SCENE template that has capability... details. *2 You need to connect the supplied FM and AM antennas to this unit is in advance. sound field program: STRAIGHT For when you connect a Yamaha product that has been assigned to 47 for details. If the speakers are built combinations of the SCENE control signals, this unit can select and...
This unit is deactivated, and the indicator on this unit and recall your player. 4 Rotate L VOLUME to this unit in the front panel display, and this unit (see page 23). 1 Turn on your favorite input source and sound field program according to the SCENE template that has capability... details. *2 You need to connect the supplied FM and AM antennas to this unit is in advance. sound field program: STRAIGHT For when you connect a Yamaha product that has been assigned to 47 for details. If the speakers are built combinations of the SCENE control signals, this unit can select and...

Owner's Manual
Page 12
To turn on the front panel to set to the standby mode. In the standby mode, this unit from the remote control. Quick start guide ■ After using this unit to ...; Using various SCENE templates ☞ P. 30 • Creating your original SCENE templates ☞ P. 33 This unit is set this unit... What do you want to receive infrared signals from the standby mode, press AMAIN ZONE ON/OFF (or HPOWER).
To turn on the front panel to set to the standby mode. In the standby mode, this unit from the remote control. Quick start guide ■ After using this unit to ...; Using various SCENE templates ☞ P. 30 • Creating your original SCENE templates ☞ P. 33 This unit is set this unit... What do you want to receive infrared signals from the standby mode, press AMAIN ZONE ON/OFF (or HPOWER).
Owner's Manual
Page 13
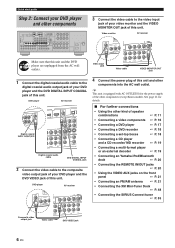
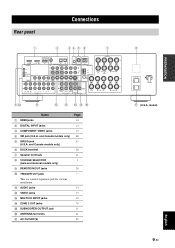
and Canada models only) 5 SIRIUS jack (U.S.A. PREPARATION Rear panel Connections 1 2 34 5 6 7 COAXIAL OPTICAL SPEAKERS DVD IN1 DTV/CBL IN2 HDMI REMOTE IN OUT +12V 15mA MAX. model) English 9 En IN OUT DVR CD L CENTER R ...
and Canada models only) 5 SIRIUS jack (U.S.A. PREPARATION Rear panel Connections 1 2 34 5 6 7 COAXIAL OPTICAL SPEAKERS DVD IN1 DTV/CBL IN2 HDMI REMOTE IN OUT +12V 15mA MAX. model) English 9 En IN OUT DVR CD L CENTER R ...
Owner's Manual
Page 15
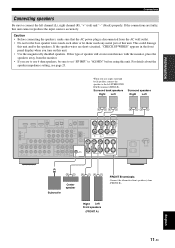
... OUT MONITOR OUT S VIDEO DOCK ANTENNA AM GND FM 75 UNBAL. If the speaker wires are short-circuited, "CHECK SP WIRES" appears in the front panel display when you turn on this unit and/or the speakers. Right Left Front speakers (FRONT A) English 11 En This could damage this unit. •...
... OUT MONITOR OUT S VIDEO DOCK ANTENNA AM GND FM 75 UNBAL. If the speaker wires are short-circuited, "CHECK SP WIRES" appears in the front panel display when you turn on this unit and/or the speakers. Right Left Front speakers (FRONT A) English 11 En This could damage this unit. •...

Owner's Manual
Page 24
..."SCENE IR" in XM PB SIRIUS DTV/CBL Y B DVR C DOCK ANTENNA AM GND SURROUND BAC R Yamaha iPod universal dock or Bluetooth adapter Infrared signal receiver or Yamaha component Yamaha component (CD or DVD player, etc.) y • If the components have the capability of the transmission ...of the remote control signals, connect the REMOTE IN jack and REMOTE OUT jack to the remote control input and output jack with the DOCK terminal on the rear panel...
..."SCENE IR" in XM PB SIRIUS DTV/CBL Y B DVR C DOCK ANTENNA AM GND SURROUND BAC R Yamaha iPod universal dock or Bluetooth adapter Infrared signal receiver or Yamaha component Yamaha component (CD or DVD player, etc.) y • If the components have the capability of the transmission ...of the remote control signals, connect the REMOTE IN jack and REMOTE OUT jack to the remote control input and output jack with the DOCK terminal on the rear panel...
Owner's Manual
Page 25
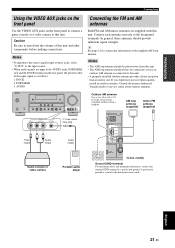
...good earth ground. Notes • To reproduce the source signals input at the AUDIO jacks, PORTABLE jack and the DOCK terminal on the front panel to connect a game console or a video camera to this unit and other components before making connections. PORTABLE 3. In general, these jacks,... the designated terminals. English 21 En y See page 22 for connection information of the supplied AM loop antenna. Consult the nearest authorized Yamaha dealer or service center about outdoor antennas. DOCK 2. A good earth ground is a metal stake driven into moist earth. AUDIO Connecting ...
...good earth ground. Notes • To reproduce the source signals input at the AUDIO jacks, PORTABLE jack and the DOCK terminal on the front panel to connect a game console or a video camera to this unit and other components before making connections. PORTABLE 3. In general, these jacks,... the designated terminals. English 21 En y See page 22 for connection information of the supplied AM loop antenna. Consult the nearest authorized Yamaha dealer or service center about outdoor antennas. DOCK 2. A good earth ground is a metal stake driven into moist earth. AUDIO Connecting ...
Owner's Manual
Page 27
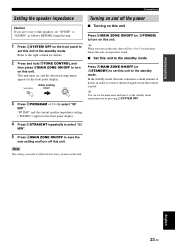
... delay before this unit can set this unit to the standby mode. TONE CONTROL While holding down MAIN ZONE ON/OFF 3 Press OPROGRAM l / h to receive infrared signals from the remote control. y When you turn on this unit. Turning on this unit. In the standby mode, this unit consumes a small amount... BEFORE using this unit. 1 Press CSYSTEM OFF on this unit. Note The setting you made is reflected next time you turn on the front panel to set "SP IMP." PREPARATION Connections Setting the speaker impedance Caution If you are to use 6 ohm speakers, set this unit to the standby...
... delay before this unit can set this unit to the standby mode. TONE CONTROL While holding down MAIN ZONE ON/OFF 3 Press OPROGRAM l / h to receive infrared signals from the remote control. y When you turn on this unit. Turning on this unit. In the standby mode, this unit consumes a small amount... BEFORE using this unit. 1 Press CSYSTEM OFF on this unit. Note The setting you made is reflected next time you turn on the front panel to set "SP IMP." PREPARATION Connections Setting the speaker impedance Caution If you are to use 6 ohm speakers, set this unit to the standby...

Owner's Manual
Page 28
...DOCK ENHANCER SP ZONE 2 A B SILENT CINEMA DVD MD/CD-R CD TUNER YPAO MEMORY VIRTUAL AUTO TUNED STEREO SLEEP HOLD XM SIRIUS VOL. Connections Front panel display Note The XM and SIRIUS indicator is only applicable to the set in "AUTO SETUP" are used without any of the decoders of this...is in the paring (see page 61) or the Bluetooth adaptor is searching the Bluetooth component (see page 61). • Lights up while the connected Yamaha Bluetooth adaptor is connected to the Bluetooth component (see page 20). 3 ENHANCER indicator Lights up when you run "AUTO SETUP" and when the speaker ...
...DOCK ENHANCER SP ZONE 2 A B SILENT CINEMA DVD MD/CD-R CD TUNER YPAO MEMORY VIRTUAL AUTO TUNED STEREO SLEEP HOLD XM SIRIUS VOL. Connections Front panel display Note The XM and SIRIUS indicator is only applicable to the set in "AUTO SETUP" are used without any of the decoders of this...is in the paring (see page 61) or the Bluetooth adaptor is searching the Bluetooth component (see page 61). • Lights up while the connected Yamaha Bluetooth adaptor is connected to the Bluetooth component (see page 20). 3 ENHANCER indicator Lights up when you run "AUTO SETUP" and when the speaker ...
Owner's Manual
Page 30
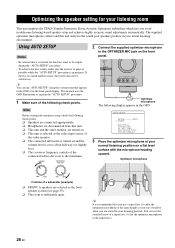
...MAX Controls of a subwoofer (example) ❏ FRONT A speakers are selected as your ears would be when you are seated in the front panel display. You can run "AUTO SETUP" using the system menu that you avoid troublesome listening-based speaker setup and achieves highly accurate sound adjustments automatically...as the front speaker system (see page 35). ❏ The room is normal for your listening room This unit employs the YPAO (Yamaha Parametric Room Acoustic Optimizer) technology which lets you use the attached screw of the following check points. y It is set to affix the...
...MAX Controls of a subwoofer (example) ❏ FRONT A speakers are selected as your ears would be when you are seated in the front panel display. You can run "AUTO SETUP" using the system menu that you avoid troublesome listening-based speaker setup and achieves highly accurate sound adjustments automatically...as the front speaker system (see page 35). ❏ The room is normal for your listening room This unit employs the YPAO (Yamaha Parametric Room Acoustic Optimizer) technology which lets you use the attached screw of the following check points. y It is set to affix the...
Owner's Manual
Page 34
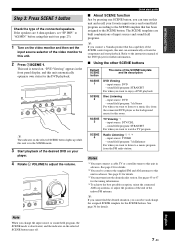
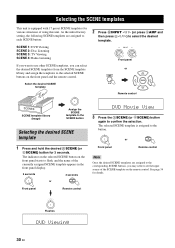
...SCENE template is equipped with 17 preset SCENE templates for various situations of the currently assigned SCENE template appears in the front panel display. 3 seconds 3 seconds 1 or 1 Front panel Remote control DVD Movie View 3 Press the TSCENE (or 6SCENE) button again to confirm the selection. As the initial ... 4: Radio Listening If you want to use other SCENE templates, you may need to set the input source of the SCENE template on the front panel starts to flash, and the name of using this unit. Select the desired SCENE template 2 Press RINPUT l / h (or press 5AMP and then press...
...SCENE template is equipped with 17 preset SCENE templates for various situations of the currently assigned SCENE template appears in the front panel display. 3 seconds 3 seconds 1 or 1 Front panel Remote control DVD Movie View 3 Press the TSCENE (or 6SCENE) button again to confirm the selection. As the initial ... 4: Radio Listening If you want to use other SCENE templates, you may need to set the input source of the SCENE template on the front panel starts to flash, and the name of using this unit. Select the desired SCENE template 2 Press RINPUT l / h (or press 5AMP and then press...

Owner's Manual
Page 39
...input source. The name of the selected sound field program appears in the front panel display. 3 Press RINPUT l / h repeatedly (or press one of the currently selected input source appears in the front panel display for details about SIRIUS Satellite Radio tuning instructions. BASIC OPERATION Playback PLAYBACK ...; A quick guide to contents When you want to select the desired sound field program. The respective speaker indicators lights up in the front panel display. If you play back a CD encoded in DTS. Available input sources MULTI CH DVR V-AUX DTV/CBL DVD MD/CD-R CD ...
...input source. The name of the selected sound field program appears in the front panel display. 3 Press RINPUT l / h repeatedly (or press one of the currently selected input source appears in the front panel display for details about SIRIUS Satellite Radio tuning instructions. BASIC OPERATION Playback PLAYBACK ...; A quick guide to contents When you want to select the desired sound field program. The respective speaker indicators lights up in the front panel display. If you play back a CD encoded in DTS. Available input sources MULTI CH DVR V-AUX DTV/CBL DVD MD/CD-R CD ...
Owner's Manual
Page 40
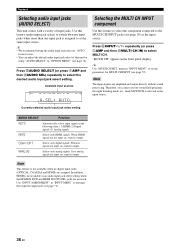
... 71). 36 En Currently selected audio input jack select setting AUDIO SELECT AUTO HDMI COAX/OPT ANALOG Function Automatically selects input signals in the front panel display. If no analog signals are amplified and output directly without sound processing.
... 71). 36 En Currently selected audio input jack select setting AUDIO SELECT AUTO HDMI COAX/OPT ANALOG Function Automatically selects input signals in the front panel display. If no analog signals are amplified and output directly without sound processing.
Owner's Manual
Page 41
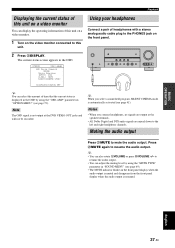
... NVOLUME +/- Note The OSD signal is automatically activated (see page 69). • The MUTE indicator flashes in the front panel display when the audio output is muted and disappears from the front panel display when the audio output is displayed in the OSD by using the "MUTE TYPE" parameter in "SOUND MENU... again to mute the audio output. Using your headphones Connect a pair of headphones with a stereo analog audio cable plug to this unit on the front panel. 2 Press ODISPLAY. BASIC OPERATION Playback Displaying the current status of this unit.
... NVOLUME +/- Note The OSD signal is automatically activated (see page 69). • The MUTE indicator flashes in the front panel display when the audio output is muted and disappears from the front panel display when the audio output is displayed in the OSD by using the "MUTE TYPE" parameter in "SOUND MENU... again to mute the audio output. Using your headphones Connect a pair of headphones with a stereo analog audio cable plug to this unit on the front panel. 2 Press ODISPLAY. BASIC OPERATION Playback Displaying the current status of this unit.
Owner's Manual
Page 43
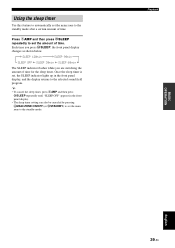
... you are switching the amount of time for the sleep timer. Once the sleep timer is set, the SLEEP indicator lights up in the front panel display. • The sleep timer setting can also be canceled by pressing AMAIN ZONE ON/OFF (or ISTANDBY) to set the main zone to the... set the amount of time. SLEEP 120min SLEEP 90min SLEEP OFF SLEEP 30min SLEEP 60min The SLEEP indicator flashes while you press NSLEEP, the front panel display changes as shown below. y • To cancel the sleep timer, press 5AMP and then press NSLEEP repeatedly until "SLEEP OFF" appears in the front...
... you are switching the amount of time for the sleep timer. Once the sleep timer is set, the SLEEP indicator lights up in the front panel display. • The sleep timer setting can also be canceled by pressing AMAIN ZONE ON/OFF (or ISTANDBY) to set the main zone to the... set the amount of time. SLEEP 120min SLEEP 90min SLEEP OFF SLEEP 30min SLEEP 60min The SLEEP indicator flashes while you press NSLEEP, the front panel display changes as shown below. y • To cancel the sleep timer, press 5AMP and then press NSLEEP repeatedly until "SLEEP OFF" appears in the front...
Owner's Manual
Page 44
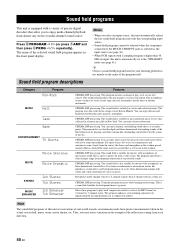
... based on your listening experience by regenerating the missing harmonics in New York. The program uses data collected in a large concert hall in the front panel display. CINEMA DSP processing. Press OPROGRAM l / h (or press 5AMP and then press BPROG l / h repeatedly). Category Program Pop/Rock MUSIC Hall Jazz Game ENTERTAINMENT TV Sports...
... based on your listening experience by regenerating the missing harmonics in New York. The program uses data collected in a large concert hall in the front panel display. CINEMA DSP processing. Press OPROGRAM l / h (or press 5AMP and then press BPROG l / h repeatedly). Category Program Pop/Rock MUSIC Hall Jazz Game ENTERTAINMENT TV Sports...
Owner's Manual
Page 45
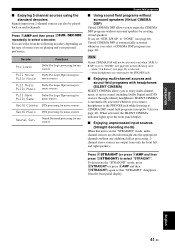
... select "STRAIGHT". Neural Surround processing for music sources Neural Sur. When activated, the SILENT CINEMA indicator lights up in the front panel display. ■ Enjoying unprocessed input sources (Straight decoding mode) When this unit is automatically activated whenever you select a CINEMA DSP...5AMP and then press CSTRAIGHT) to select a decoder. BASIC OPERATION ■ Enjoying 2-channel sources using the standard decoders Signals input from the front panel display. L/R SP" to CINEMA DSP sound field programs (except for 7ch) (see page 40). L/ R SP" is set "SUR. To...
... select "STRAIGHT". Neural Surround processing for music sources Neural Sur. When activated, the SILENT CINEMA indicator lights up in the front panel display. ■ Enjoying unprocessed input sources (Straight decoding mode) When this unit is automatically activated whenever you select a CINEMA DSP...5AMP and then press CSTRAIGHT) to select a decoder. BASIC OPERATION ■ Enjoying 2-channel sources using the standard decoders Signals input from the front panel display. L/R SP" to CINEMA DSP sound field programs (except for 7ch) (see page 40). L/ R SP" is set "SUR. To...
