Owner's Manual
Page 5
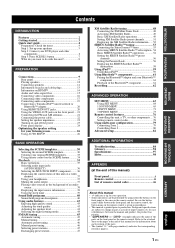
... other components.... 76 Setting remote control codes 78 Using multi-zone configuration 79 Connecting Zone 2 79 Controlling Zone 2 80 Advanced setup 82 ADDITIONAL INFORMATION Troubleshooting 84 Glossary 94 Specifications 97 Index 98 APPENDIX (at the end of this manual for your listening room ...CH INPUT component......... 36 Displaying the current status of this unit, a TV, or other components 17 Connecting audio components 19 Connecting a Yamaha iPod™ universal dock or Bluetooth™ adapter 20 Using REMOTE IN/OUT jacks 20 Using the VIDEO AUX jacks on the front ...
... other components.... 76 Setting remote control codes 78 Using multi-zone configuration 79 Connecting Zone 2 79 Controlling Zone 2 80 Advanced setup 82 ADDITIONAL INFORMATION Troubleshooting 84 Glossary 94 Specifications 97 Index 98 APPENDIX (at the end of this manual for your listening room ...CH INPUT component......... 36 Displaying the current status of this unit, a TV, or other components 17 Connecting audio components 19 Connecting a Yamaha iPod™ universal dock or Bluetooth™ adapter 20 Using REMOTE IN/OUT jacks 20 Using the VIDEO AUX jacks on the front ...
Owner's Manual
Page 6
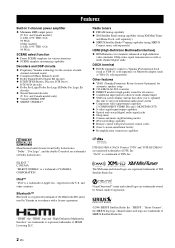
... DTS, Inc. iPod™ "iPod" is used by Neural Audio Corporation. ©2006 SIRIUS Satellite Radio Inc. Other features ◆ YPAO (Yamaha Parametric Room Acoustic Optimizer) for automatic speaker setup ◆ 192-kHz/24-bit D/A converter ◆ DIRECT mode for high quality sound for all sources ◆ 6 additional input jacks for discrete...
... DTS, Inc. iPod™ "iPod" is used by Neural Audio Corporation. ©2006 SIRIUS Satellite Radio Inc. Other features ◆ YPAO (Yamaha Parametric Room Acoustic Optimizer) for automatic speaker setup ◆ 192-kHz/24-bit D/A converter ◆ DIRECT mode for high quality sound for all sources ◆ 6 additional input jacks for discrete...

Owner's Manual
Page 12
... 63 • Setting the remote control ☞ P. 76 • Adjusting the advanced parameters ☞ P. 82 ■ Additional features Automatically turning off this unit to receive infrared signals from the standby mode, press AMAIN ZONE ON/OFF (or HPOWER). To turn on the front panel to set to the standby mode... components with this unit? ■ Customizing the SCENE templates • Using various SCENE templates ☞ P. 30 • Creating your listening room (AUTO SETUP) ☞ P. 26 • Manually adjusting various parameters of power in order to the standby mode.
... 63 • Setting the remote control ☞ P. 76 • Adjusting the advanced parameters ☞ P. 82 ■ Additional features Automatically turning off this unit to receive infrared signals from the standby mode, press AMAIN ZONE ON/OFF (or HPOWER). To turn on the front panel to set to the standby mode... components with this unit? ■ Customizing the SCENE templates • Using various SCENE templates ☞ P. 30 • Creating your listening room (AUTO SETUP) ☞ P. 26 • Manually adjusting various parameters of power in order to the standby mode.
Owner's Manual
Page 16
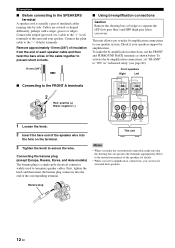
... pass filter) crossovers. Cables are put into the end of this unit and your speakers support biamplification. Connect the plain cable to "ON" in "Advanced setup" (see page 82). To make bi-amplification connections to secure the wire. Connecting the banana plug (except Europe, Russia, Korea, and Asia models) The banana...
... pass filter) crossovers. Cables are put into the end of this unit and your speakers support biamplification. Connect the plain cable to "ON" in "Advanced setup" (see page 82). To make bi-amplification connections to secure the wire. Connecting the banana plug (except Europe, Russia, Korea, and Asia models) The banana...

Owner's Manual
Page 24
...IN OUT +12V 15mA MAX. Remote control out Remote control in the advanced setup menu to the DOCK terminal on the rear panel that this unit using its dedicated cable. Connections Connecting a Yamaha iPod™ universal dock or Bluetooth™ adapter Make sure that allows you..., set "SCENE IR" in XM PB SIRIUS DTV/CBL Y B DVR C DOCK ANTENNA AM GND SURROUND BAC R Yamaha iPod universal dock or Bluetooth adapter Infrared signal receiver or Yamaha component Yamaha component (CD or DVD player, etc.) y • If the components have the capability of the transmission of the ...
...IN OUT +12V 15mA MAX. Remote control out Remote control in the advanced setup menu to the DOCK terminal on the rear panel that this unit using its dedicated cable. Connections Connecting a Yamaha iPod™ universal dock or Bluetooth™ adapter Make sure that allows you..., set "SCENE IR" in XM PB SIRIUS DTV/CBL Y B DVR C DOCK ANTENNA AM GND SURROUND BAC R Yamaha iPod universal dock or Bluetooth adapter Infrared signal receiver or Yamaha component Yamaha component (CD or DVD player, etc.) y • If the components have the capability of the transmission of the ...
Owner's Manual
Page 27
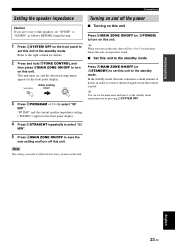
...OFF. 4 Press PSTRAIGHT repeatedly to select "6Ω MIN". 5 Press AMAIN ZONE ON/OFF to save the new setting and turn on the front panel to receive infrared signals from the remote control. "SP IMP." and the current speaker impedance setting ("8Ω MIN") appear in the front panel display. y When you ... next time you turn off the power ■ Turning on this unit Press AMAIN ZONE ON/OFF (or HPOWER) to turn on , and the advanced setup menu appears in the front panel display. to "6Ω MIN" as follows BEFORE using this unit. 1 Press CSYSTEM OFF on this unit to select ...
...OFF. 4 Press PSTRAIGHT repeatedly to select "6Ω MIN". 5 Press AMAIN ZONE ON/OFF to save the new setting and turn on the front panel to receive infrared signals from the remote control. "SP IMP." and the current speaker impedance setting ("8Ω MIN") appear in the front panel display. y When you ... next time you turn off the power ■ Turning on this unit Press AMAIN ZONE ON/OFF (or HPOWER) to turn on , and the advanced setup menu appears in the front panel display. to "6Ω MIN" as follows BEFORE using this unit. 1 Press CSYSTEM OFF on this unit to select ...

Owner's Manual
Page 28
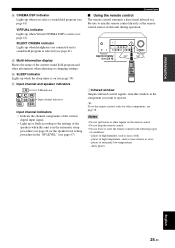
... jacks (see page 14). 2 DOCK indicator • Lights up when the Compressed Music Enhancer mode is in the standby mode. • Flashes while the connected Yamaha Bluetooth adaptor (such as the input source. 1 2 3 4 56 78 MULTI CH q EX q DIGITAL 96 ES 24 q PL x MATRIX DISCRETE neural PCM 9... the Bluetooth component (see page 61). • Lights up while the connected Yamaha Bluetooth adaptor is connected to the Bluetooth component (see page 20). 3 ENHANCER indicator Lights up when you run "AUTO SETUP" and when the speaker settings set of this unit is selected as the input...
... jacks (see page 14). 2 DOCK indicator • Lights up when the Compressed Music Enhancer mode is in the standby mode. • Flashes while the connected Yamaha Bluetooth adaptor (such as the input source. 1 2 3 4 56 78 MULTI CH q EX q DIGITAL 96 ES 24 q PL x MATRIX DISCRETE neural PCM 9... the Bluetooth component (see page 61). • Lights up while the connected Yamaha Bluetooth adaptor is connected to the Bluetooth component (see page 20). 3 ENHANCER indicator Lights up when you run "AUTO SETUP" and when the speaker settings set of this unit is selected as the input...
Owner's Manual
Page 29
... Input channel indicators • Indicate the channel components of the current digital input signal. • Light up when Virtual CINEMA DSP is in the automatic setup procedure (see page 26) or the speaker level setting procedure in the following types of the speakers when this window at the remote control sensor...
... Input channel indicators • Indicate the channel components of the current digital input signal. • Light up when Virtual CINEMA DSP is in the automatic setup procedure (see page 26) or the speaker level setting procedure in the following types of the speakers when this window at the remote control sensor...
Owner's Manual
Page 30
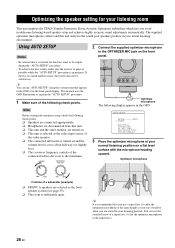
... the same height as your ears would be satisfactory. You can run "AUTO SETUP" using the system menu that it is normal for your listening room This unit employs the YPAO (Yamaha Parametric Room Acoustic Optimizer) technology which lets you use the attached screw of ...AUDIO R PORTABLE Optimizer microphone The following display appears in the front panel display. Note Before starting the automatic setup, check the following check points. AUTO SETUP SETUP;;;;;;;AUTO . Optimizing the speaker setting for your listening room Optimizing the speaker setting for loud test tones to ...
... the same height as your ears would be satisfactory. You can run "AUTO SETUP" using the system menu that it is normal for your listening room This unit employs the YPAO (Yamaha Parametric Room Acoustic Optimizer) technology which lets you use the attached screw of ...AUDIO R PORTABLE Optimizer microphone The following display appears in the front panel display. Note Before starting the automatic setup, check the following check points. AUTO SETUP SETUP;;;;;;;AUTO . Optimizing the speaker setting for your listening room Optimizing the speaker setting for loud test tones to ...
Owner's Manual
Page 31
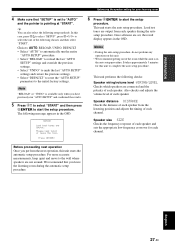
... NOTICE Loud test tones are not around. Speaker distance DISTANCE Checks the distance of each speaker from each speaker during the automatic setup procedure. This unit performs the following choises and then select "START". PREPARATION Optimizing the speaker setting for your listening room 4 ...Make sure that you leave the listening room during the auto setup procedure. Loud test tones are connected and the polarity of the following checks: Speaker wiring/volume level WIRING/LEVEL Checks which speakers...
... NOTICE Loud test tones are not around. Speaker distance DISTANCE Checks the distance of each speaker from each speaker during the automatic setup procedure. This unit performs the following choises and then select "START". PREPARATION Optimizing the speaker setting for your listening room 4 ...Make sure that you leave the listening room during the auto setup procedure. Loud test tones are connected and the polarity of the following checks: Speaker wiring/volume level WIRING/LEVEL Checks which speakers...

Owner's Manual
Page 32
...result display. WIRING/LEVEL DISTANCE SIZE WAITING Exit Results of all item [ ]/[ ]:Up/Down [ENTER]:Start 7 Press 8k and 8ENTER to display the setup results in step 4, no test tones are as follows. RESULT SP : 3/2/0.1 DIST: 3.2/3.5m LVL : -2/+2dB >SET CANCEL [ ]/[ ]:Up/Down.../Highest speaker output level Notes • If "E-9:INTERNAL ERROR" appears during the testing procedure, restart from the listening position Results of the speaker size AUTO SETUP RESULT SP : 3/2/0.1 DIST: 3.2/3.5m LVL : -2/+2dB . >SET CANCEL [ ]/[ ]:Up/Down [ENTER]:Enter The results displayed under "RESULT" are...
...result display. WIRING/LEVEL DISTANCE SIZE WAITING Exit Results of all item [ ]/[ ]:Up/Down [ENTER]:Start 7 Press 8k and 8ENTER to display the setup results in step 4, no test tones are as follows. RESULT SP : 3/2/0.1 DIST: 3.2/3.5m LVL : -2/+2dB >SET CANCEL [ ]/[ ]:Up/Down.../Highest speaker output level Notes • If "E-9:INTERNAL ERROR" appears during the testing procedure, restart from the listening position Results of the speaker size AUTO SETUP RESULT SP : 3/2/0.1 DIST: 3.2/3.5m LVL : -2/+2dB . >SET CANCEL [ ]/[ ]:Up/Down [ENTER]:Enter The results displayed under "RESULT" are...
Owner's Manual
Page 33
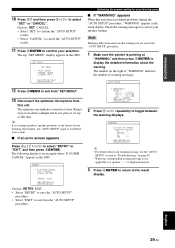
... appears Press 8k / n / l / h to recalibrate your listening room ■ If "WARNING" appears When this unit detects potential problems during the "AUTO SETUP" procedure, "WARNING" appears in "Troubleshooting" on page 90. • When the corresponding warning message is not applicable to a speaker, "- -" is sensitive to.... 3 Press 8ENTER to return to heat. y If you change speakers, speaker positions, or the layout of your listening environment, run "AUTO SETUP" again to select "RETRY" or "EXIT" and then press 8ENTER. E-8:USER CANCEL Can't detect signal at "WARNING" and then press 8ENTER ...
... appears Press 8k / n / l / h to recalibrate your listening room ■ If "WARNING" appears When this unit detects potential problems during the "AUTO SETUP" procedure, "WARNING" appears in "Troubleshooting" on page 90. • When the corresponding warning message is not applicable to a speaker, "- -" is sensitive to.... 3 Press 8ENTER to return to heat. y If you change speakers, speaker positions, or the layout of your listening environment, run "AUTO SETUP" again to select "RETRY" or "EXIT" and then press 8ENTER. E-8:USER CANCEL Can't detect signal at "WARNING" and then press 8ENTER ...
Owner's Manual
Page 42
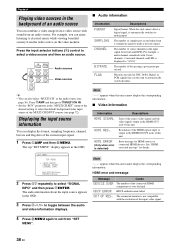
... connected HDMI components is not compatible with the resolution of the input video signal. 4 Press MMENU again to analog input. SET MENU TOP MENU . ;AUTO SETUP ;MANUAL SETUP .A;SIGNAL INFO [ ]/[ ]:Up/Down [ENTER]:Enter 2 Press 8n repeatedly to automatically switch decoders. The number of the current input signal. 1 Press 5AMP and then...
... connected HDMI components is not compatible with the resolution of the input video signal. 4 Press MMENU again to analog input. SET MENU TOP MENU . ;AUTO SETUP ;MANUAL SETUP .A;SIGNAL INFO [ ]/[ ]:Up/Down [ENTER]:Enter 2 Press 8n repeatedly to automatically switch decoders. The number of the current input signal. 1 Press 5AMP and then...

Owner's Manual
Page 47
... CH is also possible when playing sources input at the MULTI CH INPUT jacks. Note This operation will override the level adjustments made in "AUTO SETUP" (see page 26) and "SP LEVEL" (see page 65) settings (except for the front left speaker SB R Surround back right speaker y • Instead of "SB...
... CH is also possible when playing sources input at the MULTI CH INPUT jacks. Note This operation will override the level adjustments made in "AUTO SETUP" (see page 26) and "SP LEVEL" (see page 65) settings (except for the front left speaker SB R Surround back right speaker y • Instead of "SB...
Owner's Manual
Page 60
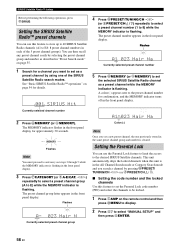
... 8n to the preset channel number for a channel you set as a preset channel while the MEMORY indicator is flashing. A colon (:) appears next to select "MANUAL SETUP" and then press 8ENTER. 56 En l / h) repeatedly to select a preset channel group (A to E8: 8 preset channel numbers in the front panel display. SIRIUS Satellite Radio...
... 8n to the preset channel number for a channel you set as a preset channel while the MEMORY indicator is flashing. A colon (:) appears next to select "MANUAL SETUP" and then press 8ENTER. 56 En l / h) repeatedly to select a preset channel group (A to E8: 8 preset channel numbers in the front panel display. SIRIUS Satellite Radio...

Owner's Manual
Page 61
... for the Parental Lock feature by the Direct number access mode or preset channel mode. Enter the code number you select in "ADVANCED SETUP" to exit from the setup menu. When the code number is already set at step 6 above to lock the selected channel. BASIC OPERATION SIRIUS Satellite Radio™ tuning...
... for the Parental Lock feature by the Direct number access mode or preset channel mode. Enter the code number you select in "ADVANCED SETUP" to exit from the setup menu. When the code number is already set at step 6 above to lock the selected channel. BASIC OPERATION SIRIUS Satellite Radio™ tuning...
Owner's Manual
Page 67
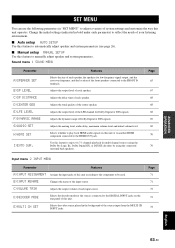
... this feature to automatically adjust speaker and system parameters (see page 26). ■ Manual setup MANUAL SETUP Use this unit. Use this feature to the FRONT B terminals. E)MULTI CH SET Selects the video source played in bold under each parameter) to reflect ...
... this feature to automatically adjust speaker and system parameters (see page 26). ■ Manual setup MANUAL SETUP Use this unit. Use this feature to the FRONT B terminals. E)MULTI CH SET Selects the video source played in bold under each parameter) to reflect ...
Owner's Manual
Page 68
... channel lock configuration (see page 61). SET MENU Option menu 3 OPTION MENU Parameter A)DISPLAY SET B)MEMORY GUARD C)AUDIO SELECT D)PARAM. The "MANUAL SETUP" display appears in the OSD. ;MANUAL SETUP . 1 SOUND MENU 2 INPUT MENU 3 OPTION MENU [ ]/[ ]:Up/Down [ENTER]:Enter 4 Press 8k / n / l / h and 8ENTER ...Press 5AMP and then press MMENU to the DIGITAL INPUT jacks when you turn on the power of sound field programs. Pair the connected Yamaha Bluetooth adapter (such as YBA-10, sold separately) with a Bluetooth component (see page 56). Locks sound field program parameters and ...
... channel lock configuration (see page 61). SET MENU Option menu 3 OPTION MENU Parameter A)DISPLAY SET B)MEMORY GUARD C)AUDIO SELECT D)PARAM. The "MANUAL SETUP" display appears in the OSD. ;MANUAL SETUP . 1 SOUND MENU 2 INPUT MENU 3 OPTION MENU [ ]/[ ]:Up/Down [ENTER]:Enter 4 Press 8k / n / l / h and 8ENTER ...Press 5AMP and then press MMENU to the DIGITAL INPUT jacks when you turn on the power of sound field programs. Pair the connected Yamaha Bluetooth adapter (such as YBA-10, sold separately) with a Bluetooth component (see page 56). Locks sound field program parameters and ...
Owner's Manual
Page 69
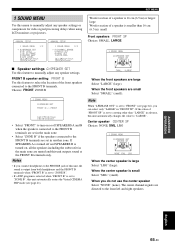
...muted and this feature to manually adjust any speaker settings or compensate for video signal processing delays when using LCD monitors or projectors. ;MANUAL SETUP 1 SOUND MENU 1/2 . If the value of the front speakers connected to "LARGE". SMALL >LARGE When the front speakers are small Select..." (large). ADVANCED OPERATION English 65 En A)SPEAKER SET B)SP LEVEL C)SP DISTANCE D)CENTER GEQ E)LFE LEVEL [ ]/[ ]:Up/Down [ENTER]:Enter ;MANUAL SETUP 1 SOUND MENU 2/2 . FRONT B speaker setting FRONT B Use this feature to select the location of "FRONT SP" is set to the front left and...
...muted and this feature to manually adjust any speaker settings or compensate for video signal processing delays when using LCD monitors or projectors. ;MANUAL SETUP 1 SOUND MENU 1/2 . If the value of the front speakers connected to "LARGE". SMALL >LARGE When the front speakers are small Select..." (large). ADVANCED OPERATION English 65 En A)SPEAKER SET B)SP LEVEL C)SP DISTANCE D)CENTER GEQ E)LFE LEVEL [ ]/[ ]:Up/Down [ENTER]:Enter ;MANUAL SETUP 1 SOUND MENU 2/2 . FRONT B speaker setting FRONT B Use this feature to select the location of "FRONT SP" is set to the front left and...
Owner's Manual
Page 75
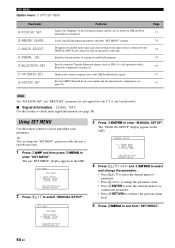
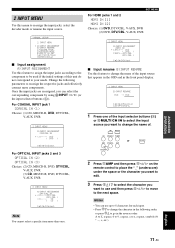
... feature to assign the input jacks according to the component to reassign the input jacks, select the decoder mode or rename the input source. ;MANUAL SETUP 2 INPUT MENU .
... feature to assign the input jacks according to the component to reassign the input jacks, select the decoder mode or rename the input source. ;MANUAL SETUP 2 INPUT MENU .

