Owner's Manual
Page 5
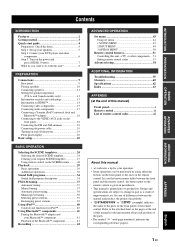
... 4 Step 1: Set up your speakers 5 Step 2: Connect your DVD player and other components.... 51 Setting remote control codes 53 Advanced setup 54 ADDITIONAL INFORMATION Troubleshooting 55 Glossary 60 Specifications 62 Index 63 APPENDIX (at the end of this unit 8 PREPARATION Connections 9 Rear panel ..., a TV, or other components 6 Step 3: Turn on HDMI 14 Connecting video components 15 Connecting audio components 17 Connecting a Yamaha iPod™ universal dock and Bluetooth™ adapter 18 Connecting to production. and Canada models only 12 Information on jacks and cable...
... 4 Step 1: Set up your speakers 5 Step 2: Connect your DVD player and other components.... 51 Setting remote control codes 53 Advanced setup 54 ADDITIONAL INFORMATION Troubleshooting 55 Glossary 60 Specifications 62 Index 63 APPENDIX (at the end of this unit 8 PREPARATION Connections 9 Rear panel ..., a TV, or other components 6 Step 3: Turn on HDMI 14 Connecting video components 15 Connecting audio components 17 Connecting a Yamaha iPod™ universal dock and Bluetooth™ adapter 18 Connecting to production. and Canada models only 12 Information on jacks and cable...
Owner's Manual
Page 12
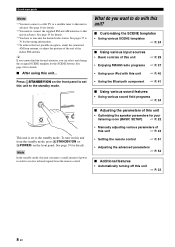
...input sources • Basic controls of this unit ☞ P. 29 • Enjoying FM/AM radio programs ☞ P. 37 • Using your listening room (BASIC SETUP) ☞ P. 22 • Manually adjusting various parameters of the indoor FM antenna. See page 16 for your iPod with this unit in order to... receive infrared signals from the standby mode, press ASTANDBY/ON (or DPOWER) on the front panel to set to do you can select and change ...
...input sources • Basic controls of this unit ☞ P. 29 • Enjoying FM/AM radio programs ☞ P. 37 • Using your listening room (BASIC SETUP) ☞ P. 22 • Manually adjusting various parameters of the indoor FM antenna. See page 16 for your iPod with this unit in order to... receive infrared signals from the standby mode, press ASTANDBY/ON (or DPOWER) on the front panel to set to do you can select and change ...
Owner's Manual
Page 16
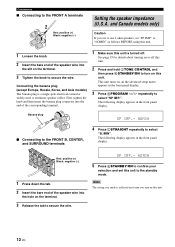
.../ON to secure the wire. The following display appears in the front panel display. See page 19 for details about turning on , an the advanced setup menu appears in the front panel display. 3 Press KPROGRAM l / h repeatedly to the FRONT A terminals 2 1 Red: positive (+) Black: negative (-) 3 Setting the speaker impedance (U.S.A. to "6ΩMIN...
.../ON to secure the wire. The following display appears in the front panel display. See page 19 for details about turning on , an the advanced setup menu appears in the front panel display. 3 Press KPROGRAM l / h repeatedly to the FRONT A terminals 2 1 Red: positive (+) Black: negative (-) 3 Setting the speaker impedance (U.S.A. to "6ΩMIN...
Owner's Manual
Page 26
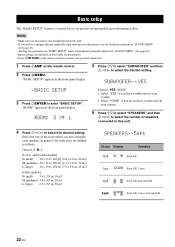
... precise adjustments, use the detailed parameters in "SOUND MENU" (see page 45). • Altering any parameters in "BASIC SETUP" resets all parameters manually adjusted in "SOUND MENU" (see page 45). • Initial settings are defined as follows: Choices: S, M, L [U.S.A. Basic... setup Basic setup The "BASIC SETUP" feature is a useful way to enter "BASIC SETUP". SUBWOOFER .. "ROOM" appears in your speakers. Select the size of the room where you do not have installed your...
... precise adjustments, use the detailed parameters in "SOUND MENU" (see page 45). • Altering any parameters in "BASIC SETUP" resets all parameters manually adjusted in "SOUND MENU" (see page 45). • Initial settings are defined as follows: Choices: S, M, L [U.S.A. Basic... setup Basic setup The "BASIC SETUP" feature is a useful way to enter "BASIC SETUP". SUBWOOFER .. "ROOM" appears in your speakers. Select the size of the room where you do not have installed your...

Owner's Manual
Page 27
..."SWFR" to adjust the balance between the front left speaker) output a test tone in the front panel display. 9 Press 7l / h to cancel the setup procedure without making any changes. appears in the front panel display for a few seconds and then "CHECK OK?" CHECK:TestTone y • Check the speaker connections... speaker currently outputting the test tone flashes in turn . CHECK OK? ..YES Choices: YES, NO • Select "YES" to complete the setup procedure if the test tone levels from each speaker. 10 Press 7ENTER to decrease the value. The selected speaker and the front left speaker (or...
..."SWFR" to adjust the balance between the front left speaker) output a test tone in the front panel display. 9 Press 7l / h to cancel the setup procedure without making any changes. appears in the front panel display for a few seconds and then "CHECK OK?" CHECK:TestTone y • Check the speaker connections... speaker currently outputting the test tone flashes in turn . CHECK OK? ..YES Choices: YES, NO • Select "YES" to complete the setup procedure if the test tone levels from each speaker. 10 Press 7ENTER to decrease the value. The selected speaker and the front left speaker (or...

Owner's Manual
Page 36
...6LEVEL repeatedly to select the speaker you can also select the speaker by pressing 7k / n. 2 Press 7l / h on the remote control. "BASIC SETUP" appears in DTS, Dolby Digital, or PCM signals that cue this unit to automatically switch decoders. 4 Press HMENU to make a discrete signal. The following...number of bits passing a given point per second taken from -10 dB to a music source. Flag data encoded in the front panel display. ;BASIC SETUP 2 Press 7k / n repeatedly to adjust the speaker output level. The number of samples per second. The control range is from a continuous signal to...
...6LEVEL repeatedly to select the speaker you can also select the speaker by pressing 7k / n. 2 Press 7l / h on the remote control. "BASIC SETUP" appears in DTS, Dolby Digital, or PCM signals that cue this unit to automatically switch decoders. 4 Press HMENU to make a discrete signal. The following...number of bits passing a given point per second taken from -10 dB to a music source. Flag data encoded in the front panel display. ;BASIC SETUP 2 Press 7k / n repeatedly to adjust the speaker output level. The number of samples per second. The control range is from a continuous signal to...
Owner's Manual
Page 47
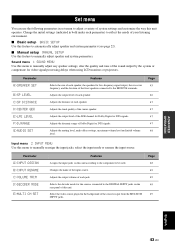
... using LCD monitors or projectors. Adjusts the distance of each parameter) to reflect the needs of your listening environment. ■ Basic setup BASIC SETUP Use this feature to automatically adjust speaker and system parameters (see page 22). ■ Manual setup MANUAL SETUP Use this feature to the DIGITAL INPUT jacks on this unit operates.
... using LCD monitors or projectors. Adjusts the distance of each parameter) to reflect the needs of your listening environment. ■ Basic setup BASIC SETUP Use this feature to automatically adjust speaker and system parameters (see page 22). ■ Manual setup MANUAL SETUP Use this feature to the DIGITAL INPUT jacks on this unit operates.
Owner's Manual
Page 48
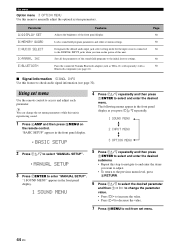
...you press 7k / n repeatedly. 1 SOUND MENU 2 INPUT MENU 3 OPTION MENU 2 Press 7 k / n to select "MANUAL SETUP". .MANUAL SETUP 3 Press 7ENTER to enter "MANUAL SETUP". Using set menu settings. The following menus appear in the front panel display as YBA-10, sold separately) with a Bluetooth component ... select and enter the desired submenu. • Repeat this unit. Parameter A)DISPLAY SET B)MEMORY GUARD C)AUDIO SELECT D)PARAM. Pairs the connected Yamaha Bluetooth adapter (such as you want to adjust. • To return to the previous menu level, press 8 RETURN. 6 Press 7k /...
...you press 7k / n repeatedly. 1 SOUND MENU 2 INPUT MENU 3 OPTION MENU 2 Press 7 k / n to select "MANUAL SETUP". .MANUAL SETUP 3 Press 7ENTER to enter "MANUAL SETUP". Using set menu settings. The following menus appear in the front panel display as YBA-10, sold separately) with a Bluetooth component ... select and enter the desired submenu. • Repeat this unit. Parameter A)DISPLAY SET B)MEMORY GUARD C)AUDIO SELECT D)PARAM. Pairs the connected Yamaha Bluetooth adapter (such as you want to adjust. • To return to the previous menu level, press 8 RETURN. 6 Press 7k /...
Owner's Manual
Page 53
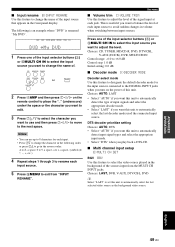
... 1 Press one of the input selector buttons (3) or BMULTI CH IN to select the input source you play back a DTS-CD. ■ Multi channel input setup E)MULTI CH SET BGV BGV Use this feature to change the name of. Choices: LAST, DVR, V-AUX, DTV/CBL, DVD y Select "LAST" to set this...
... 1 Press one of the input selector buttons (3) or BMULTI CH IN to select the input source you play back a DTS-CD. ■ Multi channel input setup E)MULTI CH SET BGV BGV Use this feature to change the name of. Choices: LAST, DVR, V-AUX, DTV/CBL, DVD y Select "LAST" to set this...
Owner's Manual
Page 57
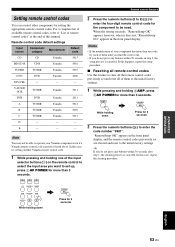
... press any buttons within 30 seconds in step 2, the setup process is canceled. If this happens, repeat the setup procedure. ■ Resetting all remote control codes Use this...previously set up, press 2AV POWER for more than 3 seconds. AMP POWER AV While holding down Press for 3 seconds ADVANCED OPERATION English 53 En Remote ... by setting the appropriate remote control codes. V-AUX/D OCK TUNER Yamaha 5011 DVR DVR Yamaha 2011 A TUNER Yamaha 5012 B TUNER Yamaha 5009 C TUNER Yamaha 5017 D - - - When the setting succeeds, "RemoteSetup OK...
... press any buttons within 30 seconds in step 2, the setup process is canceled. If this happens, repeat the setup procedure. ■ Resetting all remote control codes Use this...previously set up, press 2AV POWER for more than 3 seconds. AMP POWER AV While holding down Press for 3 seconds ADVANCED OPERATION English 53 En Remote ... by setting the appropriate remote control codes. V-AUX/D OCK TUNER Yamaha 5011 DVR DVR Yamaha 2011 A TUNER Yamaha 5012 B TUNER Yamaha 5009 C TUNER Yamaha 5017 D - - - When the setting succeeds, "RemoteSetup OK...
Owner's Manual
Page 58
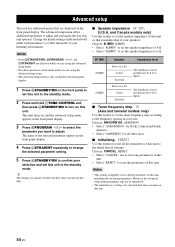
...America. • Select "AM9/FM50" for all other operations can be made are reflected next time you turn on this unit. However, the advanced setup menu parameters will not be 6 Ω or higher. ■ Tuner frequency step TU (Asia and General models only) Use this feature to set... unit. • Select "RESET" to adjust and customize the way this unit including the set the speaker impedance to adjust. The advanced setup menu offers additional operations to reset the parameters of this unit to reflect the needs of your area. Change the initial settings (indicated in ...
...America. • Select "AM9/FM50" for all other operations can be made are reflected next time you turn on this unit. However, the advanced setup menu parameters will not be 6 Ω or higher. ■ Tuner frequency step TU (Asia and General models only) Use this feature to set... unit. • Select "RESET" to adjust and customize the way this unit including the set the speaker impedance to adjust. The advanced setup menu offers additional operations to reset the parameters of this unit to reflect the needs of your area. Change the initial settings (indicated in ...
Owner's Manual
Page 63
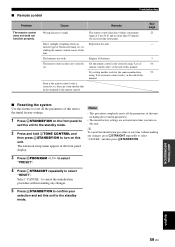
... mode. ADDITIONAL INFORMATION English 59 En Even if the remote control code is correctly set this unit. Cause Remedy Wrong distance or angle. The advanced setup menu appears in the front panel display. The remote control code is striking the remote control sensor of this unit including the set menu parameters...
... mode. ADDITIONAL INFORMATION English 59 En Even if the remote control code is correctly set this unit. Cause Remedy Wrong distance or angle. The advanced setup menu appears in the front panel display. The remote control code is striking the remote control sensor of this unit including the set menu parameters...
Owner's Manual
Page 67
... 48 Automatic preset tuning 38 Automatic tuning 37 ■B B)INPUT RENAME 49 B)MEMORY GUARD 50 B)SP LEVEL 46 BASIC SETUP 22, 43 Basic setup 43 BASS OUT 46 BGV 49 Bluetooth setting 50 Bluetooth status message 58 BT connected, Bluetooth status message 58 ■C ...Connecting speakers 11 Connecting the AM antennas 19 Connecting the FM antennas 19 Connecting the power cable 19 Connecting the Yamaha Bluetooth adapter 18 Connecting the Yamaha iPod universal dock ...........18 Connecting to the CENTER terminals 12 Connecting to the COMPONENT VIDEO jacks ..........16 Connecting ...
... 48 Automatic preset tuning 38 Automatic tuning 37 ■B B)INPUT RENAME 49 B)MEMORY GUARD 50 B)SP LEVEL 46 BASIC SETUP 22, 43 Basic setup 43 BASS OUT 46 BGV 49 Bluetooth setting 50 Bluetooth status message 58 BT connected, Bluetooth status message 58 ■C ...Connecting speakers 11 Connecting the AM antennas 19 Connecting the FM antennas 19 Connecting the power cable 19 Connecting the Yamaha Bluetooth adapter 18 Connecting the Yamaha iPod universal dock ...........18 Connecting to the CENTER terminals 12 Connecting to the COMPONENT VIDEO jacks ..........16 Connecting ...
Owner's Manual
Page 68
... the pages at the end of this unit to unprocessed input signals 36 Low-frequency effect level 47 ■M Manual preset tuning 38 MANUAL SETUP 43 Manual setup 43 Manual tuning 37 MAX VOL 48 Maximum volume 48 MEM.GUARD 50 Memory guard 50 Movie Dramatic 34 Movie Spacious 34 MULTI CH... INPUT jacks 9 Multi channel input setup 49 Multi-channel sources and sound field programs with headphones 36 Multi-information display 20 Music Disc Listening 26 Music Enh. 2ch 34 Music Enh...
... the pages at the end of this unit to unprocessed input signals 36 Low-frequency effect level 47 ■M Manual preset tuning 38 MANUAL SETUP 43 Manual setup 43 Manual tuning 37 MAX VOL 48 Maximum volume 48 MEM.GUARD 50 Memory guard 50 Movie Dramatic 34 Movie Spacious 34 MULTI CH... INPUT jacks 9 Multi channel input setup 49 Multi-channel sources and sound field programs with headphones 36 Multi-information display 20 Music Disc Listening 26 Music Enh. 2ch 34 Music Enh...

