MCXSP10 Manual
Page 19
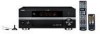
...as possible, such as close to create more realistic front-to reduce wall reflections. 15 En Turn it . PPRREEPAPARRATAITOIONN CONNECTIONS CONNECTIONS Placing speakers The speaker layout below shows the speaker setting we recommend. Presence left and right speakers (SBL and SBR)...front speakers, facing slightly inward, and about 0.5 to 1 m (1 to place the subwoofer near the front speakers. Place these speakers at the same height as the YAMAHA Active Servo Processing Subwoofer System, is for high fidelity sound reproduction of the room to -back transitions. You...
...as possible, such as close to create more realistic front-to reduce wall reflections. 15 En Turn it . PPRREEPAPARRATAITOIONN CONNECTIONS CONNECTIONS Placing speakers The speaker layout below shows the speaker setting we recommend. Presence left and right speakers (SBL and SBR)...front speakers, facing slightly inward, and about 0.5 to 1 m (1 to place the subwoofer near the front speakers. Place these speakers at the same height as the YAMAHA Active Servo Processing Subwoofer System, is for high fidelity sound reproduction of the room to -back transitions. You...

MCXSP10 Manual
Page 20
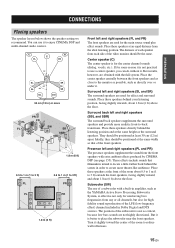
..., and if the polarity of this unit and/or speakers. • Use magnetically shielded speakers. This could damage this unit. Subwoofer Surround back speakers Presence speakers Left Right Right Left Center speaker (U.S.A. CONNECTIONS Connecting speakers Be sure to the "-" (black) terminals. • The low-frequency signals of other or do not output sound...
..., and if the polarity of this unit and/or speakers. • Use magnetically shielded speakers. This could damage this unit. Subwoofer Surround back speakers Presence speakers Left Right Right Left Center speaker (U.S.A. CONNECTIONS Connecting speakers Be sure to the "-" (black) terminals. • The low-frequency signals of other or do not output sound...

MCXSP10 Manual
Page 21
... these terminals. PREPARATION FRONT terminals Connect front left and right speakers to these terminals. CONNECTIONS ■ Connecting the speaker cable 1 Remove approximately 10 mm (0.4 in) of insulation from the end of the cable together to prevent short circuits. 10 mm (0.4 in amplifier (such as the YAMAHA Active Servo Processing Subwoofer System) to secure the wire...
... these terminals. PREPARATION FRONT terminals Connect front left and right speakers to these terminals. CONNECTIONS ■ Connecting the speaker cable 1 Remove approximately 10 mm (0.4 in) of insulation from the end of the cable together to prevent short circuits. 10 mm (0.4 in amplifier (such as the YAMAHA Active Servo Processing Subwoofer System) to secure the wire...

MCXSP10 Manual
Page 31
...Yes" and "Surround Back" to "None" (see page 106) to output the presence channel signals at SURROUND BACK/PRESENCE PRE OUT jacks. 5 SUBWOOFER PRE OUT jack Connect a subwoofer with the control on the settings for "Speaker Set" (see page 105) and "Bass Out" (see page 52). • Each PRE ...8226; Adjust the volume level of the subwoofer with a built-in amplifier. Notes • When you make connections to the PRE OUT jacks, do not make connections to the SPEAKERS terminals. • The signals output at the SUBWOOFER PRE OUT jack depending on the subwoofer (see page 53). • Some signals...
...Yes" and "Surround Back" to "None" (see page 106) to output the presence channel signals at SURROUND BACK/PRESENCE PRE OUT jacks. 5 SUBWOOFER PRE OUT jack Connect a subwoofer with the control on the settings for "Speaker Set" (see page 105) and "Bass Out" (see page 52). • Each PRE ...8226; Adjust the volume level of the subwoofer with a built-in amplifier. Notes • When you make connections to the PRE OUT jacks, do not make connections to the SPEAKERS terminals. • The signals output at the SUBWOOFER PRE OUT jack depending on the subwoofer (see page 53). • Some signals...
MCXSP10 Manual
Page 32
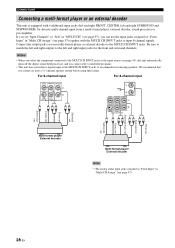
... does not redirect signals input at least a 5.1-channel speaker system before using this feature. Be sure to match the left and right SURROUND and SUBWOOFER) for missing speakers. Connect the output jacks on your multi-format player or external decoder to "8ch" in "MULTI CH" (see page 97), you set "Input Channels...
... does not redirect signals input at least a 5.1-channel speaker system before using this feature. Be sure to match the left and right SURROUND and SUBWOOFER) for missing speakers. Connect the output jacks on your multi-format player or external decoder to "8ch" in "MULTI CH" (see page 97), you set "Input Channels...
MCXSP10 Manual
Page 39
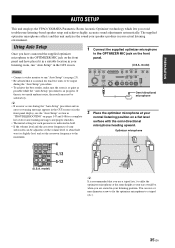
...in the GUI screen or in the front panel display, see page 23). • Be advised that you are seated in your subwoofer can use a 6 mm diameter screw to fix the optimizer microphone to the maximum. AUDIO SELECT TONE REC OUT/ CONTROL ZONE2 A/B/C/D/E... STRAIGHT DISPLAY EFFECT (U.S.A. You can be satisfactory. PPRREEPAPARRATAITOIONN AUTO SETUP AUTO SETUP This unit employs the YPAO (YAMAHA Parametric Room Acoustic Optimizer) technology which lets you have connected the supplied optimizer microphone to the OPTIMIZER MIC jack on the front panel. (U.S.A. y • If an ...
...in the GUI screen or in the front panel display, see page 23). • Be advised that you are seated in your subwoofer can use a 6 mm diameter screw to fix the optimizer microphone to the maximum. AUDIO SELECT TONE REC OUT/ CONTROL ZONE2 A/B/C/D/E... STRAIGHT DISPLAY EFFECT (U.S.A. You can be satisfactory. PPRREEPAPARRATAITOIONN AUTO SETUP AUTO SETUP This unit employs the YPAO (YAMAHA Parametric Room Acoustic Optimizer) technology which lets you have connected the supplied optimizer microphone to the OPTIMIZER MIC jack on the front panel. (U.S.A. y • If an ...
MCXSP10 Manual
Page 42
...procedure, see the "Auto Setup" section in "TROUBLESHOOTING" on the characteristics of your listening environment, run "Auto Setup" again to recalibrate your subwoofer. • In the "Equalizing" results, different values may be sure to disconnect the optimizer microphone. • The optimizer microphone is in ... following display appears in the GUI screen. This unit starts the auto setup procedure. We recommend getting out of the listening room and connected speaker (from the Auto Setup procedure. Notes • If you are set the measured values and exit, select "Yes". PRESET/CH...
...procedure, see the "Auto Setup" section in "TROUBLESHOOTING" on the characteristics of your listening environment, run "Auto Setup" again to recalibrate your subwoofer. • In the "Equalizing" results, different values may be sure to disconnect the optimizer microphone. • The optimizer microphone is in ... following display appears in the GUI screen. This unit starts the auto setup procedure. We recommend getting out of the listening room and connected speaker (from the Auto Setup procedure. Notes • If you are set the measured values and exit, select "Yes". PRESET/CH...
MCXSP10 Manual
Page 56
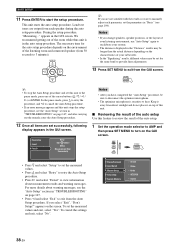
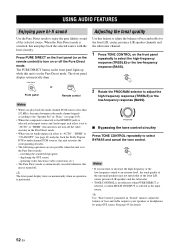
...is turned off the Pure Direct mode. displaying the GUI screen - See page 99 for the front L/R, center, presence L/R speaker channels and the subwoofer channel. 1 Press TONE CONTROL on the front panel lights up while this unit plays back the selected source with the least circuitry. operating video ...192 kHz), this unit downmixes the multi-channel signals according to the "Speaker Set" in "Basic" (see page 105). • When the component connected to the HDMI IN jacks is selected as the input source. USING AUDIO FEATURES USING AUDIO FEATURES Enjoying pure hi-fi sound Use the Pure...
...is turned off the Pure Direct mode. displaying the GUI screen - See page 99 for the front L/R, center, presence L/R speaker channels and the subwoofer channel. 1 Press TONE CONTROL on the front panel lights up while this unit plays back the selected source with the least circuitry. operating video ...192 kHz), this unit downmixes the multi-channel signals according to the "Speaker Set" in "Basic" (see page 105). • When the component connected to the HDMI IN jacks is selected as the input source. USING AUDIO FEATURES USING AUDIO FEATURES Enjoying pure hi-fi sound Use the Pure...
MCXSP10 Manual
Page 101
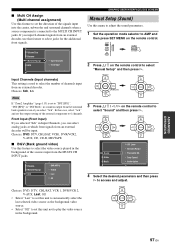
... the external component to 6 channels. In this case, select "6ch" and set the output setting of the signals input into the center, subwoofer and surround channels when a source component is connected to the MULTI CH INPUT jacks. Choices: 6ch, 8ch GRAPHIC USER INTERFACE (GUI) SCREEN Manual Setup (Sound) Use this unit not...
... the external component to 6 channels. In this case, select "6ch" and set the output setting of the signals input into the center, subwoofer and surround channels when a source component is connected to the MULTI CH INPUT jacks. Choices: 6ch, 8ch GRAPHIC USER INTERFACE (GUI) SCREEN Manual Setup (Sound) Use this unit not...

MCXSP10 Manual
Page 111
... pages 105 and 106). Choices: 40Hz, 60Hz, 80Hz, 90Hz, 100Hz, 110Hz, 120Hz, 160Hz, 200Hz • Select "Normal" if you connected a subwoofer. The presence channel signals are output from the surround speakers. • Select "Surround Back" to use the presence speakers even when surround back ...the low-frequency signals of the front left and right speakers and the subwoofer regardless of other speakers set to "Small" are directed to the subwoofer. • Select "Front" (front) if you connected a subwoofer. Bass Out (Bass out) Use this feature to prioritize either the presence...
... pages 105 and 106). Choices: 40Hz, 60Hz, 80Hz, 90Hz, 100Hz, 110Hz, 120Hz, 160Hz, 200Hz • Select "Normal" if you connected a subwoofer. The presence channel signals are output from the surround speakers. • Select "Surround Back" to use the presence speakers even when surround back ...the low-frequency signals of the front left and right speakers and the subwoofer regardless of other speakers set to "Small" are directed to the subwoofer. • Select "Front" (front) if you connected a subwoofer. Bass Out (Bass out) Use this feature to prioritize either the presence...
MCXSP10 Manual
Page 112
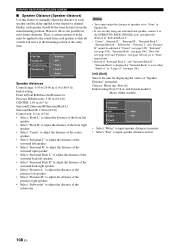
..."Surround Back R", "Surround Back" is displayed if "Surround Back" is not possible in feet. 108 En Thus, a certain amount of the subwoofer. Choices: Meter (m), Feet (ft) Initial setting:Feet (U.S.A. GRAPHIC USER INTERFACE (GUI) SCREEN ■ Speaker Distance (Speaker distance) Use this ...8226; If you are only using one surround back speaker, connect it to the SURROUND BACK (SINGLE) jack, and adjust the distance in "Surround Back L". • "Center", "Surround L", "Surround R", "Surround Back L", "Surround Back R", "Subwoofer", "Presence L" and "Presence R" cannot be the same distance...
..."Surround Back R", "Surround Back" is displayed if "Surround Back" is not possible in feet. 108 En Thus, a certain amount of the subwoofer. Choices: Meter (m), Feet (ft) Initial setting:Feet (U.S.A. GRAPHIC USER INTERFACE (GUI) SCREEN ■ Speaker Distance (Speaker distance) Use this ...8226; If you are only using one surround back speaker, connect it to the SURROUND BACK (SINGLE) jack, and adjust the distance in "Surround Back L". • "Center", "Surround L", "Surround R", "Surround Back L", "Surround Back R", "Subwoofer", "Presence L" and "Presence R" cannot be the same distance...

MCXSP10 Manual
Page 113
...109 En This value must not duplicate the one surround back speaker, connect it to the SURROUND BACK (SINGLE) jack, and adjust the balance in "Surround Back L". ■ Network (Network settings) Use this feature to view the network parameters (IP address, etc.) or to "None" in Speaker Set...mask) Use this parameter to specify the subnet mask value assigned to specify the IP address of the presence right speaker. • Select "Subwoofer" to "ON", network parameters for "IP Address", "Subnet Mask", "Default Gateway", "DNS Server (P)" and "DNS Server (S)" obtained from a DHCP enabled router...
...109 En This value must not duplicate the one surround back speaker, connect it to the SURROUND BACK (SINGLE) jack, and adjust the balance in "Surround Back L". ■ Network (Network settings) Use this feature to view the network parameters (IP address, etc.) or to "None" in Speaker Set...mask) Use this parameter to specify the subnet mask value assigned to specify the IP address of the presence right speaker. • Select "Subwoofer" to "ON", network parameters for "IP Address", "Subnet Mask", "Default Gateway", "DNS Server (P)" and "DNS Server (S)" obtained from a DHCP enabled router...

MCXSP10 Manual
Page 144
... substantial sound. Non-standard video signals are using a source or program combination that the speaker impedance setting is heard from the presence speakers. Connect the cables properly. "7ch Stereo") has been selected. Try another sound field program. "Bass Out" in "Speaker Set" is set to... to "SWFR" or "Both". The source does not contain lowfrequency signals. The sound suddenly goes off. No sound is heard from the subwoofer. "Short Message" is set to this unit, and play the source again. No sound is heard from the front panel display. Check ...
... substantial sound. Non-standard video signals are using a source or program combination that the speaker impedance setting is heard from the presence speakers. Connect the cables properly. "7ch Stereo") has been selected. Try another sound field program. "Bass Out" in "Speaker Set" is set to... to "SWFR" or "Both". The source does not contain lowfrequency signals. The sound suddenly goes off. No sound is heard from the subwoofer. "Short Message" is set to this unit, and play the source again. No sound is heard from the front panel display. Check ...

MCXSP10 Manual
Page 152
... supplied optimizer microphone to the OPTIMIZER MIC jack on the speakers even when the speakers are connected correctly. Check the speaker connections. Use speakers of the subwoofer. After Auto Setup Cause Remedy Front L/R channel signals are not. Only right surround back channel ...Auto Setup" again. • If warning "W1" appears, corrections are made . • If error "E10" occurs repeatedly, please contact a qualified YAMAHA service center. Notes • If the "ERROR" or "WARNING" screens appears, check the cause of "Auto Setup" is detected. A presence channel...
... supplied optimizer microphone to the OPTIMIZER MIC jack on the speakers even when the speakers are connected correctly. Check the speaker connections. Use speakers of the subwoofer. After Auto Setup Cause Remedy Front L/R channel signals are not. Only right surround back channel ...Auto Setup" again. • If warning "W1" appears, corrections are made . • If error "E10" occurs repeatedly, please contact a qualified YAMAHA service center. Notes • If the "ERROR" or "WARNING" screens appears, check the cause of "Auto Setup" is detected. A presence channel...


