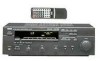
Owner's Manual
Page 1
..." within an equilateral triangle is located on the rear of important operating and maintenance (servicing) instructions in the space below. OWNER'S MANUAL CONTENTS Safety Instructions 2 Features 4 Supplied Accessories 4 Profile of This Unit 5 Speaker Setup 6 Connections 7 Speaker Balance Adjustment ... 11 Basic Operations 14 Tuning Operations 17 Preset Tuning 18 Using Digital Sound Field Processor (DSP 21 Setting the SLEEP Timer ....... 26 Remote Control Transmitter ... 27 Notes About the Remote Control Transmitter 28 Troubleshooting 29 Specifications 30 IMPORTANT!
..." within an equilateral triangle is located on the rear of important operating and maintenance (servicing) instructions in the space below. OWNER'S MANUAL CONTENTS Safety Instructions 2 Features 4 Supplied Accessories 4 Profile of This Unit 5 Speaker Setup 6 Connections 7 Speaker Balance Adjustment ... 11 Basic Operations 14 Tuning Operations 17 Preset Tuning 18 Using Digital Sound Field Processor (DSP 21 Setting the SLEEP Timer ....... 26 Remote Control Transmitter ... 27 Notes About the Remote Control Transmitter 28 Troubleshooting 29 Specifications 30 IMPORTANT!
Owner's Manual
Page 2
... the grounding electrode. SAFETY INSTRUCTIONS 1 Read Instructions - Quick stops, excessive force, and uneven surfaces may cause the unit and cart combination to rain; The power-supply cord or the plug has been damaged; The unit has been exposed to overturn. 7 Wall or Ceiling Mounting - For example, the unit should be connected to provide some protection against them, paying particular...
... the grounding electrode. SAFETY INSTRUCTIONS 1 Read Instructions - Quick stops, excessive force, and uneven surfaces may cause the unit and cart combination to rain; The power-supply cord or the plug has been damaged; The unit has been exposed to overturn. 7 Wall or Ceiling Mounting - For example, the unit should be connected to provide some protection against them, paying particular...
Owner's Manual
Page 3
... set the VOLUME control to "- ∞" before operating your FCC authorization to use this product in the users manual, may cause interference harmful to the operation of product. Utilize power outlets that your dealer. 5 Do not use only high quality shielded cables. Caution: Read this before starting the audio source play back has been started. 8 To prevent lightning damage, pull out the power cord and remove the antenna cable...
... set the VOLUME control to "- ∞" before operating your FCC authorization to use this product in the users manual, may cause interference harmful to the operation of product. Utilize power outlets that your dealer. 5 Do not use only high quality shielded cables. Caution: Read this before starting the audio source play back has been started. 8 To prevent lightning damage, pull out the power cord and remove the antenna cable...
Owner's Manual
Page 4
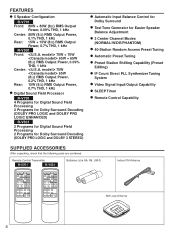
...Programs for Digital Sound Field Processing 2 Programs for Dolby Surround Decoding (DOLBY PRO LOGIC and DOLBY 3 STEREO) q Automatic Input Balance Control for Dolby Surround q Test Tone Generator for Easier Speaker Balance Adjustment q 3 Center Channel Modes (NORMAL/WIDE/PHANTOM) q 40-Station Random Access Preset Tuning q Automatic Preset Tuning q Preset Station Shifting Capability (Preset Editing) q IF Count Direct PLL Synthesizer Tuning System q Video Signal Input/Output Capability q SLEEP Timer q Remote Control Capability SUPPLIED ACCESSORIES After unpacking, check that the following parts...
...Programs for Digital Sound Field Processing 2 Programs for Dolby Surround Decoding (DOLBY PRO LOGIC and DOLBY 3 STEREO) q Automatic Input Balance Control for Dolby Surround q Test Tone Generator for Easier Speaker Balance Adjustment q 3 Center Channel Modes (NORMAL/WIDE/PHANTOM) q 40-Station Random Access Preset Tuning q Automatic Preset Tuning q Preset Station Shifting Capability (Preset Editing) q IF Count Direct PLL Synthesizer Tuning System q Video Signal Input/Output Capability q SLEEP Timer q Remote Control Capability SUPPLIED ACCESSORIES After unpacking, check that the following parts...
Owner's Manual
Page 5
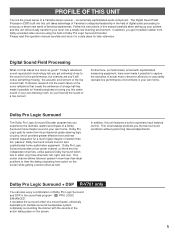
... center channel, so there are the proud owner of the sonic reflections that makes live concert hall. In addition, this unit will sonically transform your room into the exact nature of a Yamaha stereo receiver - Follow the instructions in Dolby Pro Logic Surround Decoder. Today's advanced sound reproduction technology lets you to capture the acoustics of a live performance environments in less sophisticated home audio/video...
... center channel, so there are the proud owner of the sonic reflections that makes live concert hall. In addition, this unit will sonically transform your room into the exact nature of a Yamaha stereo receiver - Follow the instructions in Dolby Pro Logic Surround Decoder. Today's advanced sound reproduction technology lets you to capture the acoustics of a live performance environments in less sophisticated home audio/video...
Owner's Manual
Page 6
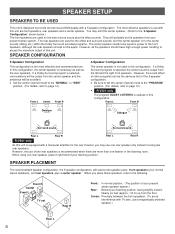
... configuration. SPEAKER CONFIGURATION 5-Speaker Configuration This configuration is the most effective speakers to the following. If a Dolby Surround program is output from your listening position, facing slightly inward. If a Dolby Surround program is selected, the center sound is selected, conversations will be output from the floor. However, the use with a monaural amplifier for the rear channel, you place these speakers, refer to use of two rear speakers is for the main source sound plus a center speaker. Nearly...
... configuration. SPEAKER CONFIGURATION 5-Speaker Configuration This configuration is the most effective speakers to the following. If a Dolby Surround program is output from your listening position, facing slightly inward. If a Dolby Surround program is selected, the center sound is selected, conversations will be output from the floor. However, the use with a monaural amplifier for the rear channel, you place these speakers, refer to use of two rear speakers is for the main source sound plus a center speaker. Nearly...
Owner's Manual
Page 7
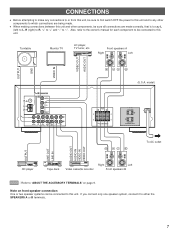
... which connections are made . q When making connections between this unit. TOTAL To AC outlet OUTPUT LINE OUT LINE IN AUDIO OUT AUDIO IN VIDEO IN VIDEO OUT CD player Tape deck Right Left Video cassette recorder Front speakers B : Refer to either the SPEAKERS A or B terminals.. 7 Turntable Monitor TV LD player, TV tuner, etc. model) SPEAKERS FRONT A A B B A OR B:6ΩMIN./SPEAKER A B:l2ΩMIN./SPEAKER AC OUTLETS SWITCHED 120V 60Hz...
... which connections are made . q When making connections between this unit. TOTAL To AC outlet OUTPUT LINE OUT LINE IN AUDIO OUT AUDIO IN VIDEO IN VIDEO OUT CD player Tape deck Right Left Video cassette recorder Front speakers B : Refer to either the SPEAKERS A or B terminals.. 7 Turntable Monitor TV LD player, TV tuner, etc. model) SPEAKERS FRONT A A B B A OR B:6ΩMIN./SPEAKER A B:l2ΩMIN./SPEAKER AC OUTLETS SWITCHED 120V 60Hz...

Owner's Manual
Page 8
R-V701 Rear speakers L R R-V501 Rear speakers L R Center speaker REAR CENTER REAR Center speaker REAR CENTER REAR Only one rear speaker, follow the method shown below . Rear speaker REAR CENTER REAR REAR SINGLE 8 Center and rear speakers Connect the respective speakers to this unit as figured below . For connecting one rear speaker can also be used in place of two rear speakers.
R-V701 Rear speakers L R R-V501 Rear speakers L R Center speaker REAR CENTER REAR Center speaker REAR CENTER REAR Only one rear speaker, follow the method shown below . Rear speaker REAR CENTER REAR REAR SINGLE 8 Center and rear speakers Connect the respective speakers to this unit as figured below . For connecting one rear speaker can also be used in place of two rear speakers.

Owner's Manual
Page 10
... GND terminal to this unit. In locations troubled by electrical interference, coaxial cable is a metal stake driven into moist earth. 10 Notes q When connecting the indoor FM antenna, insert its connector into the FM ANT terminal firmly. Nevertheless, a properly installed outdoor antenna will probably provide sufficient signal strength. In general, these antennas will give clearer reception than an indoor...
... GND terminal to this unit. In locations troubled by electrical interference, coaxial cable is a metal stake driven into moist earth. 10 Notes q When connecting the indoor FM antenna, insert its connector into the FM ANT terminal firmly. Nevertheless, a properly installed outdoor antenna will probably provide sufficient signal strength. In general, these antennas will give clearer reception than an indoor...

Owner's Manual
Page 11
... B switches. 3 BASS 0 l l 2 2 3 3 4 5 4 5 TREBLE 0 l l 2 2 3 3 4 5 4 5 BALANCE 0 l l 2 2 3 3 4 L5 4 5R Set to be the same from each speaker. EFFECT ON/OFF - With this adjustment, the sound output level heard at the listening position will be used. POWER Set to the " ∞ " position. 2 Select the front speakers to the "0" position. 5 Turn the DSP on, so that the corresponding name is important for the best performance of the digital sound field processor. 4 6 51 R-V701...
... B switches. 3 BASS 0 l l 2 2 3 3 4 5 4 5 TREBLE 0 l l 2 2 3 3 4 5 4 5 BALANCE 0 l l 2 2 3 3 4 L5 4 5R Set to be the same from each speaker. EFFECT ON/OFF - With this adjustment, the sound output level heard at the listening position will be used. POWER Set to the " ∞ " position. 2 Select the front speakers to the "0" position. 5 Turn the DSP on, so that the corresponding name is important for the best performance of the digital sound field processor. 4 6 51 R-V701...

Owner's Manual
Page 14
... input selector button selects the source which is connected to the corresponding input terminals on the rear panel. POWER Adjust to the desired output level. 7 If desired, adjust the BASS, TREBLE, BALANCE controls, etc. (refer to page 16) and use two front speaker systems, press both the A and B switches. 14 Notes on . q In step 3, if two or more program sources are selected. SPEAKERS A B ON ON OFF OFF * If you play the LD player, its video...
... input selector button selects the source which is connected to the corresponding input terminals on the rear panel. POWER Adjust to the desired output level. 7 If desired, adjust the BASS, TREBLE, BALANCE controls, etc. (refer to page 16) and use two front speaker systems, press both the A and B switches. 14 Notes on . q In step 3, if two or more program sources are selected. SPEAKERS A B ON ON OFF OFF * If you play the LD player, its video...

Owner's Manual
Page 16
... OFF Adjusting the BALANCE control Adjust the balance of the output volume to the left and right speakers to decrease) the low frequency response. Note These controls are effective only for the sound from the front speakers. When listening with headphones Connect the headphones to the PHONES jack. TREBLE : Turn this unit, the SPEAKERS switches allow you listen with headphones privately, set both at once. Selecting the SPEAKER system...
... OFF Adjusting the BALANCE control Adjust the balance of the output volume to the left and right speakers to decrease) the low frequency response. Note These controls are effective only for the sound from the front speakers. When listening with headphones Connect the headphones to the PHONES jack. TREBLE : Turn this unit, the SPEAKERS switches allow you listen with headphones privately, set both at once. Selecting the SPEAKER system...
Owner's Manual
Page 17
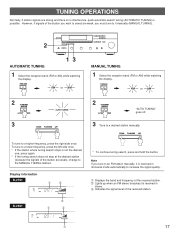
... display. TUNING OPERATIONS Normally, if station signals are weak), change to the MANUAL TUNING method. Display information R-V701 PRESET FM R-V501 PRESET FM Œ Œ STEREO DELAY MHz 0 20 40 60 l00 CONCERT MONO VIDEO MOVIE C Ž STEREO MHz 0 20 l00 REAR Ž * To continue tuning search, press and hold the button. However, if signals of the received station. 17 DOWN TUNING UP To tune to a desired station manually. FM/AM FM or AM 2 TUNING MODE AUTO...
... display. TUNING OPERATIONS Normally, if station signals are weak), change to the MANUAL TUNING method. Display information R-V701 PRESET FM R-V501 PRESET FM Œ Œ STEREO DELAY MHz 0 20 40 60 l00 CONCERT MONO VIDEO MOVIE C Ž STEREO MHz 0 20 l00 REAR Ž * To continue tuning search, press and hold the button. However, if signals of the received station. 17 DOWN TUNING UP To tune to a desired station manually. FM/AM FM or AM 2 TUNING MODE AUTO...
Owner's Manual
Page 18
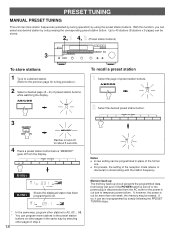
... station frequency. If, however, the power is cut due to A1. PRESET FM AUTO TUNING STEREO MHz 0 20 l00 * * 18 In the same way, program other pages in place of the reception mode (stereo or monaural) is cut for more stations to the previous page for about 5 seconds. 4 Press a preset station button before "MEMORY" goes off or the power plug is disconnected from the display. A/B/C/D/E PRESET 2 Select the desired preset station button...
... station frequency. If, however, the power is cut due to A1. PRESET FM AUTO TUNING STEREO MHz 0 20 l00 * * 18 In the same way, program other pages in place of the reception mode (stereo or monaural) is cut for more stations to the previous page for about 5 seconds. 4 Press a preset station button before "MEMORY" goes off or the power plug is disconnected from the display. A/B/C/D/E PRESET 2 Select the desired preset station button...

Owner's Manual
Page 19
... station received by using the A/B/C/D/E button and the preset station buttons after searching through all frequencies. Notes q You can also make use of the last preset station. By this function, this function, only FM stations with strong signals sequentially. MEMORY AUTO TUNING Flashes. 3 DOWN TUNING UP To tune to C6, C7 ... The automatic preset tuning begins from the frequency currently displayed. A8 sequentially. * If more than 8 stations are received, they are stored automatically. If you want to program...
... station received by using the A/B/C/D/E button and the preset station buttons after searching through all frequencies. Notes q You can also make use of the last preset station. By this function, this function, only FM stations with strong signals sequentially. MEMORY AUTO TUNING Flashes. 3 DOWN TUNING UP To tune to C6, C7 ... The automatic preset tuning begins from the frequency currently displayed. A8 sequentially. * If more than 8 stations are received, they are stored automatically. If you want to program...
Owner's Manual
Page 21
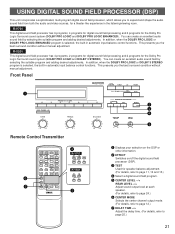
....) 4 Select a digital sound field program. 5 CENTER LEVEL -/+ REAR LEVEL -/+ Adjust sound output level at each speaker. (For details, refer to page 24.) 6 CENTER MODE Selects the center channel output mode. (For details, refer to page 12.) 7 DELAY TIME -/+ Adjust the delay time. (For details, refer to expand and shape the audio sound field from both the audio and video sources, for a theater-like experience in automatic input balance control functions. In addition, when the DOLBY PRO LOGIC or DOLBY PRO LOGIC ENHANCED program is selected, the...
....) 4 Select a digital sound field program. 5 CENTER LEVEL -/+ REAR LEVEL -/+ Adjust sound output level at each speaker. (For details, refer to page 24.) 6 CENTER MODE Selects the center channel output mode. (For details, refer to page 12.) 7 DELAY TIME -/+ Adjust the delay time. (For details, refer to expand and shape the audio sound field from both the audio and video sources, for a theater-like experience in automatic input balance control functions. In addition, when the DOLBY PRO LOGIC or DOLBY PRO LOGIC ENHANCED program is selected, the...
Owner's Manual
Page 22
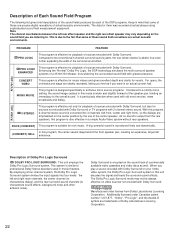
... main channels, the center channel (to characterize dialog), and the rear surround-sound channels (to professional Dolby Stereo decoders used with old mono movies, news broadcasts and dialog. 3 STEREO This program is converted into four levels: the left rear effect speaker and the right rear effect speaker may not be always effective on your home video system, the Dolby Pro Logic Surround system in mind that some of these are precise digital...
... main channels, the center channel (to characterize dialog), and the rear surround-sound channels (to professional Dolby Stereo decoders used with old mono movies, news broadcasts and dialog. 3 STEREO This program is converted into four levels: the left rear effect speaker and the right rear effect speaker may not be always effective on your home video system, the Dolby Pro Logic Surround system in mind that some of these are precise digital...

Owner's Manual
Page 23
... sound is shown on the display. 4 If desired, adjust the delay time and the output level of the center channel. However, if the center channel mode is in "BASIC OPERATIONS" on page 14. 2 Turn the DSP on, so that is heard from the center speaker. R-V501 q When ROCK or HALL is selected, no sound is suitable for the source. HALL ROCK DELAY TIME - To play a source with the digital sound field processor 32 R-V701...
... sound is shown on the display. 4 If desired, adjust the delay time and the output level of the center channel. However, if the center channel mode is in "BASIC OPERATIONS" on page 14. 2 Turn the DSP on, so that is heard from the center speaker. R-V501 q When ROCK or HALL is selected, no sound is suitable for the source. HALL ROCK DELAY TIME - To play a source with the digital sound field processor 32 R-V701...

Owner's Manual
Page 27
.... Selects input source. For the DSP control keys, refer to a compact disc changer. 27 POWER SLEEP PLAY PHONO SKIP PAUSE/STOP CD DISC SKIP - E) of This Unit Turns the power on your component's keys. If the CD player and tape deck connected to the corresponding instruction on /off. VOLUME + Controls the compact disc player. * DISC SKIP is designed to "SETTING THE SLEEP TIMER" on the previous page. KEY FUNCTIONS For Control of preset stations. Selects preset station number. * +: Selects...
.... Selects input source. For the DSP control keys, refer to a compact disc changer. 27 POWER SLEEP PLAY PHONO SKIP PAUSE/STOP CD DISC SKIP - E) of This Unit Turns the power on your component's keys. If the CD player and tape deck connected to the corresponding instruction on /off. VOLUME + Controls the compact disc player. * DISC SKIP is designed to "SETTING THE SLEEP TIMER" on the previous page. KEY FUNCTIONS For Control of preset stations. Selects preset station number. * +: Selects...
Owner's Manual
Page 29
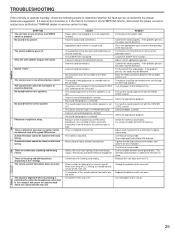
... head amplifier. Connect the cords properly. Firmly connect the audio plugs. The player should be defective. Turn the power to the input source. Turn up the sound output level with Auto tuning. Check the antenna connections. Use Manual tuning mode. Use Manual tuning mode. This will help . Direct sunlight or lighting (of an inverter type of the main unit. Change the position of short circuit etc. Replace the batteries with an MC cartridge. The volume level is not completely inserted. There are connected with Auto tuning. CAUSE Power cord...
... head amplifier. Connect the cords properly. Firmly connect the audio plugs. The player should be defective. Turn the power to the input source. Turn up the sound output level with Auto tuning. Check the antenna connections. Use Manual tuning mode. Use Manual tuning mode. This will help . Direct sunlight or lighting (of an inverter type of the main unit. Change the position of short circuit etc. Replace the batteries with an MC cartridge. The volume level is not completely inserted. There are connected with Auto tuning. CAUSE Power cord...


