
Owners Manual
Page 4
.... 7 Do not plug in this unit to a wall outlet until all connections are not suitable for cooling. 19 Install this unit (RX-E810 and DVD-E810) in them, as a plug with a humidifier) to prevent condensation inside this unit, which may cause an electrical shock, fire, damage to this...dust, moisture, and/or cold. 3 Locate this unit away from other than specified is dangerous and may be exposed to liquid dripping or splashing. YAMAHA will form when the surrounding temperature changes suddenly. Disconnect the power cable from cold to the wall outlet, even if this unit. - customers If ...
.... 7 Do not plug in this unit to a wall outlet until all connections are not suitable for cooling. 19 Install this unit (RX-E810 and DVD-E810) in them, as a plug with a humidifier) to prevent condensation inside this unit, which may cause an electrical shock, fire, damage to this...dust, moisture, and/or cold. 3 Locate this unit away from other than specified is dangerous and may be exposed to liquid dripping or splashing. YAMAHA will form when the surrounding temperature changes suddenly. Disconnect the power cable from cold to the wall outlet, even if this unit. - customers If ...

Owners Manual
Page 5
...INTRODUCTION PREPARATION BASIC OPERATIONS Contents INTRODUCTION Features 2 Supplied Accessories 2 Controls and Functions 3 Receiver (RX-E810 3 DVD player (DVD-E810 6 Remote control 8 PREPARATION Connecting the System 12 Connecting a TV 14 ...Connecting Antennas 15 Connecting the AM loop antenna 15 Connecting the FM antenna 15 Connecting External Components 16 Connecting an MD player or a tape deck 16 Connecting an MD recorder or a CD recorder ........ 16 Connecting a YAMAHA...
...INTRODUCTION PREPARATION BASIC OPERATIONS Contents INTRODUCTION Features 2 Supplied Accessories 2 Controls and Functions 3 Receiver (RX-E810 3 DVD player (DVD-E810 6 Remote control 8 PREPARATION Connecting the System 12 Connecting a TV 14 ...Connecting Antennas 15 Connecting the AM loop antenna 15 Connecting the FM antenna 15 Connecting External Components 16 Connecting an MD player or a tape deck 16 Connecting an MD recorder or a CD recorder ........ 16 Connecting a YAMAHA...

Owners Manual
Page 6
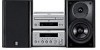
...SHUFFLE ON SCREEN INFO. FEATURES Features Receiver (RX-E810) • Maximum RMS output power per channel 65W + 65W (6 Ω, 1 kHz, 1%THD) • 40-station FM/AM preset tuning • iPod dock terminal • Pure Direct mode DVD player (DVD-E810) • Plays DVDs, Video CDs, Audio CDs, ... and coaxial digital output jacks ■ About this manual • In this manual, "RX-E810" is described as "receiver" and "DVD-E810" is described as "DVD player". • This manual describes how to operate the system using the front panel buttons. • Remote control descriptions and ...
...SHUFFLE ON SCREEN INFO. FEATURES Features Receiver (RX-E810) • Maximum RMS output power per channel 65W + 65W (6 Ω, 1 kHz, 1%THD) • 40-station FM/AM preset tuning • iPod dock terminal • Pure Direct mode DVD player (DVD-E810) • Plays DVDs, Video CDs, Audio CDs, ... and coaxial digital output jacks ■ About this manual • In this manual, "RX-E810" is described as "receiver" and "DVD-E810" is described as "DVD player". • This manual describes how to operate the system using the front panel buttons. • Remote control descriptions and ...
Owners Manual
Page 7
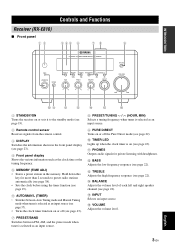
...BAND PRESET/TUNING BASS TIME ADJ TIMER TREBLE HOUR BALANCE MIN INPUT L R VOLUME MIN MAX 0A B C D E F 1 STANDBY/ON Turns the receiver on or sets it to preset radio stations automatically (see page 38). • Sets the clock before using the timer function (see page 19). 6...display (see page 22). A PHONES Outputs audio signals for more than 2 seconds to the standby mode (see page 19). 2 Remote control sensor Receives signals from the remote control. 3 DISPLAY Switches the information shown in the memory. F VOLUME Adjusts the volume level. 3 En English C TREBLE ...
...BAND PRESET/TUNING BASS TIME ADJ TIMER TREBLE HOUR BALANCE MIN INPUT L R VOLUME MIN MAX 0A B C D E F 1 STANDBY/ON Turns the receiver on or sets it to preset radio stations automatically (see page 38). • Sets the clock before using the timer function (see page 19). 6...display (see page 22). A PHONES Outputs audio signals for more than 2 seconds to the standby mode (see page 19). 2 Remote control sensor Receives signals from the remote control. 3 DISPLAY Switches the information shown in the memory. F VOLUME Adjusts the volume level. 3 En English C TREBLE ...
Owners Manual
Page 8
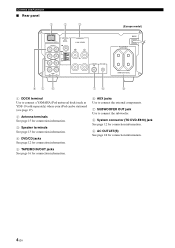
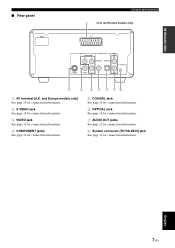
... GND IN TAPE/MD OUT AM SPEAKERS 6 MIN / SPEAKER R L SUBWOOFER OUT TO DVD-E810 AUX R L (Europe model) MAINS AC OUTLETS SWITCHED 100W MAX. TOTAL 45 6 78 9 1 DOCK terminal Use to connect a YAMAHA iPod universal dock (such as YDS-10 sold separately) where your iPod can be stationed... (see page 17). 2 Antenna terminals See page 15 for connection information. 3 Speaker terminals See page 13 for connection information. 4 DVD/CD jacks See page 12 for connection ...
... GND IN TAPE/MD OUT AM SPEAKERS 6 MIN / SPEAKER R L SUBWOOFER OUT TO DVD-E810 AUX R L (Europe model) MAINS AC OUTLETS SWITCHED 100W MAX. TOTAL 45 6 78 9 1 DOCK terminal Use to connect a YAMAHA iPod universal dock (such as YDS-10 sold separately) where your iPod can be stationed... (see page 17). 2 Antenna terminals See page 15 for connection information. 3 Speaker terminals See page 13 for connection information. 4 DVD/CD jacks See page 12 for connection ...

Owners Manual
Page 9
... indicator Lights up or flashes when you set your iPod in repeat mode. 8 Radio Data System indicators (U.K. PTY HOLD indicator Lights up when the receiver is seaching for the Radio Data System stations in the PTY SEEK mode (see page 40). 9 Multi-information display Shows the various infomaiton such as...mode (see page 38). 5 DOCK indicator Lights up when you station your iPod in a YAMAHA iPod universal dock (such as the clock time or the tuning frequency. 0 TIMER indicator Flashes when the the receiver is in the clock timer setting mode (see page 49). and Europe models only) The name...
... indicator Lights up or flashes when you set your iPod in repeat mode. 8 Radio Data System indicators (U.K. PTY HOLD indicator Lights up when the receiver is seaching for the Radio Data System stations in the PTY SEEK mode (see page 40). 9 Multi-information display Shows the various infomaiton such as...mode (see page 38). 5 DOCK indicator Lights up when you station your iPod in a YAMAHA iPod universal dock (such as the clock time or the tuning frequency. 0 TIMER indicator Flashes when the the receiver is in the clock timer setting mode (see page 49). and Europe models only) The name...
Owners Manual
Page 10
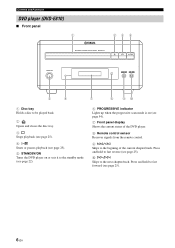
... forward (see page 25). 0 f/a Skips to the begining of the DVD player. 8 Remote control sensor Receives signals from the remote control. 9 b/w Skips to the next chapter/track. Controls and Functions DVD player (DVD-E810) ■ Front panel 1 23 4 NATURAL SOUND DVD PLAYER DVD-E810 STANDBY/ON PROGRESSIVE 5 6 7 8 90 1 Disc tray Holds... disc tray. 3s Stops playback (see page 25). 4 h/e Starts or pauses playback (see page 25). 5 STANDBY/ON Turns the DVD player on or sets it to the standby mode (see page 22). 6 PROGRESSIVE indicator Lights up when the progressive scan mode is on (see...
... forward (see page 25). 0 f/a Skips to the begining of the DVD player. 8 Remote control sensor Receives signals from the remote control. 9 b/w Skips to the next chapter/track. Controls and Functions DVD player (DVD-E810) ■ Front panel 1 23 4 NATURAL SOUND DVD PLAYER DVD-E810 STANDBY/ON PROGRESSIVE 5 6 7 8 90 1 Disc tray Holds... disc tray. 3s Stops playback (see page 25). 4 h/e Starts or pauses playback (see page 25). 5 STANDBY/ON Turns the DVD player on or sets it to the standby mode (see page 22). 6 PROGRESSIVE indicator Lights up when the progressive scan mode is on (see...
Owners Manual
Page 11
.... 7 AUDIO OUT jacks See page 12 for connection information. 8 System connector (TO RX-E810) jack See page 12 for connection information. and Europe models only) AV VIDEO OUT COMPONENT PR Y DIGITAL OUT AUDIO OUT L COAXIAL OPTICAL TO RX-E810 S VIDEO VIDEO PB R 2 3 4 5 6 78...
.... 7 AUDIO OUT jacks See page 12 for connection information. 8 System connector (TO RX-E810) jack See page 12 for connection information. and Europe models only) AV VIDEO OUT COMPONENT PR Y DIGITAL OUT AUDIO OUT L COAXIAL OPTICAL TO RX-E810 S VIDEO VIDEO PB R 2 3 4 5 6 78...
Owners Manual
Page 12
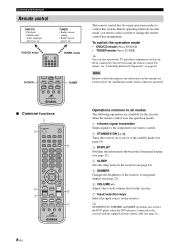
.... y STANDBY/ON, DIMMER and SLEEP operations also control the DVD player when the DVD player is in the front panel display (see page 23). 4 SLEEP Sets the sleep timer on the receiver (see page 44). 5 DIMMER Changes the brightness of the receiver's front panel display (see page 12). 8 En TUNER &#... 1 Infrared signal transmitter Sends signals to the component you need to select a mode to the receiver using the remote control. To switch the operation mode • DVD/CD mode: Press DVD/CD. • TUNER mode: Press TUNER. Note Remote control descriptions and illustrations in each mode,...
.... y STANDBY/ON, DIMMER and SLEEP operations also control the DVD player when the DVD player is in the front panel display (see page 23). 4 SLEEP Sets the sleep timer on the receiver (see page 44). 5 DIMMER Changes the brightness of the receiver's front panel display (see page 12). 8 En TUNER &#... 1 Infrared signal transmitter Sends signals to the component you need to select a mode to the receiver using the remote control. To switch the operation mode • DVD/CD mode: Press DVD/CD. • TUNER mode: Press TUNER. Note Remote control descriptions and illustrations in each mode,...

Owners Manual
Page 13
... the previous PBC menu (see page 25). C PROG Displays the program list used for the DVD player. Press and hold to the previous DVD menu. English 9 En B A-B Repeats a specified section within a chapter/track (see page 30). INTRODUCTION ■ DVD/CD mode 1 2 3 4 5 6 7 8 9 STANDBY/ON POWER TV 1 2 3 4 5... SHUFFLE 0 A B C D ON SCREEN INFO. H AUDIO Selects the audio language (see page 26). y Press DVD/CD to set the remote control to the DVD/CD mode before carrying out the following operations are available for the Program Play feature (see page 31). G Cursor keys...
... the previous PBC menu (see page 25). C PROG Displays the program list used for the DVD player. Press and hold to the previous DVD menu. English 9 En B A-B Repeats a specified section within a chapter/track (see page 30). INTRODUCTION ■ DVD/CD mode 1 2 3 4 5 6 7 8 9 STANDBY/ON POWER TV 1 2 3 4 5... SHUFFLE 0 A B C D ON SCREEN INFO. H AUDIO Selects the audio language (see page 26). y Press DVD/CD to set the remote control to the DVD/CD mode before carrying out the following operations are available for the Program Play feature (see page 31). G Cursor keys...

Owners Manual
Page 14
... the Radio Data System display between FM, AM and the preset mode. 10 En PTY SEEK START Starts searching for the receiver. PTY SEEK MODE Sets the receiver to 8) (see page 40). Controls and Functions ■ TUNER mode STANDBY/ON POWER TV 1 2 3 4 5 ...6 7 8 SCAN DIMMER 9 0 TV CH TV INPUT REPEAT A-B FREQ/TEXT PROG MODE PTY SEEK START SHUFFLE 1 2 ON SCREEN INFO. A-E SET UP PRESET ENTER MENU A-E TOP MENU /RETURN TV VOL DISPLAY VOLUME SLEEP DVD...
... the Radio Data System display between FM, AM and the preset mode. 10 En PTY SEEK START Starts searching for the receiver. PTY SEEK MODE Sets the receiver to 8) (see page 40). Controls and Functions ■ TUNER mode STANDBY/ON POWER TV 1 2 3 4 5 ...6 7 8 SCAN DIMMER 9 0 TV CH TV INPUT REPEAT A-B FREQ/TEXT PROG MODE PTY SEEK START SHUFFLE 1 2 ON SCREEN INFO. A-E SET UP PRESET ENTER MENU A-E TOP MENU /RETURN TV VOL DISPLAY VOLUME SLEEP DVD...
Owners Manual
Page 15
... and Functions ■ Using the remote control Use the remote control within two minutes to preserve the memory in the remote control. NATURAL SOUND STEREO RECEIVER RX-E810 PURE DIRECT Within 6 m (20 feet) TIMER STANDBY/ON PHONES DISPLAY MEMORY AUTO/MAN'L PRESET/BAND PRESET/TUNING BASS TIME ADJ TIMER TREBLE HOUR...
... and Functions ■ Using the remote control Use the remote control within two minutes to preserve the memory in the remote control. NATURAL SOUND STEREO RECEIVER RX-E810 PURE DIRECT Within 6 m (20 feet) TIMER STANDBY/ON PHONES DISPLAY MEMORY AUTO/MAN'L PRESET/BAND PRESET/TUNING BASS TIME ADJ TIMER TREBLE HOUR...
Owners Manual
Page 16
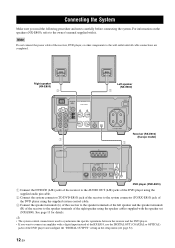
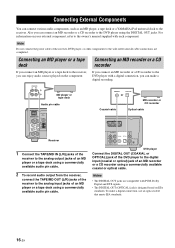
... OPTICAL TO RX-E810 S VIDEO VIDEO PB R DVD player (DVD-E810) 1 Connect the DVD/CD (L/R) jacks of the receiver to the AUDIO OUT (L/R) jacks of the DVD player using the supplied audio pin cable. 2 Connect the system connector (TO DVD-E810) jack of the receiver to the system connector (TO RX-E810) jack ...GND IN TAPE/MD OUT AM SPEAKERS 6 MIN / SPEAKER R L SUBWOOFER OUT TO DVD-E810 AUX R L 1 MAINS AV MAINS AC OUTLETS SWITCHED 100W MAX. Note Do not connect the power cable of the receiver to connect an amplifier with the speaker set (NX-E800). For information on the speakers...
... OPTICAL TO RX-E810 S VIDEO VIDEO PB R DVD player (DVD-E810) 1 Connect the DVD/CD (L/R) jacks of the receiver to the AUDIO OUT (L/R) jacks of the DVD player using the supplied audio pin cable. 2 Connect the system connector (TO DVD-E810) jack of the receiver to the system connector (TO RX-E810) jack ...GND IN TAPE/MD OUT AM SPEAKERS 6 MIN / SPEAKER R L SUBWOOFER OUT TO DVD-E810 AUX R L 1 MAINS AV MAINS AC OUTLETS SWITCHED 100W MAX. Note Do not connect the power cable of the receiver to connect an amplifier with the speaker set (NX-E800). For information on the speakers...
Owners Manual
Page 17
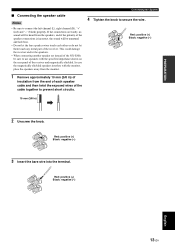
In case the magnetically shielded speakers interfere with the specified impedance shown on the rear panel of the receiver and magnetically shielded. Connecting the System 4 Tighten the knob to use speakers with the monitor, place the speakers away from the monitor. Red: positive (+) Black: ... the speakers, and if the polarity of the speaker connections is incorrect, the sound will be sure to secure the wire. This could damage the receiver and/or the speakers. • When connecting another speaker set instead of the NX-E800, be unnatural and lack bass. • Do not let the...
In case the magnetically shielded speakers interfere with the specified impedance shown on the rear panel of the receiver and magnetically shielded. Connecting the System 4 Tighten the knob to use speakers with the monitor, place the speakers away from the monitor. Red: positive (+) Black: ... the speakers, and if the polarity of the speaker connections is incorrect, the sound will be sure to secure the wire. This could damage the receiver and/or the speakers. • When connecting another speaker set instead of the NX-E800, be unnatural and lack bass. • Do not let the...

Owners Manual
Page 18
...video cable. Note (U.K. and Europe models only) Connect the AV terminal of the DVD player to "RGB" in the setup menu of the DVD player (see page 54). y To enjoy TV sounds with the receiver, connect AUX (L/R) jacks of the receiver to the audio output jacks of your TV using a commercially...with a S-video connection, a component video connection or a scart connection (U.K. Note Do not connect the power cable of the receiver, DVD player, or other components to the wall outlet until all cable connections are completed. ■ S-video connection Connect the S VIDEO jack of the...
...video cable. Note (U.K. and Europe models only) Connect the AV terminal of the DVD player to "RGB" in the setup menu of the DVD player (see page 54). y To enjoy TV sounds with the receiver, connect AUX (L/R) jacks of the receiver to the audio output jacks of your TV using a commercially...with a S-video connection, a component video connection or a scart connection (U.K. Note Do not connect the power cable of the receiver, DVD player, or other components to the wall outlet until all cable connections are completed. ■ S-video connection Connect the S VIDEO jack of the...

Owners Manual
Page 19
... loop antenna lead wires into moist earth. AM loop antenna (supplied) Indoor FM antenna (supplied) DOCK DVD/CD ANTENNA 75 UNBAL. AUX R L Ground (GND terminal) ■ About grounding For maximum safety ...Connecting Antennas To enjoy radio on the product, the shape of the receiver. 2 Place the antenna away from the receiver and speaker cables. 15 En Connecting the FM antenna 1 Connect the ...tab is a metal stake driven into the AM terminal. For details, consult the nearest authorized YAMAHA dealer or service center. Connecting the AM loop antenna 4 Replace the tab back to secure ...
... loop antenna lead wires into moist earth. AM loop antenna (supplied) Indoor FM antenna (supplied) DOCK DVD/CD ANTENNA 75 UNBAL. AUX R L Ground (GND terminal) ■ About grounding For maximum safety ...Connecting Antennas To enjoy radio on the product, the shape of the receiver. 2 Place the antenna away from the receiver and speaker cables. 15 En Connecting the FM antenna 1 Connect the ...tab is a metal stake driven into the AM terminal. For details, consult the nearest authorized YAMAHA dealer or service center. Connecting the AM loop antenna 4 Replace the tab back to secure ...
Owners Manual
Page 20
...or CD recorder Coaxial cable Optical cable AV VIDEO OUT COMPONENT PR Y DIGITAL OUT AUDIO OUT L COAXIAL OPTICAL TO RX-E810 VIDEO PB R DVD player Connect the DIGITAL OUT (COAXIAL or OPTICAL) jack of the DVD player to the analog input jacks of the receiver, DVD player, or other components to the owner...Components You can connect various audio components, such as an MD player, a tape deck or a YAMAHA iPod universal dock to the DVD player using the DIGITAL OUT jacks. If you connect an MD recorder or a CD recorder to the receiver, you can connect an MD recorder or a CD recorder ...
...or CD recorder Coaxial cable Optical cable AV VIDEO OUT COMPONENT PR Y DIGITAL OUT AUDIO OUT L COAXIAL OPTICAL TO RX-E810 VIDEO PB R DVD player Connect the DIGITAL OUT (COAXIAL or OPTICAL) jack of the DVD player to the analog input jacks of the receiver, DVD player, or other components to the owner...Components You can connect various audio components, such as an MD player, a tape deck or a YAMAHA iPod universal dock to the DVD player using the DIGITAL OUT jacks. If you connect an MD recorder or a CD recorder to the receiver, you can connect an MD recorder or a CD recorder ...

Owners Manual
Page 21
...receiver, DVD player, or other components to the wall outlet until all cable connections are completed. • Only iPod (Click and Wheel), iPod nano, and iPod mini are supported. • You need to insert one of the iPod adapters supplied with the DOCK terminal on the rear panel that allows you to connect a YAMAHA...connected to the DOCK terminal of the receiver, audio signals may need a YAMAHA iPod universal dock (such as YDS-10 sold separately) and its dedicated cables. FM GND IN TAPE/MD OUT AM SPEAKERS 6 MIN / SPEAKER R L SUBWOOFER OUT TO DVD-E810 AUX R L MAINS AC ...
...receiver, DVD player, or other components to the wall outlet until all cable connections are completed. • Only iPod (Click and Wheel), iPod nano, and iPod mini are supported. • You need to insert one of the iPod adapters supplied with the DOCK terminal on the rear panel that allows you to connect a YAMAHA...connected to the DOCK terminal of the receiver, audio signals may need a YAMAHA iPod universal dock (such as YDS-10 sold separately) and its dedicated cables. FM GND IN TAPE/MD OUT AM SPEAKERS 6 MIN / SPEAKER R L SUBWOOFER OUT TO DVD-E810 AUX R L MAINS AC ...
Owners Manual
Page 22
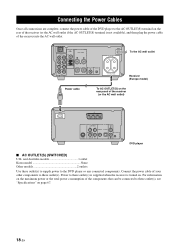
... other components to these outlet(s) is supplied when the receiver is not available), and then plug the power cable of the receiver (or the AC wall outlet) MAINS AV VIDEO OUT COMPONENT PR Y DIGITAL OUT AUDIO OUT L COAXIAL OPTICAL TO RX-E810 S VIDEO VIDEO PB R DVD player ■ AC OUTLET(S) (SWITCHED) U.K. and Australia models 1 outlet...
... other components to these outlet(s) is supplied when the receiver is not available), and then plug the power cable of the receiver (or the AC wall outlet) MAINS AV VIDEO OUT COMPONENT PR Y DIGITAL OUT AUDIO OUT L COAXIAL OPTICAL TO RX-E810 S VIDEO VIDEO PB R DVD player ■ AC OUTLET(S) (SWITCHED) U.K. and Australia models 1 outlet...
Owners Manual
Page 23
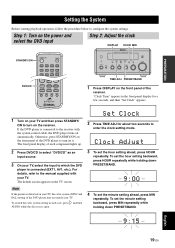
... component lights up. 2 Press TIME ADJ for a few seconds, and then "Set Clock" appears. 1 Turn on your TV and then press STANDBY/ ON to the receiver with your TV, the color system (NTSC and PAL) setting of the DVD player to turn on the receiver. To set the hour setting ahead, press HOUR repeatedly.
... component lights up. 2 Press TIME ADJ for a few seconds, and then "Set Clock" appears. 1 Turn on your TV and then press STANDBY/ ON to the receiver with your TV, the color system (NTSC and PAL) setting of the DVD player to turn on the receiver. To set the hour setting ahead, press HOUR repeatedly.