
Owner's Manual
Page 3
NO USER-SERVICEABLE PARTS INSIDE. FCC INFORMATION (for Class "B" digital devices. Cable/s supplied with one of the polarized or grounding-type plug. This equipment generates/uses radio frequencies and, if not installed and used according to the operation of other apparatus (including amplifiers) that produce heat. 9 Do not defeat the safety purpose of the following measures: Relocate either this product or the device that...
NO USER-SERVICEABLE PARTS INSIDE. FCC INFORMATION (for Class "B" digital devices. Cable/s supplied with one of the polarized or grounding-type plug. This equipment generates/uses radio frequencies and, if not installed and used according to the operation of other apparatus (including amplifiers) that produce heat. 9 Do not defeat the safety purpose of the following measures: Relocate either this product or the device that...
Owner's Manual
Page 5
... Front panel 4 Rear panel 5 Front panel display 6 Remote control 7 Quick start guide 8 L PREPARATION Preparing remote control 9 Installing batteries in the remote control 9 Using the remote control 9 Connections 10 Placing speakers 10 Connecting speakers 11 Information on jacks and cable plugs 13 Connecting a TV monitor or projector 14 Connecting other components 15 Connecting a Yamaha iPod universal dock or Bluetooth™ wireless audio receiver 16 Using the VIDEO AUX jacks on the front panel .... 16 Connecting the FM and AM antennas 17 Connecting the power cable 17 Turning...
... Front panel 4 Rear panel 5 Front panel display 6 Remote control 7 Quick start guide 8 L PREPARATION Preparing remote control 9 Installing batteries in the remote control 9 Using the remote control 9 Connections 10 Placing speakers 10 Connecting speakers 11 Information on jacks and cable plugs 13 Connecting a TV monitor or projector 14 Connecting other components 15 Connecting a Yamaha iPod universal dock or Bluetooth™ wireless audio receiver 16 Using the VIDEO AUX jacks on the front panel .... 16 Connecting the FM and AM antennas 17 Connecting the power cable 17 Turning...

Owner's Manual
Page 11
...En Presets radio stations. DECODE MUSIC STEREO STRAIGHT DIRECT BD DVD SETUP SCENE TV CD RADIO OPTION ENTER VOLUME RETURN DISPLAY TOP MENU REC MENU MUTE b c f e m o p q s t 1 2 3 4 5 6 7 8 9 INPUT MUTE 0 10 TV TV VOL TV CH ENT POWER a Remote control signal transmitter Transmits infrared signals. Selects AUDIO inputs 1 and 2. Selects a Yamaha iPod universal dock/ Bluetooth wireless audio receiver connected to the previous screen or ends the menu screen. h Tuner keys FM AM MEMORY PRESET k / n TUNING k / n Switches a band between linked sets of...
...En Presets radio stations. DECODE MUSIC STEREO STRAIGHT DIRECT BD DVD SETUP SCENE TV CD RADIO OPTION ENTER VOLUME RETURN DISPLAY TOP MENU REC MENU MUTE b c f e m o p q s t 1 2 3 4 5 6 7 8 9 INPUT MUTE 0 10 TV TV VOL TV CH ENT POWER a Remote control signal transmitter Transmits infrared signals. Selects AUDIO inputs 1 and 2. Selects a Yamaha iPod universal dock/ Bluetooth wireless audio receiver connected to the previous screen or ends the menu screen. h Tuner keys FM AM MEMORY PRESET k / n TUNING k / n Switches a band between linked sets of...
Owner's Manual
Page 12
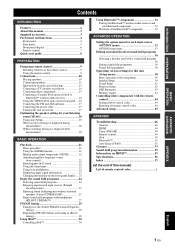
... supports the SCENE function that changes the input source and sound field program at one time. Quick start guide When you use magnetically shielded speakers. • Connecting a TV monitor or projector ☞P. 14 • Connecting other components ☞P. 15 • Connecting a Yamaha iPod universal dock or Bluetooth wireless audio receiver ☞P. 16 • Connecting the FM and AM antennas ☞P. 17 Step 4: Turn on the power Connect the power cable and turn on this unit. • Connecting the power cable • Turning...
... supports the SCENE function that changes the input source and sound field program at one time. Quick start guide When you use magnetically shielded speakers. • Connecting a TV monitor or projector ☞P. 14 • Connecting other components ☞P. 15 • Connecting a Yamaha iPod universal dock or Bluetooth wireless audio receiver ☞P. 16 • Connecting the FM and AM antennas ☞P. 17 Step 4: Turn on the power Connect the power cable and turn on this unit. • Connecting the power cable • Turning...

Owner's Manual
Page 15
... (R) SUB WOOFER External Amplifier SURROUND BACK L (white) SURRUND BACK R (red) SURROUND BACK SUBWOOFER PRE OUT You can adjust the surround back speaker volume with a surround back channel. ADVANCED OPERATION ADDITIONAL INFORMATION APPENDIX English 11 En For a 7.1-channel system, connect it to the SURROUND BACK L jack of the setup menu (see page 39). INTRODUCTION PREPARATION BASIC OPERATION Connections Connecting speakers When you to create the maximum of 7.1-channel surround system with a volume control of the external amplifier. To obtain the balanced sound...
... (R) SUB WOOFER External Amplifier SURROUND BACK L (white) SURRUND BACK R (red) SURROUND BACK SUBWOOFER PRE OUT You can adjust the surround back speaker volume with a surround back channel. ADVANCED OPERATION ADDITIONAL INFORMATION APPENDIX English 11 En For a 7.1-channel system, connect it to the SURROUND BACK L jack of the setup menu (see page 39). INTRODUCTION PREPARATION BASIC OPERATION Connections Connecting speakers When you to create the maximum of 7.1-channel surround system with a volume control of the external amplifier. To obtain the balanced sound...
Owner's Manual
Page 19
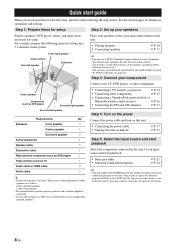
... 3 OPTICAL AV 4 AV 5 AV 6 AV OUT AUDIO1 AUDIO2 AUDIO OUT HDMI input (HDMI 1-4) CE Audio output (AUDIO OUT) Audio input (AUDIO 1-2) ■ Audio and video player / Set-top box Output jacks on standby. If your Yamaha component has the Remote in parentheses are recommended to connect to that this unit is on the connected external component External components Signals Output jacks Input sources/jacks of the input source displayed on the front panel display as necessary (see page 21). • You can reproduce sound and movies from input sources selected...
... 3 OPTICAL AV 4 AV 5 AV 6 AV OUT AUDIO1 AUDIO2 AUDIO OUT HDMI input (HDMI 1-4) CE Audio output (AUDIO OUT) Audio input (AUDIO 1-2) ■ Audio and video player / Set-top box Output jacks on standby. If your Yamaha component has the Remote in parentheses are recommended to connect to that this unit is on the connected external component External components Signals Output jacks Input sources/jacks of the input source displayed on the front panel display as necessary (see page 21). • You can reproduce sound and movies from input sources selected...
Owner's Manual
Page 20
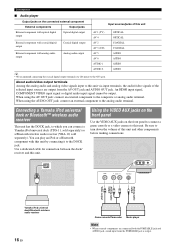
... unit. When using the AUDIO OUT jack: connect an external component to the analog audio terminal. VOLUME l PRESET h FM BD/DVD SCENE TV CD AM RADIO l TUNING h OGRAM h STRAIGHT EFFECT DIRECT INPUT OPTIMIZER MIC l h VIDEO AUX VIDEO AUDIO PORTABLE VIDEO L AUDIO R PORTABLE V L R Analog audio output Analog audio output Video output Yamaha iPod universal dock/Bluetooth wireless audio receiver 16 En Game console/Camcorder Music player Note • When external components are output from the PORTABLE jack is output. Use a dedicated cable for connection between the...
... unit. When using the AUDIO OUT jack: connect an external component to the analog audio terminal. VOLUME l PRESET h FM BD/DVD SCENE TV CD AM RADIO l TUNING h OGRAM h STRAIGHT EFFECT DIRECT INPUT OPTIMIZER MIC l h VIDEO AUX VIDEO AUDIO PORTABLE VIDEO L AUDIO R PORTABLE V L R Analog audio output Analog audio output Video output Yamaha iPod universal dock/Bluetooth wireless audio receiver 16 En Game console/Camcorder Music player Note • When external components are output from the PORTABLE jack is output. Use a dedicated cable for connection between the...

Owner's Manual
Page 28
... equipped with CINEMA DSP. The reproduced depth is ideal for music Press jMUSIC repeatedly. Enjoy the sound field programs This unit is surrounded by beautiful reverberations from very small to extremely large sound. Stereo reproduction Press jSTEREO repeatedly. Multi-channel stereo reproduction Press jSTEREO repeatedly. For example, if you play back the Dolby Digital Plus, Dolby TrueHD, DTS Express, DTS-HD Master Audio, or DTS-HD High Resolution Audio sources, this unit...
... equipped with CINEMA DSP. The reproduced depth is ideal for music Press jMUSIC repeatedly. Enjoy the sound field programs This unit is surrounded by beautiful reverberations from very small to extremely large sound. Stereo reproduction Press jSTEREO repeatedly. Multi-channel stereo reproduction Press jSTEREO repeatedly. For example, if you play back the Dolby Digital Plus, Dolby TrueHD, DTS Express, DTS-HD Master Audio, or DTS-HD High Resolution Audio sources, this unit...

Owner's Manual
Page 37
... TUNER Volume Trim iPod (DOCK) Volume Trim Bluetooth Volume (DOCK) Trim FM Mode Shuffle Auto Preset Repeat Connect/ Pairing Disconnect Clear Preset Details of the menu items are as follows: y • The default settings are displayed. 4 Change the setting of the selected menu item (or enable a function) using gInput selection keys. The procedure for setting the OPTION menu items is described below. 1 Select an input source using nCursor k / n, and press nENTER. Input Source Menu item HDMI1-4 Volume Trim Decoder Mode EXTD Signal Info Surround Volume...
... TUNER Volume Trim iPod (DOCK) Volume Trim Bluetooth Volume (DOCK) Trim FM Mode Shuffle Auto Preset Repeat Connect/ Pairing Disconnect Clear Preset Details of the menu items are as follows: y • The default settings are displayed. 4 Change the setting of the selected menu item (or enable a function) using gInput selection keys. The procedure for setting the OPTION menu items is described below. 1 Select an input source using nCursor k / n, and press nENTER. Input Source Menu item HDMI1-4 Volume Trim Decoder Mode EXTD Signal Info Surround Volume...

Owner's Manual
Page 44
... back speaker is connected. When using the surround back speakers, connect an external amplifier to change the phase of surround channels are output from the surround L/R speakers and subwoofer. Surround back channel signals are output from a subwoofer. Select this is connected. REV Select this not to the SURROUND BACK jacks of center speaker. Center Choices: None/Small*/Large Sets the size of the PRE OUT terminals. Select this when one large surround back speaker is selected, the sound field programs automatically enter the Virtual CINEMA DSP mode. NRM Select...
... back speaker is connected. When using the surround back speakers, connect an external amplifier to change the phase of surround channels are output from the surround L/R speakers and subwoofer. Surround back channel signals are output from a subwoofer. Select this is connected. REV Select this not to the SURROUND BACK jacks of center speaker. Center Choices: None/Small*/Large Sets the size of the PRE OUT terminals. Select this when one large surround back speaker is selected, the sound field programs automatically enter the Virtual CINEMA DSP mode. NRM Select...

Owner's Manual
Page 45
....B R." Note • If Auto Setup is executed while an external amplifier for low volume or a quiet environment, such as at the listening position. Sets the standard dynamic range recommended for this unit. To turn on input signal information. When "On" is connected, "Sur. Set the correction time in feet. Operating various settings for regular home use a graphic equalizer. y • When only one surround back speaker is selected, you set "Test Tone" to "On" (see...
....B R." Note • If Auto Setup is executed while an external amplifier for low volume or a quiet environment, such as at the listening position. Sets the standard dynamic range recommended for this unit. To turn on input signal information. When "On" is connected, "Sur. Set the correction time in feet. Operating various settings for regular home use a graphic equalizer. y • When only one surround back speaker is selected, you set "Test Tone" to "On" (see...

Owner's Manual
Page 46
... 14 characters. 3 Volume You can be selected before switching to standby. • When Standby Through turns on, the HDMI THROUGH indicator on the front panel display lights up to 3W of power even on standby. ■ Audio Choices: Amp*/TV/Amp+TV Selects this unit or a component connected to this unit via the HDMI OUT jack of this unit for volumes. ■ Adptv DRC Choices: Auto/Off* Adjust the dynamic range in direct mode even if...
... 14 characters. 3 Volume You can be selected before switching to standby. • When Standby Through turns on, the HDMI THROUGH indicator on the front panel display lights up to 3W of power even on standby. ■ Audio Choices: Amp*/TV/Amp+TV Selects this unit or a component connected to this unit via the HDMI OUT jack of this unit for volumes. ■ Adptv DRC Choices: Auto/Off* Adjust the dynamic range in direct mode even if...

Owner's Manual
Page 47
.... For example, when you set to "0.0dB," the volume is turned on . 4 Input Rename Changes input source names to be accidentally increased. DVD - On Protects the settings of setup menu against accidental alteration. INTRODUCTION PREPARATION BASIC OPERATION ■ MaxVol Adjustable range: -30.0dB to change the name, and select a name from templates Select an input source that you set parameters for the Memory Guard setting). CD - VCR - TV - iPod - Tape - Blu-ray - nCursor l / h nCursor...
.... For example, when you set to "0.0dB," the volume is turned on . 4 Input Rename Changes input source names to be accidentally increased. DVD - On Protects the settings of setup menu against accidental alteration. INTRODUCTION PREPARATION BASIC OPERATION ■ MaxVol Adjustable range: -30.0dB to change the name, and select a name from templates Select an input source that you set parameters for the Memory Guard setting). CD - VCR - TV - iPod - Tape - Blu-ray - nCursor l / h nCursor...

Owner's Manual
Page 48
... external component, or a menu display key. bTRANSMIT on and off TV y • You can clear all of them to "List of remote control codes" at the end of this manual. ■ Default remote control code settings Input source Category Manufacturer Default code [HDMI1] Blu-ray Disc Yamaha 2018 [HDMI2] - - - [HDMI3] - - - If it fails, bTRANSMIT blinks six times. rExternal component operation keys Function as follows: dSOURCE POWER Turns on the remote control blinks twice. 2 Press gInput selection keys. 3 Enter a remote control code using sNumeric...
... external component, or a menu display key. bTRANSMIT on and off TV y • You can clear all of them to "List of remote control codes" at the end of this manual. ■ Default remote control code settings Input source Category Manufacturer Default code [HDMI1] Blu-ray Disc Yamaha 2018 [HDMI2] - - - [HDMI3] - - - If it fails, bTRANSMIT blinks six times. rExternal component operation keys Function as follows: dSOURCE POWER Turns on the remote control blinks twice. 2 Press gInput selection keys. 3 Enter a remote control code using sNumeric...
Owner's Manual
Page 50
... the input signal format. "Audio" in again. Display the OPTION menu and set to "TV." Turn up the volume. Signals this unit, disconnect the power cable, and contact the nearest authorized Yamaha dealer or service center. The HDMI components connected to this unit does not function properly. is set "Decoder Mode" to "Auto." Incorrect input or output cable connections. Speaker connections are connected properly. This unit cannot be turned off this unit cannot reproduce are experiencing is selected). No sound. The speaker impedance setting...
... the input signal format. "Audio" in again. Display the OPTION menu and set to "TV." Turn up the volume. Signals this unit, disconnect the power cable, and contact the nearest authorized Yamaha dealer or service center. The HDMI components connected to this unit does not function properly. is set "Decoder Mode" to "Auto." Incorrect input or output cable connections. Speaker connections are connected properly. This unit cannot be turned off this unit cannot reproduce are experiencing is selected). No sound. The speaker impedance setting...
Owner's Manual
Page 52
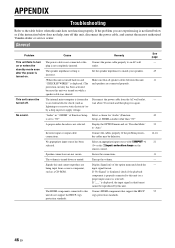
... SP WIRES!" Troubleshooting Problem Cause Remedy No sound is being played. Set "Bass Out" to its operating instructions. "Bass Out" of "A)Config" in the OPTION menu is not set to output the desired digital audio signals. Set "Bass Out" to other than "Off" or "Auto." "EXTD Surround" in "Speaker Setup" of the setup menu (Speaker Setup→Manual Setup→A)Config) is set to "Front" when a Dolby Digital, DTS or AAC signal is displayed and the setting cannot be defective. Set "EXTD Surround" other digital or radio frequency equipment. The connected component...
... SP WIRES!" Troubleshooting Problem Cause Remedy No sound is being played. Set "Bass Out" to its operating instructions. "Bass Out" of "A)Config" in the OPTION menu is not set to output the desired digital audio signals. Set "Bass Out" to other than "Off" or "Auto." "EXTD Surround" in "Speaker Setup" of the setup menu (Speaker Setup→Manual Setup→A)Config) is set to "Front" when a Dolby Digital, DTS or AAC signal is displayed and the setting cannot be defective. Set "EXTD Surround" other digital or radio frequency equipment. The connected component...

Owner's Manual
Page 54
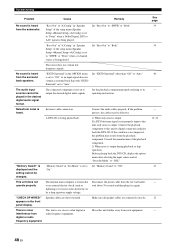
... the connection with the signal path Turn off this unit and reconnect the Yamaha iPod 16 from your iPod to the DOCK terminal of this unit. Direct sunlight or lighting (from the front panel. When the key does not work or function properly. this unit do the following. Troubleshooting Remote control Problem The remote control does not work during DVD disc menu operation: press the gInput selection keys on the front panel display, check the connection...
... the connection with the signal path Turn off this unit and reconnect the Yamaha iPod 16 from your iPod to the DOCK terminal of this unit. Direct sunlight or lighting (from the front panel. When the key does not work or function properly. this unit do the following. Troubleshooting Remote control Problem The remote control does not work during DVD disc menu operation: press the gInput selection keys on the front panel display, check the connection...
Owner's Manual
Page 58
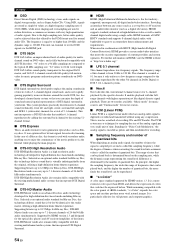
...-motion video for music programs and motion picture soundtracks on DVD video, and is fully backward-compatible with a 5.1-channel digital sound track, and is now rapidly gaining popularity in your home. There are two modes available: "Music mode" for music sources and "Cinema mode" for movie sources. ■ PCM (Linear PCM) Linear PCM is a signal format under which an analog audio signal is digitized, recorded and transmitted without using a single cable. This is used for normal audio CDs. The range...
...-motion video for music programs and motion picture soundtracks on DVD video, and is fully backward-compatible with a 5.1-channel digital sound track, and is now rapidly gaining popularity in your home. There are two modes available: "Music mode" for music sources and "Cinema mode" for movie sources. ■ PCM (Linear PCM) Linear PCM is a signal format under which an analog audio signal is digitized, recorded and transmitted without using a single cable. This is used for normal audio CDs. The range...
Owner's Manual
Page 61
... speaker setup 40 Center, C)Distance, speaker setup 41 Chamber, sound field program 25 CINEMA DSP indicator, front panel display 6 CINEMA DSP parameter 36 Clear Preset, OPTION menu 35 COAXIAL jack 13 CODE SET, remote control 7 COMPONENT VIDEO jack 13 Connect, OPTION menu 35 Connecting AM antenna 17 Connecting audio and video player 15 Connecting audio player 16 Connecting Bluetooth wireless audio receiver 16 Connecting FM antenna 17 Connecting iPod universal dock 16 Connecting power cable 17 Connecting projector 14 Connecting set-top box 15 Connecting speaker 11 Connecting...
... speaker setup 40 Center, C)Distance, speaker setup 41 Chamber, sound field program 25 CINEMA DSP indicator, front panel display 6 CINEMA DSP parameter 36 Clear Preset, OPTION menu 35 COAXIAL jack 13 CODE SET, remote control 7 COMPONENT VIDEO jack 13 Connect, OPTION menu 35 Connecting AM antenna 17 Connecting audio and video player 15 Connecting audio player 16 Connecting Bluetooth wireless audio receiver 16 Connecting FM antenna 17 Connecting iPod universal dock 16 Connecting power cable 17 Connecting projector 14 Connecting set-top box 15 Connecting speaker 11 Connecting...
Owner's Manual
Page 62
... VIDEO jack, front panel 4 Video/audio jack 13 Virtual CINEMA DSP 27 VOLUME +/-, remote control 7 VOLUME control, front panel 4 VOLUME indicator, front panel display .........6 Volume Trim, OPTION menu 33 ■Y YPAO 18 YPAO, troubleshooting 51 "ASTANDBY/ON" or "fPOWER" (example) indicates the name of the parts on page 4. 58 En Refer to "Part names and functions" on the front panel or the remote control. LR, A)Config, speaker setup 40 Sur. Index SCENE, remote control 7 Sci-Fi, sound field program 24 Selecting SCENE 21 Setting remote control code...
... VIDEO jack, front panel 4 Video/audio jack 13 Virtual CINEMA DSP 27 VOLUME +/-, remote control 7 VOLUME control, front panel 4 VOLUME indicator, front panel display .........6 Volume Trim, OPTION menu 33 ■Y YPAO 18 YPAO, troubleshooting 51 "ASTANDBY/ON" or "fPOWER" (example) indicates the name of the parts on page 4. 58 En Refer to "Part names and functions" on the front panel or the remote control. LR, A)Config, speaker setup 40 Sur. Index SCENE, remote control 7 Sci-Fi, sound field program 24 Selecting SCENE 21 Setting remote control code...


