

Owner's Manual
Page 1
U HTR-6050 AV Receiver OWNER'S MANUAL
U HTR-6050 AV Receiver OWNER'S MANUAL

Owner's Manual
Page 3
... digital devices. If the antenna lead-in is found to follow instructions could void your authority, granted by following measures: Relocate either this manual, meets FCC requirements. If this product is 300 ohm ribbon lead, change in FCC Regulations, Part 15 for US customers) 1 IMPORTANT ...NOTICE: DO NOT MODIFY THIS UNIT! Adjust only those products distributed by Yamaha Corporation of any way, and f) When the product exhibits a distinct change the lead-in fire, electric shock, or other electronic devices. ...
... digital devices. If the antenna lead-in is found to follow instructions could void your authority, granted by following measures: Relocate either this manual, meets FCC requirements. If this product is 300 ohm ribbon lead, change in FCC Regulations, Part 15 for US customers) 1 IMPORTANT ...NOTICE: DO NOT MODIFY THIS UNIT! Adjust only those products distributed by Yamaha Corporation of any way, and f) When the product exhibits a distinct change the lead-in fire, electric shock, or other electronic devices. ...
Owner's Manual
Page 4
..., dust, moisture, and/or cold. It may cause fire, damage to liquid dripping or splashing. Using this unit with a newspaper, tablecloth, curtain, etc. Yamaha will not be exposed to this unit itself is needed. vacation), disconnect the AC power plug from earphones and headphones can be opened for future...003. The cabinet should never be reached easily. 17 Be sure to a wall outlet until all connections are complete. 8 Do not operate this Owner's Manual in a well ventilated, cool, dry, clean place - WARNING TO REDUCE THE RISK OF FIRE OR ELECTRIC SHOCK, DO NOT EXPOSE THIS UNIT TO RAIN...
..., dust, moisture, and/or cold. It may cause fire, damage to liquid dripping or splashing. Using this unit with a newspaper, tablecloth, curtain, etc. Yamaha will not be exposed to this unit itself is needed. vacation), disconnect the AC power plug from earphones and headphones can be opened for future...003. The cabinet should never be reached easily. 17 Be sure to a wall outlet until all connections are complete. 8 Do not operate this Owner's Manual in a well ventilated, cool, dry, clean place - WARNING TO REDUCE THE RISK OF FIRE OR ELECTRIC SHOCK, DO NOT EXPOSE THIS UNIT TO RAIN...

Owner's Manual
Page 5
... listening room 24 Using AUTO SETUP 24 ADDITIONAL INFORMATION Troubleshooting 61 Glossary 68 Specifications 70 Index 71 APPENDIX (at the end of this manual) Front panel i Remote control ii List of remote control codes iii BASIC OPERATION Selecting the SCENE templates 28 Selecting the desired SCENE ...stations 42 Exchanging preset station 42 Using a USB memory device or a USB portable audio player 43 Playback operation 43 Recording 45 About this manual for your operation. • Some operations can be performed by using either the buttons on the front panel or the ones on the...
... listening room 24 Using AUTO SETUP 24 ADDITIONAL INFORMATION Troubleshooting 61 Glossary 68 Specifications 70 Index 71 APPENDIX (at the end of this manual) Front panel i Remote control ii List of remote control codes iii BASIC OPERATION Selecting the SCENE templates 28 Selecting the desired SCENE ...stations 42 Exchanging preset station 42 Using a USB memory device or a USB portable audio player 43 Playback operation 43 Recording 45 About this manual for your operation. • Some operations can be performed by using either the buttons on the front panel or the ones on the...
Owner's Manual
Page 13
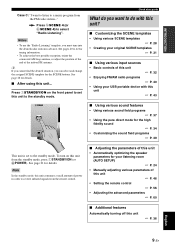
...; Basic controls of this unit ☞ P. 32 • Enjoying FM/AM radio programs ☞ P. 40 • Using your listening room (AUTO SETUP) ☞ P. 24 • Manually adjusting various parameters of this unit ☞ P. 46 • Setting the remote control ☞ P. 56 • Adjusting the advanced parameters ☞ P. 60 ■ Additional features...
...; Basic controls of this unit ☞ P. 32 • Enjoying FM/AM radio programs ☞ P. 40 • Using your listening room (AUTO SETUP) ☞ P. 24 • Manually adjusting various parameters of this unit ☞ P. 46 • Setting the remote control ☞ P. 56 • Adjusting the advanced parameters ☞ P. 60 ■ Additional features...

Owner's Manual
Page 19
... connected video monitor. You can play back pictures by connecting your video monitor and video source component to other DVI components. Refer to the instruction manual of each connected component. ■ HDMI jack and cable plug HDMI HDMI cable plug y • We recommend using an HDMI cable shorter than 5 meters (16...
... connected video monitor. You can play back pictures by connecting your video monitor and video source component to other DVI components. Refer to the instruction manual of each connected component. ■ HDMI jack and cable plug HDMI HDMI cable plug y • We recommend using an HDMI cable shorter than 5 meters (16...

Owner's Manual
Page 21
... the HDMI connection. Refer to this unit using HDMI, COMPONENT VIDEO or S VIDEO connections. For example, if you connect your video components to the instruction manual of the connected video monitor.
... the HDMI connection. Refer to this unit using HDMI, COMPONENT VIDEO or S VIDEO connections. For example, if you connect your video components to the instruction manual of the connected video monitor.

Owner's Manual
Page 28
... ❏ Headphones are disconnected from this unit analyzes the sound your speakers produce in your listening room This unit employs the YPAO (Yamaha Parametric Room Acoustic Optimizer) technology which lets you are selected as possible while the "AUTO SETUP" procedure is in your ears would be...attached screw of all item [ ]/[ ]:Up/Down [ENTER]:Start 3 Place the optimizer microphone at the same height as your listening position. This manual uses the OSD illustrations to the tripod (etc.). Optimizer microphone p p 24 En y It is recommended that it is normal for your actual ...
... ❏ Headphones are disconnected from this unit analyzes the sound your speakers produce in your listening room This unit employs the YPAO (Yamaha Parametric Room Acoustic Optimizer) technology which lets you are selected as possible while the "AUTO SETUP" procedure is in your ears would be...attached screw of all item [ ]/[ ]:Up/Down [ENTER]:Start 3 Place the optimizer microphone at the same height as your listening position. This manual uses the OSD illustrations to the tripod (etc.). Optimizer microphone p p 24 En y It is recommended that it is normal for your actual ...

Owner's Manual
Page 30
... .A;SIGNAL INFO [ ]/[ ]:Up/Down [ENTER]:Enter 11 Press QMENU to manually adjust each parameter, run "AUTO SETUP" again to recalibrate your system. 8 Press GENTER to return to toggle between the setup result displays. Keep it away ... from "SET MENU". y If you are not satisfied with the results or want to exit from the listening position Results of your listening environment, run "MANUAL SETUP" (see page 46). Optimizing the speaker setting for your listening room 6 Press GENTER to display the setup results in detail. 7 Press Gl / h repeatedly to...
... .A;SIGNAL INFO [ ]/[ ]:Up/Down [ENTER]:Enter 11 Press QMENU to manually adjust each parameter, run "AUTO SETUP" again to recalibrate your system. 8 Press GENTER to return to toggle between the setup result displays. Keep it away ... from "SET MENU". y If you are not satisfied with the results or want to exit from the listening position Results of your listening environment, run "MANUAL SETUP" (see page 46). Optimizing the speaker setting for your listening room 6 Press GENTER to display the setup results in detail. 7 Press Gl / h repeatedly to...

Owner's Manual
Page 39
... top "SET MENU" display appears in the following information about the input source appears in the front panel display. SET MENU TOP MENU . ;AUTO SETUP ;MANUAL SETUP .A;SIGNAL INFO [ ]/[ ]:Up/Down [ENTER]:Enter p 2 Press Gn repeatedly to improve listenability at lower volumes or at lower volumes. • Select "NIGHT:MUSIC" to...
... top "SET MENU" display appears in the following information about the input source appears in the front panel display. SET MENU TOP MENU . ;AUTO SETUP ;MANUAL SETUP .A;SIGNAL INFO [ ]/[ ]:Up/Down [ENTER]:Enter p 2 Press Gn repeatedly to improve listenability at lower volumes or at lower volumes. • Select "NIGHT:MUSIC" to...

Owner's Manual
Page 44
... an FM station automatically switches the tuner to monaural reception to increase the signal quality. 2 Press 3FM/AM to select is weak, tune into it manually. 1 Press DINPUT l / h repeatedly so that the AUTO indicator lights up and the frequency of the received station is no interference. Lights up.../ TUNING to turn the colon (:) off . 4 Press 5PRESET/TUNING l / h once to continue searching. 40 En You can also use the automatic and manual preset tuning features to select is not possible. If the signal received from the station you want to store up AUTO A AM 1440 kHz No...
... an FM station automatically switches the tuner to monaural reception to increase the signal quality. 2 Press 3FM/AM to select is weak, tune into it manually. 1 Press DINPUT l / h repeatedly so that the AUTO indicator lights up and the frequency of the received station is no interference. Lights up.../ TUNING to turn the colon (:) off . 4 Press 5PRESET/TUNING l / h once to continue searching. 40 En You can also use the automatic and manual preset tuning features to select is not possible. If the signal received from the station you want to store up AUTO A AM 1440 kHz No...
Owner's Manual
Page 45
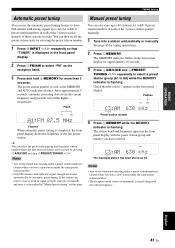
... number. • The reception mode (stereo or monaural) is completed, the front panel display shows the frequency of those stations in "Manual preset tuning" on this page. The MEMORY indicator flashes in the front panel display. 2 Press 3FM/AM to select "FM" as described... MEMORY kHz Preset station number 4 Press 6MEMORY while the MEMORY indicator is weak in signal strength, tune into a station automatically or manually. After approximately 5 seconds, automatic presetting starts from the current frequency and proceeds toward the higher frequencies. The station band and frequency ...
... number. • The reception mode (stereo or monaural) is completed, the front panel display shows the frequency of those stations in "Manual preset tuning" on this page. The MEMORY indicator flashes in the front panel display. 2 Press 3FM/AM to select "FM" as described... MEMORY kHz Preset station number 4 Press 6MEMORY while the MEMORY indicator is weak in signal strength, tune into a station automatically or manually. After approximately 5 seconds, automatic presetting starts from the current frequency and proceeds toward the higher frequencies. The station band and frequency ...

Owner's Manual
Page 50
...the LFE channel for Dolby Digital or DTS signals. Adjusts the output level of system settings and customize the way this menu to manually adjust speaker and system parameters. Selects the video source played in bold under each parameter) to reflect the needs of this feature to...; Auto setup AUTO SETUP Use this feature to automatically adjust speaker and system parameters (see page 24). ■ Manual setup MANUAL SETUP Use this unit according to the component to manually reassign the input jacks, select the input mode or rename the input source. Changes the name of this menu to...
...the LFE channel for Dolby Digital or DTS signals. Adjusts the output level of system settings and customize the way this menu to manually adjust speaker and system parameters. Selects the video source played in bold under each parameter) to reflect the needs of this feature to...; Auto setup AUTO SETUP Use this feature to automatically adjust speaker and system parameters (see page 24). ■ Manual setup MANUAL SETUP Use this unit according to the component to manually reassign the input jacks, select the input mode or rename the input source. Changes the name of this menu to...

Owner's Manual
Page 51
...; Press Gl / h to change the "SET MENU" parameters while this unit is reproducing sound. 1 Press DAMP and then press QMENU to select "MANUAL SETUP". Locks sound field program parameters and other "SET MENU" settings. p 3 Press GENTER to the DIGITAL INPUT jacks when you turn on the power... to enter the selected menu or to confirm the parameter. • Press HRETURN to return to exit from "SET MENU". SET MENU TOPAMENU . ;AUTO SETUP .A;MANUAL SETUP ;SIGNAL INFO [ ]/[ ]:Up/Down [ENTER]:Enter 2 Press Gk / n to enter "SET MENU". SET MENU Parameter A)DISPLAY SET B)MEMORY GUARD C)AUDIO ...
...; Press Gl / h to change the "SET MENU" parameters while this unit is reproducing sound. 1 Press DAMP and then press QMENU to select "MANUAL SETUP". Locks sound field program parameters and other "SET MENU" settings. p 3 Press GENTER to the DIGITAL INPUT jacks when you turn on the power... to enter the selected menu or to confirm the parameter. • Press HRETURN to return to exit from "SET MENU". SET MENU TOPAMENU . ;AUTO SETUP .A;MANUAL SETUP ;SIGNAL INFO [ ]/[ ]:Up/Down [ENTER]:Enter 2 Press Gk / n to enter "SET MENU". SET MENU Parameter A)DISPLAY SET B)MEMORY GUARD C)AUDIO ...
Owner's Manual
Page 52
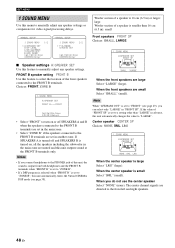
... FRONT SP Choices: SMALL, LARGE 1 SOUND MENU A)SPEAKER SET FRONT SP p p p p p p ■ Speaker settings A)SPEAKER SET Use this feature to manually adjust any speaker settings or compensate for video signal processing delays. Notes • If you connect headphones to the PHONES jack of the front speakers...to the FRONT B terminals. Note When "LFE/BASS OUT" is set in another zone. SET MENU 1 SOUND MENU Use this menu to manually adjust any speaker settings. FRONT B speaker setting FRONT B Use this feature to select the location of this unit automatically changes the value to "...
... FRONT SP Choices: SMALL, LARGE 1 SOUND MENU A)SPEAKER SET FRONT SP p p p p p p ■ Speaker settings A)SPEAKER SET Use this feature to manually adjust any speaker settings or compensate for video signal processing delays. Notes • If you connect headphones to the PHONES jack of the front speakers...to the FRONT B terminals. Note When "LFE/BASS OUT" is set in another zone. SET MENU 1 SOUND MENU Use this menu to manually adjust any speaker settings. FRONT B speaker setting FRONT B Use this feature to select the location of this unit automatically changes the value to "...

Owner's Manual
Page 54
... speaker Subwoofer Note The available speaker channels differ depending on the setting of the speakers. ■ Speaker distance C)SP DISTANCE Use this feature to manually adjust the distance of each speaker so that all sounds will arrive at the listening position at the same time. 1 SOUND MENU C)SP DISTANCE ... "meters" to adjust speaker distances in most home situations. Ideally, each speaker. p p p p SET MENU ■ Speaker level B)SP LEVEL Use this feature to manually adjust the output level of each speaker should be applied to the sound from the main listening position.
... speaker Subwoofer Note The available speaker channels differ depending on the setting of the speakers. ■ Speaker distance C)SP DISTANCE Use this feature to manually adjust the distance of each speaker so that all sounds will arrive at the listening position at the same time. 1 SOUND MENU C)SP DISTANCE ... "meters" to adjust speaker distances in most home situations. Ideally, each speaker. p p p p SET MENU ■ Speaker level B)SP LEVEL Use this feature to manually adjust the output level of each speaker should be applied to the sound from the main listening position.

Owner's Manual
Page 56
... step: 1 dB Note The "MAX VOL." Use this feature to set to reassign the input jacks, select the decoder mode or rename the input source. ;MANUAL SETUP 2 INPUT MENU . Initial volume INI.VOL. SET MENU Maximum volume MAX VOL. Use this menu to -30 dB when you can select the corresponding...
... step: 1 dB Note The "MAX VOL." Use this feature to set to reassign the input jacks, select the decoder mode or rename the input source. ;MANUAL SETUP 2 INPUT MENU . Initial volume INI.VOL. SET MENU Maximum volume MAX VOL. Use this menu to -30 dB when you can select the corresponding...

Owner's Manual
Page 58
... after scrolling all characters once when "USB" is selected as the background video source. 3 OPTION MENU Use this menu to adjust the optional system parameters. ;MANUAL SETUP 3 OPTION MENU . Choices: ON, 10s, 30s • Select "ON" to display the OSD constantly during an operation. • Select "10s" to turn off the...
... after scrolling all characters once when "USB" is selected as the background video source. 3 OPTION MENU Use this menu to adjust the optional system parameters. ;MANUAL SETUP 3 OPTION MENU . Choices: ON, 10s, 30s • Select "ON" to display the OSD constantly during an operation. • Select "10s" to turn off the...
Owner's Manual
Page 63
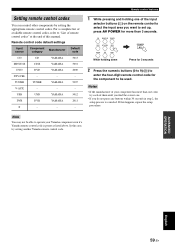
.../CD-R TUNER DVD DTV/CBL DVR V-AUX USB POWER AV While holding one of them until you find the correct one code, try setting another Yamaha remote control code. Remote control features 1 While pressing and holding down Press for 3 seconds 2 Press the numeric buttons (0 to 9) (W) to ...enter the four-digit remote control code for more than 3 seconds. If this manual. Note You may not be used. For a complete list of available remote control codes, refer to operate your component has more than one . •...
.../CD-R TUNER DVD DTV/CBL DVR V-AUX USB POWER AV While holding one of them until you find the correct one code, try setting another Yamaha remote control code. Remote control features 1 While pressing and holding down Press for 3 seconds 2 Press the numeric buttons (0 to 9) (W) to ...enter the four-digit remote control code for more than 3 seconds. If this manual. Note You may not be used. For a complete list of available remote control codes, refer to operate your component has more than one . •...
Owner's Manual
Page 65
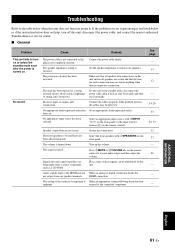
... selected properly. No appropriate Audio input jack select has Set an appropriate Audio input jack select. The sound is not completely inserted. manual of the connected component is incorrect. Connect the power cable firmly. Set this unit to the standby mode, disconnect the power cable,... Troubleshooting Refer to the table below does not help, turn off this unit, disconnect the power cable, and contact the nearest authorized Yamaha dealer or service center. ■ General Problem Cause Remedy This unit fails to turn on or enters the standby mode soon after 30...
... selected properly. No appropriate Audio input jack select has Set an appropriate Audio input jack select. The sound is not completely inserted. manual of the connected component is incorrect. Connect the power cable firmly. Set this unit to the standby mode, disconnect the power cable,... Troubleshooting Refer to the table below does not help, turn off this unit, disconnect the power cable, and contact the nearest authorized Yamaha dealer or service center. ■ General Problem Cause Remedy This unit fails to turn on or enters the standby mode soon after 30...


