
Owner's Manual
Page 4
... from the AC power source as long as sunshine, fire or like. 20 Excessive sound pressure from cold to a wall outlet until all connections are complete. 8 Do not operate this unit. Contact qualified Yamaha service personnel when any damage resulting from the wall outlet. 19 The batteries shall not..., cool, dry, clean place - CAUTION: READ THIS BEFORE OPERATING YOUR UNIT. Keep it in the space below. this sound system in this unit to hot, and do not place: - Yamaha will not be held responsible for long periods of the unit. Allow ventilation space of at least 30 cm on...
... from the AC power source as long as sunshine, fire or like. 20 Excessive sound pressure from cold to a wall outlet until all connections are complete. 8 Do not operate this unit. Contact qualified Yamaha service personnel when any damage resulting from the wall outlet. 19 The batteries shall not..., cool, dry, clean place - CAUTION: READ THIS BEFORE OPERATING YOUR UNIT. Keep it in the space below. this sound system in this unit to hot, and do not place: - Yamaha will not be held responsible for long periods of the unit. Allow ventilation space of at least 30 cm on...

Owner's Manual
Page 5
...part as a result of the parts. • The symbol "☞" with this unit 9 ADVANCED OPERATION SET MENU 46 Using SET MENU 47 1 SOUND MENU 48 2 INPUT MENU 52 3 OPTION MENU 54 Remote control features 56 Using remote control on the SCENE feature........... 56 Controlling this unit, a...28 Selecting the desired SCENE template 28 Creating your original SCENE templates 31 Playback 32 Basic operations 32 Additional operations 33 Sound field programs 37 Sound field program descriptions 37 FM/AM tuning 40 Automatic tuning 40 Manual tuning 40 Automatic preset tuning 41 Manual preset ...
...part as a result of the parts. • The symbol "☞" with this unit 9 ADVANCED OPERATION SET MENU 46 Using SET MENU 47 1 SOUND MENU 48 2 INPUT MENU 52 3 OPTION MENU 54 Remote control features 56 Using remote control on the SCENE feature........... 56 Controlling this unit, a...28 Selecting the desired SCENE template 28 Creating your original SCENE templates 31 Playback 32 Basic operations 32 Additional operations 33 Sound field programs 37 Sound field program descriptions 37 FM/AM tuning 40 Automatic tuning 40 Manual tuning 40 Automatic preset tuning 41 Manual preset ...

Owner's Manual
Page 6
...Licensing LLC. It is too late, Yamaha and the Electronic Industries Association's Consumer Electronics Group recommend you to optimize this unit for discrete multi-channel input ◆ OSD (on-screen display) menus that lets the sound come through loud and clear without ...for various situations ◆ SCENE template customizing capability Decoders and DSP circuits ◆ Proprietary Yamaha technology for the creation of multichannel surround sound ◆ Compressed Music Enhancer mode to improve the sound quality of compression artifacts (such as the MP3 format) to that of a high-...
...Licensing LLC. It is too late, Yamaha and the Electronic Industries Association's Consumer Electronics Group recommend you to optimize this unit for discrete multi-channel input ◆ OSD (on-screen display) menus that lets the sound come through loud and clear without ...for various situations ◆ SCENE template customizing capability Decoders and DSP circuits ◆ Proprietary Yamaha technology for the creation of multichannel surround sound ◆ Compressed Music Enhancer mode to improve the sound quality of compression artifacts (such as the MP3 format) to that of a high-...

Owner's Manual
Page 12
... a satellite tuner to this unit consumes a small amount of the connected speakers. Note To use the "TV Viewing" template, you change the input source or sound field program, the SCENE mode is in advance. y The indicator on the power and press SCENE 1 button Check the type of power in the front...
... a satellite tuner to this unit consumes a small amount of the connected speakers. Note To use the "TV Viewing" template, you change the input source or sound field program, the SCENE mode is in advance. y The indicator on the power and press SCENE 1 button Check the type of power in the front...
Owner's Manual
Page 13
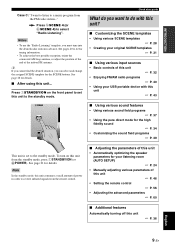
... small amount of power in advance. See page 28 for your USB portable device with this unit ☞ P. 43 ■ Using various sound features • Using various sound field programs ☞ P. 37 • Using the pure direct mode for the SCENE buttons. Notes • To use the "Radio Listening..." template, you can select and change the assigned SCENE template for the high fidelity sound ☞ P. 34 • Customizing the sound field programs ☞ P. 39 This unit is set this unit to the standby mode. y If you cannot find the desired...
... small amount of power in advance. See page 28 for your USB portable device with this unit ☞ P. 43 ■ Using various sound features • Using various sound field programs ☞ P. 37 • Using the pure direct mode for the SCENE buttons. Notes • To use the "Radio Listening..." template, you can select and change the assigned SCENE template for the high fidelity sound ☞ P. 34 • Customizing the sound field programs ☞ P. 39 This unit is set this unit to the standby mode. y If you cannot find the desired...

Owner's Manual
Page 15
...center speaker, you can use of the LFE (low-frequency effect) channel included in amplifier, such as the Yamaha Active Servo Processing Subwoofer System, is not so critical, because low bass sounds are obtained with a built-in Dolby Digital and DTS sources. FL C FR 30˚ SL SR 60...slightly toward the center of the video monitor should be the same. You can do without it is for the main source sound plus effect sounds. PREPARATION Connections Placing speakers The speaker layout below shows the speaker setting we recommend. Place these speakers at an equal distance ...
...center speaker, you can use of the LFE (low-frequency effect) channel included in amplifier, such as the Yamaha Active Servo Processing Subwoofer System, is not so critical, because low bass sounds are obtained with a built-in Dolby Digital and DTS sources. FL C FR 30˚ SL SR 60...slightly toward the center of the video monitor should be the same. You can do without it is for the main source sound plus effect sounds. PREPARATION Connections Placing speakers The speaker layout below shows the speaker setting we recommend. Place these speakers at an equal distance ...

Owner's Manual
Page 19
... unit to other DVI components. You can play back pictures by connecting your video monitor and video source component to this unit, - To enjoy the sound from the connected video monitor. English 15 En Furthermore, available audio/video signals depend on the specification of the connected video monitor.
... unit to other DVI components. You can play back pictures by connecting your video monitor and video source component to this unit, - To enjoy the sound from the connected video monitor. English 15 En Furthermore, available audio/video signals depend on the specification of the connected video monitor.

Owner's Manual
Page 21
... MONITOR OUT S VIDEO ANTENNA AM GND CH INPUT SURROUND CENTER VIDEO DVD DTV/CBL L AUDIO IN DVR OUT CD FM 75 UNBAL. To enjoy the sound from the connected video monitor. Refer to this unit using the HDMI connection. For example, if you connect your video monitor to this unit using...
... MONITOR OUT S VIDEO ANTENNA AM GND CH INPUT SURROUND CENTER VIDEO DVD DTV/CBL L AUDIO IN DVR OUT CD FM 75 UNBAL. To enjoy the sound from the connected video monitor. Refer to this unit using the HDMI connection. For example, if you connect your video monitor to this unit using...

Owner's Manual
Page 23
... components Connect the audio components as the input source (see page 33), this unit automatically turns off the digital sound field processor, and you cannot select sound field programs. • This unit does not redirect signals input at the DIGITAL INPUT jack. Be sure to ... you connect a 5.1-channel speaker system before using this unit and other components are unplugged from a multi-format player, external decoder or sound processor. Front out Surround out Subwoofer out Center out English Multi-format player or external decoder 19 En We recommend that this feature....
... components Connect the audio components as the input source (see page 33), this unit automatically turns off the digital sound field processor, and you cannot select sound field programs. • This unit does not redirect signals input at the DIGITAL INPUT jack. Be sure to ... you connect a 5.1-channel speaker system before using this unit and other components are unplugged from a multi-format player, external decoder or sound processor. Front out Surround out Subwoofer out Center out English Multi-format player or external decoder 19 En We recommend that this feature....
Owner's Manual
Page 25
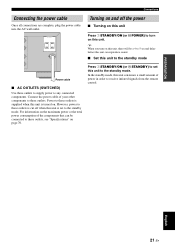
... cable ■ AC OUTLETS (SWITCHED) Use these outlets. For information on the maximum power or the total power consumption of the components that can reproduce sound. ■ Set this unit. In the standby mode, this unit consumes a small amount of your other components to these outlets to supply power to these...
... cable ■ AC OUTLETS (SWITCHED) Use these outlets. For information on the maximum power or the total power consumption of the components that can reproduce sound. ■ Set this unit. In the standby mode, this unit consumes a small amount of your other components to these outlets to supply power to these...

Owner's Manual
Page 26
...digital input signal. 22 En D CINEMA DSP indicator Lights up when you select a HiFi DSP sound field program (see page 37). Input channel indicators Indicate the channel components of the current sound field program and other information when adjusting or changing settings. D E F G A Headphones ...indicator Lights up when Virtual CINEMA DSP is active (see page 38). 4 SILENT CINEMA indicator Lights up when headphones are connected and a sound field program is selected (see page 38). 5 Input source indicators The corresponding cursor lights up to the set in "AUTO SETUP" are...
...digital input signal. 22 En D CINEMA DSP indicator Lights up when you select a HiFi DSP sound field program (see page 37). Input channel indicators Indicate the channel components of the current sound field program and other information when adjusting or changing settings. D E F G A Headphones ...indicator Lights up when Virtual CINEMA DSP is active (see page 38). 4 SILENT CINEMA indicator Lights up when headphones are connected and a sound field program is selected (see page 38). 5 Input source indicators The corresponding cursor lights up to the set in "AUTO SETUP" are...

Owner's Manual
Page 28
... to be satisfactory. Optimizer microphone p p 24 En y It is as quiet as your listening room This unit employs the YPAO (Yamaha Parametric Room Acoustic Optimizer) technology which lets you use the attached screw of the following display appears in your actual listening environment. OPTIMIZER ...before starting the AUTO SETUP operations. ❏ Speakers are connected appropriately. ❏ Headphones are disconnected from this unit analyzes the sound your speakers produce in the front panel display. If there is too much ambient noise, the results may not be output during...
... to be satisfactory. Optimizer microphone p p 24 En y It is as quiet as your listening room This unit employs the YPAO (Yamaha Parametric Room Acoustic Optimizer) technology which lets you use the attached screw of the following display appears in your actual listening environment. OPTIMIZER ...before starting the AUTO SETUP operations. ❏ Speakers are connected appropriately. ❏ Headphones are disconnected from this unit analyzes the sound your speakers produce in the front panel display. If there is too much ambient noise, the results may not be output during...

Owner's Manual
Page 34
...SCENE template Features Input source Playback mode DVD Viewing (SCENE 1 as the default setting) Select this SCENE template when you enjoy the high fidelity sound of the music discs on your DVD player. DVR Movie Dramatic Disc HiFi Listening Select this SCENE template when you enjoy the high fidelity... sound of the music discs on your CD player. DVD Movie Dramatic DVD Live Viewing Select this SCENE template when you enjoy music live ...
...SCENE template Features Input source Playback mode DVD Viewing (SCENE 1 as the default setting) Select this SCENE template when you enjoy the high fidelity sound of the music discs on your DVD player. DVR Movie Dramatic Disc HiFi Listening Select this SCENE template when you enjoy the high fidelity... sound of the music discs on your CD player. DVD Movie Dramatic DVD Live Viewing Select this SCENE template when you enjoy music live ...

Owner's Manual
Page 35
... Note When the SCENE template you want to customize is only available for a SCENE template: • INPUT: The input source component • MODE: The active sound field programs, STRAIGHT or DIRECT STEREO mode (see pages 34 and 38) • NIGHT: The night listening mode setting (see page 35) − SYSTEM: Keeps...
... Note When the SCENE template you want to customize is only available for a SCENE template: • INPUT: The input source component • MODE: The active sound field programs, STRAIGHT or DIRECT STEREO mode (see pages 34 and 38) • NIGHT: The night listening mode setting (see page 35) − SYSTEM: Keeps...

Owner's Manual
Page 36
... 34 34 39 35 36 38 36 32 En Check whether your CD player before you want to select the desired sound field program. Also, check the sound output level of the currently selected input source appears in DTS. The name of your CD player supports CDs encoded in... the currently selected input source in DTS. The name of the input selector buttons (C)) to this unit automatically selects the last sound field program used with the corresponding input source. • Sound field programs cannot be exercised when you select an input source, this unit. 2 Press DINPUT l / h repeatedly (or...
... 34 34 39 35 36 38 36 32 En Check whether your CD player before you want to select the desired sound field program. Also, check the sound output level of the currently selected input source appears in DTS. The name of your CD player supports CDs encoded in... the currently selected input source in DTS. The name of the input selector buttons (C)) to this unit automatically selects the last sound field program used with the corresponding input source. • Sound field programs cannot be exercised when you select an input source, this unit. 2 Press DINPUT l / h repeatedly (or...

Owner's Manual
Page 37
...assigned to select the front speaker system (FRONT A or FRONT B). Note This feature is not available when no sound is assigned to the FRONT B speaker terminals in the front panel display. Notes • Sound field programs cannot be selected when the component connected to the MULTI CH INPUT jacks is selected as...9632; Selecting the component connected to select the desired audio input jack select setting. Playback ■ Using the Zone B feature When you select CINEMA DSP sound field program and activate the Zone B speakers, Virtual CINEMA DSP activates automatically (see page 54).
...assigned to select the front speaker system (FRONT A or FRONT B). Note This feature is not available when no sound is assigned to the FRONT B speaker terminals in the front panel display. Notes • Sound field programs cannot be selected when the component connected to the MULTI CH INPUT jacks is selected as...9632; Selecting the component connected to select the desired audio input jack select setting. Playback ■ Using the Zone B feature When you select CINEMA DSP sound field program and activate the Zone B speakers, Virtual CINEMA DSP activates automatically (see page 54).

Owner's Manual
Page 38
...selected. • When multi-channel signals (Dolby Digital and DTS) are input, this unit automatically switches to the corresponding analog input. • No sound will override the level adjustments made in DTS when the DIRECT STEREO mode is from the subwoofer. • "TONE CONTROL" (on this page) and... "SOUND MENU" (see page 50). 1 Press DAMP and then press FLEVEL repeatedly to select the speaker you can also select the speaker by pressing Gk / n....
...selected. • When multi-channel signals (Dolby Digital and DTS) are input, this unit automatically switches to the corresponding analog input. • No sound will override the level adjustments made in DTS when the DIRECT STEREO mode is from the subwoofer. • "TONE CONTROL" (on this page) and... "SOUND MENU" (see page 50). 1 Press DAMP and then press FLEVEL repeatedly to select the speaker you can also select the speaker by pressing Gk / n....

Owner's Manual
Page 39
... of bits passing a given point per second taken from "SET MENU". FLAG Flag data encoded in effectiveness depending on the input source and surround sound settings you do not want to use this unit to automatically switch decoders. English 35 En Choices: MIN, MID, MAX • Select "MIN..." for minimum compression. • Select "MID" for standard compression. • Select "MAX" for all sounds. • Select "OFF" if you use. 1 Press DAMP and then press QMENU on the remote control. when the component connected to the MULTI CH INPUT...
... of bits passing a given point per second taken from "SET MENU". FLAG Flag data encoded in effectiveness depending on the input source and surround sound settings you do not want to use this unit to automatically switch decoders. English 35 En Choices: MIN, MID, MAX • Select "MIN..." for minimum compression. • Select "MID" for standard compression. • Select "MAX" for all sounds. • Select "OFF" if you use. 1 Press DAMP and then press QMENU on the remote control. when the component connected to the MULTI CH INPUT...

Owner's Manual
Page 40
...the front panel display, and the display returns to set the amount of time for the sleep timer. Notes • When you select a sound field program, SILENT CINEMA mode activates automatically (see page 51). • The MUTE indicator flashes in the front panel display when the audio output...or press RVOLUME +/-) to resume the audio output. • You can enjoy listening to the standby mode after a certain amount of headphones with sound from the front panel display when the audio output is muted and disappears from an audio source. Each time you can adjust the muting level...
...the front panel display, and the display returns to set the amount of time for the sleep timer. Notes • When you select a sound field program, SILENT CINEMA mode activates automatically (see page 51). • The MUTE indicator flashes in the front panel display when the audio output...or press RVOLUME +/-) to resume the audio output. • You can enjoy listening to the standby mode after a certain amount of headphones with sound from the front panel display when the audio output is muted and disappears from an audio source. Each time you can adjust the muting level...

Owner's Manual
Page 41
...in a USB memory device etc. This program enhances your listening preference, not merely on the name of real-world acoustic environments made from minimum sound effects to the MULTI CH INPUT jacks is selected as the input source (see page 33). • When PCM signals with a sampling ...as if you are input, this unit is automatically set to enjoy multi-channel playback from almost any stereo or multi-channel sound source. y • Choose a sound field program based on your listening experience by pressing UENHANCER on the stage and solo instruments and the beats of this program...
...in a USB memory device etc. This program enhances your listening preference, not merely on the name of real-world acoustic environments made from minimum sound effects to the MULTI CH INPUT jacks is selected as the input source (see page 33). • When PCM signals with a sampling ...as if you are input, this unit is automatically set to enjoy multi-channel playback from almost any stereo or multi-channel sound source. y • Choose a sound field program based on your listening experience by pressing UENHANCER on the stage and solo instruments and the beats of this program...


