Owner's Manual
Page 5
... 42 ADDITIONAL INFORMATION Troubleshooting 56 Glossary 61 Specifications 63 Index 64 APPENDIX (at the end of this manual) Front panel i Remote control ii List of remote control codes iii About this unit, a TV, or other components 6 Step 3: Turn on the power and press SCENE 1 ...ADVANCED OPERATION Set menu 43 Using set menu 44 1 SOUND MENU 45 2 INPUT MENU 48 3 OPTION MENU 50 Remote control features 51 Using remote control on the SCENE feature........... 51 Controlling this manual • y indicates a tip for the information about each position of the parts. • The symbol...
... 42 ADDITIONAL INFORMATION Troubleshooting 56 Glossary 61 Specifications 63 Index 64 APPENDIX (at the end of this manual) Front panel i Remote control ii List of remote control codes iii About this unit, a TV, or other components 6 Step 3: Turn on the power and press SCENE 1 ...ADVANCED OPERATION Set menu 43 Using set menu 44 1 SOUND MENU 45 2 INPUT MENU 48 3 OPTION MENU 50 Remote control features 51 Using remote control on the SCENE feature........... 51 Controlling this manual • y indicates a tip for the information about each position of the parts. • The symbol...

Owner's Manual
Page 6
...; Optical and coaxial digital audio signal jacks ◆ Sleep timer ◆ Cinema and music night listening modes ◆ Remote control with preset remote control codes Manufactured under license from Dolby Laboratories. "SILENT CINEMA" is too late, Yamaha and the Electronic Industries Association's Consumer Electronics Group recommend you to get the most importantly, without annoying blaring...
...; Optical and coaxial digital audio signal jacks ◆ Sleep timer ◆ Cinema and music night listening modes ◆ Remote control with preset remote control codes Manufactured under license from Dolby Laboratories. "SILENT CINEMA" is too late, Yamaha and the Electronic Industries Association's Consumer Electronics Group recommend you to get the most importantly, without annoying blaring...
Owner's Manual
Page 7
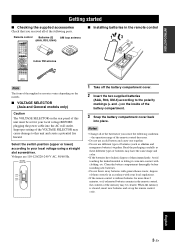
...loop antenna l PROG h ENHANCER STRAIGHT 1 2 3 4 SUR.DECODE NIGHT 5 6 7 8 9 0 10 ENT. ■ Installing batteries in the remote control 13 2 Note The form of the supplied accessories varies depending on the models. ■ VOLTAGE SELECTOR (Asia and General models only) Caution The VOLTAGE ... battery compartment cover. 2 Insert the two supplied batteries (AAA, R03, UM-4) according to this unit must be set up the remote control code. Clean the battery compartment thoroughly before installing new batteries. • Do not throw away batteries with your local voltage using ...
...loop antenna l PROG h ENHANCER STRAIGHT 1 2 3 4 SUR.DECODE NIGHT 5 6 7 8 9 0 10 ENT. ■ Installing batteries in the remote control 13 2 Note The form of the supplied accessories varies depending on the models. ■ VOLTAGE SELECTOR (Asia and General models only) Caution The VOLTAGE ... battery compartment cover. 2 Insert the two supplied batteries (AAA, R03, UM-4) according to this unit must be set up the remote control code. Clean the battery compartment thoroughly before installing new batteries. • Do not throw away batteries with your local voltage using ...

Owner's Manual
Page 13
...into the desired radio station in order to select "Radio Listening". Press FSCENE 4 (or ESCENE 4) to receive infrared signals from the remote control. ■ Adjusting the parameters of this unit • Optimizing the speaker parameters for tuning information. • To achieve the best ...possible reception, orient the connected AM loop antenna, or adjust the position of the end of this unit ☞ P. 43 • Setting the remote control ☞ P. 51 • Adjusts the advanced parameters ☞ P. 55 ■ Additional features Automatically turning off this unit ☞ P. ...
...into the desired radio station in order to select "Radio Listening". Press FSCENE 4 (or ESCENE 4) to receive infrared signals from the remote control. ■ Adjusting the parameters of this unit • Optimizing the speaker parameters for tuning information. • To achieve the best ...possible reception, orient the connected AM loop antenna, or adjust the position of the end of this unit ☞ P. 43 • Setting the remote control ☞ P. 51 • Adjusts the advanced parameters ☞ P. 55 ■ Additional features Automatically turning off this unit ☞ P. ...
Owner's Manual
Page 22
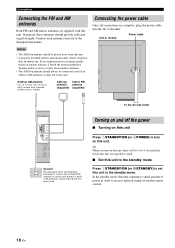
... GND terminal to turn on this unit to receive infrared signals from the remote control. 18 En Connect each antenna correctly to this unit. • A properly installed outdoor antenna provides clearer reception than an indoor one. Consult the nearest authorized Yamaha dealer or service center about outdoor antennas. • The AM loop antenna...
... GND terminal to turn on this unit to receive infrared signals from the remote control. 18 En Connect each antenna correctly to this unit. • A properly installed outdoor antenna provides clearer reception than an indoor one. Consult the nearest authorized Yamaha dealer or service center about outdoor antennas. • The AM loop antenna...

Owner's Manual
Page 24
...during operation. places of conditions: - y To set the remote control codes for other liquids on this window at the remote control sensor on the remote control. • Do not drop the remote control. • Do not leave or store the remote control in the following types of high temperature, such as near...PORTABLE 30º 30º Approximately 6 m (20 ft) XInfrared window Outputs infrared control signals. places of high humidity, such as near a bath - Be sure to aim the remote control directly at the component you want to operate. dusty places 20 En places of extremely ...
...during operation. places of conditions: - y To set the remote control codes for other liquids on this window at the remote control sensor on the remote control. • Do not drop the remote control. • Do not leave or store the remote control in the following types of high temperature, such as near...PORTABLE 30º 30º Approximately 6 m (20 ft) XInfrared window Outputs infrared control signals. places of high humidity, such as near a bath - Be sure to aim the remote control directly at the component you want to operate. dusty places 20 En places of extremely ...

Owner's Manual
Page 25
.... 4 Press Gl / h to select the desired setting. "ROOM" appears in bold under each parameter. • Press HRETURN on the remote control to return to the previous menu level. 1 Press DAMP on the remote control. 2 Press PMENU. In general, the room sizes are indicated in the front panel display. "BASIC SETUP" appears in your system...
.... 4 Press Gl / h to select the desired setting. "ROOM" appears in bold under each parameter. • Press HRETURN on the remote control to return to the previous menu level. 1 Press DAMP on the remote control. 2 Press PMENU. In general, the room sizes are indicated in the front panel display. "BASIC SETUP" appears in your system...

Owner's Manual
Page 27
...select the desired template. English 1 Flashes DVD Viewing 23 En l INPUT h Front panel or AMP ENTER Select the desired SCENE template Remote control SCENE template library (Image) 1 Assign the SCENE template to the SCENE button Selecting the desired SCENE template DVD Movie View 3 Press the...the name of currently assigned SCENE template appears in the front panel display. 3 seconds 3 seconds 1 Front panel or 1 Remote control 1 Front panel or 1 Remote control Notes • If you do not carry out any operation within 30 seconds from the last operation in these steps, this...
...select the desired template. English 1 Flashes DVD Viewing 23 En l INPUT h Front panel or AMP ENTER Select the desired SCENE template Remote control SCENE template library (Image) 1 Assign the SCENE template to the SCENE button Selecting the desired SCENE template DVD Movie View 3 Press the...the name of currently assigned SCENE template appears in the front panel display. 3 seconds 3 seconds 1 Front panel or 1 Remote control 1 Front panel or 1 Remote control Notes • If you do not carry out any operation within 30 seconds from the last operation in these steps, this...

Owner's Manual
Page 30
... of the ESCENE button, press Gl / h repeatedly to set the input source of the original SCENE template. The SCENE template customizing screen appears on the remote control. Notes • After changing the assignment of the SCENE template to the ESCENE buttons, you want to select the desired value of the selected parameter...
... of the ESCENE button, press Gl / h repeatedly to set the input source of the original SCENE template. The SCENE template customizing screen appears on the remote control. Notes • After changing the assignment of the SCENE template to the ESCENE buttons, you want to select the desired value of the selected parameter...

Owner's Manual
Page 33
Use this unit by pressing Gk / n. 2 Press Gl / h on the remote control to adjust the speaker output level. Press 0TONE CONTROL repeatedly to select "BASS" or "TREBLE" and then press APROGRAM l / h to adjust the corresponding frequency response level. • Select "BASS" to adjust the ... the high-frequency or low-frequency sound to an extreme level, the tonal quality of the surround speakers may vary in effectiveness depending on the remote control, you use the night listening modes in "SP LEVEL" (see page 50). English 29 En Note This feature is output. y You can adjust ...
Use this unit by pressing Gk / n. 2 Press Gl / h on the remote control to adjust the speaker output level. Press 0TONE CONTROL repeatedly to select "BASS" or "TREBLE" and then press APROGRAM l / h to adjust the corresponding frequency response level. • Select "BASS" to adjust the ... the high-frequency or low-frequency sound to an extreme level, the tonal quality of the surround speakers may vary in effectiveness depending on the remote control, you use the night listening modes in "SP LEVEL" (see page 50). English 29 En Note This feature is output. y You can adjust ...

Owner's Manual
Page 34
.... Each time you are switching the amount of source channels in the front panel display. Press the input selector buttons on the remote control to switch the displayed information. Playback ■ Displaying the signal information You can enjoy listening to classical music while viewing beautiful scenery...format, sampling frequency, channel, bit rate and flag data of the current input signal. 1 Press DAMP and then press PMENU on the remote control repeatedly until "SLEEP OFF" appears in the front panel display. • You can also cancel the sleep timer setting by pressing 1STANDBY/ON...
.... Each time you are switching the amount of source channels in the front panel display. Press the input selector buttons on the remote control to switch the displayed information. Playback ■ Displaying the signal information You can enjoy listening to classical music while viewing beautiful scenery...format, sampling frequency, channel, bit rate and flag data of the current input signal. 1 Press DAMP and then press PMENU on the remote control repeatedly until "SLEEP OFF" appears in the front panel display. • You can also cancel the sleep timer setting by pressing 1STANDBY/ON...

Owner's Manual
Page 35
... enjoy multi-channel playback from almost any stereo or multi-channel sound source. The sound field is suitable for movies with an emphasis on the remote control repeatedly. This program presents an image of the selected sound field program appears in 2-channel or 5-channel stereo. The sound field reproduces the spaciousness of...
... enjoy multi-channel playback from almost any stereo or multi-channel sound source. The sound field is suitable for movies with an emphasis on the remote control repeatedly. This program presents an image of the selected sound field program appears in 2-channel or 5-channel stereo. The sound field reproduces the spaciousness of...

Owner's Manual
Page 40
...4A/B/C/D/ E and 5PRESET/TUNING/CH l / h. See "Selecting preset stations" on this page. See "Selecting preset stations" on this operation with the remote control, press CTUNER to E). Flashes MEMORY A5:FM 90.60MHz Flashes 4 Press 2PRESET/TUNING again. l / h) repeatedly to select the desired preset station group ... exchanged. 36 En Exchanging preset stations You can tune into any desired station simply by pressing the numeric buttons on the remote control. The example below describes the procedure to 8) directly by selecting the preset station group and number under which it was stored...
...4A/B/C/D/ E and 5PRESET/TUNING/CH l / h. See "Selecting preset stations" on this page. See "Selecting preset stations" on this operation with the remote control, press CTUNER to E). Flashes MEMORY A5:FM 90.60MHz Flashes 4 Press 2PRESET/TUNING again. l / h) repeatedly to select the desired preset station group ... exchanged. 36 En Exchanging preset stations You can tune into any desired station simply by pressing the numeric buttons on the remote control. The example below describes the procedure to 8) directly by selecting the preset station group and number under which it was stored...

Owner's Manual
Page 43
... repeatedly to E). l / h) repeatedly to change the preset channel number (1 to 8). For details, see "Setting XM Satellite Radio preset channels" on the remote control. ■ Direct Number Access mode 2 Press 5PRESET/TUNING/CH l / h (or GPRESET/CH k / n) repeatedly to search for a channel quickly by...the entered channel number. • If no button is pressed within the selected channel category. BASIC OPERATION y When performing these operations with the remote control, press CXM to select "XM" as shown below. XM Satellite Radio tuning 3 Press 5PRESET/TUNING/CH l / h (or GPRESET/CH ...
... repeatedly to E). l / h) repeatedly to change the preset channel number (1 to 8). For details, see "Setting XM Satellite Radio preset channels" on the remote control. ■ Direct Number Access mode 2 Press 5PRESET/TUNING/CH l / h (or GPRESET/CH k / n) repeatedly to search for a channel quickly by...the entered channel number. • If no button is pressed within the selected channel category. BASIC OPERATION y When performing these operations with the remote control, press CXM to select "XM" as shown below. XM Satellite Radio tuning 3 Press 5PRESET/TUNING/CH l / h (or GPRESET/CH ...

Owner's Manual
Page 48
... U.S.A. Page 50 50 50 50 50 Note The "XM RADIO SET" parameter is only applicable to the DIGITAL INPUT jacks when you turn on the remote control. Set menu Option menu 3 OPTION MENU Use this menu to the initial factory settings. y You can change the parameter value. • Press G h... to increase the value. • Press G l to decrease the value. 7 Press PMENU to exit from set menu Use the remote control to enter "MANUAL SETUP". INI E)XM RADIO SET Features Adjusts the brightness of the front panel display and the way in the front panel display...
... U.S.A. Page 50 50 50 50 50 Note The "XM RADIO SET" parameter is only applicable to the DIGITAL INPUT jacks when you turn on the remote control. Set menu Option menu 3 OPTION MENU Use this menu to the initial factory settings. y You can change the parameter value. • Press G h... to increase the value. • Press G l to decrease the value. 7 Press PMENU to exit from set menu Use the remote control to enter "MANUAL SETUP". INI E)XM RADIO SET Features Adjusts the brightness of the front panel display and the way in the front panel display...

Owner's Manual
Page 52
... volume level when the power of this unit do not correspond to your needs. Initial volume INI VOL. Choices: Off, -80 dB to +16 dB Control step: 1 dB 2 INPUT MENU Use this menu to reassign the input jacks, select the input mode or rename the input source. ■ Input assignment A)INPUT... volume range becomes -5 dB to -80 dB. This feature is 16 dB to be necessary when using DINPUT l / h (or the input selector buttons (C) on the remote control). However, when "MAX VOL." is set to -30 dB, the volume level is turned on the power of this feature to assign the input jacks...
... volume level when the power of this unit do not correspond to your needs. Initial volume INI VOL. Choices: Off, -80 dB to +16 dB Control step: 1 dB 2 INPUT MENU Use this menu to reassign the input jacks, select the input mode or rename the input source. ■ Input assignment A)INPUT... volume range becomes -5 dB to -80 dB. This feature is 16 dB to be necessary when using DINPUT l / h (or the input selector buttons (C) on the remote control). However, when "MAX VOL." is set to -30 dB, the volume level is turned on the power of this feature to assign the input jacks...

Owner's Manual
Page 53
... that appears in the front panel display. Choices: CD, MD/CD-R, TUNER, DVD, DTV/CBL, V-AUX, DVR, MULTI CH IN, XM RADIO Control range: -6.0 to +6.0 dB Control step: 1.0 dB Initial setting: 0.0 dB ■ Decoder mode D)DECODER MODE Decoder select mode Use this feature to designate the default decoder mode for ...; Select "DTS" when you want to use up to 8 characters for the input sources connected to the DIGITAL INPUT jacks when you turn on the remote control to place the "_" (underscore) under the space or the character you want to edit. 3 Press Gk / n to select the character you want to ...
... that appears in the front panel display. Choices: CD, MD/CD-R, TUNER, DVD, DTV/CBL, V-AUX, DVR, MULTI CH IN, XM RADIO Control range: -6.0 to +6.0 dB Control step: 1.0 dB Initial setting: 0.0 dB ■ Decoder mode D)DECODER MODE Decoder select mode Use this feature to designate the default decoder mode for ...; Select "DTS" when you want to use up to 8 characters for the input sources connected to the DIGITAL INPUT jacks when you turn on the remote control to place the "_" (underscore) under the space or the character you want to edit. 3 Press Gk / n to select the character you want to ...

Owner's Manual
Page 55
...page 54). ADVANCED OPERATION English 51 En Note * These buttons control the input source component. Using remote control on the remote control. 2 Press the desired buttons in the * area below to control the input source component of each input source in the SCENE... remote control code for details of the function of the selected SCENE template. To control your TV or other components, you must set the appropriate remote control code for 3 seconds. Remote control features Remote control features In addition to controlling this unit and the input source component by Yamaha and...
...page 54). ADVANCED OPERATION English 51 En Note * These buttons control the input source component. Using remote control on the remote control. 2 Press the desired buttons in the * area below to control the input source component of each input source in the SCENE... remote control code for details of the function of the selected SCENE template. To control your TV or other components, you must set the appropriate remote control code for 3 seconds. Remote control features Remote control features In addition to controlling this unit and the input source component by Yamaha and...
Owner's Manual
Page 56
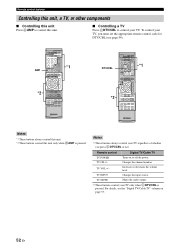
..., or other components ■ Controlling this unit Press DAMP to control your TV. Notes *1 These buttons always control your TV regardless of whether you must set the appropriate remote control code for DTV/CBL (see the "Digital TV/Cable TV" column on or off the power. Remote control Digital TV/Cable TV TV POWER... Turns on page 53. 52 En TV VOL +/- TV INPUT Changes the input source. TV MUTE Mutes the audio output. *2 These buttons control your TV, you press CDTV/CBL or not. To...
..., or other components ■ Controlling this unit Press DAMP to control your TV. Notes *1 These buttons always control your TV regardless of whether you must set the appropriate remote control code for DTV/CBL (see the "Digital TV/Cable TV" column on or off the power. Remote control Digital TV/Cable TV TV POWER... Turns on page 53. 52 En TV VOL +/- TV INPUT Changes the input source. TV MUTE Mutes the audio output. *2 These buttons control your TV, you press CDTV/CBL or not. To...
Owner's Manual
Page 57
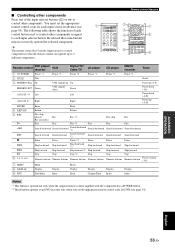
... MUTE TV VOL SCENE 1 2 3 4 2 3 4 5 BAND LEVEL TITLE SRCH MODE MENU VOLUME ENTER RETURN XM MEMORY REC DISPLAY 7 8 6 l PROG h ENHANCER STRAIGHT 1 2 3 4 SUR.DECODE NIGHT 5 6 7 8 9 0 10 ENT. 9 Remote control DVD player/ recorder VCR Digital TV/ Cable TV LD player CD player MD/CD recorder Tuner 1 AV POWER Power *1 Power *1 Power *2 Power *1 Power *1 Power *1 2 TITLE...
... MUTE TV VOL SCENE 1 2 3 4 2 3 4 5 BAND LEVEL TITLE SRCH MODE MENU VOLUME ENTER RETURN XM MEMORY REC DISPLAY 7 8 6 l PROG h ENHANCER STRAIGHT 1 2 3 4 SUR.DECODE NIGHT 5 6 7 8 9 0 10 ENT. 9 Remote control DVD player/ recorder VCR Digital TV/ Cable TV LD player CD player MD/CD recorder Tuner 1 AV POWER Power *1 Power *1 Power *2 Power *1 Power *1 Power *1 2 TITLE...


