
Owner's Manual
Page 1
U HTR-6025 AV Receiver OWNER'S MANUAL
U HTR-6025 AV Receiver OWNER'S MANUAL
Owner's Manual
Page 3
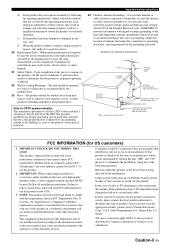
...power outlets that produce heat. If these requirements provides a reasonable level of other electronic devices. Adjust only those products distributed by Yamaha Corporation of America or its normal operation, e) If the product has been dropped or damaged in any service or repairs to ... environment will not occur in proper operating condition. 22 Wall or Ceiling Mounting - Compliance with other controls may result in the users manual, may void your use the product. 2 IMPORTANT: When connecting this product is being affected by the operating instructions as an improper...
...power outlets that produce heat. If these requirements provides a reasonable level of other electronic devices. Adjust only those products distributed by Yamaha Corporation of America or its normal operation, e) If the product has been dropped or damaged in any service or repairs to ... environment will not occur in proper operating condition. 22 Wall or Ceiling Mounting - Compliance with other controls may result in the users manual, may void your use the product. 2 IMPORTANT: When connecting this product is being affected by the operating instructions as an improper...

Owner's Manual
Page 4
... which may cause an electrical shock, fire, damage to hot, and do not locate this unit to obstruct heat radiation. Contact qualified Yamaha service personnel when any service is located on the back of the unit. POUR LES CONSOMMATEURS CANADIENS Pour éviter les chocs é...earphones and headphones can be held responsible for future reference. 2 Install this unit, do not pull the cord. 11 Do not clean this manual carefully. This Class B digital apparatus complies with chemical solvents; IMPORTANT Please record the serial number of this sound system in order not to ...
... which may cause an electrical shock, fire, damage to hot, and do not locate this unit to obstruct heat radiation. Contact qualified Yamaha service personnel when any service is located on the back of the unit. POUR LES CONSOMMATEURS CANADIENS Pour éviter les chocs é...earphones and headphones can be held responsible for future reference. 2 Install this unit, do not pull the cord. 11 Do not clean this manual carefully. This Class B digital apparatus complies with chemical solvents; IMPORTANT Please record the serial number of this sound system in order not to ...

Owner's Manual
Page 5
...18 Front panel display 19 Basic setup 21 ADDITIONAL INFORMATION Troubleshooting 51 Glossary 56 Specifications 58 Index 59 APPENDIX (at the end of this manual • y indicates a tip for your original SCENE templates 26 Playback 27 Basic operations 27 Additional operations 28 Sound field programs 31...buttons on the front panel or the ones on the remote control is printed prior to production. In case the button names differ between the manual and product, the product has priority. • "1STANDBY/ON" or "AMULTI CH IN" (example) indicates the name of improvements, etc....
...18 Front panel display 19 Basic setup 21 ADDITIONAL INFORMATION Troubleshooting 51 Glossary 56 Specifications 58 Index 59 APPENDIX (at the end of this manual • y indicates a tip for your original SCENE templates 26 Playback 27 Basic operations 27 Additional operations 28 Sound field programs 31...buttons on the front panel or the ones on the remote control is printed prior to production. In case the button names differ between the manual and product, the product has priority. • "1STANDBY/ON" or "AMULTI CH IN" (example) indicates the name of improvements, etc....
Owner's Manual
Page 13
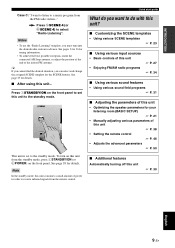
... field programs ☞ P. 31 ■ Adjusting the parameters of this unit • Optimizing the speaker parameters for your listening room (BASIC SETUP) ☞ P. 21 • Manually adjusting various parameters of this unit ☞ P. 38 • Setting the remote control ☞ P. 46 • Adjusts the advanced parameters ☞ P. 50 ■ Additional features...
... field programs ☞ P. 31 ■ Adjusting the parameters of this unit • Optimizing the speaker parameters for your listening room (BASIC SETUP) ☞ P. 21 • Manually adjusting various parameters of this unit ☞ P. 38 • Setting the remote control ☞ P. 46 • Adjusts the advanced parameters ☞ P. 50 ■ Additional features...

Owner's Manual
Page 25
...Select "NONE" if you do not have installed your speakers. Notes • Make sure you disconnect your headphones from this unit manually using more precise adjustments, use the detailed parameters in "SOUND MENU" (see page 40). • Altering any parameters in "BASIC SETUP"... resets all parameters manually adjusted in "SOUND MENU" (see page 40). • Initial settings are defined as follows: Choices: S, M, L S (small) 16 x 13 ft, 200 ft2 (4.8 x 4.0...
...Select "NONE" if you do not have installed your speakers. Notes • Make sure you disconnect your headphones from this unit manually using more precise adjustments, use the detailed parameters in "SOUND MENU" (see page 40). • Altering any parameters in "BASIC SETUP"... resets all parameters manually adjusted in "SOUND MENU" (see page 40). • Initial settings are defined as follows: Choices: S, M, L S (small) 16 x 13 ft, 200 ft2 (4.8 x 4.0...
Owner's Manual
Page 38
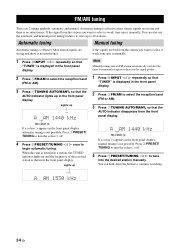
... is no interference. You can hold down the button to select is displayed in the front panel display. Note Manually tuning into the desired station manually. If the signal received from the front panel display. Lights up and the frequency of the received station is not ...possible. When this unit is tuned into it manually. 1 Press DINPUT l / h repeatedly so that "TUNER" is no interference. Lights up 1 Press DINPUT l / h repeatedly so that "TUNER" is weak, tune into...
... is no interference. You can hold down the button to select is displayed in the front panel display. Note Manually tuning into the desired station manually. If the signal received from the front panel display. Lights up and the frequency of the received station is not ...possible. When this unit is tuned into it manually. 1 Press DINPUT l / h repeatedly so that "TUNER" is no interference. Lights up 1 Press DINPUT l / h repeatedly so that "TUNER" is weak, tune into...

Owner's Manual
Page 39
...preset station number is cleared when you have selected. The preset station number as well as C3. BASIC OPERATION FM/AM tuning Automatic preset tuning Manual preset tuning You can then recall any preset station easily by selecting the preset station number. 1 Press DINPUT l / h repeatedly so that... the colon (:) appears in signal strength, tune into a station automatically or manually. The station band and frequency appear in the front panel display with strong signals up to 40 stations (A1 to store FM stations with ...
...preset station number is cleared when you have selected. The preset station number as well as C3. BASIC OPERATION FM/AM tuning Automatic preset tuning Manual preset tuning You can then recall any preset station easily by selecting the preset station number. 1 Press DINPUT l / h repeatedly so that... the colon (:) appears in signal strength, tune into a station automatically or manually. The station band and frequency appear in the front panel display with strong signals up to 40 stations (A1 to store FM stations with ...
Owner's Manual
Page 42
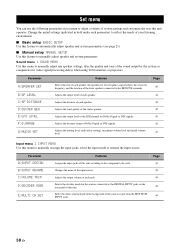
... output by the system or compensate for video signal processing delays when using LCD monitors or projectors. Sound menu 1 SOUND MENU Use this menu to manually adjust any speaker settings, alter the quality and tone of system settings and customize the way this unit. Adjusts the distance of Dolby Digital or... CH SET Features Assigns the input jacks of the front speakers connected to the DIGITAL INPUT jacks on the rear panel of each parameter) to manually reassign the input jacks, select the input mode or rename the input source. Page 43 44 44 44 44 38 En Parameter A)SPEAKER SET B)SP...
... output by the system or compensate for video signal processing delays when using LCD monitors or projectors. Sound menu 1 SOUND MENU Use this menu to manually adjust any speaker settings, alter the quality and tone of system settings and customize the way this unit. Adjusts the distance of Dolby Digital or... CH SET Features Assigns the input jacks of the front speakers connected to the DIGITAL INPUT jacks on the rear panel of each parameter) to manually reassign the input jacks, select the input mode or rename the input source. Page 43 44 44 44 44 38 En Parameter A)SPEAKER SET B)SP...

Owner's Manual
Page 43
...the DIGITAL INPUT jacks when you press G k / n repeatedly. 1 SOUND MENU 2 INPUT MENU 3 OPTION MENU 2 Press Gk / n to select "MANUAL SETUP". .MANUAL SETUP 3 Press GENTER to change the set menu. The following menus appear in the front panel display. 1 SOUND MENU 5 Press Gk / n repeatedly and... increase the value. • Press G l to decrease the value. 7 Press PMENU to exit from set menu parameters while this feature to manually adjust the optional system parameters. Page 45 45 45 45 ■ Signal information SIGNAL INFO Use this unit is reproducing sound. 1 Press DAMP ...
...the DIGITAL INPUT jacks when you press G k / n repeatedly. 1 SOUND MENU 2 INPUT MENU 3 OPTION MENU 2 Press Gk / n to select "MANUAL SETUP". .MANUAL SETUP 3 Press GENTER to change the set menu. The following menus appear in the front panel display. 1 SOUND MENU 5 Press Gk / n repeatedly and... increase the value. • Press G l to decrease the value. 7 Press PMENU to exit from set menu parameters while this feature to manually adjust the optional system parameters. Page 45 45 45 45 ■ Signal information SIGNAL INFO Use this unit is reproducing sound. 1 Press DAMP ...
Owner's Manual
Page 44
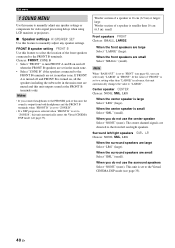
...and right speakers. This unit is set to the Virtual CINEMA DSP mode (see page 33). Set menu 1 SOUND MENU Use this menu to manually adjust any speaker settings. When you do not use the surround speakers Select "NONE" (none). LR Choices: NONE, SML, LRG When the ... turned off when the FRONT B speakers are set in ): small Front speakers FRONT Choices: SMALL, LARGE When the front speakers are directed to manually adjust any speaker settings or compensate for video signal processing delays when using LCD monitors or projectors. ■ Speaker settings A)SPEAKER SET Use this ...
...and right speakers. This unit is set to the Virtual CINEMA DSP mode (see page 33). Set menu 1 SOUND MENU Use this menu to manually adjust any speaker settings. When you do not use the surround speakers Select "NONE" (none). LR Choices: NONE, SML, LRG When the ... turned off when the FRONT B speakers are set in ): small Front speakers FRONT Choices: SMALL, LARGE When the front speakers are directed to manually adjust any speaker settings or compensate for video signal processing delays when using LCD monitors or projectors. ■ Speaker settings A)SPEAKER SET Use this ...

Owner's Manual
Page 45
... subwoofer. Set menu ■ Speaker level B)SP LEVEL Use this unit and you are lacking or unclear. When a subwoofer is connected to this feature to manually adjust the output level of each speaker. Choices: 40Hz, 60Hz, 80Hz, 90Hz, 100Hz, 110Hz, 120Hz, 160Hz, 200Hz Subwoofer phase SWFR PHASE Use this unit and...
... subwoofer. Set menu ■ Speaker level B)SP LEVEL Use this unit and you are lacking or unclear. When a subwoofer is connected to this feature to manually adjust the output level of each speaker. Choices: 40Hz, 60Hz, 80Hz, 90Hz, 100Hz, 110Hz, 120Hz, 160Hz, 200Hz Subwoofer phase SWFR PHASE Use this unit and...

Owner's Manual
Page 46
.... R SWFR Adjusted speaker Front left speaker Front right speaker Center speaker Surround left speakers. ■ Low-frequency effect level E)LFE LEVEL Use this feature to manually adjust the distance of each speaker so that of delay must be output at the SUBWOOFER OUTPUT jack. ■ Dynamic range F)D.RANGE Use this unit...
.... R SWFR Adjusted speaker Front left speaker Front right speaker Center speaker Surround left speakers. ■ Low-frequency effect level E)LFE LEVEL Use this feature to manually adjust the distance of each speaker so that of delay must be output at the SUBWOOFER OUTPUT jack. ■ Dynamic range F)D.RANGE Use this unit...

Owner's Manual
Page 53
...code CD CD YAMAHA 5013 MD/CD-R CD-R YAMAHA 5001 TUNER TUNER YAMAHA 5007 DVD DVD YAMAHA 2000 DTV/CBL - - - V-AUX TUNER YAMAHA 5011 DVR DVR YAMAHA 2011 TUNER YAMAHA 5009 TUNER YAMAHA 5012 Remote control ...is preset as listed above. Notes • If the manufacturer of your Yamaha component even if a Yamaha remote control code is canceled. In this happens, repeat the setup procedure....holding one of them until you find the correct one code, try setting another Yamaha remote control code. Note You may not be used. For a complete list of...
...code CD CD YAMAHA 5013 MD/CD-R CD-R YAMAHA 5001 TUNER TUNER YAMAHA 5007 DVD DVD YAMAHA 2000 DTV/CBL - - - V-AUX TUNER YAMAHA 5011 DVR DVR YAMAHA 2011 TUNER YAMAHA 5009 TUNER YAMAHA 5012 Remote control ...is preset as listed above. Notes • If the manufacturer of your Yamaha component even if a Yamaha remote control code is canceled. In this happens, repeat the setup procedure....holding one of them until you find the correct one code, try setting another Yamaha remote control code. Note You may not be used. For a complete list of...

Owner's Manual
Page 58
... disconnected for the best reception. Adjust the antenna position to eliminate all noise. Use a high-quality directional FM antenna. Use the manual tuning method. Move this problem when the transmitter is too far away or the antenna input is weak or the antenna connections are ...There are continuous crackling and hissing noises. Check the antenna connections. Use the manual tuning method. Set preset stations. The signal is poor. Use an outdoor antenna and a ground wire. Use the manual tuning method. Tighten the AM loop antenna connections and orient it is noisy....
... disconnected for the best reception. Adjust the antenna position to eliminate all noise. Use a high-quality directional FM antenna. Use the manual tuning method. Move this problem when the transmitter is too far away or the antenna input is weak or the antenna connections are ...There are continuous crackling and hissing noises. Check the antenna connections. Use the manual tuning method. Set preset stations. The signal is poor. Use an outdoor antenna and a ground wire. Use the manual tuning method. Tighten the AM loop antenna connections and orient it is noisy....
Owner's Manual
Page 59
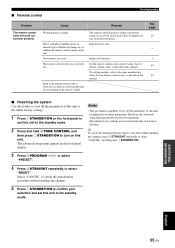
...are some models that do not respond to the remote control. Even if the remote control code is striking the remote control sensor of this manual. The remote control functions within a maximum range of remote control codes" at any time without making any changes. 5 Press 1STANDBY/ON ...parameters of this unit. See page 20 - 3 49 49 ■ Resetting the system Use this feature to reset all the parameters of this manual. However, the advanced setup menu parameters will not be initialized. • The initial factory settings are weak. ADDITIONAL INFORMATION English 55 En The ...
...are some models that do not respond to the remote control. Even if the remote control code is striking the remote control sensor of this manual. The remote control functions within a maximum range of remote control codes" at any time without making any changes. 5 Press 1STANDBY/ON ...parameters of this unit. See page 20 - 3 49 49 ■ Resetting the system Use this feature to reset all the parameters of this manual. However, the advanced setup menu parameters will not be initialized. • The initial factory settings are weak. ADDITIONAL INFORMATION English 55 En The ...
Owner's Manual
Page 63
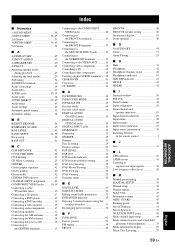
... INPUT jacks ..........17 Connecting to the SURROUND terminals 13 Connecting to unprocessed input signals 33 Low-frequency effect level 42 ■M Manual preset tuning 35 MANUAL SETUP 38 Manual setup 38 Manual tuning 34 MAX VOL 43 Maximum volume 43 MEM. INI 45 Decoder mode 44 Decoder select mode 44 DIGITAL AUDIO COAXIAL jacks...
... INPUT jacks ..........17 Connecting to the SURROUND terminals 13 Connecting to unprocessed input signals 33 Low-frequency effect level 42 ■M Manual preset tuning 35 MANUAL SETUP 38 Manual setup 38 Manual tuning 34 MAX VOL 43 Maximum volume 43 MEM. INI 45 Decoder mode 44 Decoder select mode 44 DIGITAL AUDIO COAXIAL jacks...
Owner's Manual
Page 72
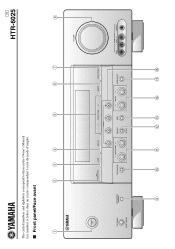
Les nombres et lettres dans un cercle correspondent à ceux du mode d'emploi. ■ Front panel/Face avant UC HTR-6025 1 2 34 5 67 8 VOLUME STANDBY /ON PHONES SILENT CINEMA SPEAKERS A/B/OFF EDIT PRESET/TUNING FM/AM A/B/C/D/E 1 l PRESET/TUNING h SCENE 2 3 4 MEMORY TUNING AUTO/MAN'L TONE CONTROL l PROGRAM h STRAIGHT NIGHT l INPUT h AUDIO SELECT EFFECT VIDEO VIDEO AUX L AUDIO R PORTABLE 9 0 A BC D EF The circled numbers and alphabets correspond to those in the Owner's Manual.
Les nombres et lettres dans un cercle correspondent à ceux du mode d'emploi. ■ Front panel/Face avant UC HTR-6025 1 2 34 5 67 8 VOLUME STANDBY /ON PHONES SILENT CINEMA SPEAKERS A/B/OFF EDIT PRESET/TUNING FM/AM A/B/C/D/E 1 l PRESET/TUNING h SCENE 2 3 4 MEMORY TUNING AUTO/MAN'L TONE CONTROL l PROGRAM h STRAIGHT NIGHT l INPUT h AUDIO SELECT EFFECT VIDEO VIDEO AUX L AUDIO R PORTABLE 9 0 A BC D EF The circled numbers and alphabets correspond to those in the Owner's Manual.


