Owner's Manual
Page 4
...damage. 9 Do not use of this sound system in a safe place for any service is needed. Retain this unit itself is too late, YAMAHA and the Electronic Industries Association's Consumer Electronics Group recommend you to wide slot and fully insert. and, most out of this unit. - a ...room with a newspaper, tablecloth, curtain, etc. Other components, as it is turned off by STANDBY/ON. Use a clean, dry cloth. 12 Only voltage specified on switches, knobs and/or cords. 10 When...
...damage. 9 Do not use of this sound system in a safe place for any service is needed. Retain this unit itself is too late, YAMAHA and the Electronic Industries Association's Consumer Electronics Group recommend you to wide slot and fully insert. and, most out of this unit. - a ...room with a newspaper, tablecloth, curtain, etc. Other components, as it is turned off by STANDBY/ON. Use a clean, dry cloth. 12 Only voltage specified on switches, knobs and/or cords. 10 When...
Owner's Manual
Page 5
... Rear panel 9 PREPARATION CONNECTIONS 10 Placing speakers 10 Connecting speakers 11 Information on jacks and cable plugs 13 Connecting video components 14 Connecting audio components 17 Connecting the FM and AM antennas 18 Connecting the power cable 19 Turning on the power 19 SETUP 20 Using ...MENU 53 SOUND MENU 53 INPUT MENU 55 OPTION MENU 56 REMOTE CONTROL FEATURES 57 Controlling this unit, a TV, or other components.... 57 Setting remote control codes 59 ADDITIONAL INFORMATION TROUBLESHOOTING 60 RESETTING THE SYSTEM 65 GLOSSARY 66 Audio information 66 Sound field program...
... Rear panel 9 PREPARATION CONNECTIONS 10 Placing speakers 10 Connecting speakers 11 Information on jacks and cable plugs 13 Connecting video components 14 Connecting audio components 17 Connecting the FM and AM antennas 18 Connecting the power cable 19 Turning on the power 19 SETUP 20 Using ...MENU 53 SOUND MENU 53 INPUT MENU 55 OPTION MENU 56 REMOTE CONTROL FEATURES 57 Controlling this unit, a TV, or other components.... 57 Setting remote control codes 59 ADDITIONAL INFORMATION TROUBLESHOOTING 60 RESETTING THE SYSTEM 65 GLOSSARY 66 Audio information 66 Sound field program...
Owner's Manual
Page 6
...[Other models] (0.9% THD, 1 kHz, 6 Ω) Front: 100 W + 100 W Center: 100 W Surround: 100 W + 100 W Decoders and DSP circuits ◆ Proprietary YAMAHA technology for your operation. • Some operations can be performed by using either the buttons on the front panel or the ones on the remote...Minimum RMS output power [U.S.A. "DTS" and "DTS Digital Surround" are subject to suit your individual audiovisual system ◆ Component video input/output capability (3 COMPONENT VIDEO INs and 1 MONITOR OUT) ◆ Optical and coaxial digital audio signal jacks ◆ Sleep timer ◆...
...[Other models] (0.9% THD, 1 kHz, 6 Ω) Front: 100 W + 100 W Center: 100 W Surround: 100 W + 100 W Decoders and DSP circuits ◆ Proprietary YAMAHA technology for your operation. • Some operations can be performed by using either the buttons on the front panel or the ones on the remote...Minimum RMS output power [U.S.A. "DTS" and "DTS Digital Surround" are subject to suit your individual audiovisual system ◆ Component video input/output capability (3 COMPONENT VIDEO INs and 1 MONITOR OUT) ◆ Optical and coaxial digital audio signal jacks ◆ Sleep timer ◆...
Owner's Manual
Page 9
... Turns on or off or on the rear panel. Adjusts the bass/treble balance of input signals and select the corresponding input signals when one component is in conjunction with TONE CONTROL. F PROGRAM l / h Selects sound field programs. G INPUT MODE Selects either digital or analog input signals exclusively or sets this unit... audio signals for private listening with INPUT l / h on the front panel (or the input selector buttons on the remote control). I MULTI CH INPUT Selects the component connected to the left and right headphone channels.
... Turns on or off or on the rear panel. Adjusts the bass/treble balance of input signals and select the corresponding input signals when one component is in conjunction with TONE CONTROL. F PROGRAM l / h Selects sound field programs. G INPUT MODE Selects either digital or analog input signals exclusively or sets this unit... audio signals for private listening with INPUT l / h on the front panel (or the input selector buttons on the remote control). I MULTI CH INPUT Selects the component connected to the left and right headphone channels.
Owner's Manual
Page 10
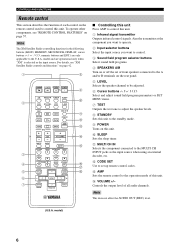
...standby mode. 9 POWER Turns on this unit. ENTER + 7 TEST RETURN MEMORY PRESET/CH A-E/CAT. Aim the transmitter at the component you want to operate. 2 Input selector buttons Select the input source you want to control. 3 Sound field program selector buttons Select... sound field programs. 4 SPEAKERS A/B Turn on or off the set up remote control codes. To operate other components, see "XM Satellite Radio controls and functions" on page 57. MUTE INPUT MUTE E 3 2CH STEREO 1 STANDARD 5 MUSIC ENTERTAIN MOVIE 2 3 4 5CH ...
...standby mode. 9 POWER Turns on this unit. ENTER + 7 TEST RETURN MEMORY PRESET/CH A-E/CAT. Aim the transmitter at the component you want to operate. 2 Input selector buttons Select the input source you want to control. 3 Sound field program selector buttons Select... sound field programs. 4 SPEAKERS A/B Turn on or off the set up remote control codes. To operate other components, see "XM Satellite Radio controls and functions" on page 57. MUTE INPUT MUTE E 3 2CH STEREO 1 STANDARD 5 MUSIC ENTERTAIN MOVIE 2 3 4 5CH ...
Owner's Manual
Page 12
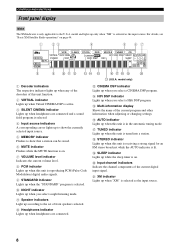
... Front panel display Note The XM indicator is lit. H STEREO indicator Lights up when you select a HiFi DSP program. J Input channel indicators Indicate the channel components of the current program and other information when adjusting or changing settings. B Headphones indicator Lights up when the "STANDARD" program is selected as the input...
... Front panel display Note The XM indicator is lit. H STEREO indicator Lights up when you select a HiFi DSP program. J Input channel indicators Indicate the channel components of the current program and other information when adjusting or changing settings. B Headphones indicator Lights up when the "STANDARD" program is selected as the input...
Owner's Manual
Page 13
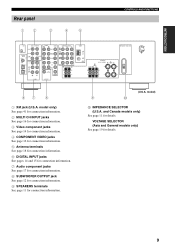
...panel 1 2 3 4 5 CONTROLS AND FUNCTIONS XM MULTI CH INPUT FRONT SURROUND DIGITAL INPUT SUB DVD 3 WOOFER CENTER AUDIO R L VIDEO DVD DTV/ CBL V-AUX COMPONENT VIDEO Y PB PR DVD A DTV/ CBL B VCR C COAXIAL CD 2 OPTICAL DTV/CBL DVD IN (PLAY) MD/ CD-R 1 OUT (REC) R L ...5 Antenna terminals See page 18 for connection information. 6 DIGITAL INPUT jacks See pages 14 and 15 for connection information. 7 Audio component jacks See page 17 for connection information. 8 SUBWOOFER OUTPUT jack See page 12 for connection information. 9 SPEAKERS terminals See page 11 for...
...panel 1 2 3 4 5 CONTROLS AND FUNCTIONS XM MULTI CH INPUT FRONT SURROUND DIGITAL INPUT SUB DVD 3 WOOFER CENTER AUDIO R L VIDEO DVD DTV/ CBL V-AUX COMPONENT VIDEO Y PB PR DVD A DTV/ CBL B VCR C COAXIAL CD 2 OPTICAL DTV/CBL DVD IN (PLAY) MD/ CD-R 1 OUT (REC) R L ...5 Antenna terminals See page 18 for connection information. 6 DIGITAL INPUT jacks See pages 14 and 15 for connection information. 7 Audio component jacks See page 17 for connection information. 8 SUBWOOFER OUTPUT jack See page 12 for connection information. 9 SPEAKERS terminals See page 11 for...
Owner's Manual
Page 16
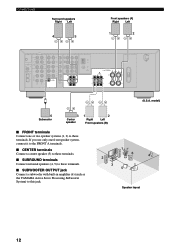
... speakers Right Left 4 5 Front speakers (A) Right Left 1 2 XM MULTI CH INPUT FRONT SURROUND DIGITAL INPUT SUB DVD 3 WOOFER CENTER AUDIO R L VIDEO DVD DTV/ CBL V-AUX COMPONENT VIDEO Y PB PR DVD A DTV/ CBL B VCR C COAXIAL CD 2 OPTICAL DTV-CBL DVD IN (PLAY) MD/ CD-R 1 OUT (REC) R L AUDIO IN VCR OUT ...to these terminals. ■ SURROUND terminals Connect surround speakers (4, 5) to these terminals. ■ SUBWOOFER OUTPUT jack Connect a subwoofer with built-in amplifier (6) (such as the YAMAHA Active Servo Processing Subwoofer System) to these terminals.
... speakers Right Left 4 5 Front speakers (A) Right Left 1 2 XM MULTI CH INPUT FRONT SURROUND DIGITAL INPUT SUB DVD 3 WOOFER CENTER AUDIO R L VIDEO DVD DTV/ CBL V-AUX COMPONENT VIDEO Y PB PR DVD A DTV/ CBL B VCR C COAXIAL CD 2 OPTICAL DTV-CBL DVD IN (PLAY) MD/ CD-R 1 OUT (REC) R L AUDIO IN VCR OUT ...to these terminals. ■ SURROUND terminals Connect surround speakers (4, 5) to these terminals. ■ SUBWOOFER OUTPUT jack Connect a subwoofer with built-in amplifier (6) (such as the YAMAHA Active Servo Processing Subwoofer System) to these terminals.
Owner's Manual
Page 17
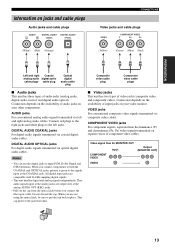
... Information on jacks and cable plugs Audio jacks and cable plugs AUDIO L R DIGITAL AUDIO COAXIAL DIGITAL AUDIO OPTICAL CONNECTIONS Video jacks and cable plugs VIDEO COMPONENT VIDEO Y PB PR (White) (Red) (Orange) (Yellow) (Green) (Blue) (Red) L R C O V Y PB PR Left and.... When you are compatible with 96-kHz sampling digital signals. • This unit handles digital and analog signals independently. COMPONENT VIDEO jacks For component signals, separated into the luminance (Y) and chrominance (PB, PR) video signals transmitted on separate wires of audio jacks ...
... Information on jacks and cable plugs Audio jacks and cable plugs AUDIO L R DIGITAL AUDIO COAXIAL DIGITAL AUDIO OPTICAL CONNECTIONS Video jacks and cable plugs VIDEO COMPONENT VIDEO Y PB PR (White) (Red) (Orange) (Yellow) (Green) (Blue) (Red) L R C O V Y PB PR Left and.... When you are compatible with 96-kHz sampling digital signals. • This unit handles digital and analog signals independently. COMPONENT VIDEO jacks For component signals, separated into the luminance (Y) and chrominance (PB, PR) video signals transmitted on separate wires of audio jacks ...

Owner's Manual
Page 18
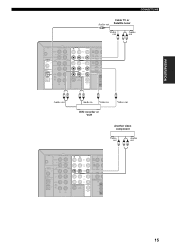
... recording. y • Use the AUDIO jacks of this unit. To enjoy the surround sound, use the sound field program selector buttons on while using the COMPONENT VIDEO connections (see page 30). • If your DVD player does not have a coaxial digital output jack but has an optical cable, connect the jack... connect a video monitor, DVD player, digital TV, and cable TV to this unit using this unit. Then connect the video signal output jack of the component to the VCR VIDEO IN jack of this unit. Notes • Once you connect your video monitor to this unit. CONNECTIONS Connecting video...
... recording. y • Use the AUDIO jacks of this unit. To enjoy the surround sound, use the sound field program selector buttons on while using the COMPONENT VIDEO connections (see page 30). • If your DVD player does not have a coaxial digital output jack but has an optical cable, connect the jack... connect a video monitor, DVD player, digital TV, and cable TV to this unit using this unit. Then connect the video signal output jack of the component to the VCR VIDEO IN jack of this unit. Notes • Once you connect your video monitor to this unit. CONNECTIONS Connecting video...
Owner's Manual
Page 19
... OUT MONITOR OUT R SURR SUB WOOFER MONITOR OUT OUTPUT LR Audio out LR Audio in V Video in V Video out DVD recorder or VCR Another video component Video out V Audio out LR XM MULTI CH INPUT FRONT SURROUND DIGITAL INPUT SUB DVD 3 WOOFER CENTER AUDIO R L VIDEO DVD DTV/ CBL V-AUX COMPONEN Y P DVD...
... OUT MONITOR OUT R SURR SUB WOOFER MONITOR OUT OUTPUT LR Audio out LR Audio in V Video in V Video out DVD recorder or VCR Another video component Video out V Audio out LR XM MULTI CH INPUT FRONT SURROUND DIGITAL INPUT SUB DVD 3 WOOFER CENTER AUDIO R L VIDEO DVD DTV/ CBL V-AUX COMPONEN Y P DVD...
Owner's Manual
Page 20
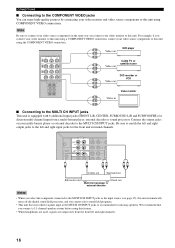
...Y Video out PB PR Video monitor Y Video in the same way you connect a 5.1-channel speaker system before using COMPONENT VIDEO connections. Note Be sure to connect your video source components in PB PR ■ Connecting to the MULTI CH INPUT jacks This unit is equipped with 6 additional input jacks... IN RL RL Center out Surround out Subwoofer out Front out Multi-format player or external decoder Notes • When you select the component connected to the MULTI CH INPUT jacks as the input source (see page 25), this unit automatically turns off the digital sound field ...
...Y Video out PB PR Video monitor Y Video in the same way you connect a 5.1-channel speaker system before using COMPONENT VIDEO connections. Note Be sure to connect your video source components in PB PR ■ Connecting to the MULTI CH INPUT jacks This unit is equipped with 6 additional input jacks... IN RL RL Center out Surround out Subwoofer out Front out Multi-format player or external decoder Notes • When you select the component connected to the MULTI CH INPUT jacks as the input source (see page 25), this unit automatically turns off the digital sound field ...
Owner's Manual
Page 21
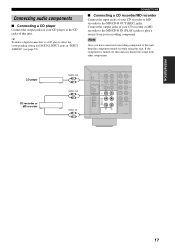
... this unit. Connect the output jacks of your CD recorder or MD recorder to the MD/CD-R IN (PLAY) jacks to play a source from other components. CD player CD recorder or MD recorder Audio out L R Audio out L R Audio in "INPUT ASSIGN" (see page 55). Note Once you have connected a recording... ■ Connecting a CD recorder/MD recorder Connect the input jacks of your CD recorder or MD recorder to this unit, keep the component turned on while using this unit may distort the sound from your CD player to a CD player, select the corresponding setting for DIGITAL INPUT jacks ...
... this unit. Connect the output jacks of your CD recorder or MD recorder to the MD/CD-R IN (PLAY) jacks to play a source from other components. CD player CD recorder or MD recorder Audio out L R Audio out L R Audio in "INPUT ASSIGN" (see page 55). Note Once you have connected a recording... ■ Connecting a CD recorder/MD recorder Connect the input jacks of your CD recorder or MD recorder to this unit, keep the component turned on while using this unit may distort the sound from your CD player to a CD player, select the corresponding setting for DIGITAL INPUT jacks ...
Owner's Manual
Page 27
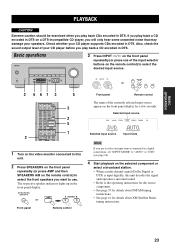
...CD encoded in DTS on the remote control) to select the front speakers you want to the operating instructions for the source component. • See page 35 for details about XM Satellite Radio tuning instructions. 23 BASIC OPERATION PLAYBACK PLAYBACK CAUTION Extreme caution ...- LEVEL SET MENU 5 3 2 5 7 1 Turn on the remote control) to "AUTO" or "DTS" (see page 26). 4 Start playback on the selected component or select a broadcast station. • When a multi-channel signal (Dolby Digital or DTS) is input digitally, this unit. 2 Press SPEAKERS on the front panel repeatedly...
...CD encoded in DTS on the remote control) to select the front speakers you want to the operating instructions for the source component. • See page 35 for details about XM Satellite Radio tuning instructions. 23 BASIC OPERATION PLAYBACK PLAYBACK CAUTION Extreme caution ...- LEVEL SET MENU 5 3 2 5 7 1 Turn on the remote control) to "AUTO" or "DTS" (see page 26). 4 Start playback on the selected component or select a broadcast station. • When a multi-channel signal (Dolby Digital or DTS) is input digitally, this unit. 2 Press SPEAKERS on the front panel repeatedly...
Owner's Manual
Page 28
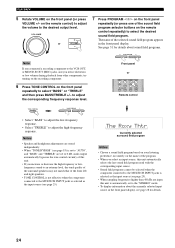
..., this unit automatically selects the last sound field program used with the corresponding input source. • Sound field programs cannot be selected when the component connected to the MULTI CH INPUT jacks is selected as the input source (see page 25). • When sampling frequencies higher than 48 kHz... tonal quality of the surround speakers may not match that of the front left and right speakers. • TONE CONTROL is not effective when the component connected to the MULTI CH INPUT jacks is set to "AUTO", and "BASS" and "TREBLE" are stored independently. • When "TONE BYPASS" (...
..., this unit automatically selects the last sound field program used with the corresponding input source. • Sound field programs cannot be selected when the component connected to the MULTI CH INPUT jacks is selected as the input source (see page 25). • When sampling frequencies higher than 48 kHz... tonal quality of the surround speakers may not match that of the front left and right speakers. • TONE CONTROL is not effective when the component connected to the MULTI CH INPUT jacks is set to "AUTO", and "BASS" and "TREBLE" are stored independently. • When "TONE BYPASS" (...
Owner's Manual
Page 29
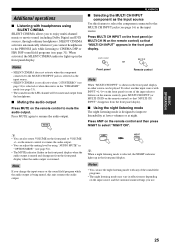
... while listening to resume the audio output. AMP NIGHT +10 y When a night listening mode is being muted, this feature to select the component connected to improve listenability at lower volumes or at night. When activated, the SILENT CINEMA indicator lights up in the front panel display. Notes ... You can also rotate VOLUME on the remote control to mute the audio output. Notes • SILENT CINEMA does not activate when the component connected to the MULTI CH INPUT jacks is selected as the input source Use this unit resumes the audio output. on the front panel ...
... while listening to resume the audio output. AMP NIGHT +10 y When a night listening mode is being muted, this feature to select the component connected to improve listenability at lower volumes or at night. When activated, the SILENT CINEMA indicator lights up in the front panel display. Notes ... You can also rotate VOLUME on the remote control to mute the audio output. Notes • SILENT CINEMA does not activate when the component connected to the MULTI CH INPUT jacks is selected as the input source Use this unit resumes the audio output. on the front panel ...
Owner's Manual
Page 33
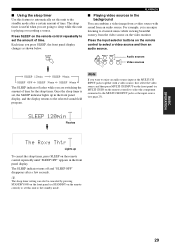
... on the remote control) to set this unit to the standby mode. 29 Press the input selector buttons on the remote control) to select the component connected to the MULTI CH INPUT jacks as shown below. The SLEEP indicator turns off and "SLEEP OFF" disappears after a certain amount of time. y The...
... on the remote control) to set this unit to the standby mode. 29 Press the input selector buttons on the remote control) to select the component connected to the MULTI CH INPUT jacks as shown below. The SLEEP indicator turns off and "SLEEP OFF" disappears after a certain amount of time. y The...

Owner's Manual
Page 34
... FIELD PROGRAMS SOUND FIELD PROGRAMS This unit is equipped with the corresponding input source. • Sound field programs cannot be selected when the component connected to the MULTI CH INPUT jacks is selected as the input source (see page 25). • When sampling frequencies higher than 48... kHz are input, this unit is also equipped with a YAMAHA digital sound field processing (DSP) chip containing several sound field programs which you select an input source, this unit automatically selects the last sound...
... FIELD PROGRAMS SOUND FIELD PROGRAMS This unit is equipped with the corresponding input source. • Sound field programs cannot be selected when the component connected to the MULTI CH INPUT jacks is selected as the input source (see page 25). • When sampling frequencies higher than 48... kHz are input, this unit is also equipped with a YAMAHA digital sound field processing (DSP) chip containing several sound field programs which you select an input source, this unit automatically selects the last sound...

Owner's Manual
Page 37
... FIELD PROGRAMS ■ Using Virtual CINEMA DSP Virtual CINEMA DSP allows you select a CINEMA DSP program (see page 54) in the "STRAIGHT" mode. - When the component connected to unprocessed input signals When this unit is in the following cases: - BASIC OPERATION 33 Bypasses the decoders and DSP processors of this unit...
... FIELD PROGRAMS ■ Using Virtual CINEMA DSP Virtual CINEMA DSP allows you select a CINEMA DSP program (see page 54) in the "STRAIGHT" mode. - When the component connected to unprocessed input signals When this unit is in the following cases: - BASIC OPERATION 33 Bypasses the decoders and DSP processors of this unit...
Owner's Manual
Page 38
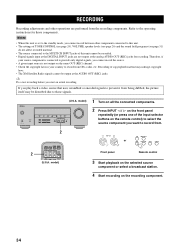
...4 Start recording on the same OUT (REC) channel. • Check the copyright laws in your country to those components. Refer to prevent it from the recording components. If you cannot record between other operations are not output at the AUDIO OUT (REC) jacks. model) STANDBY /ON... play back a video source that uses scrambled or encoded signals to the operating instructions for recording. Therefore, if your source component is not output on the recording component. 34 y Do a test recording before you cannot record the source. • A given input source is connected to ...
...4 Start recording on the same OUT (REC) channel. • Check the copyright laws in your country to those components. Refer to prevent it from the recording components. If you cannot record between other operations are not output at the AUDIO OUT (REC) jacks. model) STANDBY /ON... play back a video source that uses scrambled or encoded signals to the operating instructions for recording. Therefore, if your source component is not output on the recording component. 34 y Do a test recording before you cannot record the source. • A given input source is connected to ...


