
Owners Manual
Page 3
.... Compliance with these corrective measures do not produce satisfactory results, please contact the local retailer authorized to eliminate the problem by Yamaha may result in harmful interference with FCC regulations does not guarantee that produce heat. 24 Outdoor Antenna Grounding - Replacement Parts -...discharge unit, size of grounding conductors, location of antenna discharge unit, connection to use this product to those products distributed by turning the unit "OFF" and "ON", please try to distribute this product, ask the service technician to perform safety checks ...
.... Compliance with these corrective measures do not produce satisfactory results, please contact the local retailer authorized to eliminate the problem by Yamaha may result in harmful interference with FCC regulations does not guarantee that produce heat. 24 Outdoor Antenna Grounding - Replacement Parts -...discharge unit, size of grounding conductors, location of antenna discharge unit, connection to use this product to those products distributed by turning the unit "OFF" and "ON", please try to distribute this product, ask the service technician to perform safety checks ...
Owners Manual
Page 4
... the back of this unit, and/or personal injury. - Burning objects (i.e. Containers with Canadian ICES-003. 7 8 9 10 11 12 We Want You Listening For A Lifetime YAMAHA and the Electronic Industries Association's Consumer Electronics Group want you to avoid prolonged exposure from the AC power source as long as they may cause...rises, it at least 30 cm on the top, 20 cm on the surface of this unit must be set this unit where it is turned off. When disconnecting the power cord from cold to sudden temperature changes from the wall outlet, grasp the plug; Use a clean, dry cloth...
... the back of this unit, and/or personal injury. - Burning objects (i.e. Containers with Canadian ICES-003. 7 8 9 10 11 12 We Want You Listening For A Lifetime YAMAHA and the Electronic Industries Association's Consumer Electronics Group want you to avoid prolonged exposure from the AC power source as long as they may cause...rises, it at least 30 cm on the top, 20 cm on the surface of this unit must be set this unit where it is turned off. When disconnecting the power cord from cold to sudden temperature changes from the wall outlet, grasp the plug; Use a clean, dry cloth...
Owners Manual
Page 5
... ...14 Connecting audio components ...16 Connecting the antennas ...17 Connecting an external amplifier ...18 Connecting an external decoder ...18 Connecting the power supply cords ...19 Turning on the SET MENU ...40 1 SPEAKER SET (speaker mode settings) ...41 2 LFE LEVEL ...43 3 SP DLY TIME (speaker delay time) ...43 4 D. INTRODUCTION CONTENTS INTRODUCTION CONTENTS...
... ...14 Connecting audio components ...16 Connecting the antennas ...17 Connecting an external amplifier ...18 Connecting an external decoder ...18 Connecting the power supply cords ...19 Turning on the SET MENU ...40 1 SPEAKER SET (speaker mode settings) ...41 2 LFE LEVEL ...43 3 SP DLY TIME (speaker delay time) ...43 4 D. INTRODUCTION CONTENTS INTRODUCTION CONTENTS...
Owners Manual
Page 8
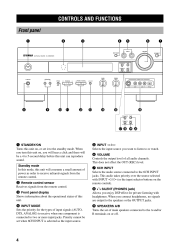
...- + S VIDEO VIDEO L AUDIO R OPTICAL 8 9 0 q w e r t PRESET/TUNING y FM/AM EDIT TUNING MODE MEMORY AUTO/MAN'L MONO MAN'L/AUTO FM ui o p 1 STANDBY/ON Turns this unit on or off. 4 INPUT MODE Sets the priority for private listening with INPUT l / h (or the input selector buttons on the remote control). 2 Remote... unit. 8 SILENT (PHONES jack) Allows you connect headphones, no signals are output to the speakers or the OUTPUT jacks. 9 SPEAKERS A/B Turns the set of main speakers connected to the A and/or B terminals on , or set when 6CH INPUT is connected to the 6CH INPUT...
...- + S VIDEO VIDEO L AUDIO R OPTICAL 8 9 0 q w e r t PRESET/TUNING y FM/AM EDIT TUNING MODE MEMORY AUTO/MAN'L MONO MAN'L/AUTO FM ui o p 1 STANDBY/ON Turns this unit on or off. 4 INPUT MODE Sets the priority for private listening with INPUT l / h (or the input selector buttons on the remote control). 2 Remote... unit. 8 SILENT (PHONES jack) Allows you connect headphones, no signals are output to the speakers or the OUTPUT jacks. 9 SPEAKERS A/B Turns the set of main speakers connected to the A and/or B terminals on , or set when 6CH INPUT is connected to the 6CH INPUT...
Owners Manual
Page 9
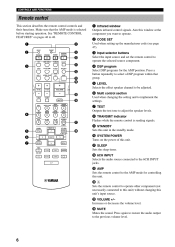
... signals from a portable external source (game console, etc.). Turn right to increase or turn left and right channels. Set the input source to V-AUX to decrease the highfrequency response. Turn right to increase or turn left and right speakers. When STEREO is selected, 2-channel ... AUX jacks on or off). CONTROLS AND FUNCTIONS 0 STEREO/EFFECT Switches between selecting a preset station number and tuning (the colon (:) turns on the front panel are mixed down to exchange the assignment of two preset stations with each other. PREPARATION e A/B/C/D/E Selects preset station groups...
... signals from a portable external source (game console, etc.). Turn right to increase or turn left and right channels. Set the input source to V-AUX to decrease the highfrequency response. Turn right to increase or turn left and right speakers. When STEREO is selected, 2-channel ... AUX jacks on or off). CONTROLS AND FUNCTIONS 0 STEREO/EFFECT Switches between selecting a preset station number and tuning (the colon (:) turns on the front panel are mixed down to exchange the assignment of two preset stations with each other. PREPARATION e A/B/C/D/E Selects preset station groups...
Owners Manual
Page 10
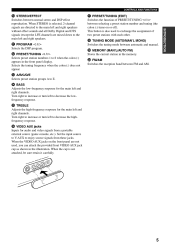
... CLUB 1 TV SPORTS 2 MONO MOVIE 3 MOVIE THEATER 1 7 TEST Outputs the test tone to 48. 1 Infrared window Outputs infrared control signals. TEST SELECT + DISPLAY 0 SYSTEM POWER Turns on pages 46 to adjust the speaker levels. 4 5 /DTS SUR. 6 7 8 8 TRANSMIT indicator SELECT EX/ES STEREO ENTER EFFECT 9 0 +10 u i Flashes while the remote control is...
... CLUB 1 TV SPORTS 2 MONO MOVIE 3 MOVIE THEATER 1 7 TEST Outputs the test tone to 48. 1 Infrared window Outputs infrared control signals. TEST SELECT + DISPLAY 0 SYSTEM POWER Turns on pages 46 to adjust the speaker levels. 4 5 /DTS SUR. 6 7 8 8 TRANSMIT indicator SELECT EX/ES STEREO ENTER EFFECT 9 0 +10 u i Flashes while the remote control is...
Owners Manual
Page 13
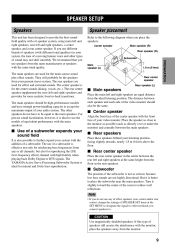
...Dolby Digital or DTS signals. Place the speaker as close to the monitor as possible (such as the rear speakers. The YAMAHA Active Servo Processing Subwoofer System is for more realistic front-to-back transitions. English CAUTION Use magnetically shielded speakers. PREPARATION SPEAKER ... critical, because low bass sounds are used for natural and lively bass reproduction. I Rear speakers Place these speakers behind your video monitor. Turn it slightly toward the center of your listening position, facing slightly inwards, nearly 1.8 m (6 feet) above the floor. If this type...
...Dolby Digital or DTS signals. Place the speaker as close to the monitor as possible (such as the rear speakers. The YAMAHA Active Servo Processing Subwoofer System is for more realistic front-to-back transitions. English CAUTION Use magnetically shielded speakers. PREPARATION SPEAKER ... critical, because low bass sounds are used for natural and lively bass reproduction. I Rear speakers Place these speakers behind your video monitor. Turn it slightly toward the center of your listening position, facing slightly inwards, nearly 1.8 m (6 feet) above the floor. If this type...
Owners Manual
Page 16
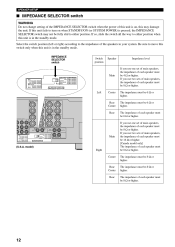
... of each speaker must be 8 Ω or higher. The impedance of each speaker must be 8 Ω or higher. The impedance must be fully slid to turn on , this unit is in your system. If so, slide the switch all the way to either position when this unit fails to either position...
... of each speaker must be 8 Ω or higher. The impedance of each speaker must be 8 Ω or higher. The impedance must be fully slid to turn on , this unit is in your system. If so, slide the switch all the way to either position when this unit fails to either position...
Owners Manual
Page 18
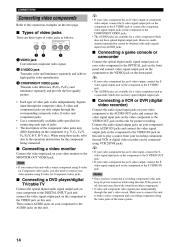
Notes • Once you have connected a recording component to this unit, keep its power turned on your recording component. Then connect AUDIO jacks on while using this unit. 14 I Types of video jacks There are three types of video jacks ...
Notes • Once you have connected a recording component to this unit, keep its power turned on your recording component. Then connect AUDIO jacks on while using this unit. 14 I Types of video jacks There are three types of video jacks ...
Owners Manual
Page 20
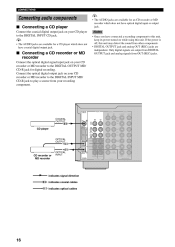
...; The AUDIO jacks are available for an CD recorder or MD recorder which does not have connected a recording component to this unit, keep its power turned on your recording component. y • The AUDIO jacks are available for digital recording. I Connecting a CD player Connect the coaxial digital output jack on your CD...
...; The AUDIO jacks are available for an CD recorder or MD recorder which does not have connected a recording component to this unit, keep its power turned on your recording component. y • The AUDIO jacks are available for digital recording. I Connecting a CD player Connect the coaxial digital output jack on your CD...
Owners Manual
Page 22
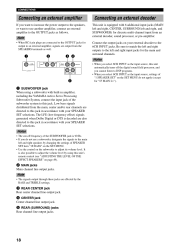
...outputs to this jack. Low bass signals distributed from the main, center and/or rear channels are also directed to this unit automatically turns off frequency of the SUBWOOFER jack is also possible to adjust the volume level by using a subwoofer with 6 additional input jacks ... EFFECT SPEAKERS" on your SPEAKER SET selections. OUTPUT R REAR (SURROUND) L 5 1 SUBWOOFER jack When using this jack in amplifier, including the YAMAHA Active Servo Processing Subwoofer System, connect the input jack of "1 SPEAKER SET" on the SET MENU do not use another amplifier, connect an external ...
...outputs to this jack. Low bass signals distributed from the main, center and/or rear channels are also directed to this unit automatically turns off frequency of the SUBWOOFER jack is also possible to adjust the volume level by using a subwoofer with 6 additional input jacks ... EFFECT SPEAKERS" on your SPEAKER SET selections. OUTPUT R REAR (SURROUND) L 5 1 SUBWOOFER jack When using this jack in amplifier, including the YAMAHA Active Servo Processing Subwoofer System, connect the input jack of "1 SPEAKER SET" on the SET MENU do not use another amplifier, connect an external ...
Owners Manual
Page 23
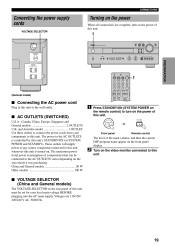
...power to any source component connected to this unit whenever this unit is controlled by this unit must be connected to the AC OUTLETS is turned on. and Australia model ...1 OUTLET Use these outlets to connect the power cords from your local main voltage BEFORE plugging into the AC ... panel Remote control The level of components) that can be set for your components to this unit. CONNECTIONS Connecting the power supply cords VOLTAGE SELECTOR Turning on the power When all connections are 110/120/ 220/240 V AC, 50/60 Hz. The maximum power (total power consumption of the...
...power to any source component connected to this unit whenever this unit is controlled by this unit must be connected to the AC OUTLETS is turned on. and Australia model ...1 OUTLET Use these outlets to connect the power cords from your local main voltage BEFORE plugging into the AC ... panel Remote control The level of components) that can be set for your components to this unit. CONNECTIONS Connecting the power supply cords VOLTAGE SELECTOR Turning on the power When all connections are 110/120/ 220/240 V AC, 50/60 Hz. The maximum power (total power consumption of the...
Owners Manual
Page 26
... adjusting the VOLUME knob (or VOLUME +/- on the SET MENU to NON, the output level of the normal level. The test tone will be heard, turn down the volume, set to -10 dB, adjust the levels for the center and rear speakers again. 22
... adjusting the VOLUME knob (or VOLUME +/- on the SET MENU to NON, the output level of the normal level. The test tone will be heard, turn down the volume, set to -10 dB, adjust the levels for the center and rear speakers again. 22

Owners Manual
Page 27
...front panel display. 6CH INPUT ADVANCED OPERATION 6CH INPUT POWER STANDBY /ON or Front panel Remote control or Remote control Front panel 2 3 Turn on the front panel display for a few seconds. APPENDIX English 23 The selected input source name and input mode appear on the video ... To select the audio source connected to the 6CH INPUT jacks (When combining with a video source) • You need to select the input to turn off "6CH INPUT" from the front panel display. SPEAKERS A B ADDITIONAL INFORMATION Note • If "6CH INPUT" is connected before selecting audio source...
...front panel display. 6CH INPUT ADVANCED OPERATION 6CH INPUT POWER STANDBY /ON or Front panel Remote control or Remote control Front panel 2 3 Turn on the front panel display for a few seconds. APPENDIX English 23 The selected input source name and input mode appear on the video ... To select the audio source connected to the 6CH INPUT jacks (When combining with a video source) • You need to select the input to turn off "6CH INPUT" from the front panel display. SPEAKERS A B ADDITIONAL INFORMATION Note • If "6CH INPUT" is connected before selecting audio source...
Owners Manual
Page 28
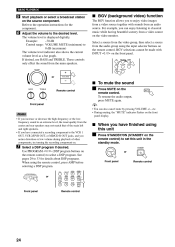
... on the remote control) to classical music while having beautiful scenery from the center and rear speakers may not match that of other components, try turning the recording component on the video monitor. STANDBY STANDBY /ON 7 Select a DSP program if desired. For example, you have finished using the input selector buttons...
... on the remote control) to classical music while having beautiful scenery from the center and rear speakers may not match that of other components, try turning the recording component on the video monitor. STANDBY STANDBY /ON 7 Select a DSP program if desired. For example, you have finished using the input selector buttons...
Owners Manual
Page 29
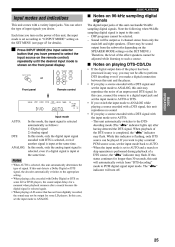
... DTS source can select the type of the player has been processed in any way, you desire. While this unit: - ANALOG: In this unit will turn on the power of a DTS source, the "t" indicator may not be sound output from "DTS-decoding" mode to ANALOG while playing a source encoded with a ... (There may flash. In this case, connect the source to a digital input jack and set the input mode to AUTO or DTS. • If you turn off. When the input mode is completed, the "t" indicator may be able to perform DTS decoding even if you make a digital connection between this unit...
... DTS source can select the type of the player has been processed in any way, you desire. While this unit: - ANALOG: In this unit will turn on the power of a DTS source, the "t" indicator may not be sound output from "DTS-decoding" mode to ANALOG while playing a source encoded with a ... (There may flash. In this case, connect the source to a digital input jack and set the input mode to AUTO or DTS. • If you turn off. When the input mode is completed, the "t" indicator may be able to perform DTS decoding even if you make a digital connection between this unit...
Owners Manual
Page 30
... the rear speakers. Minimize the sound reflections in the standby mode, the current source and DSP program are memorized and are automatically selected when you turn on the power again. • If a Dolby Digital or DTS signal is input when the input mode is set to AUTO, the DSP program (No...
... the rear speakers. Minimize the sound reflections in the standby mode, the current source and DSP program are memorized and are automatically selected when you turn on the power again. • If a Dolby Digital or DTS signal is input when the input mode is set to AUTO, the DSP program (No...
Owners Manual
Page 32
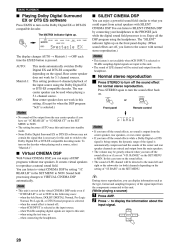
...ES compatible decoder. EX/ES MATRIX I Normal stereo reproduction Matrix6.1: 1 Press STEREO to the source with SILENT CINEMA DSP. Notes • If you turn off the sound effects, no sound is set to reproduce a natural sound field. In this unit; - PRESET/CH - Enjoy all DSP programs ...speaker does not work in the SET MENU to MIN. This setting produces 6-channel playback of LFE channel will be greatly reduced when you turn on the signal. STEREO STEREO OFF: or EFFECT ENTER EFFECT Front panel Remote control Notes • No sound will be used when playing...
...ES compatible decoder. EX/ES MATRIX I Normal stereo reproduction Matrix6.1: 1 Press STEREO to the source with SILENT CINEMA DSP. Notes • If you turn off the sound effects, no sound is set to reproduce a natural sound field. In this unit; - PRESET/CH - Enjoy all DSP programs ...speaker does not work in the SET MENU to MIN. This setting produces 6-channel playback of LFE channel will be greatly reduced when you turn on the signal. STEREO STEREO OFF: or EFFECT ENTER EFFECT Front panel Remote control Notes • No sound will be used when playing...
Owners Manual
Page 36
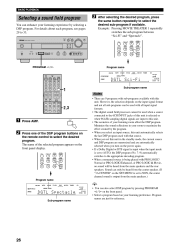
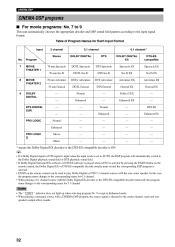
... played when AUTO is selected by pressing the EX/ES button on the remote control, the Dolby Digital EX or DTS-ES compatible decoder usually turns on and the corresponding DSP program is selected. • EX/ES on the remote control can be used to the input signal format. In ... selecting program No. 9 except in Enhanced mode. • When playing a monaural source with the Dolby Digital EX decoder or the DTS-ES compatible decoder turned off, the program name changes to the center channel, main and rear speakers output effect sounds. 32 Table of Program Names for 5.1 channel.
... played when AUTO is selected by pressing the EX/ES button on the remote control, the Dolby Digital EX or DTS-ES compatible decoder usually turns on and the corresponding DSP program is selected. • EX/ES on the remote control can be used to the input signal format. In ... selecting program No. 9 except in Enhanced mode. • When playing a monaural source with the Dolby Digital EX decoder or the DTS-ES compatible decoder turned off, the program name changes to the center channel, main and rear speakers output effect sounds. 32 Table of Program Names for 5.1 channel.
Owners Manual
Page 38
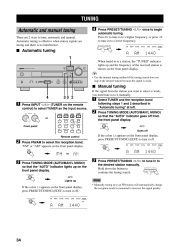
.... INPUT Select TUNER and the reception band following steps 1 and 2 described in to an FM station will automatically change the reception mode to monaural to turn it off . TUNING MODE 2 POWER TV POWER AV MD/CD-R STANDBY POWER or Front panel CD TUNER SLEEP DVD D-TV/CBL V-AUX 6CH INPUT AUTO... front panel display. TUNING Automatic and manual tuning There are strong and there is weak. Automatic tuning is effective when station signals are 2 ways to turn it off .
.... INPUT Select TUNER and the reception band following steps 1 and 2 described in to an FM station will automatically change the reception mode to monaural to turn it off . TUNING MODE 2 POWER TV POWER AV MD/CD-R STANDBY POWER or Front panel CD TUNER SLEEP DVD D-TV/CBL V-AUX 6CH INPUT AUTO... front panel display. TUNING Automatic and manual tuning There are strong and there is weak. Automatic tuning is effective when station signals are 2 ways to turn it off .

