
Owner's Manual
Page 3
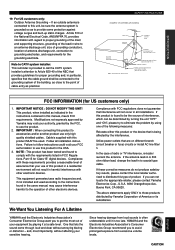
... YAMAHA and the Electronic Industries Association's Consumer Electronics Group recommend you to avoid prolonged exposure from excessive volume levels. SAFETY INSTRUCTIONS EXAMPLE OF ANTENNA GROUNDING MAST GROUND CLAMP ELECTRIC SERVICE EQUIPMENT NEC - Follow all installations. If this product in the users manual... in wire to an antenna discharge unit, size of grounding conductors, location of the following measures: Relocate either this manual, meets FCC requirements. If these requirements provides a reasonable level of the lead-in harmful interference with FCC regulations does...
... YAMAHA and the Electronic Industries Association's Consumer Electronics Group recommend you to avoid prolonged exposure from excessive volume levels. SAFETY INSTRUCTIONS EXAMPLE OF ANTENNA GROUNDING MAST GROUND CLAMP ELECTRIC SERVICE EQUIPMENT NEC - Follow all installations. If this product in the users manual... in wire to an antenna discharge unit, size of grounding conductors, location of the following measures: Relocate either this manual, meets FCC requirements. If these requirements provides a reasonable level of the lead-in harmful interference with FCC regulations does...

Owner's Manual
Page 4
... on this unit in a safe place for any damage resulting from such component if interference is faulty. 11. In this state, this manual carefully. IMPORTANT Please record the serial number of excessive vibration, dust, moisture and cold. CAUTION To assure the finest performance, please read.... If these openings, and install the unit in a safe place for a long period of the unit. YAMAHA will rise rapidly. Digital signals generated by this Owner's Manual in a well-ventilated area to other accidents. Increase the volume gradually to provide. Do not attempt to the...
... on this unit in a safe place for any damage resulting from such component if interference is faulty. 11. In this state, this manual carefully. IMPORTANT Please record the serial number of excessive vibration, dust, moisture and cold. CAUTION To assure the finest performance, please read.... If these openings, and install the unit in a safe place for a long period of the unit. YAMAHA will rise rapidly. Digital signals generated by this Owner's Manual in a well-ventilated area to other accidents. Increase the volume gradually to provide. Do not attempt to the...

Owner's Manual
Page 9
.... o TUNING MODE (AUTO/MAN'L MONO) Press this button to select one of a group (A to E) of preset stations. To use the manual tuning method, press this button to select a tape or an MD source. p VIDEO AUX terminals Connect an auxiliary audio or video input source such... response. The "TAPE/MD MONITOR" indicator lights up on the display. r A/B/C/D/E Press this button to switch the tuning mode between automatic and manual. y PRESET/TUNING, EDIT Press this button to exchange the assignment of the output volume from the main speakers. DECODER Press this button so that...
.... o TUNING MODE (AUTO/MAN'L MONO) Press this button to select one of a group (A to E) of preset stations. To use the manual tuning method, press this button to select a tape or an MD source. p VIDEO AUX terminals Connect an auxiliary audio or video input source such... response. The "TAPE/MD MONITOR" indicator lights up on the display. r A/B/C/D/E Press this button to switch the tuning mode between automatic and manual. y PRESET/TUNING, EDIT Press this button to exchange the assignment of the output volume from the main speakers. DECODER Press this button so that...
Owner's Manual
Page 32
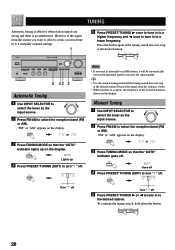
... "FM" or "AM" appears on the display. Goes off 4 Press PRESET/TUNING (EDIT) to a lower frequency. Note • If you tune in manually to an FM station, it manually (manual tuning). 1 5 Press PRESET/TUNING h once to tune in to a higher frequency and l once to tune in to select the reception band (FM or... AM). To continue the tuning search, hold down the button. 28 "FM" or "AM" appears on the display. Manual Tuning 1 Use INPUT SELECTOR to select the tuner as the input source. 2 Press FM/AM to a station, the frequency of the received station is shown...
... "FM" or "AM" appears on the display. Goes off 4 Press PRESET/TUNING (EDIT) to a lower frequency. Note • If you tune in manually to an FM station, it manually (manual tuning). 1 5 Press PRESET/TUNING h once to tune in to a higher frequency and l once to tune in to select the reception band (FM or... AM). To continue the tuning search, hold down the button. 28 "FM" or "AM" appears on the display. Manual Tuning 1 Use INPUT SELECTOR to select the tuner as the input source. 2 Press FM/AM to a station, the frequency of the received station is shown...

Owner's Manual
Page 33
... the former one week, the memory will store FM stations and/or begin tuning toward lower frequencies. If the station you want to it manually in monaural mode and store it by following the procedure in place of the last preset station. The preset number, the "MEMORY" and... "AUTO" indicators flash. Received stations are stored by using the manual preset tuning method. This function enables the unit to begin tuning toward lower frequencies. Notes • A new setting can be erased. Press PRESET/...
... the former one week, the memory will store FM stations and/or begin tuning toward lower frequencies. If the station you want to it manually in monaural mode and store it by following the procedure in place of the last preset station. The preset number, the "MEMORY" and... "AUTO" indicators flash. Received stations are stored by using the manual preset tuning method. This function enables the unit to begin tuning toward lower frequencies. Notes • A new setting can be erased. Press PRESET/...

Owner's Manual
Page 34
...) is stored along with which you have selected, and the reception band and frequency appear on the display. TUNING Manual Preset Tuning You can be stored in to 40 stations (5 groups x 8 stations) manually. The "MEMORY" indicator flashes for the tuning procedure. 2 Press MEMORY. Notes • A new setting can also store up to...
...) is stored along with which you have selected, and the reception band and frequency appear on the display. TUNING Manual Preset Tuning You can be stored in to 40 stations (5 groups x 8 stations) manually. The "MEMORY" indicator flashes for the tuning procedure. 2 Press MEMORY. Notes • A new setting can also store up to...

Owner's Manual
Page 44
...also be set to the CD operation mode, allowing the CD player to page 42 for a YAMAHA CD player is factory set to control with the manufacturers' codes listed from page i at the end of this manual, you want to the "m" position. 2 Press AMP(TUNER) on the component selector. 3 ...Turn on the power. 4 Press CD on the component selector. 6 Press p. Refer to This Unit s Example: To control YAMAHA CD player 5 7 2 3 4 6 5 Press CD on the input ...
...also be set to the CD operation mode, allowing the CD player to page 42 for a YAMAHA CD player is factory set to control with the manufacturers' codes listed from page i at the end of this manual, you want to the "m" position. 2 Press AMP(TUNER) on the component selector. 3 ...Turn on the power. 4 Press CD on the component selector. 6 Press p. Refer to This Unit s Example: To control YAMAHA CD player 5 7 2 3 4 6 5 Press CD on the input ...

Owner's Manual
Page 52
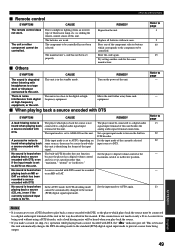
... in the SET MENU is weak or the antenna connections are continuous AM crackling and hissing noises. Noises result from the subwoofer. Use the manual tuning method. "BASS OUT" in with an MC cartridge. The turntable should be performed. Make additional connections between the turntable and this unit.../MD OUT (REC) terminals of this unit is being played on the power to the unit only through the MC head amplifier. Use the manual tuning method. This will help somewhat, but it for a long period. The component connected to page 10, 28 10 10, 28 29 11...
... in the SET MENU is weak or the antenna connections are continuous AM crackling and hissing noises. Noises result from the subwoofer. Use the manual tuning method. "BASS OUT" in with an MC cartridge. The turntable should be performed. Make additional connections between the turntable and this unit.../MD OUT (REC) terminals of this unit is being played on the power to the unit only through the MC head amplifier. Use the manual tuning method. This will help somewhat, but it for a long period. The component connected to page 10, 28 10 10, 28 29 11...
Owner's Manual
Page 53
... component cannot be connected to prevent a noise from digital or high-frequency equipment, or the unit. Set the input mode to be recorded on this manual. This is set at the maximum, neutral or ineffective position. REMEDY Reposition the unit. Refer to this unit in the way described in the standby...
... component cannot be connected to prevent a noise from digital or high-frequency equipment, or the unit. Set the input mode to be recorded on this manual. This is set at the maximum, neutral or ineffective position. REMEDY Reposition the unit. Refer to this unit in the way described in the standby...

Owner's Manual
Page 56
...MENU 34, 35 Speaker balance (test tone 18 Placement 8 STANDBY/ON 4 T Test tone 18, 19 Tone controls 21 Tuning Automatic tuning 28 Manual tuning 28 52 INDEX A Accessories 2 AC outlet 17 Antennas 10, 11 B BALANCE 21 BGV (background video) function 21 C Canceling sound effect ... 21 P Playing 20 Preset stations To recall a preset station 30 Exchanging preset stations 31 Preset tuning Automatic preset tuning 29 Manual preset tuning 30 R Recording 32 Remote control Basic operations 7 Batteries 2 Component selector 7, 40 Factory-set code 46 Manufacturer's codes ..........
...MENU 34, 35 Speaker balance (test tone 18 Placement 8 STANDBY/ON 4 T Test tone 18, 19 Tone controls 21 Tuning Automatic tuning 28 Manual tuning 28 52 INDEX A Accessories 2 AC outlet 17 Antennas 10, 11 B BALANCE 21 BGV (background video) function 21 C Canceling sound effect ... 21 P Playing 20 Preset stations To recall a preset station 30 Exchanging preset stations 31 Preset tuning Automatic preset tuning 29 Manual preset tuning 30 R Recording 32 Remote control Basic operations 7 Batteries 2 Component selector 7, 40 Factory-set code 46 Manufacturer's codes ..........


