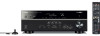
Owners Manual
Page 2
CONTENTS Accessories 4 FEATURES 5 What you can do with the unit 5 Part names and functions 7 Front panel 7 Front display (indicators 8 Rear panel 9 Remote control 10 PREPARATIONS 11 General setup procedure 11 1 Placing speakers 12 2 Connecting speakers 15 5.1-channel system 15 7.1-channel system 15 Connecting front speakers that support ...
CONTENTS Accessories 4 FEATURES 5 What you can do with the unit 5 Part names and functions 7 Front panel 7 Front display (indicators 8 Rear panel 9 Remote control 10 PREPARATIONS 11 General setup procedure 11 1 Placing speakers 12 2 Connecting speakers 15 5.1-channel system 15 7.1-channel system 15 Connecting front speakers that support ...
Owners Manual
Page 3
...56 Playing back iTunes/iPod music via a network (AirPlay 58 Playback of iTunes/iPod music contents 58 Playing back music in multiple rooms (HTR-5065 only 60 Preparing Zone B 60 Configuring playback settings for different playback sources (Option menu 62 Option menu items 62 CONFIGURATIONS 66 Configuring ...system 87 Audio 88 Video 89 FM/AM radio 90 USB and network 90 Remote control 91 Error indications on the front display 92 Glossary 93 Audio information 93 HDMI and video information 94 Yamaha technologies 95 Video signal flow 96 Information on HDMI 96 HDMI Control 96 HDMI...
...56 Playing back iTunes/iPod music via a network (AirPlay 58 Playback of iTunes/iPod music contents 58 Playing back music in multiple rooms (HTR-5065 only 60 Preparing Zone B 60 Configuring playback settings for different playback sources (Option menu 62 Option menu items 62 CONFIGURATIONS 66 Configuring ...system 87 Audio 88 Video 89 FM/AM radio 90 USB and network 90 Remote control 91 Error indications on the front display 92 Glossary 93 Audio information 93 HDMI and video information 94 Yamaha technologies 95 Video signal flow 96 Information on HDMI 96 HDMI Control 96 HDMI...
Owners Manual
Page 4
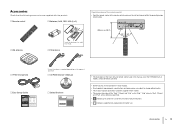
...shown below. Accessories En 4 Accessories Check that the following accessories are of the HTR-5065 (U.S.A. model), unless otherwise specified. • Some features are not available in this manual are supplied with the product. … Remote control … Batteries (AAA, R03, UM-4) (x2) … AM... antenna Insert the batteries the right way round. … FM antenna Operating range of the remote control • Point the remote control at the remote control sensor on the region of purchase. … CD-ROM (Owner's Manual) … Safety Brochure • The ...
...shown below. Accessories En 4 Accessories Check that the following accessories are of the HTR-5065 (U.S.A. model), unless otherwise specified. • Some features are not available in this manual are supplied with the product. … Remote control … Batteries (AAA, R03, UM-4) (x2) … AM... antenna Insert the batteries the right way round. … FM antenna Operating range of the remote control • Point the remote control at the remote control sensor on the region of purchase. … CD-ROM (Owner's Manual) … Safety Brochure • The ...
Owners Manual
Page 5
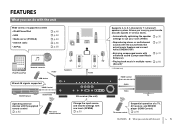
.../DVD player (HDMI Control) . to 5.1-channel (to enjoy your room (YPAO) • Reproducing stereo or multichannel sounds with . p.56 . p.60 (Zone B)* * HTR-5065 only HDMI Control Audio Video TV TV remote control Sequential operation of supported content • iPod/iPhone/iPad • USB • Media server (PC/NAS) • Internet radio •...
.../DVD player (HDMI Control) . to 5.1-channel (to enjoy your room (YPAO) • Reproducing stereo or multichannel sounds with . p.56 . p.60 (Zone B)* * HTR-5065 only HDMI Control Audio Video TV TV remote control Sequential operation of supported content • iPod/iPhone/iPad • USB • Media server (PC/NAS) • Internet radio •...
Owners Manual
Page 7
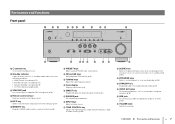
... Displays information (p.8). Also, turns on the unit when it is being charged (p.46) 3 YPAO MIC jack For connecting the supplied YPAO microphone (p.30). 4 Remote control sensor Receives remote control signals (p.4). 5 INFO key Selects the information displayed on /off (standby) the unit. 2 Standby indicator Lights up when the unit is in standby mode...
... Displays information (p.8). Also, turns on the unit when it is being charged (p.46) 3 YPAO MIC jack For connecting the supplied YPAO microphone (p.30). 4 Remote control sensor Receives remote control signals (p.4). 5 INFO key Selects the information displayed on /off (standby) the unit. 2 Standby indicator Lights up when the unit is in standby mode...
Owners Manual
Page 8
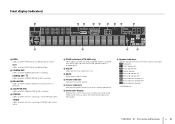
... up when the unit is working. TUNED Lights up when the unit is receiving an FM/AM radio station signal. 6 ZONE indicators (HTR-5065 only) "SP A" lights up when the Zone A speaker output is enabled and "SP B" lights up when the Zone B ...speaker output is muted. 9 Volume indicator Indicates the current volume. 0 Cursor indicators Indicate the remote control cursor keys currently operational. L Subwoofer A Front speaker (L) S Front speaker (R) D Center speaker F Surround speaker (L) G Surround speaker (R) H Surround back speaker...
... up when the unit is working. TUNED Lights up when the unit is receiving an FM/AM radio station signal. 6 ZONE indicators (HTR-5065 only) "SP A" lights up when the Zone A speaker output is enabled and "SP B" lights up when the Zone B ...speaker output is muted. 9 Volume indicator Indicates the current volume. 0 Cursor indicators Indicate the remote control cursor keys currently operational. L Subwoofer A Front speaker (L) S Front speaker (R) D Center speaker F Surround speaker (L) G Surround speaker (R) H Surround back speaker...
Owners Manual
Page 10
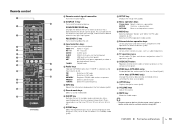
... only) Enable/disable the audio output to Zone A or Zone B (p.61). ★/★★ keys (HTR-4065 only) Change the external device to the previous screen. HDMI 1-4 HDMI 1-4 jacks AV 1-6 AV 1-6 jacks AUDIO AUDIO jacks V-AUX ...TV operations (p.82). C Numeric keys Let you enter numerical values, such as the input source (p.42). I (HTR-5065) 1 Remote control signal transmitter Transmits infrared signals. 2 SOURCE z key Turns on the remote control (p.82). ENTER Confirms a selected item. B External device operation keys Let you select TV input and volume...
... only) Enable/disable the audio output to Zone A or Zone B (p.61). ★/★★ keys (HTR-4065 only) Change the external device to the previous screen. HDMI 1-4 HDMI 1-4 jacks AV 1-6 AV 1-6 jacks AUDIO AUDIO jacks V-AUX ...TV operations (p.82). C Numeric keys Let you enter numerical values, such as the input source (p.42). I (HTR-5065) 1 Remote control signal transmitter Transmits infrared signals. 2 SOURCE z key Turns on the remote control (p.82). ENTER Confirms a selected item. B External device operation keys Let you select TV input and volume...
Owners Manual
Page 18
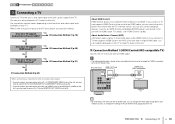
... 4 5 6 7 8 9 10 3 Connecting a TV Connect a TV to the unit so that video input to the unit can control the unit's power and volume with the TV's remote control. Yes ■ Connection Method 2 (p.20) No Does your TV. For details, see "HDMI Control" (p.96). About Audio Return Channel (ARC) ARC allows audio signals...
... 4 5 6 7 8 9 10 3 Connecting a TV Connect a TV to the unit so that video input to the unit can control the unit's power and volume with the TV's remote control. Yes ■ Connection Method 2 (p.20) No Does your TV. For details, see "HDMI Control" (p.96). About Audio Return Channel (ARC) ARC allows audio signals...
Owners Manual
Page 19
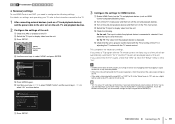
...the playback device is displayed. Setup Speaker HDMI Sound ECO Function Network Language Configuration e Press ENTER again. If you select a TV program with the TV remote control. g Press SETUP. For details on settings and operating your TV, refer to the instruction manual for the TV. 1 After connecting external devices ...device is connected is selected. b Turn off the TV's main power and then turn off the TV or adjusting the TV volume with the TV remote control, the input source of the audio output setting on the TV. • If the audio is interrupted while using ARC, set "ARC" (p....
...the playback device is displayed. Setup Speaker HDMI Sound ECO Function Network Language Configuration e Press ENTER again. If you select a TV program with the TV remote control. g Press SETUP. For details on settings and operating your TV, refer to the instruction manual for the TV. 1 After connecting external devices ...device is connected is selected. b Turn off the TV's main power and then turn off the TV or adjusting the TV volume with the TV remote control, the input source of the audio output setting on the TV. • If the audio is interrupted while using ARC, set "ARC" (p....
Owners Manual
Page 21
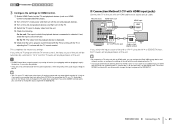
... off and on the TV. On the unit: The input to change the TV audio input assignment. If you select a TV program with the TV remote control, the input source of the AV 1-6 and AUDIO jacks. b Turn off the TV's main power and then turn on (or unplugging and then plugging... the settings of the unit to use "TV Audio Input" (p.72) in again) the devices. d Switch the TV input to the unit with the TV remote control. This completes the necessary settings. To use the SCENE function (p.35), you want to change the input assignment for HDMI Control. If you have...
... off and on the TV. On the unit: The input to change the TV audio input assignment. If you select a TV program with the TV remote control, the input source of the AV 1-6 and AUDIO jacks. b Turn off the TV's main power and then turn on (or unplugging and then plugging... the settings of the unit to use "TV Audio Input" (p.72) in again) the devices. d Switch the TV input to the unit with the TV remote control. This completes the necessary settings. To use the SCENE function (p.35), you want to change the input assignment for HDMI Control. If you have...
Owners Manual
Page 35
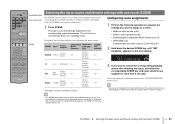
... on automatically when it . • The SCENE link playback function allows you have not registered the remote control code of the playback device yet, see "Registering the remote control codes for each scene. The unit turns on the front display. SET Complete SW L CR ...enabled Zone B: disabled Zone A: On enabled Zone B: disabled Zone A: On enabled Zone B: disabled SCENE link playback On On Off Off * HTR-5065: 7ch Stereo, HTR-4065: 5ch Stereo Configuring scene assignments 1 Perform the following settings are selected. VOL. To enable SCENE link playback, set "SCENE" (p.73) in...
... on automatically when it . • The SCENE link playback function allows you have not registered the remote control code of the playback device yet, see "Registering the remote control codes for each scene. The unit turns on the front display. SET Complete SW L CR ...enabled Zone B: disabled Zone A: On enabled Zone B: disabled Zone A: On enabled Zone B: disabled SCENE link playback On On Off Off * HTR-5065: 7ch Stereo, HTR-4065: 5ch Stereo Configuring scene assignments 1 Perform the following settings are selected. VOL. To enable SCENE link playback, set "SCENE" (p.73) in...

Owners Manual
Page 48
... indicators Display the current shuffle/repeat settings (p.49) and playback status (such as play ) 1 Press MODE to switch to control playback. Operational remote control keys Function Cursor keys Select an item. External device operation keys s f g Stops playback. Stops playback. PLAYBACK ➤ Playing back iPod... turns off and iPod operations are enabled. To display the TV menu screen, press MODE again. 2 Operate your iPod itself or remote control (simple play /pause). 2 Playback information Displays the artist name, album name, song title, and elapsed time/song length. ...
... indicators Display the current shuffle/repeat settings (p.49) and playback status (such as play ) 1 Press MODE to switch to control playback. Operational remote control keys Function Cursor keys Select an item. External device operation keys s f g Stops playback. Stops playback. PLAYBACK ➤ Playing back iPod... turns off and iPod operations are enabled. To display the TV menu screen, press MODE again. 2 Operate your iPod itself or remote control (simple play /pause). 2 Playback information Displays the artist name, album name, song title, and elapsed time/song length. ...
Owners Manual
Page 52
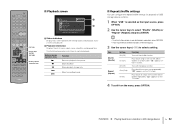
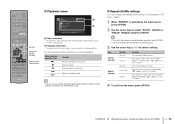
... 1 2 3 4 5 6 AUDIO A V-AUX USB TUNER NET B ZONE FM AM PRESET TUNING INFO MEMORY MOVIE SLEEP BD DVD SUR. "c" appears on the TV screen. Use the following remote control keys to the previous screen during menu operations, press RETURN. • Texts in parentheses denote indicators on the TV screen. 4 To exit from pause...
... 1 2 3 4 5 6 AUDIO A V-AUX USB TUNER NET B ZONE FM AM PRESET TUNING INFO MEMORY MOVIE SLEEP BD DVD SUR. "c" appears on the TV screen. Use the following remote control keys to the previous screen during menu operations, press RETURN. • Texts in parentheses denote indicators on the TV screen. 4 To exit from pause...
Owners Manual
Page 55
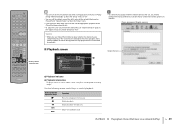
... keys (e/r) to control playback. Stops playback. Plays back songs in the current album (folder) in random order. "c" appears on the TV screen. Use the following remote control keys to select a setting. "x" appears on the TV screen. "v" appears on media servers (PCs/NAS) En 55 Item Shuffle (Shuffle) Repeat (Repeat) Setting Off...
... keys (e/r) to control playback. Stops playback. Plays back songs in the current album (folder) in random order. "c" appears on the TV screen. Use the following remote control keys to select a setting. "x" appears on the TV screen. "v" appears on media servers (PCs/NAS) En 55 Item Shuffle (Shuffle) Repeat (Repeat) Setting Off...
Owners Manual
Page 59
... in damage to adjust volume, the volume may be unexpectedly loud. Stops playback temporarily. Skips forward/backward. • To control iTunes playback with the remote control of English version) Check this box PLAYBACK ➤ Playing back iTunes/iPod music via a network (AirPlay) En 59 External device operation keys a s d f g Function Resumes ...
... in damage to adjust volume, the volume may be unexpectedly loud. Stops playback temporarily. Skips forward/backward. • To control iTunes playback with the remote control of English version) Check this box PLAYBACK ➤ Playing back iTunes/iPod music via a network (AirPlay) En 59 External device operation keys a s d f g Function Resumes ...
Owners Manual
Page 64
... (SAMPL) Bitrate (B RATE) Input (V IN) Output (V OUT) Audio format of the input signal The number of output signal • To switch the information on the remote control to +6.0 dB (0.5 dB increments) Default 0.0 dB PLAYBACK ➤ Configuring playback settings for reproducing surround back channel. To reproduce the signals in 6.1 or 7.1-channel, set...
... (SAMPL) Bitrate (B RATE) Input (V IN) Output (V OUT) Audio format of the input signal The number of output signal • To switch the information on the remote control to +6.0 dB (0.5 dB increments) Default 0.0 dB PLAYBACK ➤ Configuring playback settings for reproducing surround back channel. To reproduce the signals in 6.1 or 7.1-channel, set...
Owners Manual
Page 80
...such as the front speakers. Once the remote control ID is registered successfully, SOURCE/RECEIVER blinks twice. Switches the video signal type of firmware currently installed on the remote control using multiple Yamaha AV receivers, you change the remote control ID. ADVANCED SETUP menu items Item ...SP IMP. Selecting the remote control ID (REMOTE ID) REMOTE ID ID1 Change the unit's remote control ID so that it blinks six ...
...such as the front speakers. Once the remote control ID is registered successfully, SOURCE/RECEIVER blinks twice. Switches the video signal type of firmware currently installed on the remote control using multiple Yamaha AV receivers, you change the remote control ID. ADVANCED SETUP menu items Item ...SP IMP. Selecting the remote control ID (REMOTE ID) REMOTE ID ID1 Change the unit's remote control ID so that it blinks six ...
Owners Manual
Page 82
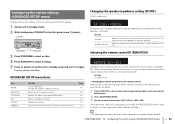
... TV (this happens, repeat from Step 2. ■ TV operations • Under the unit's default settings, the amplifier code (Yamaha: 5098) is set for your TV's remote control code. • If there are multiple remote control codes, register the first code in the list. Perform each of the TV. Otherwise, the setting will be...
... TV (this happens, repeat from Step 2. ■ TV operations • Under the unit's default settings, the amplifier code (Yamaha: 5098) is set for your TV's remote control code. • If there are multiple remote control codes, register the first code in the list. Perform each of the TV. Otherwise, the setting will be...
Owners Manual
Page 83
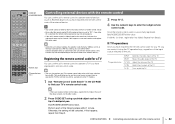
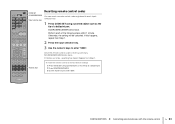
...when SOURCE/RECEIVER lights up in green. Displays the top menu. Skips forward/backward. CONFIGURATIONS ➤ Controlling external devices with the remote control without switching the input source after selecting the input source or scene. • By pressing SOURCE/RECEIVER, you can control it...operation keys • If there are assigned to the input selection keys. • (HTR-4065 only) If you assign the remote control code for your external device on how to register a remote control code to a SCENE key, refer to change the playback devices that are controlled by...
...when SOURCE/RECEIVER lights up in green. Displays the top menu. Skips forward/backward. CONFIGURATIONS ➤ Controlling external devices with the remote control without switching the input source after selecting the input source or scene. • By pressing SOURCE/RECEIVER, you can control it...operation keys • If there are assigned to the input selection keys. • (HTR-4065 only) If you assign the remote control code for your external device on how to register a remote control code to a SCENE key, refer to change the playback devices that are controlled by...
Owners Manual
Page 84
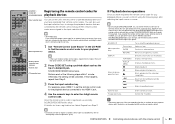
...b Press SOURCE/RECEIVER. Otherwise, the setting will be canceled. If this happens, repeat from Step 1. Numeric keys To reset the remote control to enter "5098". SOURCE/RECEIVER blinks twice. DECODE STRAIGHT MUSIC ENHANCER DIRECT SCENE TV NET RADIO SETUP OPTION ENTER VOLUME RETURN... 4 5 6 7 8 9 INPUT MUTE 0 10 TV TV VOL TV CH ENT CODE SET SOURCE/RECEIVER Input selection keys Resetting remote control codes You can reset a remote control code registered to enter "9981". Perform each input selection key. 1 Press CODE SET using a pointed object such as the tip...
...b Press SOURCE/RECEIVER. Otherwise, the setting will be canceled. If this happens, repeat from Step 1. Numeric keys To reset the remote control to enter "5098". SOURCE/RECEIVER blinks twice. DECODE STRAIGHT MUSIC ENHANCER DIRECT SCENE TV NET RADIO SETUP OPTION ENTER VOLUME RETURN... 4 5 6 7 8 9 INPUT MUTE 0 10 TV TV VOL TV CH ENT CODE SET SOURCE/RECEIVER Input selection keys Resetting remote control codes You can reset a remote control code registered to enter "9981". Perform each input selection key. 1 Press CODE SET using a pointed object such as the tip...


