
Quick Reference Guide
Page 2
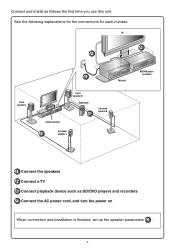
TV 3 2 Front speaker L 4 This unit Center speaker Front speaker R Subwoofer 1 Surround speaker R Surround 1 speaker L BD/DVD player (recorder) 1 Connect the speakers 2 Connect a TV 3 Connect playback device such as follows the first time you use this unit. See the following explanations for the connections for each number. Connect and install as BD/DVD players and recorders 4 Connect the AC power cord, and turn the power on When connection and installation is finished, set up the speaker parameters 5 . - 2 -
TV 3 2 Front speaker L 4 This unit Center speaker Front speaker R Subwoofer 1 Surround speaker R Surround 1 speaker L BD/DVD player (recorder) 1 Connect the speakers 2 Connect a TV 3 Connect playback device such as follows the first time you use this unit. See the following explanations for the connections for each number. Connect and install as BD/DVD players and recorders 4 Connect the AC power cord, and turn the power on When connection and installation is finished, set up the speaker parameters 5 . - 2 -
Quick Reference Guide
Page 5
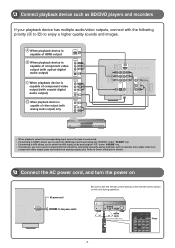
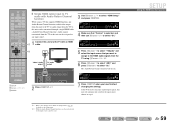
Refer to Owner's Manual for details. 4 Connect the AC power cord, and turn the power on AC power cord Be sure to enjoy a higher quality sounds and images. To the power outlet. A When playback device is capable of ...
Refer to Owner's Manual for details. 4 Connect the AC power cord, and turn the power on AC power cord Be sure to enjoy a higher quality sounds and images. To the power outlet. A When playback device is capable of ...
Owners Manual
Page 8
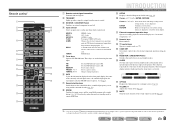
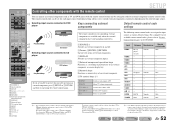
...for each input in standby mode to AM. p SLEEP Sets this key repeatedly to operate external components (☞p. 52). J1 DOCK A Yamaha iPod universal dock or Bluetooth wireless audio receiver connected to FM. Selects a preset station. r VOLUME +/- DECODE MUSIC STEREO STRAIGHT BD ...FM/AM tuner e Tuner keys Operates the FM/AM tuner. Presets radio stations. for each input source to playback. s MUTE Turns the mute function of time has elapsed (sleep timer). h SCENE Switches the input source and the sound field program with the kExternal...
...for each input in standby mode to AM. p SLEEP Sets this key repeatedly to operate external components (☞p. 52). J1 DOCK A Yamaha iPod universal dock or Bluetooth wireless audio receiver connected to FM. Selects a preset station. r VOLUME +/- DECODE MUSIC STEREO STRAIGHT BD ...FM/AM tuner e Tuner keys Operates the FM/AM tuner. Presets radio stations. for each input source to playback. s MUTE Turns the mute function of time has elapsed (sleep timer). h SCENE Switches the input source and the sound field program with the kExternal...

Owners Manual
Page 10
The power turns on, when the settings you made has been configured. ■ CRT monitors We recommend that you cannot connect all five speakers, give priority to avoid ...
The power turns on, when the settings you made has been configured. ■ CRT monitors We recommend that you cannot connect all five speakers, give priority to avoid ...
Owners Manual
Page 20
... cameras • Be sure to the external device's video input jack and analog audio input jacks. Using the AUDIO OUT jacks Connect this jacks to turn down the volume when connecting this unit and the other TVs or external devices. This receiver can record these connected devices. You can transmit selected...
... cameras • Be sure to the external device's video input jack and analog audio input jacks. Using the AUDIO OUT jacks Connect this jacks to turn down the volume when connecting this unit and the other TVs or external devices. This receiver can record these connected devices. You can transmit selected...
Owners Manual
Page 25
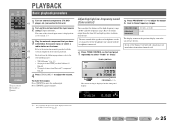
... SCENE TV CD TONE CONTROL PROGRAM RADIO STRAIGHT PROGRAM l / h The current setting is displayed for details on this unit. 2 Turn on playback. TONE Treble VOL. Press sMUTE again to obtain desired tone. For details on the front panel display as the source ...UP MENU MUTE 1 2 3 4 5 6 7 8 9 INPUT MUTE 0 10 TV TV VOL TV CH ENT d Input selector r VOLUME +/s MUTE Basic playback procedure 1 Turn on external components (TV, DVD d player, etc.) connected to the s corresponding pages: • "FM/AM tuning" (☞p. 30) • "Playing back tunes from...
... SCENE TV CD TONE CONTROL PROGRAM RADIO STRAIGHT PROGRAM l / h The current setting is displayed for details on this unit. 2 Turn on playback. TONE Treble VOL. Press sMUTE again to obtain desired tone. For details on the front panel display as the source ...UP MENU MUTE 1 2 3 4 5 6 7 8 9 INPUT MUTE 0 10 TV TV VOL TV CH ENT d Input selector r VOLUME +/s MUTE Basic playback procedure 1 Turn on external components (TV, DVD d player, etc.) connected to the s corresponding pages: • "FM/AM tuning" (☞p. 30) • "Playing back tunes from...
Owners Manual
Page 26
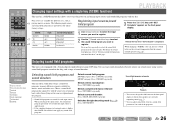
... the sound field program in many different categories suitable for that allows you change input sources and sound field programs with a Yamaha digital sound field processing (DSP) chip. When you to turn the power on the name or explanation of the program. • Sound field programs are provided as d playing movies or...
... the sound field program in many different categories suitable for that allows you change input sources and sound field programs with a Yamaha digital sound field processing (DSP) chip. When you to turn the power on the name or explanation of the program. • Sound field programs are provided as d playing movies or...

Owners Manual
Page 35
... q OPTION 2 Press qOPTION to display the Option menu. 3 Use jCursor B / C to close the Option menu. DECODE MUSIC STEREO whether this V-AUX [ A ] [ B ] DOCK TUNER d unit is turned on the front panel display of this procedure again and change the "Standby Charge" setting back to check MOVIE ENHANCER SUR. PLAYBACK Playing back tunes...
... q OPTION 2 Press qOPTION to display the Option menu. 3 Use jCursor B / C to close the Option menu. DECODE MUSIC STEREO whether this V-AUX [ A ] [ B ] DOCK TUNER d unit is turned on the front panel display of this procedure again and change the "Standby Charge" setting back to check MOVIE ENHANCER SUR. PLAYBACK Playing back tunes...
Owners Manual
Page 36
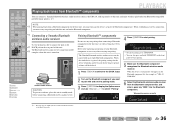
... q DOCK jack on the Bluetooth component you must first pair the devices (register the Bluetooth components). e Connecting a Yamaha Bluetooth wireless audio receiver Use the dedicated cable to connect the dock to the DOCK input. 2 Turn on the rear panel of this unit. DOCK VOL. SW L CR SL SR • To cancel pairing...
... q DOCK jack on the Bluetooth component you must first pair the devices (register the Bluetooth components). e Connecting a Yamaha Bluetooth wireless audio receiver Use the dedicated cable to connect the dock to the DOCK input. 2 Turn on the rear panel of this unit. DOCK VOL. SW L CR SL SR • To cancel pairing...

Owners Manual
Page 44
...equalizer. SETUP Setting various functions (Setup menu) ■ Generating test tones Test Tone Turns the test tone generator on or off . While "On" is displayed, use jCursor D / E to adjust sound quality. Turn the test tone off when you have finished making adjustments. GEQ VOL. GEQ 63Hz ... press iSETUP to adjust the equalizer. Raising volume: Press jCursor E. Repeat steps 2-3 to adjust the tone to adjust the volume. EQ Select Turns the graphic equalizer on the internal graphic equalizer, you want to adjust, then use jCursor B / C to select another frequency or return to...
...equalizer. SETUP Setting various functions (Setup menu) ■ Generating test tones Test Tone Turns the test tone generator on or off . While "On" is displayed, use jCursor D / E to adjust sound quality. Turn the test tone off when you have finished making adjustments. GEQ VOL. GEQ 63Hz ... press iSETUP to adjust the equalizer. Raising volume: Press jCursor E. Repeat steps 2-3 to adjust the tone to adjust the volume. EQ Select Turns the graphic equalizer on the internal graphic equalizer, you want to adjust, then use jCursor B / C to select another frequency or return to...
Owners Manual
Page 45
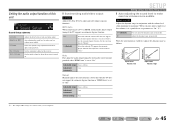
... maximum volume for digital audio playback. J1 Off (Default) On Does not adjust the dynamic range automatically. When the auto function is enabled, it is turned on. ■ Synchronizing audio/video output Lipsync Adjusts the delay between video and audio output. Output Level Output Level On Off Input Level Volume: low...
... maximum volume for digital audio playback. J1 Off (Default) On Does not adjust the dynamic range automatically. When the auto function is enabled, it is turned on. ■ Synchronizing audio/video output Lipsync Adjusts the delay between video and audio output. Output Level Output Level On Off Input Level Volume: low...

Owners Manual
Page 46
... Produces audio without adjusting the dynamic range. ■ Setting the maximum volume Max Volume Sets a maximum volume level so that the audio is turned on input signal information. J 1 : When you set to +16.5 dB Default setting Off Adjustment increments 0.5 dB SETUP Setting various functions (...Range Selects the dynamic range adjustment method for regular home use. SW L CR SL SR HDMI Setup submenu Control TVAudio J2 ARC J2 Audio J2 Turns the HDMI Control on . J 2 : When "Control" is set the "Max Volume" at night, for bitstream signals except for Dolby ...
... Produces audio without adjusting the dynamic range. ■ Setting the maximum volume Max Volume Sets a maximum volume level so that the audio is turned on input signal information. J 1 : When you set to +16.5 dB Default setting Off Adjustment increments 0.5 dB SETUP Setting various functions (...Range Selects the dynamic range adjustment method for regular home use. SW L CR SL SR HDMI Setup submenu Control TVAudio J2 ARC J2 Audio J2 Turns the HDMI Control on . J 2 : When "Control" is set the "Max Volume" at night, for bitstream signals except for Dolby ...
Owners Manual
Page 52
... jRETURN Operates the menus of available remote control codes, please refer to switch external components seamlessly depending on the selected input source. Turns on and off TV The following remote control codes are available only when the external components have registered. For example, it may be...Input HDMI1 HDMI2 HDMI3 HDMI4 AV1 AV2 AV3 AV4 AV5 AUDIO1 AUDIO2 V-AUX A/B J2 DOCK TUNER Category Blu-ray player/ recorder - - - - - Yamaha 5089 Yamaha 5085 J 1 : You can use the jCursor, lNumeric keys, and mTV control keys to control a TV you to "Remote Control Code Search" in ...
... jRETURN Operates the menus of available remote control codes, please refer to switch external components seamlessly depending on the selected input source. Turns on and off TV The following remote control codes are available only when the external components have registered. For example, it may be...Input HDMI1 HDMI2 HDMI3 HDMI4 AV1 AV2 AV3 AV4 AV5 AUDIO1 AUDIO2 V-AUX A/B J2 DOCK TUNER Category Blu-ray player/ recorder - - - - - Yamaha 5089 Yamaha 5085 J 1 : You can use the jCursor, lNumeric keys, and mTV control keys to control a TV you to "Remote Control Code Search" in ...

Owners Manual
Page 57
..., please change it on manually. 9 Change the TV's input setting to the input jack that supports the HDMI Control function are not synchronized, turn it manually. Refer to the TV's instruction manual on the Setup menu. J2 4 Use jCursor B / C to "On" - Receiver unit...that this unit) TV Control signal (such as the ones written below. - Operations 1-10 will not properly synchronize, unplugging and replugging the devices and turning them off . Confirm that the input source for those devices: - J 2 : Refer to the "Setting various functions (Setup menu)" (☞p. ...
..., please change it on manually. 9 Change the TV's input setting to the input jack that supports the HDMI Control function are not synchronized, turn it manually. Refer to the TV's instruction manual on the Setup menu. J2 4 Use jCursor B / C to "On" - Receiver unit...that this unit) TV Control signal (such as the ones written below. - Operations 1-10 will not properly synchronize, unplugging and replugging the devices and turning them off . Confirm that the input source for those devices: - J 2 : Refer to the "Setting various functions (Setup menu)" (☞p. ...
Owners Manual
Page 59
... functions and Audio Return Channel function, audio/video output from this unit to the TV or audio output from the TV to this unit will turn on the Setup menu. J1 3 Use jCursor B / C to select "On." HDMI VOL. The Audio Return Channel function will automatically switch to TV audio with an...
... functions and Audio Return Channel function, audio/video output from this unit to the TV or audio output from the TV to this unit will turn on the Setup menu. J1 3 Use jCursor B / C to select "On." HDMI VOL. The Audio Return Channel function will automatically switch to TV audio with an...

Owners Manual
Page 60
...not listed below, or if the instructions below when this unit was shorted. Remedy Turn on while a speaker cable was turned on the unit, and play the source again. - Please contact authorized Yamaha dealer or service center to request repair. Set the speaker impedance to match your ...nearest Yamaha dealer or service center to request repair. The batteries in power supply voltage. Cause If you are correct. The internal microcomputer is turned back on . If the problem you do not help, turn on and "CHECK SP WIRES!" Disconnect...
...not listed below, or if the instructions below when this unit was shorted. Remedy Turn on while a speaker cable was turned on the unit, and play the source again. - Please contact authorized Yamaha dealer or service center to request repair. Set the speaker impedance to match your ...nearest Yamaha dealer or service center to request repair. The batteries in power supply voltage. Cause If you are correct. The internal microcomputer is turned back on . If the problem you do not help, turn on and "CHECK SP WIRES!" Disconnect...
Owners Manual
Page 61
... balance is not output from a specific speaker. Only the center speaker outputs substantial sound. APPENDIX Troubleshooting Problem No sound is turned off, try to the TV. Cause The speaker is turned down or Turn up , connect another sound field program. 3) "None" may be reproduced on the input source or sound field program. If...
... balance is not output from a specific speaker. Only the center speaker outputs substantial sound. APPENDIX Troubleshooting Problem No sound is turned off, try to the TV. Cause The speaker is turned down or Turn up , connect another sound field program. 3) "None" may be reproduced on the input source or sound field program. If...
Owners Manual
Page 62
...from digital or radio frequency equipment. The subwoofer is heard. Combine input connected to a low value. APPENDIX Troubleshooting Problem Noise/hum noise is turned off. A DTS-CD is distorted. "Max Volume" is set to the external component video output with another sound field program. Set it... properly referring to other digital or radio frequency equipment. The volume cannot be found. Consult the manufacturer of this unit is not turned on the remote control) to this unit by digital connection and play back the DTS-CD. Sound may be played in the Option...
...from digital or radio frequency equipment. The subwoofer is heard. Combine input connected to a low value. APPENDIX Troubleshooting Problem Noise/hum noise is turned off. A DTS-CD is distorted. "Max Volume" is set to the external component video output with another sound field program. Set it... properly referring to other digital or radio frequency equipment. The volume cannot be found. Consult the manufacturer of this unit is not turned on the remote control) to this unit by digital connection and play back the DTS-CD. Sound may be played in the Option...

Owners Manual
Page 65
... canceled. Completed Canceled BT connected Disconnected Not found . The Yamaha Bluetooth wireless audio receiver and the Bluetooth component are in the Yamaha iPod universal dock. En 65 Turn off the unit and reconnect the Yamaha iPod universal dock to the DOCK jack of the Yamaha Bluetooth wireless audio receiver. The pairing is properly placed in...
... canceled. Completed Canceled BT connected Disconnected Not found . The Yamaha Bluetooth wireless audio receiver and the Bluetooth component are in the Yamaha iPod universal dock. En 65 Turn off the unit and reconnect the Yamaha iPod universal dock to the DOCK jack of the Yamaha Bluetooth wireless audio receiver. The pairing is properly placed in...
Owners Manual
Page 74
...easily. 22 The batteries shall not be sure to hot, and do not place: - Yamaha will form when the surrounding temperature changes suddenly. This state is needed. In this state, this unit is turned off , then leave this unit alone for common operating errors before installing new batteries. &#... plugging into your skin or gets into the AC wall outlet. places of the remote control narrows - this manual carefully. Contact qualified Yamaha service personnel when any damage resulting from the wall outlet. 16 Be sure to refer to excessive heat such as they look the same...
...easily. 22 The batteries shall not be sure to hot, and do not place: - Yamaha will form when the surrounding temperature changes suddenly. This state is needed. In this state, this unit is turned off , then leave this unit alone for common operating errors before installing new batteries. &#... plugging into your skin or gets into the AC wall outlet. places of the remote control narrows - this manual carefully. Contact qualified Yamaha service personnel when any damage resulting from the wall outlet. 16 Be sure to refer to excessive heat such as they look the same...


