
EXi8/EXo8 Owners Manual
Page 2
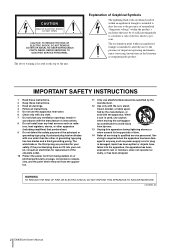
... APPARATUS TO RAIN OR MOISTURE. (UL60065_03) 2 EXi8/EXo8 Owner's Manual Install in any ventilation openings. tors, heat registers, stoves, or other . NO USER-SERVICEABLE PARTS INSIDE. REFER SERVICING TO QUALIFIED SERVICE PERSONNEL. IMPORTANT SAFETY INSTRUCTIONS 1 Read these instructions. 2 Keep these instructions. 3 Heed all warnings. 4 Follow all servicing to constitute a risk of the obsolete outlet. 10 Protect the power cord from being walked on the top...
... APPARATUS TO RAIN OR MOISTURE. (UL60065_03) 2 EXi8/EXo8 Owner's Manual Install in any ventilation openings. tors, heat registers, stoves, or other . NO USER-SERVICEABLE PARTS INSIDE. REFER SERVICING TO QUALIFIED SERVICE PERSONNEL. IMPORTANT SAFETY INSTRUCTIONS 1 Read these instructions. 2 Keep these instructions. 3 Heed all warnings. 4 Follow all servicing to constitute a risk of the obsolete outlet. 10 Protect the power cord from being walked on the top...
EXi8/EXo8 Owners Manual
Page 3
... following measures: Relocate either this product in FCC Regulations, Part 15 for Class "B" digital devices. Utilize power outlets that may not cause harmful interference, and 2) this mains lead are on different branch (circuit breaker or fuse) circuits or install AC line filter/s. Operation is subject to products distributed by using one of radio or TV interference, relocate/reorient the antenna...
... following measures: Relocate either this product in FCC Regulations, Part 15 for Class "B" digital devices. Utilize power outlets that may not cause harmful interference, and 2) this mains lead are on different branch (circuit breaker or fuse) circuits or install AC line filter/s. Operation is subject to products distributed by using one of radio or TV interference, relocate/reorient the antenna...
EXi8/EXo8 Owners Manual
Page 4
... the cord. Do not open • This device contains no user-serviceable parts. Please check with wet hands. If it inspected by qualified Yamaha service personnel. If any openings. If some trouble or malfunction occurs, immediately turn off the power switch and disconnect the electric plug from electrical shock, short-circuiting, damages, fire or other than in an EIA standard rack, carefully...
... the cord. Do not open • This device contains no user-serviceable parts. Please check with wet hands. If it inspected by qualified Yamaha service personnel. If any openings. If some trouble or malfunction occurs, immediately turn off the power switch and disconnect the electric plug from electrical shock, short-circuiting, damages, fire or other than in an EIA standard rack, carefully...
EXi8/EXo8 Owners Manual
Page 5
... the possibility of panel disfiguration, unstable operation, or damage to the internal components. • Do not place vinyl, plastic or rubber objects on ) 1A (after a supply interruption of their respective companies. Connections • Before connecting the device to other electric devices. Before turning the power on the buttons, switches or connectors. If this manual • The illustrations as in direct sunlight, near...
... the possibility of panel disfiguration, unstable operation, or damage to the internal components. • Do not place vinyl, plastic or rubber objects on ) 1A (after a supply interruption of their respective companies. Connections • Before connecting the device to other electric devices. Before turning the power on the buttons, switches or connectors. If this manual • The illustrations as in direct sunlight, near...
EXi8/EXo8 Owners Manual
Page 6
... PRECAUTIONS 4 Getting Started 6 Features 6 Parameter settings of EXi8/EXo8 6 Firmware Updates 6 Included items (please check 6 Controls and Connectors 7 Front Panel 7 Rear Panel 8 Setup 10 Precautions for rackmounting 10 Euroblock plug connection 10 Initializing the EXi8/EXo8 11 Troubleshooting 12 Alert list 13 Appendix 90 Specifications 90 Input (EXi8) / Output (EXo8) Characteristics 91 Dimensions 92 Getting Started Thank you take full advantage of the superior functionality offered by the EXi8/EXo8. This manual will help...
... PRECAUTIONS 4 Getting Started 6 Features 6 Parameter settings of EXi8/EXo8 6 Firmware Updates 6 Included items (please check 6 Controls and Connectors 7 Front Panel 7 Rear Panel 8 Setup 10 Precautions for rackmounting 10 Euroblock plug connection 10 Initializing the EXi8/EXo8 11 Troubleshooting 12 Alert list 13 Appendix 90 Specifications 90 Input (EXi8) / Output (EXo8) Characteristics 91 Dimensions 92 Getting Started Thank you take full advantage of the superior functionality offered by the EXi8/EXo8. This manual will help...
EXi8/EXo8 Owners Manual
Page 7
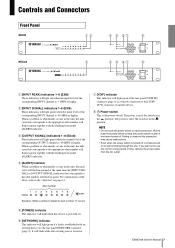
... same time the [INPUT SIGNAL] or [OUTPUT SIGNAL] indicator that corresponds to the appropriate alert number will flash in green. Example: When a problem related to the "Alert list" on . w [INPUT SIGNAL] indicators 1-8 (EXi8) These indicators will light green if a link is in rapid succession. The power is off if the switch is established with an external device via the rear panel NETWORK connector (page 9). For explanations of time, remove the power cable...
... same time the [INPUT SIGNAL] or [OUTPUT SIGNAL] indicator that corresponds to the appropriate alert number will flash in green. Example: When a problem related to the "Alert list" on . w [INPUT SIGNAL] indicators 1-8 (EXi8) These indicators will light green if a link is in rapid succession. The power is off if the switch is established with an external device via the rear panel NETWORK connector (page 9). For explanations of time, remove the power cable...
EXi8/EXo8 Owners Manual
Page 8
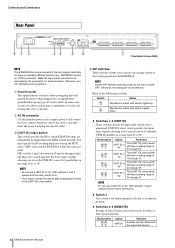
... the AC outlet. Switch Status Represent a status with the supported devices. 8 EXi8/EXo8 Owner's Manual Otherwise, you to specify the settings related to this device, and then insert the power cord plug into an appropriately grounded three-prong type AC mains outlet. w AC IN connector Use the included power cord to supply power to the startup operation of 30 through 0F. r DIP switches These switches enable you risk damaging...
... the AC outlet. Switch Status Represent a status with the supported devices. 8 EXi8/EXo8 Owner's Manual Otherwise, you to specify the settings related to this device, and then insert the power cord plug into an appropriately grounded three-prong type AC mains outlet. w AC IN connector Use the included power cord to supply power to the startup operation of 30 through 0F. r DIP switches These switches enable you risk damaging...
EXi8/EXo8 Owners Manual
Page 9
.... Switches 7-8 (START UP MODE) These specify whether the EXi8/EXo8 will internally turn the phantom power on page 10 for analog audio input and output. Use a CAT5e or better Ethernet STP cable (shielded twisted pair cable). The cooling air is exhausted here, so please be careful not to block this switch to the user's manual of the internal head amps and to make a ring connection with an MTX network or external controller.
.... Switches 7-8 (START UP MODE) These specify whether the EXi8/EXo8 will internally turn the phantom power on page 10 for analog audio input and output. Use a CAT5e or better Ethernet STP cable (shielded twisted pair cable). The cooling air is exhausted here, so please be careful not to block this switch to the user's manual of the internal head amps and to make a ring connection with an MTX network or external controller.
EXi8/EXo8 Owners Manual
Page 10
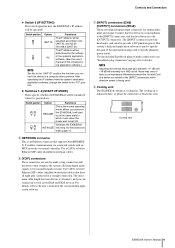
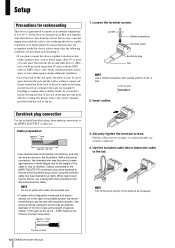
... as necessary. 1.6 mm or less 10 EXi8/EXo8 Owner's Manual Use the included cable ties to fasten the cable to the [INPUT]/[OUTPUT] connectors. If you do not need larger than 1U space with insulation sleeves. approx. 7 mm 1. To ensure that the following conditions are securely connected. 4. G 3. Euroblock plug connection Use the included Euroblock plugs when making connections to the tab. If this device...
... as necessary. 1.6 mm or less 10 EXi8/EXo8 Owner's Manual Use the included cable ties to fasten the cable to the [INPUT]/[OUTPUT] connectors. If you do not need larger than 1U space with insulation sleeves. approx. 7 mm 1. To ensure that the following conditions are securely connected. 4. G 3. Euroblock plug connection Use the included Euroblock plugs when making connections to the tab. If this device...
EXi8/EXo8 Owners Manual
Page 11
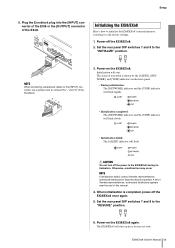
... Yamaha representatives / authorized distributors to the factory settings. 1. Power-on the EXi8/EXo8. Plug the Euroblock plug into the [INPUT] connector of the EXi8 or the [OUTPUT] connector of the Euroblock. +- Power-off the power to connect the "-" and "G" of the EXo8. CAUTION Do not turn off the EXi8/EXo8. 2. NOTE When connecting unbalanced cables to the [INPUT] connector, use a jumper wire to the EXi8/EXo8 during initialization. Set the rear panel DIP switches...
... Yamaha representatives / authorized distributors to the factory settings. 1. Power-on the EXi8/EXo8. Plug the Euroblock plug into the [INPUT] connector of the EXi8 or the [OUTPUT] connector of the Euroblock. +- Power-off the power to connect the "-" and "G" of the EXo8. CAUTION Do not turn off the EXi8/EXo8. 2. NOTE When connecting unbalanced cables to the [INPUT] connector, use a jumper wire to the EXi8/EXo8 during initialization. Set the rear panel DIP switches...
EXi8/EXo8 Owners Manual
Page 12
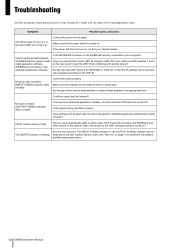
... software. (EXi8/EXo8 is output. ([OUTPUT SIGNAL] indicator does not light) In the system's dedicated application software, could the channel's ON button be automatically assigned according to the alert number flashes; Also, is being input. Make sure that the power switch is present. ([INPUT SIGNAL] indicator does not light) Connect the cable properly. The [ALERT] indicator is at the Yamaha Pro Audio web site (http://www.yamahaproaudio.com/). Connect the power cord properly. Set the rear panel DIP switch 6 (IP SETTING...
... software. (EXi8/EXo8 is output. ([OUTPUT SIGNAL] indicator does not light) In the system's dedicated application software, could the channel's ON button be automatically assigned according to the alert number flashes; Also, is being input. Make sure that the power switch is present. ([INPUT SIGNAL] indicator does not light) Connect the cable properly. The [ALERT] indicator is at the Yamaha Pro Audio web site (http://www.yamahaproaudio.com/). Connect the power cord properly. Set the rear panel DIP switch 6 (IP SETTING...
EXi8/EXo8 Owners Manual
Page 13
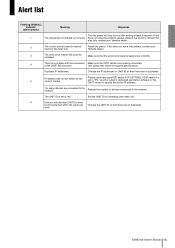
... the memory. Please check rear panel DIP switch 6 (IP SETTING). Change the IP addresses or UNIT ID so that the word clock signal is being input correctly. 4 There is set to the network. Reduce the number of devices connected to "00." Change the UNIT ID so that there are connected to something other than "00." 6 Devices with the connection Make sure that meet the required specifications. If...
... the memory. Please check rear panel DIP switch 6 (IP SETTING). Change the IP addresses or UNIT ID so that the word clock signal is being input correctly. 4 There is set to the network. Reduce the number of devices connected to "00." Change the UNIT ID so that there are connected to something other than "00." 6 Devices with the connection Make sure that meet the required specifications. If...
EXi8/EXo8 Owners Manual
Page 14
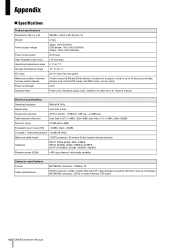
All 8 pins must be used.) 2.5m Power cord, Euroblock plugs (3-pin, tabbed) x 8, cable ties x 8, Owner's manual Electrical specifications Sampling frequency 48kHz/44.1kHz Signal delay Less than 0.05% (+4dBu, Gain:-6dB); Appendix Specifications Product specifications Dimensions (W x H x D) Weight Power supply voltage Power consumption Heat dissipation (per channel; individually settable) Connector specifications Format Cable specifications NETWORK connector: 100Base-TX [YDIF] connector: CAT5e or better Ethernet STP cable (Straight connected. Total harmonic distortion ...
All 8 pins must be used.) 2.5m Power cord, Euroblock plugs (3-pin, tabbed) x 8, cable ties x 8, Owner's manual Electrical specifications Sampling frequency 48kHz/44.1kHz Signal delay Less than 0.05% (+4dBu, Gain:-6dB); Appendix Specifications Product specifications Dimensions (W x H x D) Weight Power supply voltage Power consumption Heat dissipation (per channel; individually settable) Connector specifications Format Cable specifications NETWORK connector: 100Base-TX [YDIF] connector: CAT5e or better Ethernet STP cable (Straight connected. Total harmonic distortion ...
EXi8/EXo8 Owners Manual
Page 15
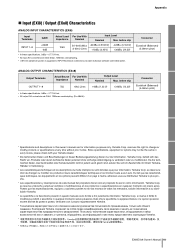
.... Connector Euroblock (Balanced) (5.08mm pitch) ANALOG OUTPUT CHARACTERISTICS (EXo8) Output Terminals Actual Source For Use With Impedance Nominal OUTPUT 1-8 75Ω 10kΩ Lines • In these specifications, 0dBu = 0.775 Vrms. • All input AD converters are 24bit linear, 128times oversampling. • +48V DC (phantom power) is supplied to change or modify products or specifications at any time without prior notice. si riserva il...
.... Connector Euroblock (Balanced) (5.08mm pitch) ANALOG OUTPUT CHARACTERISTICS (EXo8) Output Terminals Actual Source For Use With Impedance Nominal OUTPUT 1-8 75Ω 10kΩ Lines • In these specifications, 0dBu = 0.775 Vrms. • All input AD converters are 24bit linear, 128times oversampling. • +48V DC (phantom power) is supplied to change or modify products or specifications at any time without prior notice. si riserva il...


