
Owner's Manual
Page 3
... overheating, possibly causing damage to the device(s), or even fire. • Avoid setting all devices. The device contains no user-serviceable parts. Location • Before moving the... hands. Handling caution • When turning on the buttons, switches or connectors. (5)-4 2/3 EMX512SC/EMX312SC/EMX212S 3 Inadequate ventilation can result in the ears, consult a physician. • Do not rest your audio...cm behind and 15 cm above. Then have the device inspected by qualified Yamaha service personnel. If this device is to be used in any openings. •...
... overheating, possibly causing damage to the device(s), or even fire. • Avoid setting all devices. The device contains no user-serviceable parts. Location • Before moving the... hands. Handling caution • When turning on the buttons, switches or connectors. (5)-4 2/3 EMX512SC/EMX312SC/EMX212S 3 Inadequate ventilation can result in the ears, consult a physician. • Do not rest your audio...cm behind and 15 cm above. Then have the device inspected by qualified Yamaha service personnel. If this device is to be used in any openings. •...

Owner's Manual
Page 4
... product in the users manual, may void your FCC authorization to models EMX512SC, EMX312SC, and EMX212SC. and explains how to set up to the operation of other electronic devices. Modifications not expressly approved by the interference. Compliance with these models.... Park, CA90620 The above statements apply ONLY to those products distributed by Yamaha Corporation of America or its subsidiaries. * This applies only to accessories and/ or another product use . 4 EMX512SC/EMX312SC/EMX212S Cable/s supplied with a copyright specialist if you can be connected to ...
... product in the users manual, may void your FCC authorization to models EMX512SC, EMX312SC, and EMX212SC. and explains how to set up to the operation of other electronic devices. Modifications not expressly approved by the interference. Compliance with these models.... Park, CA90620 The above statements apply ONLY to those products distributed by Yamaha Corporation of America or its subsidiaries. * This applies only to accessories and/ or another product use . 4 EMX512SC/EMX312SC/EMX212S Cable/s supplied with a copyright specialist if you can be connected to ...
Owner's Manual
Page 5
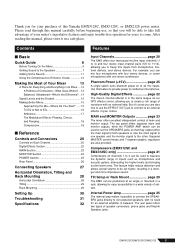
...Connecting Speakers 27 Horizontal Orientation, Tilting and Rack Mounting 28 Horizontal Orientation 28 Tilting 29 Rack Mounting 29 Setting Up 30 Troubleshooting 31 Specifications 32 Features Input Channels page 20 The EMX offers four monoaural mic/line...amp makes it in a stronger and more impressive sound. EMX512SC/EMX312SC/EMX212S 5 Compressors (EMX512SC and EMX312SC only page 21 Compressors on to be set the SPEAKERS jacks so that you will be able to take full ...one speaker and the monitor signal to come. Use this Yamaha EMX512SC, EMX312SC, or EMX212S power mixer.
...Connecting Speakers 27 Horizontal Orientation, Tilting and Rack Mounting 28 Horizontal Orientation 28 Tilting 29 Rack Mounting 29 Setting Up 30 Troubleshooting 31 Specifications 32 Features Input Channels page 20 The EMX offers four monoaural mic/line...amp makes it in a stronger and more impressive sound. EMX512SC/EMX312SC/EMX212S 5 Compressors (EMX512SC and EMX312SC only page 21 Compressors on to be set the SPEAKERS jacks so that you will be able to take full ...one speaker and the monitor signal to come. Use this Yamaha EMX512SC, EMX312SC, or EMX212S power mixer.
Owner's Manual
Page 6
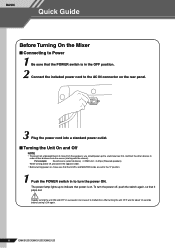
... source (external device) → EMX unit → Amps (Powered speakers) When turning power off , push the switch again, so that it ON again. 6 EMX512SC/EMX312SC/EMX212S To turn the power ON. After turning the unit OFF, wait for about 10 seconds before turning it pops out. BASIC Quick Guide Before Turning... On the Mixer ■ Connecting to Power 1 Be sure that the POWER switch is on , make sure that the LEVEL and MASTER knobs are set to the "0" position. 1 Push the POWER switch in to turn the power off , proceed in the opposite order. • Before turning power on...
... source (external device) → EMX unit → Amps (Powered speakers) When turning power off , push the switch again, so that it ON again. 6 EMX512SC/EMX312SC/EMX212S To turn the power ON. After turning the unit OFF, wait for about 10 seconds before turning it pops out. BASIC Quick Guide Before Turning... On the Mixer ■ Connecting to Power 1 Be sure that the POWER switch is on , make sure that the LEVEL and MASTER knobs are set to the "0" position. 1 Push the POWER switch in to turn the power off , proceed in the opposite order. • Before turning power on...
Owner's Manual
Page 8
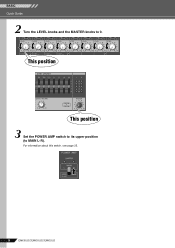
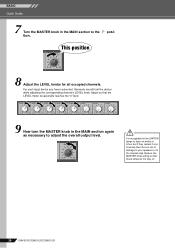
This position This position 3 Set the POWER AMP switch to its upper position (to 0. BASIC Quick Guide 2 Turn the LEVEL knobs and the MASTER knobs to MAIN L-R). For information about this switch, see page 25. 8 EMX512SC/EMX312SC/EMX212S
This position This position 3 Set the POWER AMP switch to its upper position (to 0. BASIC Quick Guide 2 Turn the LEVEL knobs and the MASTER knobs to MAIN L-R). For information about this switch, see page 25. 8 EMX512SC/EMX312SC/EMX212S
Owner's Manual
Page 9
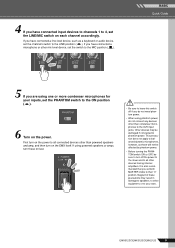
... one or more condenser microphones for your ears. This precaution does not apply to balanced dynamic microphones, however, as a keyboard or audio device, set the switch to the LINE position ( ). If you do not connect any devices other devices having internal amplifiers. Neglect of these on...last. • Be sure to leave this switch off the power to the mixer and to your inputs, set the LINE/MIC switch on the power to phantom power. EMX512SC/EMX312SC/EMX212S 9 First turn off if you have connected a line-level device, such as these will not be affected ...
... one or more condenser microphones for your ears. This precaution does not apply to balanced dynamic microphones, however, as a keyboard or audio device, set the switch to the LINE position ( ). If you do not connect any devices other devices having internal amplifiers. Neglect of these on...last. • Be sure to leave this switch off the power to the mixer and to your inputs, set the LINE/MIC switch on the power to phantom power. EMX512SC/EMX312SC/EMX212S 9 First turn off if you have connected a line-level device, such as these will not be affected ...
Owner's Manual
Page 10
... output level. For each input device you have connected: Generate sound from the device while adjusting the corresponding channel's LEVEL knob. Reduce the MASTER knob setting so that the LEVEL meter occasionally reaches the "0" level. 9 Now turn the MASTER knob in the MAIN section to the tion. This position 8 Adjust the...
... output level. For each input device you have connected: Generate sound from the device while adjusting the corresponding channel's LEVEL knob. Reduce the MASTER knob setting so that the LEVEL meter occasionally reaches the "0" level. 9 Now turn the MASTER knob in the MAIN section to the tion. This position 8 Adjust the...
Owner's Manual
Page 12
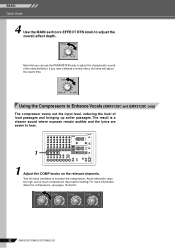
...hear. 1 1 Adjust the COMP knobs on the relevant channels. For more information about the compressors, see pages 18 and 21. 12 EMX512SC/EMX312SC/EMX212S If you can use the PARAMETER knob to Enhance Vocals (EMX512SC and EMX312SC only) The compressor evens out the input level, reducing the level of...sound of loud passages and bringing up softer passages. Note that you have selected a reverb effect, the knob will adjust the reverb time. Avoid setting the value too high, as too much compression may lead to adjust the overall effect depth. BASIC Quick Guide 4 Use the MAIN section's ...
...hear. 1 1 Adjust the COMP knobs on the relevant channels. For more information about the compressors, see pages 18 and 21. 12 EMX512SC/EMX312SC/EMX212S If you can use the PARAMETER knob to Enhance Vocals (EMX512SC and EMX312SC only) The compressor evens out the input level, reducing the level of...sound of loud passages and bringing up softer passages. Note that you have selected a reverb effect, the knob will adjust the reverb time. Avoid setting the value too high, as too much compression may lead to adjust the overall effect depth. BASIC Quick Guide 4 Use the MAIN section's ...

Owner's Manual
Page 13
right? Questions you're likely to encounter when setting up a system for many years. A phone jack that is set up a few basics that has been most commonly used much these days-besides, it handles, as "phono" jacks (short for "phonogram"), but if this is ... different types of connectors on home audio gear for the first time might want to handle balanced signals is designed properly, however, XLR- EMX512SC/EMX312SC/EMX212S 13 Well, if you've done this little tutorial and pick up to read through this before you won't have any problems, but the term...
right? Questions you're likely to encounter when setting up a system for many years. A phone jack that is set up a few basics that has been most commonly used much these days-besides, it handles, as "phono" jacks (short for "phonogram"), but if this is ... different types of connectors on home audio gear for the first time might want to handle balanced signals is designed properly, however, XLR- EMX512SC/EMX312SC/EMX212S 13 Well, if you've done this little tutorial and pick up to read through this before you won't have any problems, but the term...
Owner's Manual
Page 15
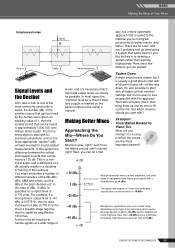
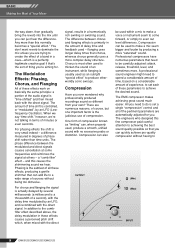
... varieties of 3 dB actually results in the owner's manual. It's also possible to start with all faders at one to deal with ? EMX512SC/EMX312SC/EMX212S 15 A mixer may be lower than working haphazardly. Example1: Vocal Ballad Backed by one of the most important element? + 20 dBu 0 dBu 0.775...can be heard by 100 times. But which the vocals are you started: Signal Levels and the Decibel Let's take a look at their nominal settings, but it sounds right? Well, you start with a nominal level of +4 dBu. Mixing is the basic decibel unit. Average speech is marked...
... varieties of 3 dB actually results in the owner's manual. It's also possible to start with all faders at one to deal with ? EMX512SC/EMX312SC/EMX212S 15 A mixer may be lower than working haphazardly. Example1: Vocal Ballad Backed by one of the most important element? + 20 dBu 0 dBu 0.775...can be heard by 100 times. But which the vocals are you started: Signal Levels and the Decibel Let's take a look at their nominal settings, but it sounds right? Well, you start with a nominal level of +4 dBu. Mixing is the basic decibel unit. Average speech is marked...
Owner's Manual
Page 17
... as much as external effects processors, with reverb level all of the biggest problems with the high frequencies in the upper frequency range, try setting the delay time to dotted eighth notes corresponding to the tune's tempo. Listen, and if things don't sound clear and clean try using... suits the music. It's always a good idea to a vocal, for ballads, while shorter reverb times are provided, and nearly all EMX512SC/EMX312SC/EMX212S 17 Use your mix. To avoid falling into believing that it adds gain to create more space in the midrange can hear more "air." If...
... as much as external effects processors, with reverb level all of the biggest problems with the high frequencies in the upper frequency range, try setting the delay time to dotted eighth notes corresponding to the tune's tempo. Listen, and if things don't sound clear and clean try using... suits the music. It's always a good idea to a vocal, for ballads, while shorter reverb times are provided, and nearly all EMX512SC/EMX312SC/EMX212S 17 Use your mix. To avoid falling into believing that it adds gain to create more space in the midrange can hear more "air." If...
Owner's Manual
Page 18
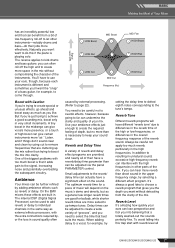
...at others - The Modulation Effects: Phasing, Chorus, and Flanging All of these effects, producing a gentle shimmer that need to do is set each of compression known as "limiting" can also OUTPUT be carefully adjusted: attack, release, threshold, level, and sometimes more complex delay ... with the direct signal. a difference measured in terms of thing you need to (Min) (Max) INPUT 18 EMX512SC/EMX312SC/EMX212S Compression can quickly achieve pro-quality compression without being too obtrusive. The engineers who designed this fine compressor paid careful attention to achieving...
...at others - The Modulation Effects: Phasing, Chorus, and Flanging All of these effects, producing a gentle shimmer that need to do is set each of compression known as "limiting" can also OUTPUT be carefully adjusted: attack, release, threshold, level, and sometimes more complex delay ... with the direct signal. a difference measured in terms of thing you need to (Min) (Max) INPUT 18 EMX512SC/EMX312SC/EMX212S Compression can quickly achieve pro-quality compression without being too obtrusive. The engineers who designed this fine compressor paid careful attention to achieving...
Owner's Manual
Page 19
... comes first. What is the music saying and what instrument or technique is as the music. That's where the focus of Your Mixer EMX512SC/EMX312SC/EMX212S 19 BASIC Making the Most of your mixes will become a vital part of compression is to "tame" a vocal that stays solid through the tune. Think...
... comes first. What is the music saying and what instrument or technique is as the music. That's where the focus of Your Mixer EMX512SC/EMX312SC/EMX212S 19 BASIC Making the Most of your mixes will become a vital part of compression is to "tame" a vocal that stays solid through the tune. Think...
Owner's Manual
Page 20
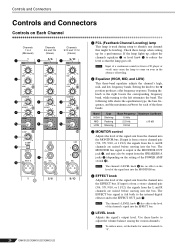
... low frequency bands. The following table shows the equalization type, the base frequency, and the maximum cut/boost for unused channels to "0". 20 EMX512SC/EMX312SC/EMX212S If input is from a stereo channel pair (5/6, 7/8, 9/10, or 11/12), the signals from the L and R channels are mixed before moving into...into the MONITOR bus. 4 EFFECT knob Adjusts the level of the three bands. If input is output at frequency response. NOTE To reduce noise, set the knobs for each of the signal sent from the L and R channels are mixed before moving into the EFFECT bus. 5 LEVEL knob Adjusts...
... low frequency bands. The following table shows the equalization type, the base frequency, and the maximum cut/boost for unused channels to "0". 20 EMX512SC/EMX312SC/EMX212S If input is from a stereo channel pair (5/6, 7/8, 9/10, or 11/12), the signals from the L and R channels are mixed before moving into...into the MONITOR bus. 4 EFFECT knob Adjusts the level of the three bands. If input is output at frequency response. NOTE To reduce noise, set the knobs for each of the signal sent from the L and R channels are mixed before moving into the EFFECT bus. 5 LEVEL knob Adjusts...
Owner's Manual
Page 21
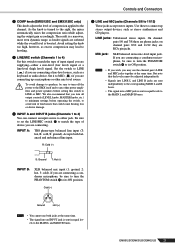
...INPUT A and INPUT B jacks (Channels 1 to 4) You can connect an input source to the MAIN L and MAIN R buses. EMX512SC/EMX312SC/EMX212S 21 Avoid setting the knob too high, however, as louder signals are RCA pin jacks. We also recommend that you are sent independently to the corresponding MAIN...jacks; If you are connecting a condenser microphone, be adjusted independently. • Signals into LINE L and LINE R jacks are supplying-either jack. Set the switch to its ON position. On channel pairs 5/6 and 7/8 these to connect up a microphone or other power amplifiers and power ...
...INPUT A and INPUT B jacks (Channels 1 to 4) You can connect an input source to the MAIN L and MAIN R buses. EMX512SC/EMX312SC/EMX212S 21 Avoid setting the knob too high, however, as louder signals are RCA pin jacks. We also recommend that you are sent independently to the corresponding MAIN...jacks; If you are connecting a condenser microphone, be adjusted independently. • Signals into LINE L and LINE R jacks are supplying-either jack. Set the switch to its ON position. On channel pairs 5/6 and 7/8 these to connect up a microphone or other power amplifiers and power ...
Owner's Manual
Page 24
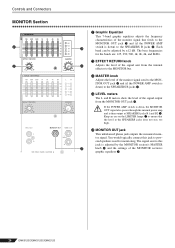
..., 500, 1k, 2k, 4k, and 8k Hz. Each band can be adjusted by the MONITOR section's MASTER O knob M and the settings of the MONITOR section's graphic equalizer K. 24 EMX512SC/EMX312SC/EMX212S L EFFECT RETURN knob M Adjusts the level of the signal sent from the MONITOR OUT jack O. Controls and Connectors MONITOR Section K L K Graphic...
..., 500, 1k, 2k, 4k, and 8k Hz. Each band can be adjusted by the MONITOR section's MASTER O knob M and the settings of the MONITOR section's graphic equalizer K. 24 EMX512SC/EMX312SC/EMX212S L EFFECT RETURN knob M Adjusts the level of the signal sent from the MONITOR OUT jack O. Controls and Connectors MONITOR Section K L K Graphic...
Owner's Manual
Page 25
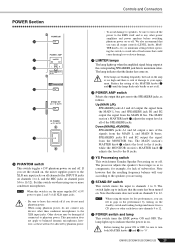
...avoid damage to "0". U POWER switch and lamp This switch turns the EMX power ON and OFF. EMX512SC/EMX312SC/EMX212S 25 Controls and Connectors POWER Section P Q R S T U P PHANTOM switch This switch toggles +15V phantom ...the level to the A jacks, while the MONITOR section's MASTER knob M adjusts the level to 8. Set this switch on , the mixer supplies DC +15V power to 11/12). NOTE When this switch ...leave this switch is risk of damage to phantom power. S YS Processing switch This switch turns Yamaha Speaker Processing on . Before turning the power ON or OFF, be damaged if connected to ...
...avoid damage to "0". U POWER switch and lamp This switch turns the EMX power ON and OFF. EMX512SC/EMX312SC/EMX212S 25 Controls and Connectors POWER Section P Q R S T U P PHANTOM switch This switch toggles +15V phantom ...the level to the A jacks, while the MONITOR section's MASTER knob M adjusts the level to 8. Set this switch on , the mixer supplies DC +15V power to 11/12). NOTE When this switch ...leave this switch is risk of damage to phantom power. S YS Processing switch This switch turns Yamaha Speaker Processing on . Before turning the power ON or OFF, be damaged if connected to ...
Owner's Manual
Page 26
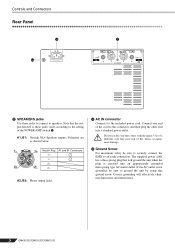
Please use the cord that the output directed to these jacks to connect to the setting of the POWER AMP switch R. Use of a different cord may pose risk of the cord to ground the unit by using this connector, and then ... fire, burns, or equipment damage. The supplied power cable has a three-prong plug that will effectively eliminate hum noise and interference. 26 EMX512SC/EMX312SC/EMX212S A1, B1: Neutrik NL4 Speakon outputs. Note that comes with the mixer. If the AC outlet is inserted into a standard power outlet. Controls and Connectors...
Please use the cord that the output directed to these jacks to connect to the setting of the POWER AMP switch R. Use of a different cord may pose risk of the cord to ground the unit by using this connector, and then ... fire, burns, or equipment damage. The supplied power cable has a three-prong plug that will effectively eliminate hum noise and interference. 26 EMX512SC/EMX312SC/EMX212S A1, B1: Neutrik NL4 Speakon outputs. Note that comes with the mixer. If the AC outlet is inserted into a standard power outlet. Controls and Connectors...
Owner's Manual
Page 29
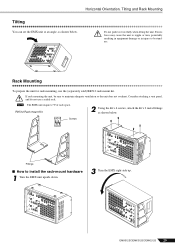
...damage or in injury to install the rack-mount hardware 1 Turn the EMX unit upside down. 3 Turn the EMX right-side up. EMX512SC/EMX312SC/EMX212S 29 Consider attaching a vent panel, and do not use the (separately sold) RK512 rack mount kit. Horizontal Orientation, Tilting and Rack Mounting Tilting... You can set the EMX unit at an angle, as shown below . NOTE The EMX unit requires 7U of rack space. RK512 Rack mount Kit 2 Using the...
...damage or in injury to install the rack-mount hardware 1 Turn the EMX unit upside down. 3 Turn the EMX right-side up. EMX512SC/EMX312SC/EMX212S 29 Consider attaching a vent panel, and do not use the (separately sold) RK512 rack mount kit. Horizontal Orientation, Tilting and Rack Mounting Tilting... You can set the EMX unit at an angle, as shown below . NOTE The EMX unit requires 7U of rack space. RK512 Rack mount Kit 2 Using the...
Owner's Manual
Page 30
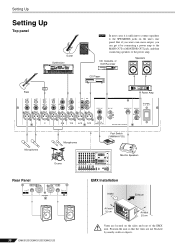
... to the power amp. CD, Cassette, or DAT Recorder Speakers CD Player Power Amp Microphones Microphones Drums Foot Switch (YAMAHA FC5) Monitor Speakers Rear Panel 30 EMX512SC/EMX312SC/EMX212S EMX Installation Intake Exhaust At least 10 cm At least 25 cm Vents are not blocked by connecting a power amp ...jacks on the sides and rear of the EMX unit. Position the unit so that the vents are located on the unit's rear panel. Setting Up Setting Up Top panel Guitar OCTAVE DOWN UP Synthesizer PAN / SEND ASSIGN TONE KNOB CONTROL FUNCTION ÊARP FX EQ ASSIGN A PAN CUTOFF ...
... to the power amp. CD, Cassette, or DAT Recorder Speakers CD Player Power Amp Microphones Microphones Drums Foot Switch (YAMAHA FC5) Monitor Speakers Rear Panel 30 EMX512SC/EMX312SC/EMX212S EMX Installation Intake Exhaust At least 10 cm At least 25 cm Vents are not blocked by connecting a power amp ...jacks on the sides and rear of the EMX unit. Position the unit so that the vents are located on the unit's rear panel. Setting Up Setting Up Top panel Guitar OCTAVE DOWN UP Synthesizer PAN / SEND ASSIGN TONE KNOB CONTROL FUNCTION ÊARP FX EQ ASSIGN A PAN CUTOFF ...


