
Owner's Manual
Page 4
... for future reference. 2 Install this sound system in them, as they may cause damage and/ or discoloration on the surface of this unit, do not place: - On the top of this unit. - YAMAHA will not be opened for any reason. 15 When not planning to use this unit with the power switched on. Never make or change connections with chemical solvents...
... for future reference. 2 Install this sound system in them, as they may cause damage and/ or discoloration on the surface of this unit, do not place: - On the top of this unit. - YAMAHA will not be opened for any reason. 15 When not planning to use this unit with the power switched on. Never make or change connections with chemical solvents...
Owner's Manual
Page 5
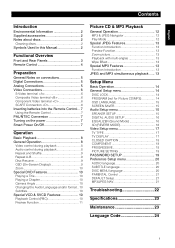
English Contents Introduction Environmental Information 2 Supplied accessories 2 Notes about discs 2 Cleaning discs 2 Symbols Used in this Manual 2 Functional Overview Front and Rear Panels 3 Remote Control 4 Preparation General Notes on connections 5 Digital Connections 5 Analog Connections 5 Video Connections 6 S-Video terminal
English Contents Introduction Environmental Information 2 Supplied accessories 2 Notes about discs 2 Cleaning discs 2 Symbols Used in this Manual 2 Functional Overview Front and Rear Panels 3 Remote Control 4 Preparation General Notes on connections 5 Digital Connections 5 Analog Connections 5 Video Connections 6 S-Video terminal
Owner's Manual
Page 6
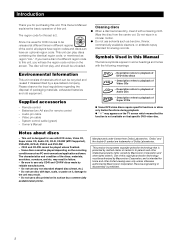
... different times in failure. - Remote control - Owner's Manual DVD VCD - materials, scratches, curvature, and etc, may result. - Be sure to use disc with DVD video, Video CD, Super video CD, Audio CD, CD-R, CD-RW (MP3 Supported), DVD+RW, DVD+R, DVD-R and DVD-RW. - This product incorporates copyright protection technology that specific DVD video disc. Introduction Thank you for purchasing this unit, you load a disc of a different region code to this unit. Video pin cable - Notes about discs - CD-R and CD-RW cannot be played depending...
... different times in failure. - Remote control - Owner's Manual DVD VCD - materials, scratches, curvature, and etc, may result. - Be sure to use disc with DVD video, Video CD, Super video CD, Audio CD, CD-R, CD-RW (MP3 Supported), DVD+RW, DVD+R, DVD-R and DVD-RW. - This product incorporates copyright protection technology that specific DVD video disc. Introduction Thank you for purchasing this unit, you load a disc of a different region code to this unit. Video pin cable - Notes about discs - CD-R and CD-RW cannot be played depending...
Owner's Manual
Page 7
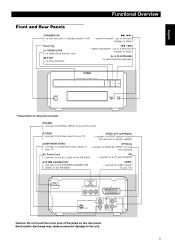
...-E600 VIDEO - connect to start/interrupt playback NATURAL SOUND DVD PLAYER DVD-E600 STANDBY/ON / / * Press button for about two seconds. connect to the unit. 3 Electrostatic discharge may cause permanent damage to the SYSTEM CONNECTOR (DVD) of the jacks on the rear panel. English Functional Overview Front and Rear Panels STANDBY/ON - PLAY/PAUSE - connect to open/close the disc tray 9 STOP - to DIGITAL INPUT of your AV reciver S-VIDEO - connect to DIGITAL INPUT of your AV receiver AC Power Cord - connect to S-Video input of your TV OPTICAL...
...-E600 VIDEO - connect to start/interrupt playback NATURAL SOUND DVD PLAYER DVD-E600 STANDBY/ON / / * Press button for about two seconds. connect to the unit. 3 Electrostatic discharge may cause permanent damage to the SYSTEM CONNECTOR (DVD) of the jacks on the rear panel. English Functional Overview Front and Rear Panels STANDBY/ON - PLAY/PAUSE - connect to open/close the disc tray 9 STOP - to DIGITAL INPUT of your AV reciver S-VIDEO - connect to DIGITAL INPUT of your AV receiver AC Power Cord - connect to S-Video input of your TV OPTICAL...
Owner's Manual
Page 8
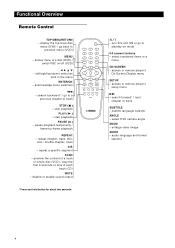
... chapter or track SUBTITLE - repeat a specific segment SCAN - disable or enable sound output 1 2 3 4 5 6 7 8 TOP MENU RETURN 0 MENU 9 ON SCREEN SETUP ENTER OK STOP PLAY PAUSE SUBTITLE ANGLE ZOOM AUDIO REPEAT A B SCAN MUTE DVD - access or remove player's setup menu T - access menu of each track (CD) MUTE - select DVD camera angle ZOOM - Functional Overview Remote Control TOP MENU/RETURN - subtitle language selector ANGLE - display the top-level disc menu (DVD) / go back to a previous chapter...
... chapter or track SUBTITLE - repeat a specific segment SCAN - disable or enable sound output 1 2 3 4 5 6 7 8 TOP MENU RETURN 0 MENU 9 ON SCREEN SETUP ENTER OK STOP PLAY PAUSE SUBTITLE ANGLE ZOOM AUDIO REPEAT A B SCAN MUTE DVD - access or remove player's setup menu T - access menu of each track (CD) MUTE - select DVD camera angle ZOOM - Functional Overview Remote Control TOP MENU/RETURN - subtitle language selector ANGLE - display the top-level disc menu (DVD) / go back to a previous chapter...
Owner's Manual
Page 9
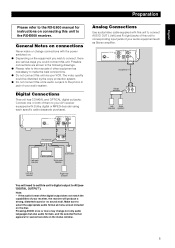
... S VIDEO R COAXIAL OPTICAL E R L (supplied) Stereo amplifier R L 1 CD/DVD R L Left Right speaker speaker Center speaker Subwoofer Left main speaker Right main speaker Left rear speaker Right rear speaker You will produce a strong, distorted sound or no sound at menu screen included on the disc. Pressing AUDIO once or more may change connections with Dolby digital or MPEG decoder using each specific cable (separate purchase). Possible connections are various ways you wish to your receiver, the receiver will need to set this unit's digital output to make the best...
... S VIDEO R COAXIAL OPTICAL E R L (supplied) Stereo amplifier R L 1 CD/DVD R L Left Right speaker speaker Center speaker Subwoofer Left main speaker Right main speaker Left rear speaker Right rear speaker You will produce a strong, distorted sound or no sound at menu screen included on the disc. Pressing AUDIO once or more may change connections with Dolby digital or MPEG decoder using each specific cable (separate purchase). Possible connections are various ways you wish to your receiver, the receiver will need to set this unit's digital output to make the best...
Owner's Manual
Page 10
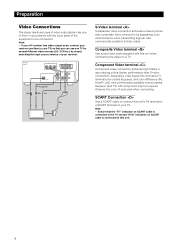
... player to be connected. Use commercially available coaxial cables. Use one TV for several different video sources (LD, VCR etc.) by separating color and luminance when transmitting signals. Use commercially available S-video cable. If your AV receiver has video output jacks, connect your receiver (and then to the TV set and "DVD" indication on your TV) so that the "TV" indication on SCART cable is required. Composite Video terminal Use audio/video cable supplied with component input...
... player to be connected. Use commercially available coaxial cables. Use one TV for several different video sources (LD, VCR etc.) by separating color and luminance when transmitting signals. Use commercially available S-video cable. If your AV receiver has video output jacks, connect your receiver (and then to the TV set and "DVD" indication on your TV) so that the "TV" indication on SCART cable is required. Composite Video terminal Use audio/video cable supplied with component input...
Owner's Manual
Page 11
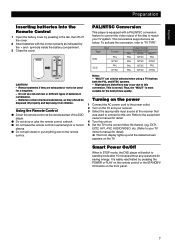
... input source at the remote sensor of the disc to the correct Video IN channel. (eg. symbols inside the battery compartment. 3 Close the cover. + - EXT1, EXT2, AV1, AV2, AUDIO/VIDEO, etc. (Refer to the equipment owner's manual for detail) ➜ The front display lights up and the default screen appears on the remote control. + - Using the Remote Control ● Direct the remote control at the receiver that has both the PAL and NTSC systems...
... input source at the remote sensor of the disc to the correct Video IN channel. (eg. symbols inside the battery compartment. 3 Close the cover. + - EXT1, EXT2, AV1, AV2, AUDIO/VIDEO, etc. (Refer to the equipment owner's manual for detail) ➜ The front display lights up and the default screen appears on the remote control. + - Using the Remote Control ● Direct the remote control at the receiver that has both the PAL and NTSC systems...
Owner's Manual
Page 12
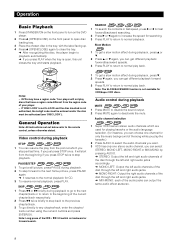
... STOP twice to stop playback. Audio channel selection VCD CD SVCD 1 Super VCD has two stereo audio channels which you stopped last time, if you can resume the play from the region code of the !1 or 2@ till switch on the front panel to open , this unit closes the tray and starts playback. If 'DISC LOCK' is open disc loading tray. 3 Place the chosen disc in fast speed, press 2 or...
... STOP twice to stop playback. Audio channel selection VCD CD SVCD 1 Super VCD has two stereo audio channels which you stopped last time, if you can resume the play from the region code of the !1 or 2@ till switch on the front panel to open , this unit closes the tray and starts playback. If 'DISC LOCK' is open disc loading tray. 3 Place the chosen disc in fast speed, press 2 or...
Owner's Manual
Page 13
... may not be played back from left to right using the numeric buttons. (e.g. 0:34:27) Audio/Subtitle/Angle DVD You can resume playback of the last 5 discs, even if the disc was ejected or the power switched off. 1 Load one disc, which is recognizing the disc. or For Angle, Select an angle using the numeric buttons. Time display CD Each time you press ON SCREEN, the time display changes as follows...
... may not be played back from left to right using the numeric buttons. (e.g. 0:34:27) Audio/Subtitle/Angle DVD You can resume playback of the last 5 discs, even if the disc was ejected or the power switched off. 1 Load one disc, which is recognizing the disc. or For Angle, Select an angle using the numeric buttons. Time display CD Each time you press ON SCREEN, the time display changes as follows...

Owner's Manual
Page 14
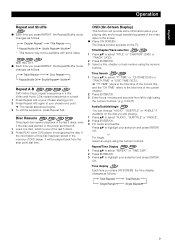
... highlight your remote control. Special DVD Features Playing a Title DVD A DVD disc may include one or more chapters. ● Any time you want to skip the index menu and playback directly from various angles. You can press ¡!1 or 2@ to make a change the image size. 1 Press ZOOM to activate the function. ➜ Use 341 2 to view other parts of the index menu depends on the disc. Note...
... highlight your remote control. Special DVD Features Playing a Title DVD A DVD disc may include one or more chapters. ● Any time you want to skip the index menu and playback directly from various angles. You can press ¡!1 or 2@ to make a change the image size. 1 Press ZOOM to activate the function. ➜ Use 341 2 to view other parts of the index menu depends on the disc. Note...
Owner's Manual
Page 18
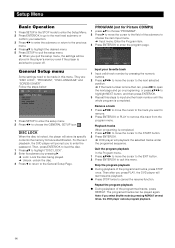
... PLAY to remove this menu. Follow the steps below: GENERAL SETUP PAGE DISK LOCK PROGRAM OSD LANGUAGE SCREEN SAVER 1 Press SETUP to enter the setup menu. 2 Press 1 2 to power off. Then, press ENTER/OK to load the disc. 1 Press 34 to highlight "DISC LOCK". 2 Enter its specific code into the memory for Picture CD/MP3) 1 press 34 to choose "PROGRAM". 2 Press 2 to move the cursor to the START button...
... PLAY to remove this menu. Follow the steps below: GENERAL SETUP PAGE DISK LOCK PROGRAM OSD LANGUAGE SCREEN SAVER 1 Press SETUP to enter the setup menu. 2 Press 1 2 to power off. Then, press ENTER/OK to load the disc. 1 Press 34 to highlight "DISC LOCK". 2 Enter its specific code into the memory for Picture CD/MP3) 1 press 34 to choose "PROGRAM". 2 Press 2 to move the cursor to the START button...
Owner's Manual
Page 19
... ➜ This option should be activated. ➜ Off: Screen saver is connected to a Dolby Prologic decoder. ● STEREO ➜ This option will downmix Dolby Digital signals directly into analogue stereo from L/R jacks. ● VIRTUAL SURROUND ➜ This option will reproduce the surround channels virtually. 4 Press ENTER/OK. 5 Press 1 to return to the Audio Setup Page. DRC (Dynamic Range Compression) The DVD player will compress the dynamic range...
... ➜ This option should be activated. ➜ Off: Screen saver is connected to a Dolby Prologic decoder. ● STEREO ➜ This option will downmix Dolby Digital signals directly into analogue stereo from L/R jacks. ● VIRTUAL SURROUND ➜ This option will reproduce the surround channels virtually. 4 Press ENTER/OK. 5 Press 1 to return to the Audio Setup Page. DRC (Dynamic Range Compression) The DVD player will compress the dynamic range...
Owner's Manual
Page 20
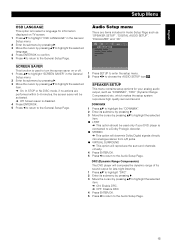
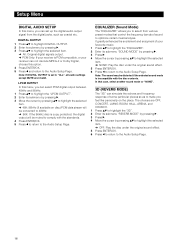
... to the Audio Setup Page. EQUALIZER (Sound Mode) The "EQUALIZER" allows you to select from the digital jacks, such as to make you can simulate the echoes and frequency response of sound to comply with the disc contents. The choices are invalid. LPCM OUTPUT In this option. 4 Press ENTER/OK. 5 Press 1 and return to the Audio Setup Page. 16 In that control the...
... to the Audio Setup Page. EQUALIZER (Sound Mode) The "EQUALIZER" allows you to select from the digital jacks, such as to make you can simulate the echoes and frequency response of sound to comply with the disc contents. The choices are invalid. LPCM OUTPUT In this option. 4 Press ENTER/OK. 5 Press 1 and return to the Audio Setup Page. 16 In that control the...
Owner's Manual
Page 21
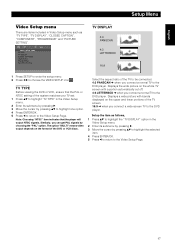
...", "COMPONENT", "PROGRESSIVE" and "PICTURE SETTING". TV TYPE Before viewing the DVD or VCD, ensure that the player will output NTSC signals, Similarly, you connect a normal TV to choose the VIDEO SETUP icon . Displays the wide picture on the whole TV screen with bands displayed on the format of the system matches your TV set. 1 Press 34 to highlight "TV TYPE" in the Video Setup menu. 2 Enter...
...", "COMPONENT", "PROGRESSIVE" and "PICTURE SETTING". TV TYPE Before viewing the DVD or VCD, ensure that the player will output NTSC signals, Similarly, you connect a normal TV to choose the VIDEO SETUP icon . Displays the wide picture on the whole TV screen with bands displayed on the format of the system matches your TV set. 1 Press 34 to highlight "TV TYPE" in the Video Setup menu. 2 Enter...
Owner's Manual
Page 22
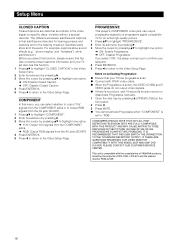
... THE USER SWITCH THE CONNECTION TO THE "STANDARD DEFINITION" OUTPUT. For example, captions show all of YAMAHA products, including the projectors DPX-1000, LPX-510 and the plasma monitor PDM-4210E. 18 CONSUMERS SHOULD NOTE THAT NOT ALL HIGH DEFINITION TELEVISION SETS ARE FULLY COMPATIBLE WITH THIS PRODUCT AND MAY CAUSE ARTIFACTS TO BE DISPLAYED IN THE PICTURE. PROGRESSIVE This player's COMPONENT video jack...
... THE USER SWITCH THE CONNECTION TO THE "STANDARD DEFINITION" OUTPUT. For example, captions show all of YAMAHA products, including the projectors DPX-1000, LPX-510 and the plasma monitor PDM-4210E. 18 CONSUMERS SHOULD NOTE THAT NOT ALL HIGH DEFINITION TELEVISION SETS ARE FULLY COMPATIBLE WITH THIS PRODUCT AND MAY CAUSE ARTIFACTS TO BE DISPLAYED IN THE PICTURE. PROGRESSIVE This player's COMPONENT video jack...
Owner's Manual
Page 23
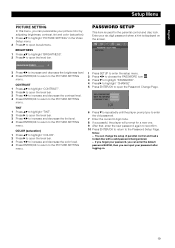
.../OK to return to open the Password Change Page. OLD PASSWORD NEW PASSWORD CONFIRM PWD 6 Press 4 to repeatedly until the player prompt you to enter the old password. 7 Enter the current 6 digit code. 8 If successful, the player will prompt for the parental control and disc lock. English Setup Menu PICTURE SETTING In this menu, you can change the setup of parental control and load a locked disc with a valid password being entered. -
.../OK to return to open the Password Change Page. OLD PASSWORD NEW PASSWORD CONFIRM PWD 6 Press 4 to repeatedly until the player prompt you to enter the old password. 7 Enter the current 6 digit code. 8 If successful, the player will prompt for the parental control and disc lock. English Setup Menu PICTURE SETTING In this menu, you can change the setup of parental control and load a locked disc with a valid password being entered. -
Owner's Manual
Page 25
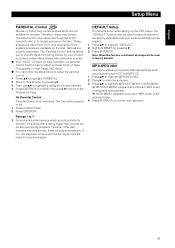
.... ● VCD, SVCD, CD have certain discs played with a rating higher than you set will be skipped during playback. The Disc will be played in the selected folder. 4 Press ENTER/OK to have no level indication, so parental control function has no effect on those kinds of discs. DEFAULT Setup If problems occur while setting up the DVD player, the "DEFAULT" function can...
.... ● VCD, SVCD, CD have certain discs played with a rating higher than you set will be skipped during playback. The Disc will be played in the selected folder. 4 Press ENTER/OK to have no level indication, so parental control function has no effect on those kinds of discs. DEFAULT Setup If problems occur while setting up the DVD player, the "DEFAULT" function can...
Owner's Manual
Page 26
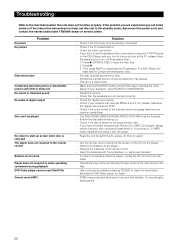
... CONVERSION) - Replace the batteries in the remote control. - No power No picture Problem Distorted picture Completely distorted picture or black/white picture with DVD or Video CD No sound or distorted sound No audio at the TV, please follow the steps below when this unit to Component/Interlaced video. - The DVD Player will reset itself to the standby mode, disconnect the power cord, and contact the nearest authorized YAMAHA dealer or service center. Make sure...
... CONVERSION) - Replace the batteries in the remote control. - No power No picture Problem Distorted picture Completely distorted picture or black/white picture with DVD or Video CD No sound or distorted sound No audio at the TV, please follow the steps below when this unit to Component/Interlaced video. - The DVD Player will reset itself to the standby mode, disconnect the power cord, and contact the nearest authorized YAMAHA dealer or service center. Make sure...
Owner's Manual
Page 27
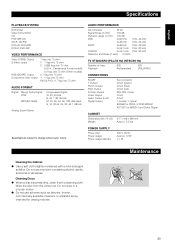
... POWER SUPPLY Power inlet Power usage Power usage standby 230 V, 50 Hz Approx. 12 W < 1 W Cleaning the Cabinet ● Use a soft cloth slightly moistened with a cleaning cloth. Do not wipe in a circular motion. ● Do not use a solution containing alcohol, spirits, ammonia or abrasives. Cleaning Discs ● When a disc becomes dirty, clean it with a mild detergent solution. Maintenance 23 English Specifications PLAYBACK SYSTEM DVD Video Video CD...
... POWER SUPPLY Power inlet Power usage Power usage standby 230 V, 50 Hz Approx. 12 W < 1 W Cleaning the Cabinet ● Use a soft cloth slightly moistened with a cleaning cloth. Do not wipe in a circular motion. ● Do not use a solution containing alcohol, spirits, ammonia or abrasives. Cleaning Discs ● When a disc becomes dirty, clean it with a mild detergent solution. Maintenance 23 English Specifications PLAYBACK SYSTEM DVD Video Video CD...


