

CRX-N560/N560D Safety Brochure
Page 2
... as power-supply cord or plug is required when the apparatus has been damaged in accordance with the manufacturer's instructions. 8 Do not install near water. 6 Clean only with arrowhead symbol, within an equilateral triangle, is too late, Yamaha and the Electronic Industries Association's Consumer Electronics Group recommend you to avoid prolonged exposure from excessive volume levels. 1 Read these instructions...
... as power-supply cord or plug is required when the apparatus has been damaged in accordance with the manufacturer's instructions. 8 Do not install near water. 6 Clean only with arrowhead symbol, within an equilateral triangle, is too late, Yamaha and the Electronic Industries Association's Consumer Electronics Group recommend you to avoid prolonged exposure from excessive volume levels. 1 Read these instructions...
CRX-N560/N560D Safety Brochure
Page 3
... fuse) circuits or install AC line filter/s. The above statements apply ONLY to those products distributed by the FCC, to use the product. 2 IMPORTANT: When connecting this product to coaxial type cable. MODEL: Serial No.: The serial number is 300 ohm ribbon lead, change the lead-in a live socket outlet. ■ Special Instructions for the plug supplied with the letter L or coloured RED...
... fuse) circuits or install AC line filter/s. The above statements apply ONLY to those products distributed by the FCC, to use the product. 2 IMPORTANT: When connecting this product to coaxial type cable. MODEL: Serial No.: The serial number is 300 ohm ribbon lead, change the lead-in a live socket outlet. ■ Special Instructions for the plug supplied with the letter L or coloured RED...
CRX-N560/N560D Safety Brochure
Page 4
... When using this unit for future reference. 2 Install this unit near the AC outlet and where the AC power plug can cause hearing loss. The cabinet should never be different even though they may happen if batteries are complete. 8 Do not operate this unit. Yamaha will form when the surrounding temperature changes suddenly. Disconnect the power cable from direct sunlight, heat sources...
... When using this unit for future reference. 2 Install this unit near the AC outlet and where the AC power plug can cause hearing loss. The cabinet should never be different even though they may happen if batteries are complete. 8 Do not operate this unit. Yamaha will form when the surrounding temperature changes suddenly. Disconnect the power cable from direct sunlight, heat sources...

CRX-N560/N560D Safety Brochure
Page 5
... attempt to beam. CAUTION Use of controls or adjustments or performance of the corporation itself as well as its business partners shall observe the contractual bans stipulated within this Yamaha product, and Pan-EEA* and Switzerland warranty service, please either visit the ...is plugged into inside. Avoid direct eye exposure to service this contract cannot be used in combination with general household waste. The user shall not reverse engineer, decompile, alter, translate or disassemble the software used in this unit is capable of sale where you will help ...
... attempt to beam. CAUTION Use of controls or adjustments or performance of the corporation itself as well as its business partners shall observe the contractual bans stipulated within this Yamaha product, and Pan-EEA* and Switzerland warranty service, please either visit the ...is plugged into inside. Avoid direct eye exposure to service this contract cannot be used in combination with general household waste. The user shall not reverse engineer, decompile, alter, translate or disassemble the software used in this unit is capable of sale where you will help ...
CRX-N560 Owners Manual
Page 2
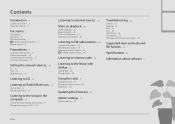
Contents Introduction......4 Supplied accessories......4 About this manual......4 Part name......5 Front panel......5 Rear panel......6 Front panel display......7 Adjusting display brightness......7 Remote control......8 Preparations......9 Connecting the speakers......9 Connecting antenna......10 Connecting to the network......11 Turning on the power......12 Setting the network devices......13 PC......13 NAS......13 Mobile devices......13 Listening to CD......14 Listening to iPod/USB devices......15 Playing iPod......15 Playing USB devices......15 Listening to the songs in the computer...
Contents Introduction......4 Supplied accessories......4 About this manual......4 Part name......5 Front panel......5 Rear panel......6 Front panel display......7 Adjusting display brightness......7 Remote control......8 Preparations......9 Connecting the speakers......9 Connecting antenna......10 Connecting to the network......11 Turning on the power......12 Setting the network devices......13 PC......13 NAS......13 Mobile devices......13 Listening to CD......14 Listening to iPod/USB devices......15 Playing iPod......15 Playing USB devices......15 Listening to the songs in the computer...

CRX-N560 Owners Manual
Page 5
A (Play/pause) (& P.14, 16, 18) B Front panel display (& P.7) En 5 English Front panel 1 Remote control receiver 2 INPUT Turn left or right to change the audio source. (The source is shown on the front panel display.) 3 (& P.14, 16, 18) PRESET (& P.24) 4 A (Power) (& P.12) 5 PHONES Connect headphones to this jack. 6 Disc tray (& P.14) 7 USB jack (& P.15) 8 (Stop) (& P.14, 16, 18, 25) 9 (Open/close the disc tray) (& P.14) 0 VOLUME Controls the volume. Part name Familiarize yourself with all parts and these functions.
A (Play/pause) (& P.14, 16, 18) B Front panel display (& P.7) En 5 English Front panel 1 Remote control receiver 2 INPUT Turn left or right to change the audio source. (The source is shown on the front panel display.) 3 (& P.14, 16, 18) PRESET (& P.24) 4 A (Power) (& P.12) 5 PHONES Connect headphones to this jack. 6 Disc tray (& P.14) 7 USB jack (& P.15) 8 (Stop) (& P.14, 16, 18, 25) 9 (Open/close the disc tray) (& P.14) 0 VOLUME Controls the volume. Part name Familiarize yourself with all parts and these functions.
CRX-N560 Owners Manual
Page 6
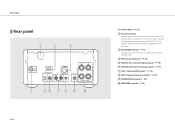
Part name Rear panel 6 En 1 Power cable (& P.12) 2 DC OUT terminal Supplies power to the Yamaha AV accessories from this , set [Use Accessory] in [System Config] from the option setting, to a network using this terminal. When using a commercially available network cable. 4 FM antenna terminal (& P.10) 5 DIGITAL IN 1 terminal (optical input) (& P.19) 6 DIGITAL IN 2 terminal (coaxial input) (& P.19) 7 AUX 1 terminal (RCA input) (& P.19) 8 AUX 2 terminal (mini jack input) (& P.19) 9 SUBWOOFER terminal (& P.9) 0 SPEAKERS terminal (& P.9) For details, refer to the owner's manual supplied ...
Part name Rear panel 6 En 1 Power cable (& P.12) 2 DC OUT terminal Supplies power to the Yamaha AV accessories from this , set [Use Accessory] in [System Config] from the option setting, to a network using this terminal. When using a commercially available network cable. 4 FM antenna terminal (& P.10) 5 DIGITAL IN 1 terminal (optical input) (& P.19) 6 DIGITAL IN 2 terminal (coaxial input) (& P.19) 7 AUX 1 terminal (RCA input) (& P.19) 8 AUX 2 terminal (mini jack input) (& P.19) 9 SUBWOOFER terminal (& P.9) 0 SPEAKERS terminal (& P.9) For details, refer to the owner's manual supplied ...

CRX-N560 Owners Manual
Page 7
... iPod, CD, USB device, or computer to shuffle or repeat playback (& P.20). 8 STEREO indicator Lights up when the unit is receiving a strong signal from an FM stereo broadcast. 9 Operation indicators Shows available control buttons S/T/ENTER (& P.8) of the button changes the brightness: bright (default), mid dim, or dim. English Front panel display Part name 1 Clock Displays the time when the power is on the remote control (& P.8). • Each press of the remote control...
... iPod, CD, USB device, or computer to shuffle or repeat playback (& P.20). 8 STEREO indicator Lights up when the unit is receiving a strong signal from an FM stereo broadcast. 9 Operation indicators Shows available control buttons S/T/ENTER (& P.8) of the button changes the brightness: bright (default), mid dim, or dim. English Front panel display Part name 1 Clock Displays the time when the power is on the remote control (& P.8). • Each press of the remote control...
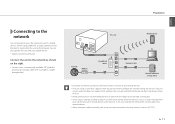
CRX-N560 Owners Manual
Page 11
...using a router that supports DHCP, you are using a router that does not support DHCP, configure the network setting from [Network Config] in the option setting (& P.31). • Wired connections are recommended for devices other than the mobile to ensure high sound quality. • Some security software installed...or audio contents on the Internet, by connecting this case, change the setting of the security software or network devices. • When setting the subnet manually, each server must be connected to the same subnet as shown on Internet connection, refer to the owner's manuals of...
...using a router that supports DHCP, you are using a router that does not support DHCP, configure the network setting from [Network Config] in the option setting (& P.31). • Wired connections are recommended for devices other than the mobile to ensure high sound quality. • Some security software installed...or audio contents on the Internet, by connecting this case, change the setting of the security software or network devices. • When setting the subnet manually, each server must be connected to the same subnet as shown on Internet connection, refer to the owner's manuals of...
CRX-N560 Owners Manual
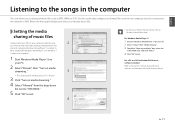
Page 17
... the "Share my media to" box, select the "CRX-N560" icon, and click "Allow." 4 Click "OK" to the owner's manual of music files To play back music files such as MP3, WMA, or FLAC (lossless audio data compression format) files stored in your favorite music file. Brows the front panel display and select your computer with other DLNA server software installed Refer to exit.
... the "Share my media to" box, select the "CRX-N560" icon, and click "Allow." 4 Click "OK" to the owner's manual of music files To play back music files such as MP3, WMA, or FLAC (lossless audio data compression format) files stored in your favorite music file. Brows the front panel display and select your computer with other DLNA server software installed Refer to exit.

CRX-N560 Owners Manual
Page 18
... the songs in the computer Playing back songs in the PC 1 Press repeatedly and select [Server]. 2 Browse and select a song. Listening to the App Store or Google Play and search "NETWORK PLAYER CONTROLLER." Play/pause / Move to the same router (& P.11). Changing the music source - Show the top-level item. Displaying the information of the radio tuner - Power-on/off, adjusting volume or other item. Stop Shuffle...
... the songs in the computer Playing back songs in the PC 1 Press repeatedly and select [Server]. 2 Browse and select a song. Listening to the App Store or Google Play and search "NETWORK PLAYER CONTROLLER." Play/pause / Move to the same router (& P.11). Changing the music source - Show the top-level item. Displaying the information of the radio tuner - Power-on/off, adjusting volume or other item. Stop Shuffle...

CRX-N560 Owners Manual
Page 22
... 2, 3 S/T, ENTER Option menu regarding sound quality (Setting value. The setting is also applied when using headphones. (Lch. +10 to +10) Balance Adjusts the volume balance of the left and right speakers. More on playback Adjusting sound quality Use the option setting to adjust sound quality. 1 Press . • Option menu is shown on the front panel display. 2 Press S/T to select the desired item and press . 3 Press S/T to change the setting and press . •...
... 2, 3 S/T, ENTER Option menu regarding sound quality (Setting value. The setting is also applied when using headphones. (Lch. +10 to +10) Balance Adjusts the volume balance of the left and right speakers. More on playback Adjusting sound quality Use the option setting to adjust sound quality. 1 Press . • Option menu is shown on the front panel display. 2 Press S/T to select the desired item and press . 3 Press S/T to change the setting and press . •...
CRX-N560 Owners Manual
Page 26
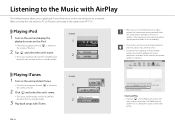
... and your PC or iPod are connected to [AirPlay] (except in the eco standby mode). 3 Play back songs with iTunes. Playing iTunes 1 Turn on the unit and start iTunes. • If the iTunes recognizes the unit, is shown on the iPod/iTunes screen and select a device other than CRX-N560 from remote speakers in advance. Example 1 2 • When you to adjust volume, the volume may be unexpectedly...
... and your PC or iPod are connected to [AirPlay] (except in the eco standby mode). 3 Play back songs with iTunes. Playing iTunes 1 Turn on the unit and start iTunes. • If the iTunes recognizes the unit, is shown on the iPod/iTunes screen and select a device other than CRX-N560 from remote speakers in advance. Example 1 2 • When you to adjust volume, the volume may be unexpectedly...
CRX-N560 Owners Manual
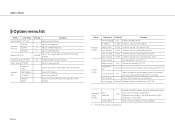
Page 32
...). CENTER Adjusts the volume balance of network components. (Operation with AirPlay is not affected even if [MAC Add.Filter] is set to [ON].) Resets the unit's settings to a Yamaha accessory connected through the DC OUT jack. Shows the system ID. Subnet Mask 0.0.0.0 Confirms and sets the subnet mask. Shows MAC address. OFF Enables/disables Music Enhancer. Option settings Option menu list Menu Sub menu Preset Delete*1 (& P.24) Equalizer (& P.22) EQ Low EQ...
...). CENTER Adjusts the volume balance of network components. (Operation with AirPlay is not affected even if [MAC Add.Filter] is set to [ON].) Resets the unit's settings to a Yamaha accessory connected through the DC OUT jack. Shows the system ID. Subnet Mask 0.0.0.0 Confirms and sets the subnet mask. Shows MAC address. OFF Enables/disables Music Enhancer. Option settings Option menu list Menu Sub menu Preset Delete*1 (& P.24) Equalizer (& P.22) EQ Low EQ...
CRX-N560 Owners Manual
Page 33
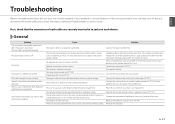
... nearest authorized Yamaha dealer or service center. No sound. Connect the power cable firmly. The sleep timer may be set (& P.29). Source device or speakers are not secure. Turn up the volume. If the problem persists, the cables may be defective. General Problem The unit enters the standby mode soon after 30 seconds or more than 10 seconds to a drop in to jacks on the remote control (& P.5, 8). Turn on . The remote control may...
... nearest authorized Yamaha dealer or service center. No sound. Connect the power cable firmly. The sleep timer may be set (& P.29). Source device or speakers are not secure. Turn up the volume. If the problem persists, the cables may be defective. General Problem The unit enters the standby mode soon after 30 seconds or more than 10 seconds to a drop in to jacks on the remote control (& P.5, 8). Turn on . The remote control may...
CRX-N560 Owners Manual
Page 34
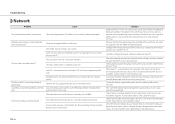
...] to the same network. Use the file format supported by each radio station. Some security software installed on your router settings, and then connect the unit and the PC to [OFF] (& P.32). Some files cannot be played back with DRM (Digital Rights Management) purchased on iTunes Store. The selected Internet radio station is available). Configure the sharing setting and select the unit as the...
...] to the same network. Use the file format supported by each radio station. Some security software installed on your router settings, and then connect the unit and the PC to [OFF] (& P.32). Some files cannot be played back with DRM (Digital Rights Management) purchased on iTunes Store. The selected Internet radio station is available). Configure the sharing setting and select the unit as the...
CRX-N560 Owners Manual
Page 35
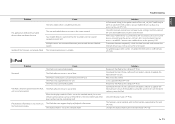
... extended mode, iPod does not function for a while. The iPod is connected to update the iPod software version. Change the display mode to mobile devices does not detect the unit. Your mobile device is in the same network. Update of a router supporting multi SSID. the front panel display. Reconnect the iPod to the unit (& P.32). The iPod is not connected properly. The iPod is not supported by the iPod, unit, or remote control...
... extended mode, iPod does not function for a while. The iPod is connected to update the iPod software version. Change the display mode to mobile devices does not detect the unit. Your mobile device is in the same network. Update of a router supporting multi SSID. the front panel display. Reconnect the iPod to the unit (& P.32). The iPod is not connected properly. The iPod is not supported by the iPod, unit, or remote control...
CRX-N560 Owners Manual
Page 36
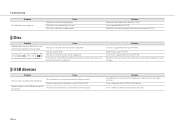
... connected to the room temperature, and try again. The USB device is protected by the unit (& P.39). The unit is set. Solution Use a disc supported by this unit. Solution Turn off the unit, reconnect your USB device, and turn the unit on the remote control (stops immediately). Use a USB device without an encryption function. 36 En Troubleshooting Problem The iPod does not charge up. Use the disc supported...
... connected to the room temperature, and try again. The USB device is protected by the unit (& P.39). The unit is set. Solution Use a disc supported by this unit. Solution Turn off the unit, reconnect your USB device, and turn the unit on the remote control (stops immediately). Use a USB device without an encryption function. 36 En Troubleshooting Problem The iPod does not charge up. Use the disc supported...
CRX-N560 Owners Manual
Page 38
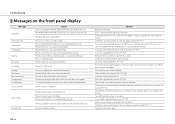
... iPod and turn it on the unit. Make sure your iPod to this does not solve the problem for the USB device, it on the front panel display Message Unknown Timer not work Overcurrent Unplugged No Disc No Songs Initializing Loading... Selected folder does not contain playable files. The disc set upside-down. Use a supported iPod/USB device (& P.39). Use a disc supported by the unit (& P.40). Play a file supported...
... iPod and turn it on the unit. Make sure your iPod to this does not solve the problem for the USB device, it on the front panel display Message Unknown Timer not work Overcurrent Unplugged No Disc No Songs Initializing Loading... Selected folder does not contain playable files. The disc set upside-down. Use a supported iPod/USB device (& P.39). Use a disc supported by the unit (& P.40). Play a file supported...

CRX-N560 Owners Manual
Page 41
... (6.0 lbs.) (As of August 2013) Specifications are subject to change without notice. English Specifications Player section Media Audio format CD Type Laser Wave length Output power iPod (digital connection) Supported iPod Supported iPhone Supported iPad USB Supported file format AUX IN DIGITAL IN Input connector AUX1 AUX2 Input connector DIGITAL IN 1 DIGITAL IN 2 Interface Internet radio Network PC client function Supported file format AirPlay Tuner section Tuning range (FM) CD, CD-R/RW Audio CD, MP3, WMA Semiconductor laser...
... (6.0 lbs.) (As of August 2013) Specifications are subject to change without notice. English Specifications Player section Media Audio format CD Type Laser Wave length Output power iPod (digital connection) Supported iPod Supported iPhone Supported iPad USB Supported file format AUX IN DIGITAL IN Input connector AUX1 AUX2 Input connector DIGITAL IN 1 DIGITAL IN 2 Interface Internet radio Network PC client function Supported file format AirPlay Tuner section Tuning range (FM) CD, CD-R/RW Audio CD, MP3, WMA Semiconductor laser...


