Owner's Manual
Page 2
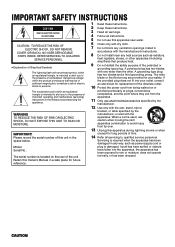
... near any heat sources such as power-supply cord or plug is used, use this unit in any ventilation openings. IMPORTANT SAFETY INSTRUCTIONS CAUTION RISK OF ELECTRIC SHOCK DO␣ NOT OPEN CAUTION: TO REDUCE THE RISK OF ELECTRIC SHOCK, DO NOT REMOVE COVER (OR BACK). Retain this Owner's Manual in accordance with the manufacturer's instructions. 8 Do not install near water...
... near any heat sources such as power-supply cord or plug is used, use this unit in any ventilation openings. IMPORTANT SAFETY INSTRUCTIONS CAUTION RISK OF ELECTRIC SHOCK DO␣ NOT OPEN CAUTION: TO REDUCE THE RISK OF ELECTRIC SHOCK, DO NOT REMOVE COVER (OR BACK). Retain this Owner's Manual in accordance with the manufacturer's instructions. 8 Do not install near water...

Owner's Manual
Page 3
... by playing it is 300 ohm ribbon lead, change the lead-in this product is often undetectable until it at a safe level. If this manual, meets FCC requirements. Since hearing damage from loud sounds is found in the users manual, may void your sensitive hearing. This equipment generates/uses radio frequencies and, if not installed and used according to the instructions found to be used.
... by playing it is 300 ohm ribbon lead, change the lead-in this product is often undetectable until it at a safe level. If this manual, meets FCC requirements. Since hearing damage from loud sounds is found in the users manual, may void your sensitive hearing. This equipment generates/uses radio frequencies and, if not installed and used according to the instructions found to be used.
Owner's Manual
Page 4
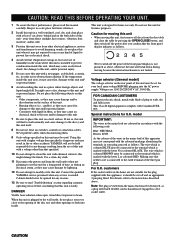
...button, and then switch off the power after you confirm that the front panel display indicates as follows. 2345 Never switch off and an appropriate 3 pin plug fitted. Use a clean, dry cloth. 11 Disconnect the power cord from other than specified is hazardous if engaged in a live socket outlet. model IMPORTANT: The wires... fix this unit with the following objects on this unit with the letter L or coloured RED. Note: The plug severed from direct sunlight, heat sources, vibration, dust, moisture, and/or cold. 3 Position this unit rises, it may cause an electrical shock to the user ...
...button, and then switch off the power after you confirm that the front panel display indicates as follows. 2345 Never switch off and an appropriate 3 pin plug fitted. Use a clean, dry cloth. 11 Disconnect the power cord from other than specified is hazardous if engaged in a live socket outlet. model IMPORTANT: The wires... fix this unit with the following objects on this unit with the letter L or coloured RED. Note: The plug severed from direct sunlight, heat sources, vibration, dust, moisture, and/or cold. 3 Position this unit rises, it may cause an electrical shock to the user ...
Owner's Manual
Page 5
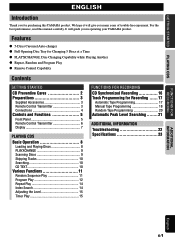
... Track Programming for Changing 5 Discs at a Time q PLAYXCHANGE; We hope it will guide you in operating your YAMAHA product. Features q 5-Discs Carousel Auto-changer q Full Opening Disc Tray for Recording ...... 17 Automatic Tape Programming 17 Manual Tape Programming 18 Random Tape Programming 20 Automatic Peak Level Searching ........ 21 ADDITIONAL INFORMATION Troubleshooting 22 Specifications 23 ADDITIONAL INFORMATION English E-1 For the best performance, read this YAMAHA product. It will give you many years of trouble-free...
... Track Programming for Changing 5 Discs at a Time q PLAYXCHANGE; We hope it will guide you in operating your YAMAHA product. Features q 5-Discs Carousel Auto-changer q Full Opening Disc Tray for Recording ...... 17 Automatic Tape Programming 17 Manual Tape Programming 18 Random Tape Programming 20 Automatic Peak Level Searching ........ 21 ADDITIONAL INFORMATION Troubleshooting 22 Specifications 23 ADDITIONAL INFORMATION English E-1 For the best performance, read this YAMAHA product. It will give you many years of trouble-free...
Owner's Manual
Page 8
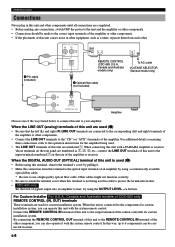
... optical fiber cable. * Be sure to use a high quality optical fiber cable. Connect the REMOTE CONTROL IN terminal of CDC-685 only REMOTE CONTROL (IN, OUT) terminals These terminals are numbered !. PREPARATIONS Connections Never plug in this unit and other components until all connections are completed. • Before making any connections, switch OFF the power to the unit and the amplifier or other components. • Connections should be connected in series. For Custom Installer...
... optical fiber cable. * Be sure to use a high quality optical fiber cable. Connect the REMOTE CONTROL IN terminal of CDC-685 only REMOTE CONTROL (IN, OUT) terminals These terminals are numbered !. PREPARATIONS Connections Never plug in this unit and other components until all connections are completed. • Before making any connections, switch OFF the power to the unit and the amplifier or other components. • Connections should be connected in series. For Custom Installer...
Owner's Manual
Page 9
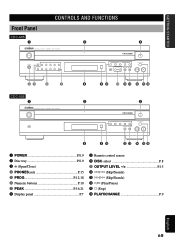
... CONTROLS AND FUNCTIONS Front Panel CDC-685 1 NATURAL SOUND COMPACT DISC PLAYER POWER PHONES PROG 1 2 3 4 5 +10 6 7 8 9 0 PEAK 2 3 DISC 1 2 3 4 5 OUTPUT LEVEL PLAYXCHANGE 45 6 7 CDC-585 1 NATURAL SOUND COMPACT DISC PLAYER POWER 8 9 0 q w e r ty 2 3 DISC 1 2 3 4 5 PLAYXCHANGE 8 90 w e r ty 1 POWER P.8,9 2 Disc tray P.8,9 3 v (Open/Close) 4 PHONES jack P.15 5 PROG P.12,18 6 Numeric buttons P.10 7 PEAK P.16,21 8 Display panel P.7 9 Remote control sensor 0 DISC-select P.8 q OUTPUT LEVEL P.15 w t/e (Skip/Search) e r/y (Skip/Search) r w/d (Play...
... CONTROLS AND FUNCTIONS Front Panel CDC-685 1 NATURAL SOUND COMPACT DISC PLAYER POWER PHONES PROG 1 2 3 4 5 +10 6 7 8 9 0 PEAK 2 3 DISC 1 2 3 4 5 OUTPUT LEVEL PLAYXCHANGE 45 6 7 CDC-585 1 NATURAL SOUND COMPACT DISC PLAYER POWER 8 9 0 q w e r ty 2 3 DISC 1 2 3 4 5 PLAYXCHANGE 8 90 w e r ty 1 POWER P.8,9 2 Disc tray P.8,9 3 v (Open/Close) 4 PHONES jack P.15 5 PROG P.12,18 6 Numeric buttons P.10 7 PEAK P.16,21 8 Display panel P.7 9 Remote control sensor 0 DISC-select P.8 q OUTPUT LEVEL P.15 w t/e (Skip/Search) e r/y (Skip/Search) r w/d (Play...

Owner's Manual
Page 11
... the time displays. (Refer to "Selecting time displays and the text data" on the right side.) 5 Displays the numbers that contain discs light up after discs are also displayed in three degrees by using the OUTPUT LEVEL -/+ buttons. GETTING STARTED Display The display located in the display. After closing the disc tray by pressing the OPEN/CLOSE button or selecting any of signals output into an amplifier or the headphones level adjusted by pressing the TEXT/TIME display mode-select button...
... the time displays. (Refer to "Selecting time displays and the text data" on the right side.) 5 Displays the numbers that contain discs light up after discs are also displayed in three degrees by using the OUTPUT LEVEL -/+ buttons. GETTING STARTED Display The display located in the display. After closing the disc tray by pressing the OPEN/CLOSE button or selecting any of signals output into an amplifier or the headphones level adjusted by pressing the TEXT/TIME display mode-select button...
Owner's Manual
Page 12
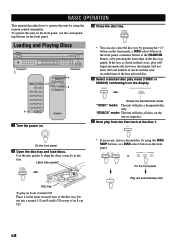
... unit by using the DISC SKIP buttons, or a DISC-select button on the front panel. 3 Close the disc tray. MODE 1DISC REP RN 5DISCS S F P SEARCH TITLE ARTIST Shows the selected disc mode. Use the disc guides to operate this unit on the front panel, use the corresponding buttons on the front panel. OPEN/ CLOSE Loading and Playing Discs NATURAL SOUND COMPACT DISC PLAYER POWER PHONES PROG 1 2 3 4 5 +10 6 7 8 9 0 PEAK DISC 1 2 3 4 5 OUTPUT LEVEL PLAYXCHANGE 1 DISC SCAN DISC SKIP 5 OPEN/ SYNCHRO DIMMER CLOSE TEXT/ TIME PEAK 2,3 REPEAT...
... unit by using the DISC SKIP buttons, or a DISC-select button on the front panel. 3 Close the disc tray. MODE 1DISC REP RN 5DISCS S F P SEARCH TITLE ARTIST Shows the selected disc mode. Use the disc guides to operate this unit on the front panel, use the corresponding buttons on the front panel. OPEN/ CLOSE Loading and Playing Discs NATURAL SOUND COMPACT DISC PLAYER POWER PHONES PROG 1 2 3 4 5 +10 6 7 8 9 0 PEAK DISC 1 2 3 4 5 OUTPUT LEVEL PLAYXCHANGE 1 DISC SCAN DISC SKIP 5 OPEN/ SYNCHRO DIMMER CLOSE TEXT/ TIME PEAK 2,3 REPEAT...
Owner's Manual
Page 13
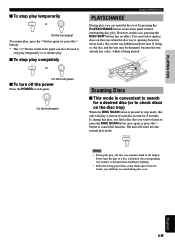
... already has a disc, which is changed from flashing to cancel this function. Every time the play of each disc in turn off the power Press the POWER switch again. You can open the disc tray by pressing the PLAYXCHANGE button on the disc tray) When the DISC SCAN button is pressed in stop mode, this case, pressing the DISC SKIP buttons has no sound during this play, the disc tray numbers blink in this...
... already has a disc, which is changed from flashing to cancel this function. Every time the play of each disc in turn off the power Press the POWER switch again. You can open the disc tray by pressing the PLAYXCHANGE button on the disc tray) When the DISC SCAN button is pressed in stop mode, this case, pressing the DISC SKIP buttons has no sound during this play, the disc tray numbers blink in this...
Owner's Manual
Page 14
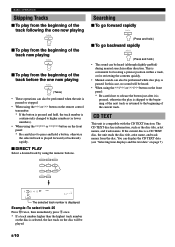
... "Selecting time displays and the text data" on the front panel: * Be careful not to press and hold .) • The sound can also be performed when the unit is paused or stopped. • When using the t or y button on the remote control transmitter: * If the button is pressed and held, the track number is continuously changed to higher numbers (or lower numbers). • When using...
... "Selecting time displays and the text data" on the front panel: * Be careful not to press and hold .) • The sound can also be performed when the unit is paused or stopped. • When using the t or y button on the remote control transmitter: * If the button is pressed and held, the track number is continuously changed to higher numbers (or lower numbers). • When using...
Owner's Manual
Page 15
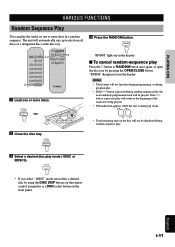
... display. OUTPUT LEVEL - 3 DISC SCAN DISC SKIP 1 Load one or more discs. DISC SCAN DISC SKIP OPEN/ SYNCHRO DIMMER CLOSE TEXT/ TIME PEAK 1,2 REPEAT RANDOM 4 TAPE CLEAR PROG 1 2 3 4 5 6 - - 7 8 9 0 -10 INDEX MODE - s To cancel random-sequence play mode (1DISC or 5DISCS). If the t button is pressed, play will be played. MODE * If you select "1DISC" mode, next select a desired disc by pressing the OPEN/CLOSE button. RANDOM "RNDM" lights up tracks. • Total remaining time...
... display. OUTPUT LEVEL - 3 DISC SCAN DISC SKIP 1 Load one or more discs. DISC SCAN DISC SKIP OPEN/ SYNCHRO DIMMER CLOSE TEXT/ TIME PEAK 1,2 REPEAT RANDOM 4 TAPE CLEAR PROG 1 2 3 4 5 6 - - 7 8 9 0 -10 INDEX MODE - s To cancel random-sequence play mode (1DISC or 5DISCS). If the t button is pressed, play will be played. MODE * If you select "1DISC" mode, next select a desired disc by pressing the OPEN/CLOSE button. RANDOM "RNDM" lights up tracks. • Total remaining time...
Owner's Manual
Page 16
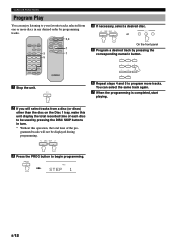
... DISC SCAN DISC SKIP DISC SCAN REPEAT DISC SKIP RANDOM 2,4 7 1 4 If necessary, select a desired disc. DISC SKIP 3 Press the PROG button to program more discs in turn. * Without this unit display the total recorded time of each disc to be displayed during programming. You can enjoy listening to your favorite tracks selected from a disc (or discs) other than the disc on the Disc 1 tray, make this operation, the total time of the pro- - - - DISC SKIP DISC...
... DISC SCAN DISC SKIP DISC SCAN REPEAT DISC SKIP RANDOM 2,4 7 1 4 If necessary, select a desired disc. DISC SKIP 3 Press the PROG button to program more discs in turn. * Without this unit display the total recorded time of each disc to be displayed during programming. You can enjoy listening to your favorite tracks selected from a disc (or discs) other than the disc on the Disc 1 tray, make this operation, the total time of the pro- - - - DISC SKIP DISC...
Owner's Manual
Page 17
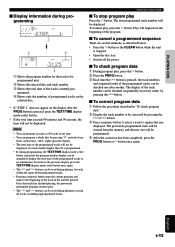
... disc tray. • Switch off the power. At that track has finished playing, the previously interrupted program resumes play , press the a button. 2 Press the PROG button. 3 Each time the y button is pressed, the program number display can be displayed. To resume play Press the a button. s To correct program data 1 Follow the procedure described in reverse order) by pressing the t button. The previously programmed track will be displayed. Once that time, "ALL" lights...
... disc tray. • Switch off the power. At that track has finished playing, the previously interrupted program resumes play , press the a button. 2 Press the PROG button. 3 Each time the y button is pressed, the program number display can be displayed. To resume play Press the a button. s To correct program data 1 Follow the procedure described in reverse order) by pressing the t button. The previously programmed track will be displayed. Once that time, "ALL" lights...
Owner's Manual
Page 18
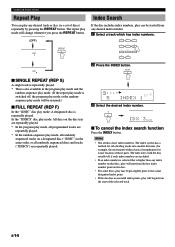
... repeatedly played. The repeat play mode will change whenever you press the REPEAT button. (OFF) 1DISC REP RNDM SA 5DISCS S F PROG C RCH T T E ART ST TRAC REPEAT Index Search If the disc includes index numbers, play can play mode, all randomly sequenced tracks on a designated disc ("1DISC") in the program play mode and the random-sequence play mode. (If the repeat play mode is switched off, the program play mode or the randomsequence play mode...
... repeatedly played. The repeat play mode will change whenever you press the REPEAT button. (OFF) 1DISC REP RNDM SA 5DISCS S F PROG C RCH T T E ART ST TRAC REPEAT Index Search If the disc includes index numbers, play can play mode, all randomly sequenced tracks on a designated disc ("1DISC") in the program play mode and the random-sequence play mode. (If the repeat play mode is switched off, the program play mode or the randomsequence play mode...
Owner's Manual
Page 19
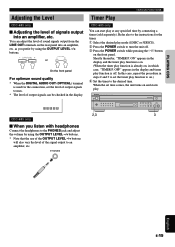
... E-15 OUTPUT LEVEL - - NATURAL SOUND COMPACT DISC PLAYER POWER PHONES PROG 1 2 3 4 5 +10 6 7 8 9 0 PEAK DISC 1 2 3 4 5 OUTPUT LEVEL PLAYXCHANGE CDC-685 only 2,3 3 s When you prefer by using the OUTPUT LEVEL -/+ buttons. * Note that the use of the OUTPUT LEVEL -/+ buttons will also vary the level of the signal output to turn the unit off . You can adjust the level of sound signals output from the LINE OUT terminals on the front panel. OUTPUT LEVEL or On the front panel For optimum sound quality * When the DIGITAL AUDIO OUT (OPTICAL...
... E-15 OUTPUT LEVEL - - NATURAL SOUND COMPACT DISC PLAYER POWER PHONES PROG 1 2 3 4 5 +10 6 7 8 9 0 PEAK DISC 1 2 3 4 5 OUTPUT LEVEL PLAYXCHANGE CDC-685 only 2,3 3 s When you prefer by using the OUTPUT LEVEL -/+ buttons. * Note that the use of the OUTPUT LEVEL -/+ buttons will also vary the level of the signal output to turn the unit off . You can adjust the level of sound signals output from the LINE OUT terminals on the front panel. OUTPUT LEVEL or On the front panel For optimum sound quality * When the DIGITAL AUDIO OUT (OPTICAL...
Owner's Manual
Page 20
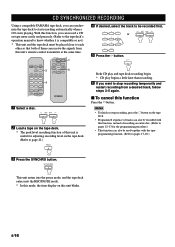
... time. Using a compatible YAMAHA tape deck, you can record a CD on tape more easily and precisely. (Refer to the tape deck's operation manual to know whether it is useful for Recording CD SYNCHRONIZED RECORDING - - - DISC SCAN DISC SKIP DISC SCAN REPEAT DISC SKIP 1 RANDOM 5 1 Select a disc. Functions for adjusting recording level on the tape deck. (Refer to page 21.) PEAK 4 If desired, select the track to stop recording, press the a button on the tape deck. • Programmed...
... time. Using a compatible YAMAHA tape deck, you can record a CD on tape more easily and precisely. (Refer to the tape deck's operation manual to know whether it is useful for Recording CD SYNCHRONIZED RECORDING - - - DISC SCAN DISC SKIP DISC SCAN REPEAT DISC SKIP 1 RANDOM 5 1 Select a disc. Functions for adjusting recording level on the tape deck. (Refer to page 21.) PEAK 4 If desired, select the track to stop recording, press the a button on the tape deck. • Programmed...
Owner's Manual
Page 21
... MODE - DISC SCAN DISC SKIP - - TAPE 46 You can select any of four tape lengths by pressing the TAPE button. 46 TAPE 54 (OFF) 60 90 You can also enter the tape's total possible recording time manually. Turn the tape over to page 21.) Automatic Tape Programming The unit will automatically program tracks or help you to page 16.) English E-17 In this unit is useful for adjusting recording level on a disc...
... MODE - DISC SCAN DISC SKIP - - TAPE 46 You can select any of four tape lengths by pressing the TAPE button. 46 TAPE 54 (OFF) 60 90 You can also enter the tape's total possible recording time manually. Turn the tape over to page 21.) Automatic Tape Programming The unit will automatically program tracks or help you to page 16.) English E-17 In this unit is useful for adjusting recording level on a disc...
Owner's Manual
Page 23
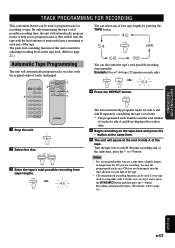
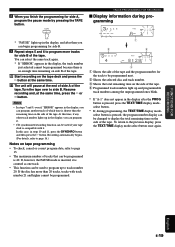
... SAVE BEST EDIT FILE 1 2 3 4 5 5DISCS S F PROG CD- Start recording on the side of the tape. Turn the tape over to the previous display, press the TEXT/TIME display mode-select button once again. TRACK PROGRAMMING FOR RECORDING s Display information during programming, the TEXT/TIME display modeselect button is shorter than 20 tracks, tracks with it is 40. You can be programmed. In this time, if any other track number lights...
... SAVE BEST EDIT FILE 1 2 3 4 5 5DISCS S F PROG CD- Start recording on the side of the tape. Turn the tape over to the previous display, press the TEXT/TIME display mode-select button once again. TRACK PROGRAMMING FOR RECORDING s Display information during programming, the TEXT/TIME display modeselect button is shorter than 20 tracks, tracks with it is 40. You can be programmed. In this time, if any other track number lights...
Owner's Manual
Page 25
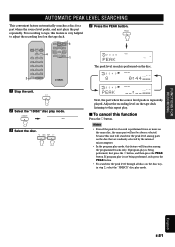
... will search for the peak level among parts on the tape deck listening to tape, this function Press the a button. If program play mode. PEAK 12345 PEAK 1DISC REP RNDM SAVE BEST 5DISCS S F PROG CD- TEX SEARCH TITLE ARTIST TRACK 3 Select the disc. Adjust the recording level on the disc that are randomly selected by the internal microcomputer. • In the program play mode, this repeat play mode. For recording to this...
... will search for the peak level among parts on the tape deck listening to tape, this function Press the a button. If program play mode. PEAK 12345 PEAK 1DISC REP RNDM SAVE BEST 5DISCS S F PROG CD- TEX SEARCH TITLE ARTIST TRACK 3 Select the disc. Adjust the recording level on the disc that are randomly selected by the internal microcomputer. • In the program play mode, this repeat play mode. For recording to this...
Owner's Manual
Page 26
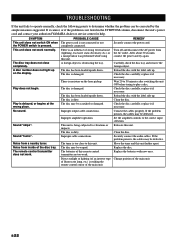
... unit. A disc number does not light up . Wait 20 to 30 minutes after switching the unit ON before trying to the correct input selection. If the problem persists, the cables may be defective. A foreign object is too close completely. Carefully check the disc tray and remove the foreign object. Clean the disc. Improper amplifier operation. The tuner is obstructing the tray. Replace the disc. Play does...
... unit. A disc number does not light up . Wait 20 to 30 minutes after switching the unit ON before trying to the correct input selection. If the problem persists, the cables may be defective. A foreign object is too close completely. Carefully check the disc tray and remove the foreign object. Clean the disc. Improper amplifier operation. The tuner is obstructing the tray. Replace the disc. Play does...


