
Owner's Manual
Page 2
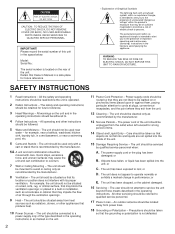
... that produce heat. 10 Power Sources - NO USER-SERVICEABLE PARTS INSIDE. Model: Serial No.: The serial number is intended to alert you to cords at plugs, convenience receptacles, and the point where they are not spilled into the inside of air through the ventilation openings. 9 Heat - The exclamation point within an equilateral triangle, is operated. 2 Retain Instructions - The unit should be...
... that produce heat. 10 Power Sources - NO USER-SERVICEABLE PARTS INSIDE. Model: Serial No.: The serial number is intended to alert you to cords at plugs, convenience receptacles, and the point where they are not spilled into the inside of air through the ventilation openings. 9 Heat - The exclamation point within an equilateral triangle, is operated. 2 Retain Instructions - The unit should be...

Owner's Manual
Page 3
... equipment generates/uses radio frequencies and, if not installed and used according to the instructions found to comply with this product MUST be determined by turning the unit "OFF" and "ON", please try to use this product in this product is 300 ohm ribbon lead, change the lead-in FCC Regulations, Part 15 for US customers only) 1. If the antenna lead-in...
... equipment generates/uses radio frequencies and, if not installed and used according to the instructions found to comply with this product MUST be determined by turning the unit "OFF" and "ON", please try to use this product in this product is 300 ohm ribbon lead, change the lead-in FCC Regulations, Part 15 for US customers only) 1. If the antenna lead-in...

Owner's Manual
Page 4
..., please read the "TROUBLESHOOTING" section on common operating errors before concluding that the display lights up as shown below, switch off the power by pressing the POWER switch, and then disconnect the power plug from the AC outlet. CAUTION FOR CARRYING THIS UNIT Be sure not to clean the unit with a Compatible YAMAHA Tape Deck q Optical Digital Output CDC-675 only q Automatic Programming for future reference. 2 Install your unit is...
..., please read the "TROUBLESHOOTING" section on common operating errors before concluding that the display lights up as shown below, switch off the power by pressing the POWER switch, and then disconnect the power plug from the AC outlet. CAUTION FOR CARRYING THIS UNIT Be sure not to clean the unit with a Compatible YAMAHA Tape Deck q Optical Digital Output CDC-675 only q Automatic Programming for future reference. 2 Install your unit is...
Owner's Manual
Page 5
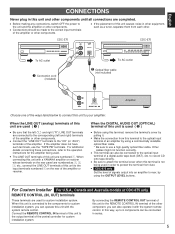
... to 6 components can also operate it . For Custom Installer For U.S.A., Canada and Australia models of a digital audio tape deck (DAT), etc. Connect the REMOTE CONTROL IN terminal of this unit to max. by using the OUTPUT LEVEL buttons. q Connect the "LINE OUT" terminals to the "CD" (or "AUX") terminals of signals output into an amplifier to the input terminals numbered 1 on the rear panel are completed. By connecting the REMOTE CONTROL OUT terminal of the amplifier or receiver. For...
... to 6 components can also operate it . For Custom Installer For U.S.A., Canada and Australia models of a digital audio tape deck (DAT), etc. Connect the REMOTE CONTROL IN terminal of this unit to max. by using the OUTPUT LEVEL buttons. q Connect the "LINE OUT" terminals to the "CD" (or "AUX") terminals of signals output into an amplifier to the input terminals numbered 1 on the rear panel are completed. By connecting the REMOTE CONTROL OUT terminal of the amplifier or receiver. For...
Owner's Manual
Page 6
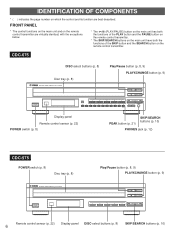
...OUTPUT LEVEL PHONES - + Display panel Remote control sensor (p. 22) POWER switch (p. 8) SKIP/SEARCH buttons (p. 10) PEAK button (p. 21) PHONES jack (p. 12) CDC-575 POWER switch (p. 8) Disc tray (p. 8) NATURAL SOUND COMPACT DISC PLAYER POWER Play/Pause button (p. 8, 9) PLAYXCHANGE button (p. 9) DISC 1 2 3 4 5 / OPEN/CLOSE PLAYXCHANGE SKIP/SEARCH Remote control sensor (p. 22) Display panel DISC-select buttons (p. 8) SKIP/SEARCH buttons (p. 10) 6 IDENTIFICATION OF COMPONENTS * ( ) indicates the page number on the remote control transmitter. FRONT PANEL * The control...
...OUTPUT LEVEL PHONES - + Display panel Remote control sensor (p. 22) POWER switch (p. 8) SKIP/SEARCH buttons (p. 10) PEAK button (p. 21) PHONES jack (p. 12) CDC-575 POWER switch (p. 8) Disc tray (p. 8) NATURAL SOUND COMPACT DISC PLAYER POWER Play/Pause button (p. 8, 9) PLAYXCHANGE button (p. 9) DISC 1 2 3 4 5 / OPEN/CLOSE PLAYXCHANGE SKIP/SEARCH Remote control sensor (p. 22) Display panel DISC-select buttons (p. 8) SKIP/SEARCH buttons (p. 10) 6 IDENTIFICATION OF COMPONENTS * ( ) indicates the page number on the remote control transmitter. FRONT PANEL * The control...
Owner's Manual
Page 8
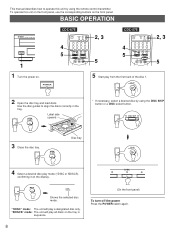
... * If necessary, select a desired disc by using the DISC SKIP button or a DISC-select button. "1DISC" mode: The unit will play a designated disc only. "5DISCS" mode: The unit will play all discs on the display. PLAY OPEN/ CLOSE 4 Select a desired disc play from the first track of the disc 1. To operate this unit by using the remote control transmitter. BASIC OPERATION NATURAL SOUND COMP POWER 1 1 Turn the power on the front panel. OUTPUT LEVEL + SKIP STOP PAUSE PLAY 2, 3 5 CDC-575 4 5 SYNCHRO 1 4 TEXT/ OPEN/ DIMMER TIME CLOSE CLEAR...
... * If necessary, select a desired disc by using the DISC SKIP button or a DISC-select button. "1DISC" mode: The unit will play a designated disc only. "5DISCS" mode: The unit will play all discs on the display. PLAY OPEN/ CLOSE 4 Select a desired disc play from the first track of the disc 1. To operate this unit by using the remote control transmitter. BASIC OPERATION NATURAL SOUND COMP POWER 1 1 Turn the power on the front panel. OUTPUT LEVEL + SKIP STOP PAUSE PLAY 2, 3 5 CDC-575 4 5 SYNCHRO 1 4 TEXT/ OPEN/ DIMMER TIME CLOSE CLEAR...
Owner's Manual
Page 9
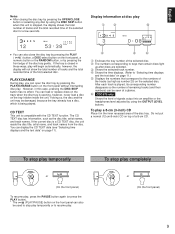
... as number 20) on the front panel, a numeric button or the RANDOM button, or by pressing the front edge of signals output into an amplifier or the headphones level adjusted by using the DISC SKIP button when this case, pressing the DISC SKIP button has no effect. However, in these ways, play . To play completely STOP or (On the front panel) 9 Display information at a glance. ‘ CDC-675 only...
... as number 20) on the front panel, a numeric button or the RANDOM button, or by pressing the front edge of signals output into an amplifier or the headphones level adjusted by using the DISC SKIP button when this case, pressing the DISC SKIP button has no effect. However, in these ways, play . To play completely STOP or (On the front panel) 9 Display information at a glance. ‘ CDC-675 only...

Owner's Manual
Page 10
... track or returned to higher numbers (or lower numbers). To play forward or backward rapidly (MANUAL SEARCH) To go forward rapidly SEARCH (Press and hold.) To go backward rapidly q The sound can also be performed while disc play is displayed. q When using the SKIP/SEARCH buttons on the disc DIRECT PLAY Select a desired track by using the SKIP button on the front panel: * Be careful not to...
... track or returned to higher numbers (or lower numbers). To play forward or backward rapidly (MANUAL SEARCH) To go forward rapidly SEARCH (Press and hold.) To go backward rapidly q The sound can also be performed while disc play is displayed. q When using the SKIP/SEARCH buttons on the disc DIRECT PLAY Select a desired track by using the SKIP button on the front panel: * Be careful not to...
Owner's Manual
Page 12
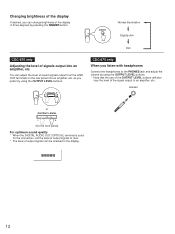
... the rear panel into an amplifier, etc. OUTPUT LEVEL + CDC-675 only When you listen with headphones Connect the headphones to an amplifier, etc. PHONES or OUTPUT LEVEL - + (On the front panel) For optimum sound quality * When the DIGITAL AUDIO OUT (OPTICAL) terminal is used for the connection, set the level of output signals to max. * The level of output signals can be checked in three degrees by using the OUTPUT LEVEL buttons. * Note that the use of the OUTPUT LEVEL buttons...
... the rear panel into an amplifier, etc. OUTPUT LEVEL + CDC-675 only When you listen with headphones Connect the headphones to an amplifier, etc. PHONES or OUTPUT LEVEL - + (On the front panel) For optimum sound quality * When the DIGITAL AUDIO OUT (OPTICAL) terminal is used for the connection, set the level of output signals to max. * The level of output signals can be checked in three degrees by using the OUTPUT LEVEL buttons. * Note that the use of the OUTPUT LEVEL buttons...
Owner's Manual
Page 13
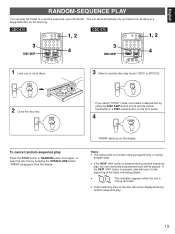
..." mode, next select a desired disc by pressing the OPEN/CLOSE button. "RNDM" disappears from all discs or a designated disc on the front panel. 4 RANDOM To cancel random-sequence play mode (1DISC or 5DISCS). The unit will return to 99 tracks). CDC-675 3 DISC SKIP SYNCHRO 1 4 TEXT/ OPEN/ DIMMER TIME CLOSE TAPE CLEAR PROG 2 3 INDEX 5 6 +I0 7 8 9 0 DISC SCAN MODE REPEAT RANDOM DISC SKIP SEARCH - OUTPUT LEVEL + SKIP STOP PAUSE PLAY 1, 2 4 CDC-575 3 DISC...
..." mode, next select a desired disc by pressing the OPEN/CLOSE button. "RNDM" disappears from all discs or a designated disc on the front panel. 4 RANDOM To cancel random-sequence play mode (1DISC or 5DISCS). The unit will return to 99 tracks). CDC-675 3 DISC SKIP SYNCHRO 1 4 TEXT/ OPEN/ DIMMER TIME CLOSE TAPE CLEAR PROG 2 3 INDEX 5 6 +I0 7 8 9 0 DISC SCAN MODE REPEAT RANDOM DISC SKIP SEARCH - OUTPUT LEVEL + SKIP STOP PAUSE PLAY 1, 2 4 CDC-575 3 DISC...
Owner's Manual
Page 14
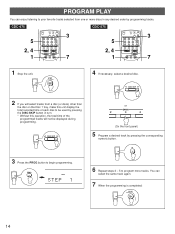
... Disc 1 tray, make this operation, the total time of each disc to begin programming. PROG PROG 6 Repeat steps 4 - 5 to program more discs in turn. * Without this unit display the total recorded time of the programmed tracks will select tracks from one or more tracks. CDC-675 5 2, 4 1 SYNCHRO 1 4 TEXT/ OPEN/ DIMMER TIME CLOSE TAPE CLEAR PROG 2 3 INDEX 5 6 +I0 7 8 9 0 DISC SCAN MODE REPEAT RANDOM DISC SKIP SEARCH - OUTPUT LEVEL + SKIP STOP PAUSE PLAY 3 7 CDC-575...
... Disc 1 tray, make this operation, the total time of each disc to begin programming. PROG PROG 6 Repeat steps 4 - 5 to program more discs in turn. * Without this unit display the total recorded time of the programmed tracks will select tracks from one or more tracks. CDC-675 5 2, 4 1 SYNCHRO 1 4 TEXT/ OPEN/ DIMMER TIME CLOSE TAPE CLEAR PROG 2 3 INDEX 5 6 +I0 7 8 9 0 DISC SCAN MODE REPEAT RANDOM DISC SKIP SEARCH - OUTPUT LEVEL + SKIP STOP PAUSE PLAY 3 7 CDC-575...

Owner's Manual
Page 15
... changed to display the total time of the programmed tracks or no information. To stop program play , press the PLAY button. The first programmed track number will not be programmed. 4. To resume play Press the STOP button. Play will begin from the memory and the new one will be displayed. q Switch off the power. To correct program data 1. Press a numeric button to select a track to the previous display, press the TEXT/TIME display mode-select button...
... changed to display the total time of the programmed tracks or no information. To stop program play , press the PLAY button. The first programmed track number will not be programmed. 4. To resume play Press the STOP button. Play will begin from the memory and the new one will be displayed. q Switch off the power. To correct program data 1. Press a numeric button to select a track to the previous display, press the TEXT/TIME display mode-select button...
Owner's Manual
Page 16
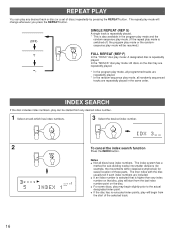
... If the disc includes index numbers, play can play mode, all programmed tracks are repeatedly played. * In the random-sequence play any desired track or disc (or a set of those parts. In the "5DISCS" disc play mode: All discs on that disc, play will be started from any desired index number. 1 Select a track which has index numbers. 3 Select the desired index number. 5 3 2 INDEX To cancel the index search function Press the INDEX button. 5 6 7 8 9 10...
... If the disc includes index numbers, play can play mode, all programmed tracks are repeatedly played. * In the random-sequence play any desired track or disc (or a set of those parts. In the "5DISCS" disc play mode: All discs on that disc, play will be started from any desired index number. 1 Select a track which has index numbers. 3 Select the desired index number. 5 3 2 INDEX To cancel the index search function Press the INDEX button. 5 6 7 8 9 10...
Owner's Manual
Page 17
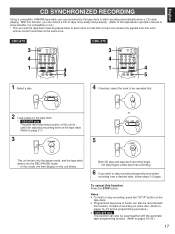
... and the tape deck must be used together with the automatic tape-programming function. (Refer to pages 18-20.) 17 English CD SYNCHRONIZED RECORDING Using a compatible YAMAHA tape deck, you can synchronize the tape deck to stop recording, press the "STOP" button on this function, you want to start recording automatically when a CD starts playing. With this unit blinks. OUTPUT LEVEL + SKIP STOP PAUSE PLAY 4 5 CDC-575 3 4 1 SYNCHRO 1 4 TEXT/ DIMMER TIME OPEN...
... and the tape deck must be used together with the automatic tape-programming function. (Refer to pages 18-20.) 17 English CD SYNCHRONIZED RECORDING Using a compatible YAMAHA tape deck, you can synchronize the tape deck to stop recording, press the "STOP" button on this function, you want to start recording automatically when a CD starts playing. With this unit blinks. OUTPUT LEVEL + SKIP STOP PAUSE PLAY 4 5 CDC-575 3 4 1 SYNCHRO 1 4 TEXT/ DIMMER TIME OPEN...
Owner's Manual
Page 18
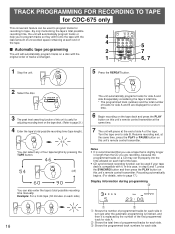
... tape. DISC SKIP 3 The peak level searching function of the tape. TAPE (off) You can select any of four tape lengths by the number of the first programmed track for a short time. 6 Begin recording on the tape deck and press the PLAY button on this unit's remote control transmitter at the same time. 7 The unit will automatically program tracks or help you use a tape that is replaced by pressing the TAPE button. q CD synchronized recording function...
... tape. DISC SKIP 3 The peak level searching function of the tape. TAPE (off) You can select any of four tape lengths by the number of the first programmed track for a short time. 6 Begin recording on the tape deck and press the PLAY button on this unit's remote control transmitter at the same time. 7 The unit will automatically program tracks or help you use a tape that is replaced by pressing the TAPE button. q CD synchronized recording function...
Owner's Manual
Page 19
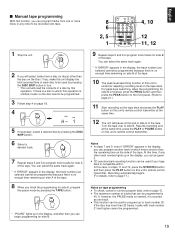
... the tape deck and press the PLAY button on the tape deck. STOP 2 If you finish the programming for side A of the tape. You can select the same track again. * If "ERROR" appears in turn. * This unit will pause at the same time, press the PLAY or PAUSE button on this unit's remote control transmitter. Resume recording and, at the end of side A of the tape. TAPE * "PAUSE" lights...
... the tape deck and press the PLAY button on the tape deck. STOP 2 If you finish the programming for side A of the tape. You can select the same track again. * If "ERROR" appears in turn. * This unit will pause at the same time, press the PLAY or PAUSE button on this unit's remote control transmitter. Resume recording and, at the end of side A of the tape. TAPE * "PAUSE" lights...

Owner's Manual
Page 20
... used if your tape deck is compatible with it is replaced by the number of the first programmed track for side A. Shows the total time of programmed tracks for each side. Ž Shows the programmed track numbers for a short time. 3 Start recording on the tape deck and press the PLAY button on this unit's remote control transmitter. Display information during programming, the TEXT/TIME display mode-select button is pressed, the program number display can be changed...
... used if your tape deck is compatible with it is replaced by the number of the first programmed track for side A. Shows the total time of programmed tracks for each side. Ž Shows the programmed track numbers for a short time. 3 Start recording on the tape deck and press the PLAY button on this unit's remote control transmitter. Display information during programming, the TEXT/TIME display mode-select button is pressed, the program number display can be changed...
Owner's Manual
Page 21
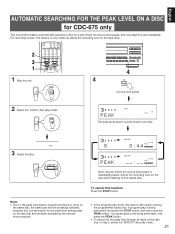
... OUTPUT LEVEL PHONES - + 4 0 PEAK (On the front panel) 2 Select the "1DISC" disc play mode, this unit will function among parts on the tape deck listening to tape, this feature is not being performed, first press the STOP button, and then press the PEAK button. OUTPUT LEVEL + SKIP STOP PAUSE PLAY 1 Stop the unit. Adjust the recording level on the disc that are randomly selected by the internal microcomputer. • In the program play mode...
... OUTPUT LEVEL PHONES - + 4 0 PEAK (On the front panel) 2 Select the "1DISC" disc play mode, this unit will function among parts on the tape deck listening to tape, this feature is not being performed, first press the STOP button, and then press the PEAK button. OUTPUT LEVEL + SKIP STOP PAUSE PLAY 1 Stop the unit. Adjust the recording level on the disc that are randomly selected by the internal microcomputer. • In the program play mode...
Owner's Manual
Page 22
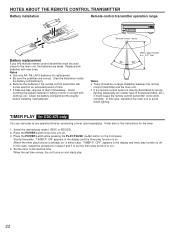
... to avoid direct lighting. OFF" appears in the display and timer play function to the instructions for the timer. 1. When the set the timer play function is already on, in steps 2 and 3 to set time comes, the unit turns on . (When the timer play . 22 In this case, repeat the procedure in which case, "TIMER P. NOTES ABOUT THE REMOTE CONTROL TRANSMITTER Battery installation Remote control transmitter operation range 2 1 3 Battery replacement If...
... to avoid direct lighting. OFF" appears in the display and timer play function to the instructions for the timer. 1. When the set the timer play function is already on, in steps 2 and 3 to set time comes, the unit turns on . (When the timer play . 22 In this case, repeat the procedure in which case, "TIMER P. NOTES ABOUT THE REMOTE CONTROL TRANSMITTER Battery installation Remote control transmitter operation range 2 1 3 Battery replacement If...
Owner's Manual
Page 24
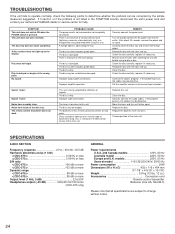
... apart. After about 30 seconds, connect the power and try again. Set the amplifier controls to play a disc. If it if necessary. If the problem persists, the cables may be defective. The remote control transmitter does not work normally. Wait 20 to 30 minutes after switching the unit ON before trying to the correct input selection. Improper amplifier operation. Direct sunlight or lighting (of an inverter type of strong...
... apart. After about 30 seconds, connect the power and try again. Set the amplifier controls to play a disc. If it if necessary. If the problem persists, the cables may be defective. The remote control transmitter does not work normally. Wait 20 to 30 minutes after switching the unit ON before trying to the correct input selection. Improper amplifier operation. Direct sunlight or lighting (of an inverter type of strong...


