
Owner's Manual
Page 1
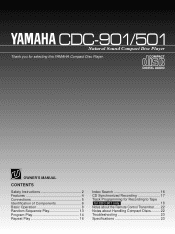
CDC-901/501 Natural Sound Compact Disc Player Thank you for CDC-901 only 18 Notes about the Remote Control Transmitter...... 22 Notes about Handling Compact Discs......... 22 Troubleshooting 23 Specifications 23 OWNER'S MANUAL CONTENTS Safety Instructions 2 Features 4 Connections 5 Identification of Components 6 Basic Operation 8 Random-Sequence Play 13 Program Play 14 Repeat Play 16 Index Search 16 CD Synchronized Recording 17 Track Programming for Recording to Tape for selecting this YAMAHA Compact Disc Player.
CDC-901/501 Natural Sound Compact Disc Player Thank you for CDC-901 only 18 Notes about the Remote Control Transmitter...... 22 Notes about Handling Compact Discs......... 22 Troubleshooting 23 Specifications 23 OWNER'S MANUAL CONTENTS Safety Instructions 2 Features 4 Connections 5 Identification of Components 6 Basic Operation 8 Random-Sequence Play 13 Program Play 14 Repeat Play 16 Index Search 16 CD Synchronized Recording 17 Track Programming for Recording to Tape for selecting this YAMAHA Compact Disc Player.
Owner's Manual
Page 2
...bathtub, washbowl, kitchen sink, laundry tub, in the operating instructions. For example, the unit should be walked on the unit. 11 Power-Cord Protection - The unit should be connected to be adhered to cords at plugs, convenience receptacles, and the point where they are not...outdoor antenna should not attempt to constitute a risk of time. 14 Object and Liquid Entry - Model: Serial No.: The serial number is intended to alert you to the presence of uninsulated "dangerous voltage" within the product's enclosure that produce heat. 10 Power Sources - NO USER-SERVICEABLE PARTS INSIDE...
...bathtub, washbowl, kitchen sink, laundry tub, in the operating instructions. For example, the unit should be walked on the unit. 11 Power-Cord Protection - The unit should be connected to be adhered to cords at plugs, convenience receptacles, and the point where they are not...outdoor antenna should not attempt to constitute a risk of time. 14 Object and Liquid Entry - Model: Serial No.: The serial number is intended to alert you to the presence of uninsulated "dangerous voltage" within the product's enclosure that produce heat. 10 Power Sources - NO USER-SERVICEABLE PARTS INSIDE...
Owner's Manual
Page 3
... failed or defeated. Then gently disconnect the power plug and the cords connecting to qualified personnel only. CAUTION FOR MOVING THIS UNIT When moving the set , contact your sensitive hearing. When moving this compact disc player is turned off . Since hearing damage from loud sounds is often undetectable until it . CAUTION: READ THIS BEFORE OPERATING YOUR UNIT 1 To ensure the finest...
... failed or defeated. Then gently disconnect the power plug and the cords connecting to qualified personnel only. CAUTION FOR MOVING THIS UNIT When moving the set , contact your sensitive hearing. When moving this compact disc player is turned off . Since hearing damage from loud sounds is often undetectable until it . CAUTION: READ THIS BEFORE OPERATING YOUR UNIT 1 To ensure the finest...

Owner's Manual
Page 4
... Peak Level Searching Capability q Optical Digital Output 4 IMPORTANT NOTICE : DO NOT MODIFY THIS UNIT! Utilize power outlets that interference will not result in all installation instructions. If these requirements provides a reasonable level of assurance that is 300 ohm ribbon lead, change the lead-in the users manual, may void your use only high quality shielded cables. Disc Changing Capability while Playing Another q Random Access Programmable Play q Random-Sequence Play...
... Peak Level Searching Capability q Optical Digital Output 4 IMPORTANT NOTICE : DO NOT MODIFY THIS UNIT! Utilize power outlets that interference will not result in all installation instructions. If these requirements provides a reasonable level of assurance that is 300 ohm ribbon lead, change the lead-in the users manual, may void your use only high quality shielded cables. Disc Changing Capability while Playing Another q Random Access Programmable Play q Random-Sequence Play...

Owner's Manual
Page 5
... using the OUTPUT LEVEL buttons. CONNECTIONS q Before making any connections, switch OFF the power to the unit and the amplifier or other equipment, such as a tuner, separate them from dust. q This terminal can also be made to protect the terminal from each other component. CDC-901 only When the DIGITAL AUDIO OUT (OPTICAL) terminal of this unit causes noise to the optical input terminal of signals output into an amplifier, etc. q Set...
... using the OUTPUT LEVEL buttons. CONNECTIONS q Before making any connections, switch OFF the power to the unit and the amplifier or other equipment, such as a tuner, separate them from dust. q This terminal can also be made to protect the terminal from each other component. CDC-901 only When the DIGITAL AUDIO OUT (OPTICAL) terminal of this unit causes noise to the optical input terminal of signals output into an amplifier, etc. q Set...
Owner's Manual
Page 6
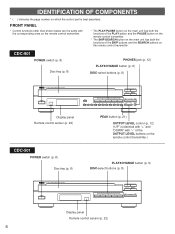
...PHONES jack (p. 12) PLAYXCHANGE button (p. 9) DISC-select buttons (p. 8) NATURAL SOUND COMPACT DISC PLAYER POWER Display panel Remote control sensor (p. 22) PLAYXCHANGE OPEN/CLOSE STOP PLAY/ PAUSE PROG DISC I 2 3 4 5 SKIP/SEARCH OUTPUT LEVEL PHONES +I0 I 2 3 4 5 SKIP/SEARCH Display panel Remote control sensor (p. 22) 6 FRONT PANEL * Control functions other than shown below are the same with "-" of the SKIP buttons and the SEARCH buttons on the remote control transmitter.) CDC-501 POWER switch (p. 8) Disc tray (p. 8) PLAYXCHANGE button (p. 9) DISC-select buttons...
...PHONES jack (p. 12) PLAYXCHANGE button (p. 9) DISC-select buttons (p. 8) NATURAL SOUND COMPACT DISC PLAYER POWER Display panel Remote control sensor (p. 22) PLAYXCHANGE OPEN/CLOSE STOP PLAY/ PAUSE PROG DISC I 2 3 4 5 SKIP/SEARCH OUTPUT LEVEL PHONES +I0 I 2 3 4 5 SKIP/SEARCH Display panel Remote control sensor (p. 22) 6 FRONT PANEL * Control functions other than shown below are the same with "-" of the SKIP buttons and the SEARCH buttons on the remote control transmitter.) CDC-501 POWER switch (p. 8) Disc tray (p. 8) PLAYXCHANGE button (p. 9) DISC-select buttons...
Owner's Manual
Page 8
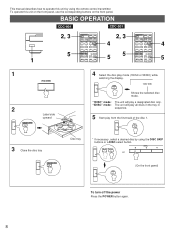
... panel) PLAY To turn off the power Press the POWER button again. 8 MODE 1DISC 5DISC Shows the selected disc mode. BASIC OPERATION CDC-901 CDC-501 1 2, 3 5 OPEN/CLOSE DIMMER TIME PROG TAPE REPEAT RANDOM 1 2 3 MODE 4 5 6 +10 7 8 9 0 DISC SKIP SKIP DISC SCAN PAUSE PLAY SEARCH INDEX STOP 2, 3 4 55 OPEN/CLOSE DIMMER TIME PROG CLEAR REPEAT RANDOM 1 2 3 MODE 4 5 6 +10 7 8 9 0 DISC SKIP SKIP DISC SCAN PAUSE PLAY SEARCH INDEX STOP 4 5 1 POWER 2 OPEN/CLOSE Label side upward 4 Select the disc play a designated disc only. PLAY...
... panel) PLAY To turn off the power Press the POWER button again. 8 MODE 1DISC 5DISC Shows the selected disc mode. BASIC OPERATION CDC-901 CDC-501 1 2, 3 5 OPEN/CLOSE DIMMER TIME PROG TAPE REPEAT RANDOM 1 2 3 MODE 4 5 6 +10 7 8 9 0 DISC SKIP SKIP DISC SCAN PAUSE PLAY SEARCH INDEX STOP 2, 3 4 55 OPEN/CLOSE DIMMER TIME PROG CLEAR REPEAT RANDOM 1 2 3 MODE 4 5 6 +10 7 8 9 0 DISC SKIP SKIP DISC SCAN PAUSE PLAY SEARCH INDEX STOP 4 5 1 POWER 2 OPEN/CLOSE Label side upward 4 Select the disc play a designated disc only. PLAY...
Owner's Manual
Page 9
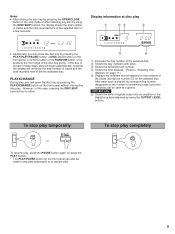
... pressing the PLAY(PLAY/PAUSE) button, a DISC-select button on the front panel without interrupting disc play. However, in these ways, play will begin automatically, however, the display will not show the total number of tracks and the total recorded time of signals output into an amplifier or the headphone level adjusted by using the DISC SKIP buttons, the display shows the total number of tracks and the total recorded time of the selected disc for...
... pressing the PLAY(PLAY/PAUSE) button, a DISC-select button on the front panel without interrupting disc play. However, in these ways, play will begin automatically, however, the display will not show the total number of tracks and the total recorded time of signals output into an amplifier or the headphone level adjusted by using the DISC SKIP buttons, the display shows the total number of tracks and the total recorded time of the selected disc for...
Owner's Manual
Page 10
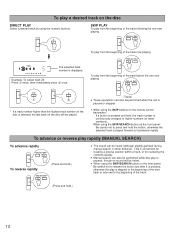
... disc play is paused, though no sound will be heard. q Manual search can also be performed when the unit is paused or stopped. • When using the SKIP buttons on the remote control transmitter: If a button is pressed and held, the track number is continuously changed to higher numbers (or lower numbers). To play a desired track on the disc DIRECT PLAY Select a desired track by using the numeric buttons. 5 SKIP PLAY...
... disc play is paused, though no sound will be heard. q Manual search can also be performed when the unit is paused or stopped. • When using the SKIP buttons on the remote control transmitter: If a button is pressed and held, the track number is continuously changed to higher numbers (or lower numbers). To play a desired track on the disc DIRECT PLAY Select a desired track by using the numeric buttons. 5 SKIP PLAY...
Owner's Manual
Page 12
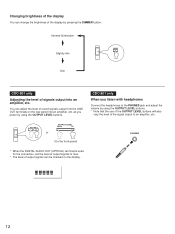
... output signals can be checked on the rear panel into an amplifier, etc. as you listen with headphones Connect the headphones to the PHONES jack and adjust the volume by pressing the DIMMER button. OUTPUT LEVEL + OUTPUT LEVEL DOWN UP or (On the front panel) * When the DIGITAL AUDIO OUT (OPTICAL) terminal is used for the connection, set the level of output signals to an amplifier, etc. - Changing brightness of the display You can change the brightness of sound signals output...
... output signals can be checked on the rear panel into an amplifier, etc. as you listen with headphones Connect the headphones to the PHONES jack and adjust the volume by pressing the DIMMER button. OUTPUT LEVEL + OUTPUT LEVEL DOWN UP or (On the front panel) * When the DIGITAL AUDIO OUT (OPTICAL) terminal is used for the connection, set the level of output signals to an amplifier, etc. - Changing brightness of the display You can change the brightness of sound signals output...
Owner's Manual
Page 13
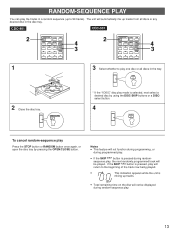
... a random sequence (up tracks from all discs in the disc tray. The unit will not function during programming, or during random-sequence play. 13 MODE 2 Close the disc tray. Notes q This feature will automatically mix up to play . CDC-901 CDC-501 2 OPEN/CLOSE DIMMER TIME PROG TAPE REPEAT RANDOM 1 2 3 MODE 4 5 6 +10 7 8 9 0 4 3 2 OPEN/CLOSE DIMMER TIME PROG CLEAR REPEAT RANDOM 1 2 3 MODE 4 5 6 +10 7 8 9 0 4 3 1 3 Select whether to 99 tracks).
... a random sequence (up tracks from all discs in the disc tray. The unit will not function during programming, or during random-sequence play. 13 MODE 2 Close the disc tray. Notes q This feature will automatically mix up to play . CDC-901 CDC-501 2 OPEN/CLOSE DIMMER TIME PROG TAPE REPEAT RANDOM 1 2 3 MODE 4 5 6 +10 7 8 9 0 4 3 2 OPEN/CLOSE DIMMER TIME PROG CLEAR REPEAT RANDOM 1 2 3 MODE 4 5 6 +10 7 8 9 0 4 3 1 3 Select whether to 99 tracks).
Owner's Manual
Page 14
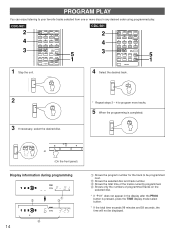
...; Shows the program number for the track to be displayed. OUTPUT LEVEL + 5 1 CDC-501 2 4 3 PROG CLEAR REPEAT RANDOM 1 2 3 MODE 4 5 6 +10 7 8 9 0 DISC SKIP SKIP DISC SCAN PAUSE PLAY SEARCH INDEX STOP SYNCHRO 5 1 1 Stop the unit. 4 Select the desired track. PROGRAM PLAY You can enjoy listening to your favorite tracks selected from one or more tracks. 5 When the programming is pressed, press the TIME display mode-select button. * If the total time exceeds 99...
...; Shows the program number for the track to be displayed. OUTPUT LEVEL + 5 1 CDC-501 2 4 3 PROG CLEAR REPEAT RANDOM 1 2 3 MODE 4 5 6 +10 7 8 9 0 DISC SKIP SKIP DISC SCAN PAUSE PLAY SEARCH INDEX STOP SYNCHRO 5 1 1 Stop the unit. 4 Select the desired track. PROGRAM PLAY You can enjoy listening to your favorite tracks selected from one or more tracks. 5 When the programming is pressed, press the TIME display mode-select button. * If the total time exceeds 99...
Owner's Manual
Page 15
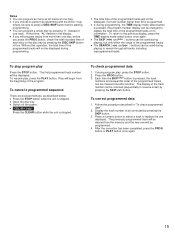
... the display. Press a numeric button to select a track to be displayed during programming. At that time, "AL" flashes in "To check programmed data". 2. q If, during playing, but only within the range of the programmed tracks can be checked one track. q The SEARCH ( and ) buttons can be used during programming, the TIME display mode-select button is pressed, the track numbers and sequential order of the programmed tracks. q Switch off the power. To correct programmed...
... the display. Press a numeric button to select a track to be displayed during programming. At that time, "AL" flashes in "To check programmed data". 2. q If, during playing, but only within the range of the programmed tracks can be checked one track. q The SEARCH ( and ) buttons can be used during programming, the TIME display mode-select button is pressed, the track numbers and sequential order of the programmed tracks. q Switch off the power. To correct programmed...
Owner's Manual
Page 17
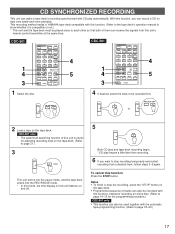
... 3-5 again. OUTPUT LEVEL + 4 5 CDC-501 1 4 3 OPEN/CLOSE DIMMER TIME PROG CLEAR REPEAT RANDOM 1 2 3 MODE 4 5 6 +10 7 8 9 0 DISC SKIP SKIP DISC SCAN PAUSE PLAY SEARCH INDEX STOP SYNCHRO 4 5 1 Select the disc. 4 If desired, select the track to be recorded with the automatic tape-programming function. (Refer to page 21.) 3 SYNCHRO This unit enters into the pause mode, and the tape deck enters into the REC/PAUSE mode. * In this mode, the time display on...
... 3-5 again. OUTPUT LEVEL + 4 5 CDC-501 1 4 3 OPEN/CLOSE DIMMER TIME PROG CLEAR REPEAT RANDOM 1 2 3 MODE 4 5 6 +10 7 8 9 0 DISC SKIP SKIP DISC SCAN PAUSE PLAY SEARCH INDEX STOP SYNCHRO 4 5 1 Select the disc. 4 If desired, select the track to be recorded with the automatic tape-programming function. (Refer to page 21.) 3 SYNCHRO This unit enters into the pause mode, and the tape deck enters into the REC/PAUSE mode. * In this mode, the time display on...
Owner's Manual
Page 18
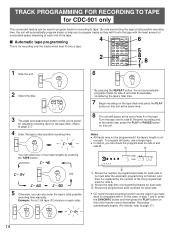
... only the tracks which best fit onto a tape. 2 1 2 3 MODE 4 5 6 +10 7 8 9 0 DISC SKIP SKIP DISC SCAN PAUSE PLAY SEARCH INDEX STOP 5 8 7, 8 1 1 Stop the unit. 6 REPEAT STOP 2 Select the disc. In this case, in turn just after the automatic programming is replaced by pressing the TAPE button. Example: For a C-64 tape (32 minutes on this unit's remote control transmitter. s Automatic tape programming 4 OPEN/CLOSE DIMMER TIME PROG TAPE REPEAT RANDOM 6 This is...
... only the tracks which best fit onto a tape. 2 1 2 3 MODE 4 5 6 +10 7 8 9 0 DISC SKIP SKIP DISC SCAN PAUSE PLAY SEARCH INDEX STOP 5 8 7, 8 1 1 Stop the unit. 6 REPEAT STOP 2 Select the disc. In this case, in turn just after the automatic programming is replaced by pressing the TAPE button. Example: For a C-64 tape (32 minutes on this unit's remote control transmitter. s Automatic tape programming 4 OPEN/CLOSE DIMMER TIME PROG TAPE REPEAT RANDOM 6 This is...
Owner's Manual
Page 19
... "E rr" appears in the display, the track number just selected cannot be used in turn by pressing the DISC SKIP button. * This unit will read the contents of which this operation is omitted, tracks on the disc cannot be programmed because there is not enough time remaining on side B of the tape. 11 The peak level searching function of the tape. If, however, the PAUSE...
... "E rr" appears in the display, the track number just selected cannot be used in turn by pressing the DISC SKIP button. * This unit will read the contents of which this operation is omitted, tracks on the disc cannot be programmed because there is not enough time remaining on side B of the tape. 11 The peak level searching function of the tape. If, however, the PAUSE...

Owner's Manual
Page 20
... changes accordingly. Turn the tape over to page 17.) In this case, in step 3 and 4, press the SYNCHRO button and then press the PLAY button on a disc in the display after the automatic programming is replaced by the number of the first programmed track for side A. Shows the total time of the tape. Programmed track numbers light up and programmable track numbers among the unprogrammed ones flash...
... changes accordingly. Turn the tape over to page 17.) In this case, in step 3 and 4, press the SYNCHRO button and then press the PLAY button on a disc in the display after the automatic programming is replaced by the number of the first programmed track for side A. Shows the total time of the tape. Programmed track numbers light up and programmable track numbers among the unprogrammed ones flash...

Owner's Manual
Page 21
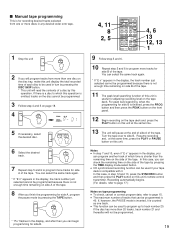
... then press the PEAK button. Adjust the recording level on the tape deck listening to adjust the recording level on a disc where the source level peaks, and next plays the part repeatedly. MODE 1DISC 3 Select the disc. To cancel this repeat play mode. 21 PROG TAPE REPEAT RANDOM 1 2 3 MODE 4 5 6 +10 7 8 9 0 DISC SKIP SKIP DISC SCAN PAUSE PLAY SEARCH INDEX STOP SYNCHRO - If program play mode. Automatic searching for the peak level on a disc This convenient feature automatically...
... then press the PEAK button. Adjust the recording level on the tape deck listening to adjust the recording level on a disc where the source level peaks, and next plays the part repeatedly. MODE 1DISC 3 Select the disc. To cancel this repeat play mode. 21 PROG TAPE REPEAT RANDOM 1 2 3 MODE 4 5 6 +10 7 8 9 0 DISC SKIP SKIP DISC SCAN PAUSE PLAY SEARCH INDEX STOP SYNCHRO - If program play mode. Automatic searching for the peak level on a disc This convenient feature automatically...
Owner's Manual
Page 22
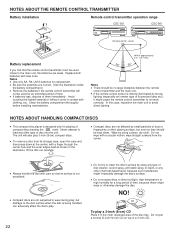
... inner recessed area of time. Replace both batteries with clothing, etc. q To remove a disc from the center. ,,,,, q Always handle the disc with care so that the remote control transmitter must be used closer to the main unit, the batteries are not subjected to load any other type of time, because these might cause the remote control transmitter to avoid direct lighting. q Compact discs are weak.
... inner recessed area of time. Replace both batteries with clothing, etc. q To remove a disc from the center. ,,,,, q Always handle the disc with care so that the remote control transmitter must be used closer to the main unit, the batteries are not subjected to load any other type of time, because these might cause the remote control transmitter to avoid direct lighting. q Compact discs are weak.

Owner's Manual
Page 23
... POWER switch is dirty. The tuner is being subjected to play a disc. The disc is pressed. Load the disc correctly. Connect the cables properly. Replace the batteries with the label side up in the SYMPTOM column, disconnect the unit's power cord and contact your authorized YAMAHA dealer or service center for assistance. A foreign object is delayed, or begins at the wrong place. Improper amplifier operation. Clean the disc. Replace the disc. Change...
... POWER switch is dirty. The tuner is being subjected to play a disc. The disc is pressed. Load the disc correctly. Connect the cables properly. Replace the batteries with the label side up in the SYMPTOM column, disconnect the unit's power cord and contact your authorized YAMAHA dealer or service center for assistance. A foreign object is delayed, or begins at the wrong place. Improper amplifier operation. Clean the disc. Replace the disc. Change...


