
Owner's Manual
Page 2
... must be connected to eliminate the problem by Yamaha-Kemble Music (U.K.) Ltd. 2 IMPORTANT NOTICE FOR THE UNITED KINGDOM Connecting the Plug and Cord WARNING: THIS APPARATUS MUST BE EARTHED IMPORTANT. This product, when installed as follows: The wire which is marked by the letter E or by Yamaha Canada Music Ltd. • Ceci ne s'applique qu'aux produits distribués par Yamaha Canada Musique...
... must be connected to eliminate the problem by Yamaha-Kemble Music (U.K.) Ltd. 2 IMPORTANT NOTICE FOR THE UNITED KINGDOM Connecting the Plug and Cord WARNING: THIS APPARATUS MUST BE EARTHED IMPORTANT. This product, when installed as follows: The wire which is marked by the letter E or by Yamaha Canada Music Ltd. • Ceci ne s'applique qu'aux produits distribués par Yamaha Canada Musique...
Owner's Manual
Page 3
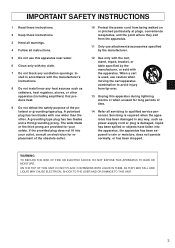
... MAY FALL AND LIQUID MAY CAUSE ELECTRICAL SHOCK TO THE USER AND/OR DAMAGE TO THIS UNIT. 3 IMPORTANT SAFETY INSTRUCTIONS 1 Read these instructions. 2 Keep these instructions. 3 Heed all warnings. 4 Follow all servicing to qualified service personnel. A grounding type plug has two blades and a third ... stoves, or other . Install in any ventilation openings. Servicing is used, use caution when moving the cart/apparatus combination to avoid injury from the apparatus. 11 Only use attachments/accessories specified by the manufacturer. 12 Use only with the cart, stand, tripod, bracket, or...
... MAY FALL AND LIQUID MAY CAUSE ELECTRICAL SHOCK TO THE USER AND/OR DAMAGE TO THIS UNIT. 3 IMPORTANT SAFETY INSTRUCTIONS 1 Read these instructions. 2 Keep these instructions. 3 Heed all warnings. 4 Follow all servicing to qualified service personnel. A grounding type plug has two blades and a third ... stoves, or other . Install in any ventilation openings. Servicing is used, use caution when moving the cart/apparatus combination to avoid injury from the apparatus. 11 Only use attachments/accessories specified by the manufacturer. 12 Use only with the cart, stand, tripod, bracket, or...
Owner's Manual
Page 4
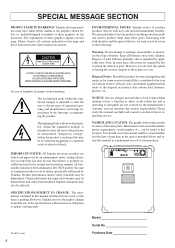
... to change or modify any of important operating and maintenance (servicing) instructions in the literature accompanying the product. Purchase Date Please study this page. Claims filed under the expressed warranty may be at this manual is properly installed and used in this location. The explanation of products that may be correct at the time of electrical shock. ENVIRONMENTAL ISSUES: Yamaha...
... to change or modify any of important operating and maintenance (servicing) instructions in the literature accompanying the product. Purchase Date Please study this page. Claims filed under the expressed warranty may be at this manual is properly installed and used in this location. The explanation of products that may be correct at the time of electrical shock. ENVIRONMENTAL ISSUES: Yamaha...
Owner's Manual
Page 5
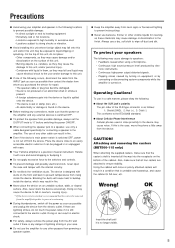
... connected to the switches and controls. ● To prevent damage and possibly electrical shock, never open the case and tamper with the internal circuitry. ● Do not block the ventilation ducts. The use only a cable designed specifically for cleaning, as they may cause damage or discoloration to ensure stability. The device is designed with ease. ● Your Yamaha amplifier is a precision musical instrument...
... connected to the switches and controls. ● To prevent damage and possibly electrical shock, never open the case and tamper with the internal circuitry. ● Do not block the ventilation ducts. The use only a cable designed specifically for cleaning, as they may cause damage or discoloration to ensure stability. The device is designed with ease. ● Your Yamaha amplifier is a precision musical instrument...

Owner's Manual
Page 6
... Panel Controls and Connections 7 Front Panel 7 Rear Panel 8 Operating Instructions 11 Getting sound output 11 Adjusting the Input Level 11 Sound Setting 11 Storing and Recalling Patches 12 Detailed Parameter Settings 13 Amp Mode 13 Equalizer Mode 14 Compressor Mode 14 Utility Mode 15 Air Flow 18 Error Messages 18 Troubleshooting 18 Specifications 19 MIDI Implementation Chart 95 6 Also, keep the manual in a safe, convenient place for purchasing the Yamaha BBT500-115/BBT500-110 Bass Amplifier. Thank you store up to the use in...
... Panel Controls and Connections 7 Front Panel 7 Rear Panel 8 Operating Instructions 11 Getting sound output 11 Adjusting the Input Level 11 Sound Setting 11 Storing and Recalling Patches 12 Detailed Parameter Settings 13 Amp Mode 13 Equalizer Mode 14 Compressor Mode 14 Utility Mode 15 Air Flow 18 Error Messages 18 Troubleshooting 18 Specifications 19 MIDI Implementation Chart 95 6 Also, keep the manual in a safe, convenient place for purchasing the Yamaha BBT500-115/BBT500-110 Bass Amplifier. Thank you store up to the use in...
Owner's Manual
Page 7
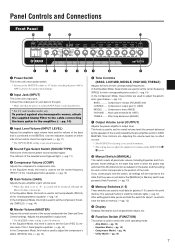
...) u Master Volume (MASTER) Adjusts the overall volume of the knob. In the Equalizer mode, this jack. * Make sure that they were in when the power was pressed (Undo Function). (→ pg. 13) !1 Memory Switches (1-5) These switches are used to protect the speaker from damage. Compressor's output gain (C. Effect loop blend level (BLEND) o Output Volume Level (OUTPUT) Adjusts the power amplifier's output level. The selected memory's (switch's) indicator lights. (→ pg. 12) After editing patch data, press and hold the switch, all...
...) u Master Volume (MASTER) Adjusts the overall volume of the knob. In the Equalizer mode, this jack. * Make sure that they were in when the power was pressed (Undo Function). (→ pg. 13) !1 Memory Switches (1-5) These switches are used to protect the speaker from damage. Compressor's output gain (C. Effect loop blend level (BLEND) o Output Volume Level (OUTPUT) Adjusts the power amplifier's output level. The selected memory's (switch's) indicator lights. (→ pg. 12) After editing patch data, press and hold the switch, all...
Owner's Manual
Page 8
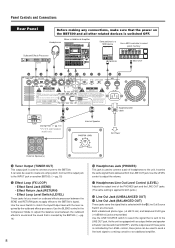
... Use a MIDI controller to a mixing console or an additional amplifier. and Canadian models only Internal Speaker @6 AC Power External Speaker(s) !4 Tuner Output (TUNER OUT) This output jack is used to create a bi-amp system. It can also be used to connect a pair of these jacks can be switched ON/OFF), and the output level of headphones to the BBT500's signal. Use the LINE SOURCE switch to the BBT500. Connect this output jack to the LINE OUT jack. Use the LEVEL control to adjust...
... Use a MIDI controller to a mixing console or an additional amplifier. and Canadian models only Internal Speaker @6 AC Power External Speaker(s) !4 Tuner Output (TUNER OUT) This output jack is used to create a bi-amp system. It can also be used to connect a pair of these jacks can be switched ON/OFF), and the output level of headphones to the BBT500's signal. Use the LINE SOURCE switch to the BBT500. Connect this output jack to the LINE OUT jack. Use the LEVEL control to adjust...
Owner's Manual
Page 9
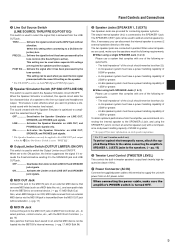
... for connecting speaker systems. The amp's internal speaker (4 Ω) is also effective when you want to produce a distorted sound with the Speaker Simulator is optimized to the MIDI IN jack on both LINE OUT and SPEAKER jack signals. Also, if necessary, you can only be loaded into the BBT500's internal memory. (→ pg. 17: MIDI Bulk IN) Panel Controls and Connections @5 Speaker Jacks (SPEAKER 1, 2 (EXT)) Two Speaker Jacks are used, make sure the amplifier's POWER switch is used to the speakers...
... for connecting speaker systems. The amp's internal speaker (4 Ω) is also effective when you want to produce a distorted sound with the Speaker Simulator is optimized to the MIDI IN jack on both LINE OUT and SPEAKER jack signals. Also, if necessary, you can only be loaded into the BBT500's internal memory. (→ pg. 17: MIDI Bulk IN) Panel Controls and Connections @5 Speaker Jacks (SPEAKER 1, 2 (EXT)) Two Speaker Jacks are used, make sure the amplifier's POWER switch is used to the speakers...
Owner's Manual
Page 10
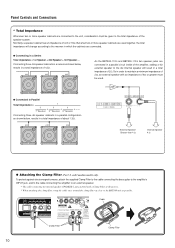
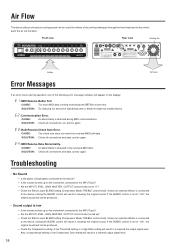
... attaching the clamp filter, wrap the cable once around the clamp filter as close to the BBT500 unit as possible. and Canadian models only) To protect against electromagnetic waves, attach the supplied Clamp Filter to the cable connecting the bass guitar to the amplifier's INPUT jack, and to the cable connecting the amplifier to an external speaker. * The cable connecting the internal speaker (SPEAKER 1 jack) is fitted with an impedance of...
... attaching the clamp filter, wrap the cable once around the clamp filter as close to the BBT500 unit as possible. and Canadian models only) To protect against electromagnetic waves, attach the supplied Clamp Filter to the cable connecting the bass guitar to the amplifier's INPUT jack, and to the cable connecting the amplifier to an external speaker. * The cable connecting the internal speaker (SPEAKER 1 jack) is fitted with an impedance of...
Owner's Manual
Page 11
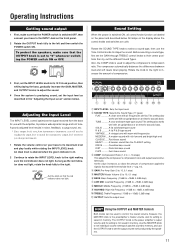
... warm tube type sound. A modern sound with an upright bass or an electric-acoustic bass. As the value increases, so does the amount of compression. Use the MASTER knob to set individual volume settings of patches saved to memory, and use the OUTPUT knob to set the GAIN through TREBLE control knobs to their center positions then try out the different Sound Types. A poorly adjusted level results in the "Adjusting the Input Level...
... warm tube type sound. A modern sound with an upright bass or an electric-acoustic bass. As the value increases, so does the amount of compression. Use the MASTER knob to set individual volume settings of patches saved to memory, and use the OUTPUT knob to set the GAIN through TREBLE control knobs to their center positions then try out the different Sound Types. A poorly adjusted level results in the "Adjusting the Input Level...
Owner's Manual
Page 12
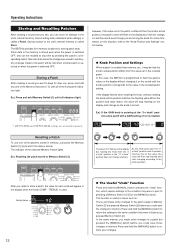
...'s actual position, the patch's value will flash in the recalled patch setting. Setting Value 12 ● The Useful "Undo" Function Press and hold the [MANUAL] switch activates the "Undo" function, which the data is recalled. * INPUT LEVEL and OUTPUT LEVEL settings are turning the knob. The BBT500 provides five memory locations for later use one of the Memory Switches (1-5) until the knob's position corresponds to the unit's internal memory is switched OFF. In this...
...'s actual position, the patch's value will flash in the recalled patch setting. Setting Value 12 ● The Useful "Undo" Function Press and hold the [MANUAL] switch activates the "Undo" function, which the data is recalled. * INPUT LEVEL and OUTPUT LEVEL settings are turning the knob. The BBT500 provides five memory locations for later use one of the Memory Switches (1-5) until the knob's position corresponds to the unit's internal memory is switched OFF. In this...
Owner's Manual
Page 13
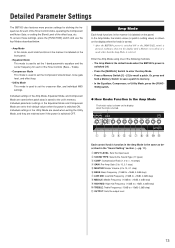
... they are saved when patch data is used to set to +15dB, 0.2dB step) !1 OUTPUT: Sets the output level 13 Enter the Amp Mode using one of the following methods. • The Amp Mode is the default mode when the BBT500's power is switched ON. q INPUT LEVEL: Sets the Input Level w SOUND TYPE: Selects the Sound Type (11 types) e COMP: Compression Ratio (1.0 to ∞, 16 steps) r GAIN: Pre-Amp Gain (0 to 10, 0.1 step) t MASTER: Master Volume (0 to 10, 0.1 step) y BASS: Bass Frequency (-15dB...
... they are saved when patch data is used to set to +15dB, 0.2dB step) !1 OUTPUT: Sets the output level 13 Enter the Amp Mode using one of the following methods. • The Amp Mode is the default mode when the BBT500's power is switched ON. q INPUT LEVEL: Sets the Input Level w SOUND TYPE: Selects the Sound Type (11 types) e COMP: Compression Ratio (1.0 to ∞, 16 steps) r GAIN: Pre-Amp Gain (0 to 10, 0.1 step) t MASTER: Master Volume (0 to 10, 0.1 step) y BASS: Bass Frequency (-15dB...
Owner's Manual
Page 14
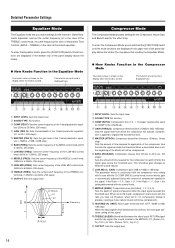
... TREBLE con- To enter the Equalizer mode, press the [FUNCTION] switch. q w e r t y u i o !0 !1 q INPUT LEVEL: Sets the Input Level w SOUND TYPE: No function. e COMP (PEQ F): Sets the center frequency of signal compression after the signal goes below this level. r GAIN (THRSLD): Compressor threshold level (-54dB to 18dB, 0.1dB step) This parameter works in the upper row of the panel's Tone Controls (BASS - GAIN): Compressor gain (0dB to...
... TREBLE con- To enter the Equalizer mode, press the [FUNCTION] switch. q w e r t y u i o !0 !1 q INPUT LEVEL: Sets the Input Level w SOUND TYPE: No function. e COMP (PEQ F): Sets the center frequency of signal compression after the signal goes below this level. r GAIN (THRSLD): Compressor threshold level (-54dB to 18dB, 0.1dB step) This parameter works in the upper row of the panel's Tone Controls (BASS - GAIN): Compressor gain (0dB to...

Owner's Manual
Page 15
... frequencies that the INPUT LEVEL control knob on the second BBT500 is set to h50 (HPF 500Hz) to produce low frequencies. TION] switch for the Crossover Filter and MIDI. Crossover Filter By connecting two BBT500s as shown in the display. Ex.) Operating a bi-amplified system in the Utility Mode In the Utility Mode, only the INPUT LEVEL, OUTPUT, and COMP knobs function. play. ● How Knobs...
... frequencies that the INPUT LEVEL control knob on the second BBT500 is set to h50 (HPF 500Hz) to produce low frequencies. TION] switch for the Crossover Filter and MIDI. Crossover Filter By connecting two BBT500s as shown in the display. Ex.) Operating a bi-amplified system in the Utility Mode In the Utility Mode, only the INPUT LEVEL, OUTPUT, and COMP knobs function. play. ● How Knobs...

Owner's Manual
Page 16
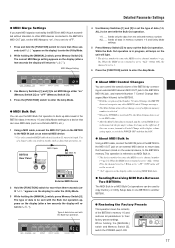
... MIDI 1 Using a MIDI cable, connect the MIDI IN jack on the BBT500 to the MIDI OUT jack on the display (after a few seconds, the display will return to "utL"). MIDI Receive Channel 2-3 Use Memory Switches [1] and [2] to enter the Amp Mode. 4 Now, when a program change number transmitted from the BBT500's memory using an external MIDI device like the MFC10 Yamaha MIDI Foot Controller, etc. When "oFF" is set in the unit's memory to enter the Utility Mode. 3-2 While holding the [MANUAL] switch, press Memory Switch...
... MIDI 1 Using a MIDI cable, connect the MIDI IN jack on the BBT500 to the MIDI OUT jack on the display (after a few seconds, the display will return to "utL"). MIDI Receive Channel 2-3 Use Memory Switches [1] and [2] to enter the Amp Mode. 4 Now, when a program change number transmitted from the BBT500's memory using an external MIDI device like the MFC10 Yamaha MIDI Foot Controller, etc. When "oFF" is set in the unit's memory to enter the Utility Mode. 3-2 While holding the [MANUAL] switch, press Memory Switch...
Owner's Manual
Page 17
... display) to enter the Utility Mode. 3 While holding the [MANUAL] switch and Memory Switch [5], switch the POWER switch ON. 17 Sends only the data from the selected memory number. Sends all parameters to their factory preset settings. Use of data (1-5, ALL) to the MIDI IN jack on the BBT500 to be sufficient. When the MIDI receive channel is set to "ALL" (Omni ON), the channel is set the type of a longer cable can be sent with the...
... display) to enter the Utility Mode. 3 While holding the [MANUAL] switch and Memory Switch [5], switch the POWER switch ON. 17 Sends only the data from the selected memory number. Sends all parameters to their factory preset settings. Use of data (1-5, ALL) to the MIDI IN jack on the BBT500 to be sufficient. When the MIDI receive channel is set to "ALL" (Omni ON), the channel is set the type of a longer cable can be sent with the...
Owner's Manual
Page 18
... following error message numbers will not be produced. • Sound output is connected to "0"? → Check the Effect Loop's BLEND setting (Compressor Mode: TREBLE control knob). CAUSE: An abnormality is being sent or, break the data into smaller blocks. Unless an external effector is set to "100", the original sound will appear on the instrument connected to the INPUT jack? → Are the INPUT LEVEL, GAIN, MASTER, OUTPUT control knobs set...
... following error message numbers will not be produced. • Sound output is connected to "0"? → Check the Effect Loop's BLEND setting (Compressor Mode: TREBLE control knob). CAUSE: An abnormality is being sent or, break the data into smaller blocks. Unless an external effector is set to "100", the original sound will appear on the instrument connected to the INPUT jack? → Are the INPUT LEVEL, GAIN, MASTER, OUTPUT control knobs set...
Owner's Manual
Page 19
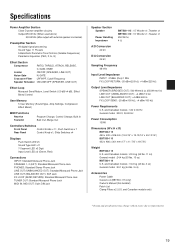
..., Level Switch (-20 dB/+4 dB), Effect Blend Control User Memory 5 User Memory (Sound Type, Amp Settings, Compressor, Effect Blend) MIDI Functions Receive Transmit Program Change, Control Change, Bulk In Bulk Out, Merge Out Controllers/Switches Front Panel Control Knobs x 11, Push Switches x 7 Rear Panel Control Knob x1, Slide Switches x4 Displays Push Switch LED x5 Sound Type LED x11 7-Segment LED x3 Digit Input Level LED x2 (Green, Red) Connections INPUT: Standard Monaural Phone Jack SPEAKER 1, 2 (EXT): Standard Monaural Phone Jack PHONES: Standard Stereo Phone Jack LINE OUT...
..., Level Switch (-20 dB/+4 dB), Effect Blend Control User Memory 5 User Memory (Sound Type, Amp Settings, Compressor, Effect Blend) MIDI Functions Receive Transmit Program Change, Control Change, Bulk In Bulk Out, Merge Out Controllers/Switches Front Panel Control Knobs x 11, Push Switches x 7 Rear Panel Control Knob x1, Slide Switches x4 Displays Push Switch LED x5 Sound Type LED x11 7-Segment LED x3 Digit Input Level LED x2 (Green, Red) Connections INPUT: Standard Monaural Phone Jack SPEAKER 1, 2 (EXT): Standard Monaural Phone Jack PHONES: Standard Stereo Phone Jack LINE OUT...
Owner's Manual
Page 20
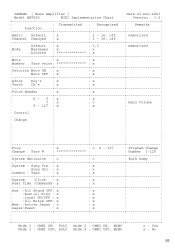
YAMAHA [ Bass Amplifier ] Date:23-Dec-2003 Model BBT500 MIDI Implementation Chart Version : 1.0 : : Transmitted : Recognized : Remarks : : Function ... : : : : :Basic Default : x : 1 - 16, off : memorized : :Channel Changed : x : 1 - 16, off : : : Default : x : 1,3 : memorized : :Mode Messages : x : x : : : Altered x : : :Note : x : x : : :Number : True voice x : : :Velocity Note ON : x : x : : : Note OFF : x : x : : :After Key's : x : x : : :Touch Ch's : x : x : : :Pitch Bender : x : x : : : 0-...
YAMAHA [ Bass Amplifier ] Date:23-Dec-2003 Model BBT500 MIDI Implementation Chart Version : 1.0 : : Transmitted : Recognized : Remarks : : Function ... : : : : :Basic Default : x : 1 - 16, off : memorized : :Channel Changed : x : 1 - 16, off : : : Default : x : 1,3 : memorized : :Mode Messages : x : x : : : Altered x : : :Note : x : x : : :Number : True voice x : : :Velocity Note ON : x : x : : : Note OFF : x : x : : :After Key's : x : x : : :Touch Ch's : x : x : : :Pitch Bender : x : x : : : 0-...

