
User Guide
Page 4
...FAXING Faxing from your WorkCentre 4-1 Customizing Copier Features 4-2 Selecting WorkCentre Display Window Language 4-2 Selecting Paper Default 4-3 Selecting Program Timeout 4-3 Selecting Sleep Mode Setting 4-4 Learning How to Customize Print Features on Your PC 4-4 Customizing Scan Features 4-5 Setting a Preset for Email 4-6 5. Clear/Stop 2-8 Start 2-8 3. SCANNING Scanning 5-1 Scan Using Preset 1 5-2 Sending a Scan through Email 5-3 Scanning Using ControlCentre - CUSTOMIZING YOUR WORKCENTRE Customizing your PC 6-1 User Guide iv Pagis Inbox 5-4 Scanning...
...FAXING Faxing from your WorkCentre 4-1 Customizing Copier Features 4-2 Selecting WorkCentre Display Window Language 4-2 Selecting Paper Default 4-3 Selecting Program Timeout 4-3 Selecting Sleep Mode Setting 4-4 Learning How to Customize Print Features on Your PC 4-4 Customizing Scan Features 4-5 Setting a Preset for Email 4-6 5. Clear/Stop 2-8 Start 2-8 3. SCANNING Scanning 5-1 Scan Using Preset 1 5-2 Sending a Scan through Email 5-3 Scanning Using ControlCentre - CUSTOMIZING YOUR WORKCENTRE Customizing your PC 6-1 User Guide iv Pagis Inbox 5-4 Scanning...
User Guide
Page 5
TROUBLESHOOTING Troubleshooting 8-1 Printing a Test Page 8-2 Paper Feeding Problems 8-3 Quality Problems 8-4 Quality Problems 8-5 Quality Problems 8-7 Copier/Printer Problems 8-8 Scanner Problems 8-11 Scanner Problems 8-12 Error Codes 8-13 Error Codes 8-14 9. General Information General Information 9-1 Service and Support 9-2 Ordering Supplies 9-3 Ink Cartridge/Print Head Re-Order Numbers 9-3 Safety 9-7 User Guide v Pagis Inbox 6-3 7. MAINTENANCE Maintaining Your WorkCentre 7-1 Changing an Ink Cartridge 7-2 Cleaning the Print Head 7-5 Aligning ...
TROUBLESHOOTING Troubleshooting 8-1 Printing a Test Page 8-2 Paper Feeding Problems 8-3 Quality Problems 8-4 Quality Problems 8-5 Quality Problems 8-7 Copier/Printer Problems 8-8 Scanner Problems 8-11 Scanner Problems 8-12 Error Codes 8-13 Error Codes 8-14 9. General Information General Information 9-1 Service and Support 9-2 Ordering Supplies 9-3 Ink Cartridge/Print Head Re-Order Numbers 9-3 Safety 9-7 User Guide v Pagis Inbox 6-3 7. MAINTENANCE Maintaining Your WorkCentre 7-1 Changing an Ink Cartridge 7-2 Cleaning the Print Head 7-5 Aligning ...
User Guide
Page 7
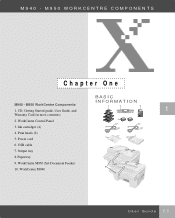
M940 - Output tray 8. Paper tray 9. M950 WorkCentre Components 1. Print heads (2) 5. Ink cartridges (4) 5 6 4. M950 WORKCENTRE COMPONENTS C h a p t e r O n e 1z M940 - Power cord 7 8 6. USB cable 7. WorkCentre M950 (Set Document Feeder) 9 10. CD, Getting Started guide, User Guide, and Warranty Card (in most countries) 2. WorkCentre M940 U s e r G u i d e 1.1 WorkCentre Control Panel BASIC INFORMATION 1 2 3 - + 4 Y104 Black Magenta Yellow Cyan DOCU PRINT M Series WORK CENTRE M Series Ink Cartridges Catouche d'Encre Tintenpatrone Cartuccia inhiostro...
M940 - Output tray 8. Paper tray 9. M950 WorkCentre Components 1. Print heads (2) 5. Ink cartridges (4) 5 6 4. M950 WORKCENTRE COMPONENTS C h a p t e r O n e 1z M940 - Power cord 7 8 6. USB cable 7. WorkCentre M950 (Set Document Feeder) 9 10. CD, Getting Started guide, User Guide, and Warranty Card (in most countries) 2. WorkCentre M940 U s e r G u i d e 1.1 WorkCentre Control Panel BASIC INFORMATION 1 2 3 - + 4 Y104 Black Magenta Yellow Cyan DOCU PRINT M Series WORK CENTRE M Series Ink Cartridges Catouche d'Encre Tintenpatrone Cartuccia inhiostro...

User Guide
Page 8
Envelope/card stock printing 1.2 U s e r G u i d e USB cable (included) 2. An envelope icon indicates the setting for envelope printing and a paper icon indicates the dial setting for paper printing. 1. Connections 1. Do not disconnect the power cord from the wall outlet, as the WorkCentre requires a small amount of power to prevent the ink in the paper position, except when printing envelopes or card stock. 1 2 Paper Thickness Knob The paper thickness knob allows you to choose envelope or paper printing. CONNECTIONS Note: When power is connected the...
Envelope/card stock printing 1.2 U s e r G u i d e USB cable (included) 2. An envelope icon indicates the setting for envelope printing and a paper icon indicates the dial setting for paper printing. 1. Connections 1. Do not disconnect the power cord from the wall outlet, as the WorkCentre requires a small amount of power to prevent the ink in the paper position, except when printing envelopes or card stock. 1 2 Paper Thickness Knob The paper thickness knob allows you to choose envelope or paper printing. CONNECTIONS Note: When power is connected the...

User Guide
Page 13
... Software Components ControlCentre 2.0: • Pagis PRO 3.0 : The latest version of the functions into Xerox ControlCentre, so Faxing is integrated into one easy to use interface. The primary functions include: • TextBridge PRO 9.0: Beneficial for the M940/950 which integrates all of Pagis customized for any scanned image, documet or file, and to incorporate it to that application. • Pagis Copier: Scan document and copy...
... Software Components ControlCentre 2.0: • Pagis PRO 3.0 : The latest version of the functions into Xerox ControlCentre, so Faxing is integrated into one easy to use interface. The primary functions include: • TextBridge PRO 9.0: Beneficial for the M940/950 which integrates all of Pagis customized for any scanned image, documet or file, and to incorporate it to that application. • Pagis Copier: Scan document and copy...
User Guide
Page 15
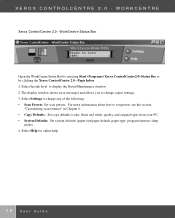
... display window shows error messages and allows you to change copier settings. 3. Select Help for online help. 1.9 U s e r G u i d e WorkCentre Status Bar Open the WorkCentre Status Bar by selecting Start>Programs>Xerox ControlCentre2.0>Status Bar or by clicking the Xerox ControlCentre 2.0 - Select the ink level to set presets, see the section, "Customizing scan features" in Chapter 4. • Copy Defaults: Set copy defaults (color, black and white, quality, and original type) from your PC. • System Defaults: Set system defaults (paper size/paper default, paper type, program timeout...
... display window shows error messages and allows you to change copier settings. 3. Select Help for online help. 1.9 U s e r G u i d e WorkCentre Status Bar Open the WorkCentre Status Bar by selecting Start>Programs>Xerox ControlCentre2.0>Status Bar or by clicking the Xerox ControlCentre 2.0 - Select the ink level to set presets, see the section, "Customizing scan features" in Chapter 4. • Copy Defaults: Set copy defaults (color, black and white, quality, and original type) from your PC. • System Defaults: Set system defaults (paper size/paper default, paper type, program timeout...

User Guide
Page 19
... good quality business graphics up to making one copy in the Set Document feeder. 1 Adjust the side guide. 2 Press the Start button. 3 Copy Color Select either B & W or Color on the left side of the control panel: • Best - Best overall quality and speed • eXpress - Copy Quality Select from the following options on the left side of the control panel. USING THE SET DOCUMENT FEEDER (M950 ONLY) Using the Set Document Feeder (M950 only) Load your original face-down in the...
... good quality business graphics up to making one copy in the Set Document feeder. 1 Adjust the side guide. 2 Press the Start button. 3 Copy Color Select either B & W or Color on the left side of the control panel: • Best - Best overall quality and speed • eXpress - Copy Quality Select from the following options on the left side of the control panel. USING THE SET DOCUMENT FEEDER (M950 ONLY) Using the Set Document Feeder (M950 only) Load your original face-down in the...

User Guide
Page 23
...%, default) Variable (100%, default) Changes the size in sections to A5 (70%) Reduces page size. Legal to A4 (82%) B5 to fit on the WorkCentre M950. AutoFit (Letter) AutoFit (A4) Prescans and automatically sizes the image to twice the original size. Legal size paper can only be 2 copied using the Set Document Feeder on the same page. Repeat Image (100%) Repeat Image (100%) Fits many smaller identical images on the WorkCentre M950. Double Size (200%) Double Size (200...
...%, default) Variable (100%, default) Changes the size in sections to A5 (70%) Reduces page size. Legal to A4 (82%) B5 to fit on the WorkCentre M950. AutoFit (Letter) AutoFit (A4) Prescans and automatically sizes the image to twice the original size. Legal size paper can only be 2 copied using the Set Document Feeder on the same page. Repeat Image (100%) Repeat Image (100%) Fits many smaller identical images on the WorkCentre M950. Double Size (200%) Double Size (200...

User Guide
Page 33
... transparencies in the Paper type list box. Note: Ensure you can print with the rough 1 side down in the tray. PRINTING TRANSPARENCIES Printing Transparencies For best results use a Xerox ink jet transparency or a transparency specifically designed for ink jet machines. Click OK to dry before handling. In the Print Quality list box select eXpress or Best. Adjust the guides snugly against the transparencies. 2 After you open your transparency has...
... transparencies in the Paper type list box. Note: Ensure you can print with the rough 1 side down in the tray. PRINTING TRANSPARENCIES Printing Transparencies For best results use a Xerox ink jet transparency or a transparency specifically designed for ink jet machines. Click OK to dry before handling. In the Print Quality list box select eXpress or Best. Adjust the guides snugly against the transparencies. 2 After you open your transparency has...
User Guide
Page 38
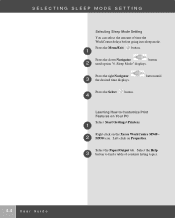
Sleep Mode" displays. - Left-click on the Xerox WorkCentre M940 - 2 M950 icon. Select the Paper/Output tab. SELECTING SLEEP MODE SETTING Selecting Sleep Mode Setting You can select the amount of contents listing topics. 4.4 U s e r G u i d e Select the Help 3 button to Customize Print Features on Your PC Select Start>Settings>Printers. 1 Right-click on Properties. Learning How to find a table of time the WorkCentre delays before going into sleep mode. Press the Menu/Exit 1 button. - + Press...
Sleep Mode" displays. - Left-click on the Xerox WorkCentre M940 - 2 M950 icon. Select the Paper/Output tab. SELECTING SLEEP MODE SETTING Selecting Sleep Mode Setting You can select the amount of contents listing topics. 4.4 U s e r G u i d e Select the Help 3 button to Customize Print Features on Your PC Select Start>Settings>Printers. 1 Right-click on Properties. Learning How to find a table of time the WorkCentre delays before going into sleep mode. Press the Menu/Exit 1 button. - + Press...
User Guide
Page 42
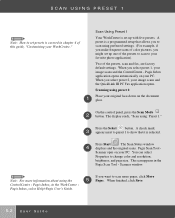
... about using preferred settings. (For example, if you make frequent scans of color pictures, you select preset 1, your image scans and the QuickLink III PC Fax application opens. Pagis Inbox, in the Pagis Scan Tool - A preset is a programmed setup that it is selected. On the control panel, press the Scan Mode 2 button. When finished, click Save. Pagis Inbox application opens automatically on the document glass. Scanning using : Preset 1." The Scan Status window 4 displays and the original scans. Scanner window...
... about using preferred settings. (For example, if you make frequent scans of color pictures, you select preset 1, your image scans and the QuickLink III PC Fax application opens. Pagis Inbox, in the Pagis Scan Tool - A preset is a programmed setup that it is selected. On the control panel, press the Scan Mode 2 button. When finished, click Save. Pagis Inbox application opens automatically on the document glass. Scanning using : Preset 1." The Scan Status window 4 displays and the original scans. Scanner window...

User Guide
Page 44
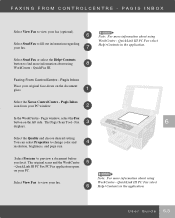
... application to change color and resolution, brightness, and page size. If the scanner 6 does not scan, see the Troubleshooting chapter of a document. Select the Page Type. Select Xerox ControlCentre - Select Scan to preview a document 5 (optional). To actually scan a document, select the Scan button. The Pagis Scan Tool - SCANNING USING CONTROLCENTRE - Scanning Using ControlCentre - Pagis Inbox Place your PC window. PAGIS INBOX Note: Remember that Prescan only scans a preview of this guide. Select Prescan to scan the document. Pagis...
... application to change color and resolution, brightness, and page size. If the scanner 6 does not scan, see the Troubleshooting chapter of a document. Select the Page Type. Select Xerox ControlCentre - Select Scan to preview a document 5 (optional). To actually scan a document, select the Scan button. The Pagis Scan Tool - SCANNING USING CONTROLCENTRE - Scanning Using ControlCentre - Pagis Inbox Place your PC window. PAGIS INBOX Note: Remember that Prescan only scans a preview of this guide. Select Prescan to scan the document. Pagis...
User Guide
Page 45
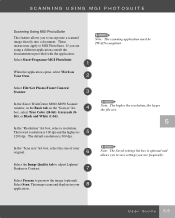
... PHOTOSUITE Scanning Using MGI PhotoSuite This feature allows you to MGI PhotoSuite. These instructions apply to incorporate a scanned image directly into a document. Note: The scanning application must be TWAIN-compliant. 1 2 Select File>Get Photos From>Camera/ Scanner. 3 In the Xerox WorkCentre M940-M950 Scanner window, in the Basic tab, in your original. 6 Select the Image Quality tab to adjust Lighten/ Darken or Contrast. 7 Note: The Saved settings list box is optional...
... PHOTOSUITE Scanning Using MGI PhotoSuite This feature allows you to MGI PhotoSuite. These instructions apply to incorporate a scanned image directly into a document. Note: The scanning application must be TWAIN-compliant. 1 2 Select File>Get Photos From>Camera/ Scanner. 3 In the Xerox WorkCentre M940-M950 Scanner window, in the Basic tab, in your original. 6 Select the Image Quality tab to adjust Lighten/ Darken or Contrast. 7 Note: The Saved settings list box is optional...
User Guide
Page 51
... using 8 WorkCentre - Select Send Fax or select the Help>Contents button to view your PC. Select Prescan to change color and 4 resolution, brightness, and page size. QuickFax III. U s e r G u i d e 6.3 Faxing From ControlCentre - The Pagis Scan Tool - Select the Quality and choose desired setting. QuickLink III PC Fax PC Fax application opens on the left side. Pagis Inbox icon from your original face-down on the document glass. 1 Select the Xerox...
... using 8 WorkCentre - Select Send Fax or select the Help>Contents button to view your PC. Select Prescan to change color and 4 resolution, brightness, and page size. QuickFax III. U s e r G u i d e 6.3 Faxing From ControlCentre - The Pagis Scan Tool - Select the Quality and choose desired setting. QuickLink III PC Fax PC Fax application opens on the left side. Pagis Inbox icon from your original face-down on the document glass. 1 Select the Xerox...
User Guide
Page 68
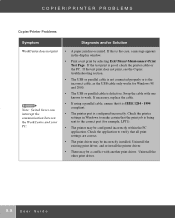
Check the printer settings in the display window. • Print a test print by selecting Exit/ Menu>Maintenance>Print Test Page. Uninstall the other print driver. 8.8 U s e r G u i d e Uninstall the existing print driver, and re-install the printer driver. • There may be a conflict with one known to the correct port (for Windows 98 and 2000. • The USB or parallel cable is defective. If this is the case, a message appears in Windows to make certain that the print job is configured incorrectly. Swap...
Check the printer settings in the display window. • Print a test print by selecting Exit/ Menu>Maintenance>Print Test Page. Uninstall the other print driver. 8.8 U s e r G u i d e Uninstall the existing print driver, and re-install the printer driver. • There may be a conflict with one known to the correct port (for Windows 98 and 2000. • The USB or parallel cable is defective. If this is the case, a message appears in Windows to make certain that the print job is configured incorrectly. Swap...

User Guide
Page 69
... printer or change the paper size selection in the print driver. Remove and re-insert the paper correctly. • There is partly blank • The page orientation setting may be incorrect. U s e r G u i d e 8.9 Add paper. • Paper has not been loaded properly. Printed document does not match selected settings • Some PC software applications override the settings selected on the Control Panel. • Press the down Navigator button until Maintenance 8 displays. • Press the right Navigator button until Clean Print Head 1 displays. Change...
... printer or change the paper size selection in the print driver. Remove and re-insert the paper correctly. • There is partly blank • The page orientation setting may be incorrect. U s e r G u i d e 8.9 Add paper. • Paper has not been loaded properly. Printed document does not match selected settings • Some PC software applications override the settings selected on the Control Panel. • Press the down Navigator button until Maintenance 8 displays. • Press the right Navigator button until Clean Print Head 1 displays. Change...
User Guide
Page 71
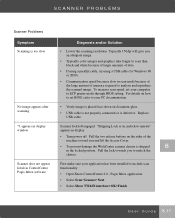
... appear listed in ControlCentre Pagis-Inbox software First make sure your application has been installed to ECP printer mode through BIOS setting. Typically 150dpi will give you an adequate image. • Typically color images and graphics take longer to scan than black and white because of larger amounts of data. • If using a parallel cable, try using a USB cable (for Windows 98 or 2000). • Communication speed becomes slow in display. • Turn power...
... appear listed in ControlCentre Pagis-Inbox software First make sure your application has been installed to ECP printer mode through BIOS setting. Typically 150dpi will give you an adequate image. • Typically color images and graphics take longer to scan than black and white because of larger amounts of data. • If using a parallel cable, try using a USB cable (for Windows 98 or 2000). • Communication speed becomes slow in display. • Turn power...
User Guide
Page 73
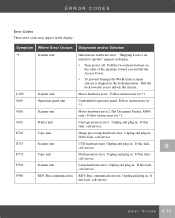
Pull the two release buttons on , unlock to unlock the chassis. L100 0001 0016 Scanner unit Operation panel unit Scanner unit Motor hardware error. Follow instructions for *1. 0032 Printer unit Carriage position error. Unidentified operation panel. Motor hardware error 2 (Set Document Feeder, M960 only). Follow instructions for *1. Unplug and plug in . Unplug and plug in . CCD hardware unit. ERROR CODES Error Codes These error codes may appear in . Follow instructions for *1. If this fails, call service. Unplug and plug in the...
Pull the two release buttons on , unlock to unlock the chassis. L100 0001 0016 Scanner unit Operation panel unit Scanner unit Motor hardware error. Follow instructions for *1. 0032 Printer unit Carriage position error. Unidentified operation panel. Motor hardware error 2 (Set Document Feeder, M960 only). Follow instructions for *1. Unplug and plug in . Unplug and plug in . CCD hardware unit. ERROR CODES Error Codes These error codes may appear in . Follow instructions for *1. If this fails, call service. Unplug and plug in the...
User Guide
Page 77
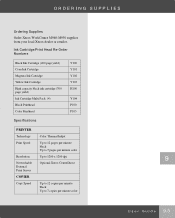
... Xerox WorkCentre M940-M950 supplies from your local Xerox dealer or retailer. Ink Cartridge/Print Head Re-Order Numbers Black Ink Cartridge (400 page yield) Cyan Ink Cartridge Magenta Ink Cartridge Yellow Ink Cartridge High capacity black ink cartridge (700 page yield) Ink Cartridge Multi Pack (4) Black Printhead Color Printhead Y100 Y101 Y102 Y103 H100 Y104 P100 P105 Specifications PRINTER Technology Print Speed Resolution Networkable External Print Server COPIER Copy Speed Color Thermal Inkjet Up to 12 pages per minute black Up to 7 pages per minute color Up to 1200 x 1200 dpi Optional...
... Xerox WorkCentre M940-M950 supplies from your local Xerox dealer or retailer. Ink Cartridge/Print Head Re-Order Numbers Black Ink Cartridge (400 page yield) Cyan Ink Cartridge Magenta Ink Cartridge Yellow Ink Cartridge High capacity black ink cartridge (700 page yield) Ink Cartridge Multi Pack (4) Black Printhead Color Printhead Y100 Y101 Y102 Y103 H100 Y104 P100 P105 Specifications PRINTER Technology Print Speed Resolution Networkable External Print Server COPIER Copy Speed Color Thermal Inkjet Up to 12 pages per minute black Up to 7 pages per minute color Up to 1200 x 1200 dpi Optional...
User Guide
Page 86
User Guide INDEX E Envelopes Printing Several 3-5 Printing Single 3-4 I Ink Cartridge Changing 7-2 Re-Order Numbers 9-3 Iron-On, Printing 3-6 L Labels, Printing 3-7 O Output Tray 1-5 Output Tray Extension 1-5 P Paper Feeding Problems, Diagnosis &/or Solution 8-3 Paper Tray 1-5 Print Head Alignment 7-6 Changing 7-7 Re-Order Numbers 9-3 Print Quality Problems, Diagnosis &/or Solution 8-4 Printer Components and Parts 1-1 Bypass Tray 1-6 Output Tray 1-5 Output Tray Extension 1-5 Paper Thickness Dial 1-2 Paper Tray 1-5 Rear Access Door 1-6 Printer Problems, Diagnosis &/or ...
User Guide INDEX E Envelopes Printing Several 3-5 Printing Single 3-4 I Ink Cartridge Changing 7-2 Re-Order Numbers 9-3 Iron-On, Printing 3-6 L Labels, Printing 3-7 O Output Tray 1-5 Output Tray Extension 1-5 P Paper Feeding Problems, Diagnosis &/or Solution 8-3 Paper Tray 1-5 Print Head Alignment 7-6 Changing 7-7 Re-Order Numbers 9-3 Print Quality Problems, Diagnosis &/or Solution 8-4 Printer Components and Parts 1-1 Bypass Tray 1-6 Output Tray 1-5 Output Tray Extension 1-5 Paper Thickness Dial 1-2 Paper Tray 1-5 Rear Access Door 1-6 Printer Problems, Diagnosis &/or ...


