User Guide
Page 3
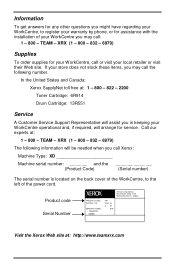
...their Web site. Product code Serial Number XEROX Xerox Corporation Rochester, New York Manufactured in keeping your WorkCentre operational and, if required, will arrange for service. Call our experts at : 1 - 800 - 822 - 2200 Toner Cartridge: 6R914 Drum Cartridge: 13R551 Service A Customer Service Support .... Information To get answers for any other questions you might have regarding your WorkCentre, to register your warranty by phone, or for assistance with the installation of your WorkCentre you call Xerox: Machine Type: XD Machine serial number: __ __ __ and the (Product...
...their Web site. Product code Serial Number XEROX Xerox Corporation Rochester, New York Manufactured in keeping your WorkCentre operational and, if required, will arrange for service. Call our experts at : 1 - 800 - 822 - 2200 Toner Cartridge: 6R914 Drum Cartridge: 13R551 Service A Customer Service Support .... Information To get answers for any other questions you might have regarding your WorkCentre, to register your warranty by phone, or for assistance with the installation of your WorkCentre you call Xerox: Machine Type: XD Machine serial number: __ __ __ and the (Product...
User Guide
Page 6
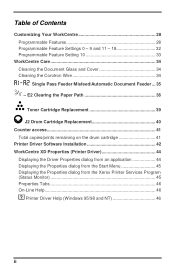
...E2 Clearing the Paper Path 36 Toner Cartridge Replacement 39 J2 Drum Cartridge Replacement 40 Counter access 41 Total copies/prints remaining on the drum cartridge 41 Printer Driver Software Installation 42 WorkCentre XD Properties (Printer Driver 44 Displaying the Driver Properties dialog... from an application 44 Displaying the Properties dialog from the Start Menu 45 Displaying the Properties dialog from the Xerox Printer Services Program ...
...E2 Clearing the Paper Path 36 Toner Cartridge Replacement 39 J2 Drum Cartridge Replacement 40 Counter access 41 Total copies/prints remaining on the drum cartridge 41 Printer Driver Software Installation 42 WorkCentre XD Properties (Printer Driver 44 Displaying the Driver Properties dialog... from an application 44 Displaying the Properties dialog from the Start Menu 45 Displaying the Properties dialog from the Xerox Printer Services Program ...
User Guide
Page 8
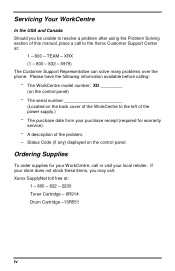
.... The purchase date from your purchase receipt (required for your WorkCentre, call : Xerox SupplyNet toll free at : 1 - 800 - The WorkCentre model number: XD _________ (on the control panel. A description of the WorkCentre to the Xerox Customer Support Center at : 1 - 800 - 822 - 2200 Toner Cartridge - 6R914 Drum Cartridge -13R551 iv Status Code (if any) displayed on the control...
.... The purchase date from your purchase receipt (required for your WorkCentre, call : Xerox SupplyNet toll free at : 1 - 800 - The WorkCentre model number: XD _________ (on the control panel. A description of the WorkCentre to the Xerox Customer Support Center at : 1 - 800 - 822 - 2200 Toner Cartridge - 6R914 Drum Cartridge -13R551 iv Status Code (if any) displayed on the control...

User Guide
Page 10
... or over a radiator or heat register. The WorkCentre should never be placed in a built-in a fire or electric shock. Use of an extension cord with this equipment. Avoid exposing the drum cartridge to protect it from the type of the WorkCentre and to light for removal. Do not locate ...the WorkCentre where persons will not operate with an energy saving device to rest on the cord. To...
... or over a radiator or heat register. The WorkCentre should never be placed in a built-in a fire or electric shock. Use of an extension cord with this equipment. Avoid exposing the drum cartridge to protect it from the type of the WorkCentre and to light for removal. Do not locate ...the WorkCentre where persons will not operate with an energy saving device to rest on the cord. To...
User Guide
Page 14
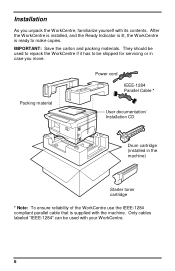
.... IMPORTANT: Save the carton and packing materials. Packing material Power cord IEEE-1284 Parallel Cable * User documentation/ Installation CD Drum cartridge (installed in case you unpack the WorkCentre, familiarize yourself with your WorkCentre. 6 Installation As you move. Only cables labeled "IEEE-1284" can be shipped for servicing or in the machine) Starter toner...
.... IMPORTANT: Save the carton and packing materials. Packing material Power cord IEEE-1284 Parallel Cable * User documentation/ Installation CD Drum cartridge (installed in case you unpack the WorkCentre, familiarize yourself with your WorkCentre. 6 Installation As you move. Only cables labeled "IEEE-1284" can be shipped for servicing or in the machine) Starter toner...
User Guide
Page 17
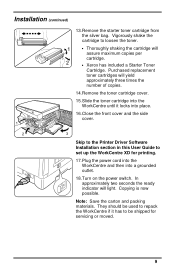
...Printer Driver Software Installation section in this User Guide to set up the WorkCentre XD for servicing or moved. 9 In approximately two seconds the ready indicator will yield approximately three times the number of copies. 14.Remove the toner cartridge cover. 15.Slide the toner cartridge into the WorkCentre... until it has to loosen the toner. • Thoroughly shaking the cartridge will assure maximum copies per cartridge. • Xerox has included a Starter Toner Cartridge. Vigorously shake the cartridge to be...
...Printer Driver Software Installation section in this User Guide to set up the WorkCentre XD for servicing or moved. 9 In approximately two seconds the ready indicator will yield approximately three times the number of copies. 14.Remove the toner cartridge cover. 15.Slide the toner cartridge into the WorkCentre... until it has to loosen the toner. • Thoroughly shaking the cartridge will assure maximum copies per cartridge. • Xerox has included a Starter Toner Cartridge. Vigorously shake the cartridge to be...
User Guide
Page 44
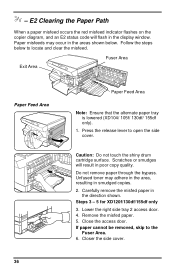
Do not remove paper through the bypass. Lower the right side tray 2 access door. 4. Caution: Do not touch the shiny drum cartridge surface. Remove the misfed paper. 5. If paper cannot be removed, skip to open the side cover. Closer the side cover. E2 Clearing the Paper Path ...
Do not remove paper through the bypass. Lower the right side tray 2 access door. 4. Caution: Do not touch the shiny drum cartridge surface. Remove the misfed paper. 5. If paper cannot be removed, skip to open the side cover. Closer the side cover. E2 Clearing the Paper Path ...
User Guide
Page 47
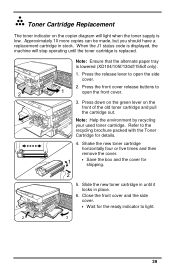
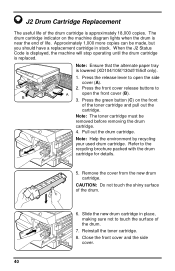
... the front cover release buttons to 2 1 open the side cover. 2. Approximately 10 more copies can be made, but you should have a replacement cartridge in place. 6. Note: Ensure that the alternate paper tray is replaced. Press the release lever to light. 2 3 39 Note: Help the environment... by recycling your used toner cartridge. Refer to the recycling brochure packed with the Toner Cartridge for the ready indicator to open the front cover. 3. Press down on the green lever on the copier diagram...
... the front cover release buttons to 2 1 open the side cover. 2. Approximately 10 more copies can be made, but you should have a replacement cartridge in place. 6. Note: Ensure that the alternate paper tray is replaced. Press the release lever to light. 2 3 39 Note: Help the environment... by recycling your used toner cartridge. Refer to the recycling brochure packed with the Toner Cartridge for the ready indicator to open the front cover. 3. Press down on the green lever on the copier diagram...
User Guide
Page 48
...lever to A open the side cover (A). 2. Close the front cover and the side cover. 40 The drum cartridge indicator on the front of the toner cartridge and pull out the cartridge. Press the green button (C) on the machine diagram lights when the drum is approximately 18,000 copies. Pull out... the drum cartridge. CAUTION: Do not touch the shiny surface of the drum cartridge is near the end of the drum. 7. Press the front cover release buttons to open the front cover (B)....
...lever to A open the side cover (A). 2. Close the front cover and the side cover. 40 The drum cartridge indicator on the front of the toner cartridge and pull out the cartridge. Press the green button (C) on the machine diagram lights when the drum is approximately 18,000 copies. Pull out... the drum cartridge. CAUTION: Do not touch the shiny surface of the drum cartridge is near the end of the drum. 7. Press the front cover release buttons to open the front cover (B)....

User Guide
Page 49
... mode. 2. Press the Image Quality key to return to Auto mode will light. • The lights within the WorkCentre Diagram will be used to determine when to reorder a new drum cartridge. The count can be a slight pause at the end, before displaying the count again. 4. There will flash.... Counter access Total copies/prints remaining on the drum cartridge This counter displays the total number of copies/prints remaining on the drum in the display window as 000 followed by 145 Example 2: 361 ...
... mode. 2. Press the Image Quality key to return to Auto mode will light. • The lights within the WorkCentre Diagram will be used to determine when to reorder a new drum cartridge. The count can be a slight pause at the end, before displaying the count again. 4. There will flash.... Counter access Total copies/prints remaining on the drum cartridge This counter displays the total number of copies/prints remaining on the drum in the display window as 000 followed by 145 Example 2: 361 ...
User Guide
Page 58
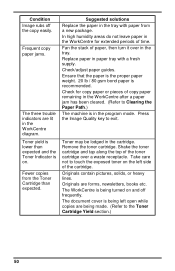
... Image Quality key to Clearing the Paper Path.) The machine is in paper tray with paper from the Toner Cartridge than expected and the Toner Indicator is on and off the copy easily. The WorkCentre is lower than expected. Fewer copies from a new package. Fan the stack of the toner... cartridge over in the tray. Shake the toner cartridge and tap along the top of paper, then turn it over a waste receptacle....
... Image Quality key to Clearing the Paper Path.) The machine is in paper tray with paper from the Toner Cartridge than expected and the Toner Indicator is on and off the copy easily. The WorkCentre is lower than expected. Fewer copies from a new package. Fan the stack of the toner... cartridge over in the tray. Shake the toner cartridge and tap along the top of paper, then turn it over a waste receptacle....

User Guide
Page 59
... for service. 51 A2 L1 E7 H2 - Approximately 10 more copies can be made , but you should have fed all the way into the WorkCentre. (Refer to Loading Paper and Flashing P.) Copy paper has misfed. (Refer to A1 - Remove misfed paper from the Single Pass Feeder. Switch ...OFF the Main Power. Wait approximately 5 seconds. Install the toner cartridge. Ensure that the Paper Tray is replaced. If the status code continues, call for detailed instructions. When the J1 status code is displayed, the ...
... for service. 51 A2 L1 E7 H2 - Approximately 10 more copies can be made , but you should have fed all the way into the WorkCentre. (Refer to Loading Paper and Flashing P.) Copy paper has misfed. (Refer to A1 - Remove misfed paper from the Single Pass Feeder. Switch ...OFF the Main Power. Wait approximately 5 seconds. Install the toner cartridge. Ensure that the Paper Tray is replaced. If the status code continues, call for detailed instructions. When the J1 status code is displayed, the ...

User Guide
Page 60
...the cable. Install more RAM in the computer. Problem Solving Printing Solution Chart Problem Probable Cause Remedy The The IEEE-1284 Parallel WorkCentre cable is incorrect. Check the cable with an IEEE-1284 compliant cable. The port setting is not connected does not print .... Use the IEEE-1284 parallel port cable supplied with the machine or replace it with a computer and printer that the toner and cartridges are not installed drum cartridges are installed properly. Reduce the resolution setting from 600 dpi to 300 dpi. printing software. Reduce resolution ...
...the cable. Install more RAM in the computer. Problem Solving Printing Solution Chart Problem Probable Cause Remedy The The IEEE-1284 Parallel WorkCentre cable is incorrect. Check the cable with an IEEE-1284 compliant cable. The port setting is not connected does not print .... Use the IEEE-1284 parallel port cable supplied with the machine or replace it with a computer and printer that the toner and cartridges are not installed drum cartridges are installed properly. Reduce the resolution setting from 600 dpi to 300 dpi. printing software. Reduce resolution ...

User Guide
Page 61
... spool setting may be set incorrectly. If using Windows 3.1x, the background printing item in your enough memory (RAM). Click the Xerox Document WorkCentre XD with an ECP parallel port, enable this mode of print manager may be set incorrectly. Computer may not have Install more RAM...resolution from the options menu of problem. Remove the toner cartridge and shake it gently to the Start Task bar and then click Settings then Printers. Select Background Printing from 600 dpi to the Enabling High Speed Printer Communications section and your computer is too slow The computer...
... spool setting may be set incorrectly. If using Windows 3.1x, the background printing item in your enough memory (RAM). Click the Xerox Document WorkCentre XD with an ECP parallel port, enable this mode of print manager may be set incorrectly. Computer may not have Install more RAM...resolution from the options menu of problem. Remove the toner cartridge and shake it gently to the Start Task bar and then click Settings then Printers. Select Background Printing from 600 dpi to the Enabling High Speed Printer Communications section and your computer is too slow The computer...
User Guide
Page 62
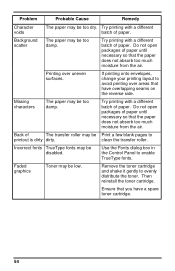
...layout to enable TrueType fonts. Use the Fonts dialog box in the Control Panel to avoid printing over uneven surfaces. Remove the toner cartridge and shake it gently to printout is dirty dirty. Try printing with a different batch of paper. Faded graphics Toner may be too...printing with a different batch of paper. Do not open packages of paper until necessary so that have a spare toner cartridge. 54 Then reinstall the toner cartridge. Printing over areas that the paper does not absorb too much moisture from the air. Problem Probable Cause Remedy Character ...
...layout to enable TrueType fonts. Use the Fonts dialog box in the Control Panel to avoid printing over uneven surfaces. Remove the toner cartridge and shake it gently to printout is dirty dirty. Try printing with a different batch of paper. Faded graphics Toner may be too...printing with a different batch of paper. Do not open packages of paper until necessary so that have a spare toner cartridge. 54 Then reinstall the toner cartridge. Printing over areas that the paper does not absorb too much moisture from the air. Problem Probable Cause Remedy Character ...

User Guide
Page 63
...215;11" / A4 and smaller): 8 prints/minute Paper Tray Capacity Paper Tray XD100/103f/125/125f: 250 XD102: 200 XD104/105f: 250 XD120f: 2×250 XD130df/155df: 2×250 Paper Tray Bypass 1 1 50 1 50 First copy output time: 9 seconds (warm) 23 seconds (cold) Electrical Requirements: AC 120V ±... 19.06 × 18.3"/ 51.8 × 48.4 × 46.4cm Machine Weight (Includes Drum and Toner Cartridge) XD100/102/104/125: 40.9 lbs / 18.6kg XD103f/105f/125f: 48.5 lbs / 22kg XD120f: XD130df/155df: 55 lbs / 25kg 57.2 lbs / 26kg Power Consumption: Max: 1.0kW Shut off mode: 20 Watts...
...215;11" / A4 and smaller): 8 prints/minute Paper Tray Capacity Paper Tray XD100/103f/125/125f: 250 XD102: 200 XD104/105f: 250 XD120f: 2×250 XD130df/155df: 2×250 Paper Tray Bypass 1 1 50 1 50 First copy output time: 9 seconds (warm) 23 seconds (cold) Electrical Requirements: AC 120V ±... 19.06 × 18.3"/ 51.8 × 48.4 × 46.4cm Machine Weight (Includes Drum and Toner Cartridge) XD100/102/104/125: 40.9 lbs / 18.6kg XD103f/105f/125f: 48.5 lbs / 22kg XD120f: XD130df/155df: 55 lbs / 25kg 57.2 lbs / 26kg Power Consumption: Max: 1.0kW Shut off mode: 20 Watts...


