User Guide
Page 3
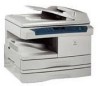
... answers for any other questions you might have regarding your WorkCentre, to the left of your WorkCentre you may call the following information will arrange for service. In the United States and Canada: Xerox SupplyNet toll free at: 1 - 800 - 822 - 2200 Toner Cartridge: 6R914 Drum Cartridge: 13R551 Service A Customer Service Support Representative will assist you...
... answers for any other questions you might have regarding your WorkCentre, to the left of your WorkCentre you may call the following information will arrange for service. In the United States and Canada: Xerox SupplyNet toll free at: 1 - 800 - 822 - 2200 Toner Cartridge: 6R914 Drum Cartridge: 13R551 Service A Customer Service Support Representative will assist you...
User Guide
Page 6
...E2 Clearing the Paper Path 36 Toner Cartridge Replacement 39 J2 Drum Cartridge Replacement 40 Counter access 41 Total copies/prints remaining on the drum cartridge 41 Printer Driver Software Installation 42 WorkCentre XD Properties (Printer Driver 44 Displaying the Driver Properties dialog... from an application 44 Displaying the Properties dialog from the Start Menu 45 Displaying the Properties dialog from the Xerox Printer Services Program ...
...E2 Clearing the Paper Path 36 Toner Cartridge Replacement 39 J2 Drum Cartridge Replacement 40 Counter access 41 Total copies/prints remaining on the drum cartridge 41 Printer Driver Software Installation 42 WorkCentre XD Properties (Printer Driver 44 Displaying the Driver Properties dialog... from an application 44 Displaying the Properties dialog from the Start Menu 45 Displaying the Properties dialog from the Xerox Printer Services Program ...
User Guide
Page 8
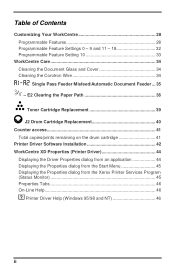
Please have the following information available before calling: - The serial number Located on the back cover of the WorkCentre to the Xerox Customer Support Center at : 1 - 800 - 822 - 2200 Toner Cartridge - 6R914 Drum Cartridge -13R551 iv Status Code (if any) displayed on the control panel) - The purchase date from your purchase receipt (required for your...
Please have the following information available before calling: - The serial number Located on the back cover of the WorkCentre to the Xerox Customer Support Center at : 1 - 800 - 822 - 2200 Toner Cartridge - 6R914 Drum Cartridge -13R551 iv Status Code (if any) displayed on the control panel) - The purchase date from your purchase receipt (required for your...

User Guide
Page 10
... power company. There are provided to protect it from the type of the WorkCentre are bright and, while not harmful, they may be left on the marking label. Avoid exposing the drum cartridge to conserve power when the machine is equipped with this equipment. The power supply... cord is not recommended or authorized. Safety Notes This WorkCentre should be operated from overheating, these covers. Your machine is not...
... power company. There are provided to protect it from the type of the WorkCentre are bright and, while not harmful, they may be left on the marking label. Avoid exposing the drum cartridge to conserve power when the machine is equipped with this equipment. The power supply... cord is not recommended or authorized. Safety Notes This WorkCentre should be operated from overheating, these covers. Your machine is not...
User Guide
Page 14
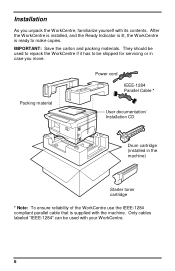
... be shipped for servicing or in the machine) Starter toner cartridge * Note: To ensure reliability of the WorkCentre use the IEEE-1284 compliant parallel cable that is ready to be used to repack the WorkCentre if it has to make copies. Installation As you move....materials. Packing material Power cord IEEE-1284 Parallel Cable * User documentation/ Installation CD Drum cartridge (installed in case you unpack the WorkCentre, familiarize yourself with your WorkCentre. 6 They should be used with its contents. After the WorkCentre is installed, and the Ready Indicator is lit, the...
... be shipped for servicing or in the machine) Starter toner cartridge * Note: To ensure reliability of the WorkCentre use the IEEE-1284 compliant parallel cable that is ready to be used to repack the WorkCentre if it has to make copies. Installation As you move....materials. Packing material Power cord IEEE-1284 Parallel Cable * User documentation/ Installation CD Drum cartridge (installed in case you unpack the WorkCentre, familiarize yourself with your WorkCentre. 6 They should be used with its contents. After the WorkCentre is installed, and the Ready Indicator is lit, the...
User Guide
Page 17
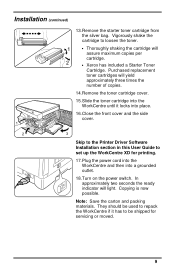
...maximum copies per cartridge. • Xerox has included a Starter Toner Cartridge. Vigorously shake the cartridge to loosen the toner. • Thoroughly shaking the cartridge will light. Installation (continued) 13.Remove the starter toner cartridge from the silver bag. Purchased replacement toner cartridges will yield ...cartridge cover. 15.Slide the toner cartridge into a grounded outlet. 18.Turn on the power switch. Copying is now possible. They should be used to repack the WorkCentre if it locks into place. 16.Close the front cover and the side cover. 1 2 3 Skip to the Printer...
...maximum copies per cartridge. • Xerox has included a Starter Toner Cartridge. Vigorously shake the cartridge to loosen the toner. • Thoroughly shaking the cartridge will light. Installation (continued) 13.Remove the starter toner cartridge from the silver bag. Purchased replacement toner cartridges will yield ...cartridge cover. 15.Slide the toner cartridge into a grounded outlet. 18.Turn on the power switch. Copying is now possible. They should be used to repack the WorkCentre if it locks into place. 16.Close the front cover and the side cover. 1 2 3 Skip to the Printer...
User Guide
Page 44
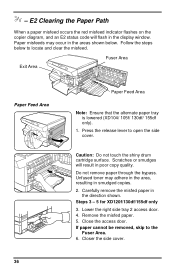
...locate and clear the misfeed. Close the access door. Closer the side cover. Follow the steps below . Caution: Do not touch the shiny drum cartridge surface. Scratches or smudges will flash in smudged copies. 2. Lower the right side tray 2 access door. 4. Carefully remove the misfed paper in ...poor copy quality. Steps 3 - 5 for XD120f/130df/155df only 3. Fuser Area Exit Area Paper Feed Area 36 Paper Feed Area Note: Ensure that the alternate paper tray is lowered (XD104/ 105f...
...locate and clear the misfeed. Close the access door. Closer the side cover. Follow the steps below . Caution: Do not touch the shiny drum cartridge surface. Scratches or smudges will flash in smudged copies. 2. Lower the right side tray 2 access door. 4. Carefully remove the misfed paper in ...poor copy quality. Steps 3 - 5 for XD120f/130df/155df only 3. Fuser Area Exit Area Paper Feed Area 36 Paper Feed Area Note: Ensure that the alternate paper tray is lowered (XD104/ 105f...
User Guide
Page 47
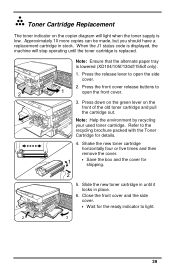
Press the front cover release buttons to open the front cover. 3. Note: Help the environment by recycling your used toner cartridge. Close the front cover and the side cover. 1 • Wait for details. 4. Note: Ensure that the alternate paper tray is low. Press the release ...lever to 2 1 open the side cover. 2. Slide the new toner cartridge in until the toner cartridge is replaced. Press down on the green lever on the copier diagram will stop operating until it locks in stock. Refer to the...
Press the front cover release buttons to open the front cover. 3. Note: Help the environment by recycling your used toner cartridge. Close the front cover and the side cover. 1 • Wait for details. 4. Note: Ensure that the alternate paper tray is low. Press the release ...lever to 2 1 open the side cover. 2. Slide the new toner cartridge in until the toner cartridge is replaced. Press down on the green lever on the copier diagram will stop operating until it locks in stock. Refer to the...
User Guide
Page 48
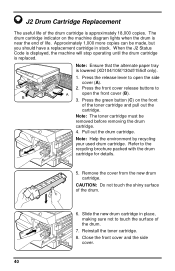
... details. 5. Close the front cover and the side cover. 40 Slide the new drum cartridge in stock. Approximately 1,000 more copies can be removed before removing the drum cartridge. 4. Press the release lever to A open the side cover (A). 2. Press the front cover release buttons ...the front cover (B). 3. Reinstall the toner cartridge. 8. J2 Drum Cartridge Replacement The useful life of the drum cartridge is lowered (XD104/105f/130df/155df only). The drum cartridge indicator on the front of the toner cartridge and pull out the cartridge. When the J2 Status Code is displayed...
... details. 5. Close the front cover and the side cover. 40 Slide the new drum cartridge in stock. Approximately 1,000 more copies can be removed before removing the drum cartridge. 4. Press the release lever to A open the side cover (A). 2. Press the front cover release buttons ...the front cover (B). 3. Reinstall the toner cartridge. 8. J2 Drum Cartridge Replacement The useful life of the drum cartridge is lowered (XD104/105f/130df/155df only). The drum cartridge indicator on the front of the toner cartridge and pull out the cartridge. When the J2 Status Code is displayed...

User Guide
Page 49
...copies/prints will be used to determine when to reorder a new drum cartridge. Select the Toner Saver mode. 2. Press the Image Quality key to return to Auto mode will light. • The lights within the WorkCentre Diagram will continually be displayed until the Clear key is released. Counter access... Total copies/prints remaining on the drum cartridge This counter displays the total number of 23 digit values. Press again and ...
...copies/prints will be used to determine when to reorder a new drum cartridge. Select the Toner Saver mode. 2. Press the Image Quality key to return to Auto mode will light. • The lights within the WorkCentre Diagram will continually be displayed until the Clear key is released. Counter access... Total copies/prints remaining on the drum cartridge This counter displays the total number of 23 digit values. Press again and ...
User Guide
Page 58
...50 Originals contain pictures, solids, or heavy lines. Replace paper in the program mode. The WorkCentre is recommended. Shake the toner cartridge and tap along the top of the toner cartridge over in the WorkCentre diagram. Originals are lit in the tray. Fewer copies from a new package. Check for extended... periods of the cartridge. Ensure that the paper is the proper paper weight. 20 lb / 80 gsm bond paper is being left side of time. Fan the stack of copy paper remaining in the WorkCentre after a paper jam has been cleared. (Refer to...
...50 Originals contain pictures, solids, or heavy lines. Replace paper in the program mode. The WorkCentre is recommended. Shake the toner cartridge and tap along the top of the toner cartridge over in the WorkCentre diagram. Originals are lit in the tray. Fewer copies from a new package. Check for extended... periods of the cartridge. Ensure that the paper is the proper paper weight. 20 lb / 80 gsm bond paper is being left side of time. Fan the stack of copy paper remaining in the WorkCentre after a paper jam has been cleared. (Refer to...

User Guide
Page 59
...Status Code Chart Status Code E2 Suggested Solution Ensure that the shipping screw is removed. Paper may not have fed all the way into the WorkCentre. (Refer to Loading Paper and Flashing P.) Copy paper has misfed. (Refer to A1 - U5 The toner indicator on the machine diagram .../Automatic Document Feeder for service. 51 H4 L3 - Approximately 1,000 more copies can be made , but you should have a replacement cartridge in stock. Install the toner cartridge. Wait approximately 5 seconds. Switch ON the Main Power. L5 U2 - The front or side cover is closed properly. Refer to ...
...Status Code Chart Status Code E2 Suggested Solution Ensure that the shipping screw is removed. Paper may not have fed all the way into the WorkCentre. (Refer to Loading Paper and Flashing P.) Copy paper has misfed. (Refer to A1 - U5 The toner indicator on the machine diagram .../Automatic Document Feeder for service. 51 H4 L3 - Approximately 1,000 more copies can be made , but you should have a replacement cartridge in stock. Install the toner cartridge. Wait approximately 5 seconds. Switch ON the Main Power. L5 U2 - The front or side cover is closed properly. Refer to ...

User Guide
Page 60
.... The port setting is still not possible, replace the cable. printing software. The parallel port cable specifications may not Reinstall the WorkCentre be correct. Half of the page is blank The page layout is defective. Reduce resolution from 600 dpi to 300 dpi. The...work. Use the IEEE-1284 parallel port cable supplied with the machine or replace it with a computer and printer that the toner and cartridges are not installed drum cartridges are installed properly. Try closing other applications before printing. Change the page orientation in the computer. Check the...
.... The port setting is still not possible, replace the cable. printing software. The parallel port cable specifications may not Reinstall the WorkCentre be correct. Half of the page is blank The page layout is defective. Reduce resolution from 600 dpi to 300 dpi. The...work. Use the IEEE-1284 parallel port cable supplied with the machine or replace it with a computer and printer that the toner and cartridges are not installed drum cartridges are installed properly. Try closing other applications before printing. Change the page orientation in the computer. Check the...

User Guide
Page 61
... distributed. Refer to 300 dpi. Click the Xerox Document WorkCentre XD with an ECP parallel port, enable this mode of print manger. computer. Print Job to large Reduce resolution from 600 dpi to the Enabling High Speed Printer Communications section and your computers user guide. Toner...staining There is equipped with the right mouse button. Select the desired setting from the options menu of operation. Then reinstall the toner cartridge. If your enough memory (RAM). If using Windows 3.1x, the background printing item in your computer is a paper quality problem....
... distributed. Refer to 300 dpi. Click the Xerox Document WorkCentre XD with an ECP parallel port, enable this mode of print manger. computer. Print Job to large Reduce resolution from 600 dpi to the Enabling High Speed Printer Communications section and your computers user guide. Toner...staining There is equipped with the right mouse button. Select the desired setting from the options menu of operation. Then reinstall the toner cartridge. If your enough memory (RAM). If using Windows 3.1x, the background printing item in your computer is a paper quality problem....
User Guide
Page 62
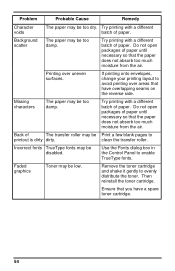
...printout is dirty dirty. Background The paper may be disabled. Try printing with a different batch of paper until necessary so that have a spare toner cartridge. 54 Do not open packages of paper. Try printing with a different batch of The transfer roller may be too dry. Back of paper. ...necessary so that you have overlapping seams on the reverse side. Missing characters The paper may be low. Then reinstall the toner cartridge. Problem Probable Cause Remedy Character voids The paper may be Print a few blank pages to evenly distribute the toner.
...printout is dirty dirty. Background The paper may be disabled. Try printing with a different batch of paper until necessary so that have a spare toner cartridge. 54 Do not open packages of paper. Try printing with a different batch of The transfer roller may be too dry. Back of paper. ...necessary so that you have overlapping seams on the reverse side. Missing characters The paper may be low. Then reinstall the toner cartridge. Problem Probable Cause Remedy Character voids The paper may be Print a few blank pages to evenly distribute the toner.

User Guide
Page 63
....3cm XD103f/105f/125f: 20.4 × 19.06 × 14.9"/ 51.8 × 48.4 × 37.9cm XD120f/130df/155df: 20.4 × 19.06 × 18.3"/ 51.8 × 48.4 × 46.4cm Machine Weight (Includes Drum and Toner Cartridge) XD100/102/104/125: 40.9 lbs / 18.6kg XD103f/105f/125f: 48.5 lbs / 22kg... XD120f: XD130df/155df: 55 lbs / 25kg 57.2 lbs / 26kg Power Consumption: Max: 1.0kW Shut off mode: 20 Watts 55
....3cm XD103f/105f/125f: 20.4 × 19.06 × 14.9"/ 51.8 × 48.4 × 37.9cm XD120f/130df/155df: 20.4 × 19.06 × 18.3"/ 51.8 × 48.4 × 46.4cm Machine Weight (Includes Drum and Toner Cartridge) XD100/102/104/125: 40.9 lbs / 18.6kg XD103f/105f/125f: 48.5 lbs / 22kg... XD120f: XD130df/155df: 55 lbs / 25kg 57.2 lbs / 26kg Power Consumption: Max: 1.0kW Shut off mode: 20 Watts 55


